当前位置:网站首页>Implementation of MySQL master-slave architecture
Implementation of MySQL master-slave architecture
2022-06-26 16:54:00 【Comrade Xiaoqiang】
- MHA The implementation of the
1.1 Environmental preparation :
centos System server 2 platform 、 One user does Mysql master server , One for Mysql From the server , Good configuration yum Source 、 Firewall OFF 、 The clock service of each node is synchronized 、 Nodes can communicate with each other through host names
1)iptables -F && setenforce Clear firewall policy , close selinux
2) Use both servers yum Way to install Mysql service , The version is required to be consistent
3) Start two servers respectively mysql service , Make sure the service is normal

1.3.1 To configure master master server
Yes master To configure , Including opening binary logs , Assign a unique servr ID. for example , Add the following values to the configuration file [mysqld]
# open Mysql journal , The log format is binary
log-bin=/usr/local/mysql/data/binlog/mysql-bin
#[ must ] The server is unique ID, The default is 1
server-id=1
# Every write is synchronized with the hard disk
sync-binlog=1
# The name of the binary database to be synchronized
binlog-do-db=tuling
# Only keep 7 Days of binary logs , In case the disk is full of logs
expire-logs-days = 7
# Database not backed up
binlog-ignore-db=information_schema
binlog-ignore-db=performation_schema
binlog-ignore-db=sys
skip-name-resolve
// Turn off name resolution ,( Not necessary )

stay Master In the database of Backup account (user = tuling,pwd=root): Every slave standards-of-use MySQL User name and password connection master . The user who makes the copy will grant REPLICATION SLAVE jurisdiction .
# Create user MariaDB [(none)]> CREATE USER 'tuling'@'192.168.%.%' IDENTIFIED BY 'root'; # to grant authorization MariaDB [(none)]> grant replication slave,replication client on *.* to tuling@'192.168.%.%' identified by 'root'; # Refresh the permissions MariaDB [(none)]> FLUSH PRIVILEGES;
1.3.3 Check the main server status
stay Master Database execution show master status, View the binary log status and location number of the primary server .

1.3.4 To configure slave From the server
Yes slave To configure , Turn on the relay log , Assign a unique servr ID, Set read-only permissions . Add the following values to the configuration file :
server-id=2 // To configure server-id, Let the slave server have a unique ID Number
relay_log = mysql-relay-bin // open Mysql relay journal , The log format is binary
read_only = 1 // Set read-only permissions
log_bin = mysql-bin // Turn on the binary log from the server
log_slave_updates = 1 // Make the updated data written in the binary log
# If salve Library name and master The library name is the same , Use this configuration
replicate-do-db = tuling # If master Library name [tuling] And salve Library name [tuling01] Different , Use the following configuration [ You need to map ]
replicate-rewrite-db = tuling[ Main database name ] -> tuling01[ From the library name ] # If you don't want to synchronize them all [ By default, synchronize all ], Then specify the tables that need to be synchronized
replicate-wild-do-table=tuling01.t_order
replicate-wild-do-table=tuling01.t_order_item

1.3.5 Start the copy thread from the server
Give Way slave Connect master , And start doing it again master Events in binary logs .
MariaDB [(none)]> change master to master_host='192.168.241.198', [ Yours master-ip] >master_user='tuling',
>master_password='root',
>master_log_file='mysql-bin.000007', //master Corresponding bin-log file
>master_log_pos=413; //master Corresponding position
>start slave; // Start replication thread .
>SHOW SLAVE STATUS\G; // View the slave node status # Error may be reported during startup : ERROR 3021 (HY000): This operation cannot be performed with a running slave io thread;run STOP SLAVE IO_THREAD FOR CHANNEL '' first.
# terms of settlement
// When setting the synchronization relationship , It didn't stop first slaves Threads . The solution is before setting up the synchronization relationship ,
// Execute first “stop slave;”, To stop slave Threads . Then start the thread "start slave;"
1.3.6 View the status of the slave server
You can use SHOW SLAVE STATUS\G; View the status of the slave server , As shown below , Also available show processlist \G; View the current replication status :
Slave_IO_Running: Yes //IO The thread is running normally Slave_SQL_Running: Yes //SQL The thread is running normally

1) Test master-slave synchronization
We are master Create a database on the server , Then use the database to create a table , Add a record , Take a look at slave Does the server synchronize successfully .
First , Let's take a look at the databases on the two servers :


Now? , We create a database on the primary server “keer”:
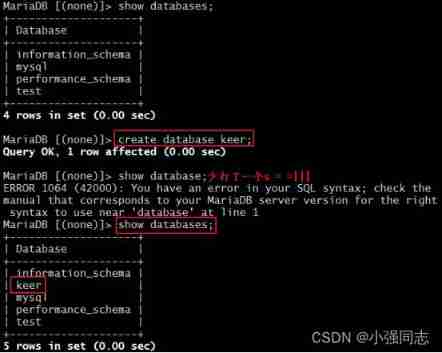
then , Let's see if the slave server has been updated :

We can see that , The database has been synchronized , Next , Let's create the table , And insert a record in the table :
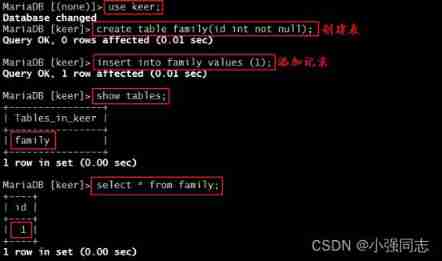
then , Let's see if the slave server is updated :

We set read-only on the slave server , So let's try to insert data :

This is awkward , Why do we set read-only or insert data ? How can this be solved ?
Because when we log in, we use root The super user , This big perversion is not affected by the read-only setting , therefore , We can still insert data into it , Of course , If we switch to other ordinary users, we won't have such a problem .
The solution is simple , We just need to lock the watch :
MariaDB [keer]> flush tables with read lock;
After locking the table , Let's insert another piece of data :
![]()
In this case , Even if we log in as super users , No more data can be inserted . It's a lot safer . however , There are advantages and disadvantages , In this case , Our master and slave cannot synchronize in real time , Because our master-slave synchronization is through the master-slave synchronization sql The statement is implemented by executing it again from the top , But if we lock the watch ,sql Statement cannot be executed . It is also easy to synchronize , Just unlock the table .
We insert a piece of data on the master :

here , From the top, we need to solve the table before we can realize synchronization :

1.4 Expand —— Realize one master and many slaves
When our server runs for a while , Traffic is getting more and more , At this time , The high availability and load balancing that one master and one slave can achieve cannot meet our needs , We will choose to add another slave server .
But now our master It's been running for a long time , We also need to check the new installation slave Data synchronization , Even it doesn't have master The data of .
here , There are several ways to make slave Start with another service , for example , from master Copy the data , From the other slave clone , Start with the most recent backup slave . In order to speed up slave And master Sync , Data synchronization can be carried out first in the following ways :
(1)master A snapshot of the data at some point in time ;
(3)master Binary log file of .
Next , Let's implement this process :
1.4.2 Specific implementation process
1) Yes master Make a full backup
[[email protected] ~]# mkdir /backup [[email protected] ~]# mysqldump --all-database > /backup/mysql-backup-`date +%F-%T`-all.sql
Check the binary log status and location number of the master as usual .

2) Send the fully backed up data to the newly added slave
[[email protected] ~]# scp /backup/mysql-backup-2017-11-21-10\:28\:29-all.sql @192.168.37.133:~ [email protected]'s password: mysql-backup-2017-11-21-10:28:29-all.sql 100% 504KB 503.9KB/s 00:00
3) Import this full backup into the database from :
![]()
4) Check whether the recovery from is successful :


Let's check the binary log status and location number of the slave :

Our data has been recovered successfully
The next step is to follow the above steps , Set the slave server :
[[email protected] ~]# vim /etc/my.cnf [mysqld] server-id = 3 relay-log = mysql-relay-bin read-only = 1 log-bin = mysql-bin log-slave-updates = 1
then , Let's set up the slave server :
[[email protected] ~]# mysql -uroot -p Enter password: MariaDB [(none)]> change master to master_host='192.168.37.111', >master_user='slave', >master_password='keer', >master_log_file='mysql-bin.000001', >master_log_pos=330; MariaDB [(none)]> start slave;
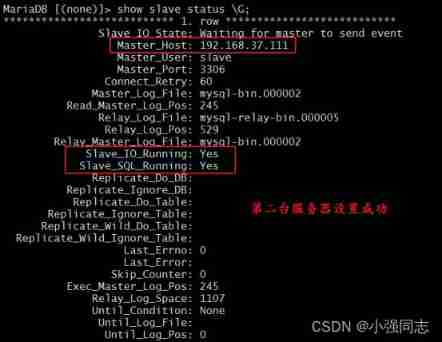
Then let's check the status of the slave server :

Setup complete , So let's test that out , When the master has operations , Whether to update from :


thus , We have completed one master and two slaves . If necessary , We can also continue to add slave servers .
1.5 Expand —— Realize semi synchronous replication
When the master library completes a transaction , All slave libraries execute the transaction To the client . Because you need to wait for all the transactions from the library to complete before returning , So full synchronous replication Performance is bound to be severely affected . Need a timeout .
MySQL The default copy That is, asynchronous , The main database will return the result to the client immediately after executing the transaction submitted by the client , It doesn't matter if the slave library has been received and processed , There will be a problem , Lord if crash It fell off , At this time, the submitted transactions on the master may not be transferred to the slave , If at this time , Force will come first from ascension , May result in incomplete data on the new master .
3) Semi-synchronous replication
Between asynchronous replication and full synchronous replication , The main library does not return to the client immediately after executing a transaction committed by the client , Instead, wait for at least one of the slave libraries to receive and write relay log Is returned to the client . As opposed to asynchronous replication , Semi-synchronous replication Improved data security , At the same time, it also causes a certain degree of delay , The delay is at least one TCP/IP Round-trip time . therefore , Semi synchronous replication is best used in low latency networks .
1.5.2 Realize semi synchronous replication
Semi synchronous replication is based on specific modules . But very nice One thing is , In our mariadb5.5 By default, the above versions have this module .
If our centos7 Installed on mariadb , We can go into the directory to check :
[[email protected] ~]# cd /usr/lib64/mysql/plugin/

Find our module , We can install by command , Then simply configure it to use . The following is the specific method :
MariaDB [(none)]> INSTALL PLUGIN rpl_semi_sync_master SONAME 'semisync_master.so'; MariaDB [(none)]> SHOW GLOBAL VARIABLES LIKE 'rpl_semi%'; MariaDB [(none)]> SET GLOBAL rpl_semi_sync_master_enabled=ON;

MariaDB [(none)]> INSTALL PLUGIN rpl_semi_sync_slave SONAME 'semisync_slave.so'; MariaDB [(none)]> SHOW GLOBAL VARIABLES LIKE 'rpl_semi%'; MariaDB [(none)]> SET GLOBAL rpl_semi_sync_slave_enabled = ON ; MariaDB [(none)]> stop slave; MariaDB [(none)]> start slave;


Now? , Our semi synchronous replication is started , We can check the log :
[[email protected] ~]# tail -200 /var/log/mariadb/mariadb.log
It can also be seen from the log that our semi synchronous replication has been started .

above , Experiment one is finished .
They are masters and followers of each other ( Double master )
Another database architecture is dual master mode , That is to say, they are master and slave to each other , This setting is not commonly used in enterprises , But we still need to master .
Master-Master Two servers to replicate , both master, It's another server slave. such , Changes made by either party , Will be applied to the other party's database through replication .
The architecture is as follows :

2.1 Environmental preparation :
centos System server 2 platform 、 Two users realize Mysql They are masters and followers of each other , Good configuration yum Source 、 Firewall OFF 、 The clock service of each node is synchronized 、 Nodes can communicate with each other through host names
1)iptables -F && setenforce Clear firewall policy , close selinux
2) Use both servers yum Way to install Mysql service , The version is required to be consistent
3) Start two servers respectively mysql service , Make sure the service is normal
2.3.1 Configure the first master master server
server-id = 1 // To configure server-id, Let the master server have a unique ID Number
log-bin = mysql-bin // open Mysql journal , The log format is binary
skip-name-resolve // Turn off name resolution ,( Not necessary )
relay_log = mysql-relay-bin // open Mysql journal , The log format is binary
read_only = 1 // Set read-only permissions
log_slave_updates = 1 // Make the updated data written in the binary log
auto_increment_offset = 1 // Indicates the number from which the growth field starts
auto_increment_increment = 2 // Represents the amount of each increment of the self growing field

2.3.2 Configure the second master master server
server-id = 2 // To configure server-id, Let the master server have a unique ID Number
log-bin = mysql-bin // open Mysql journal , The log format is binary
skip-name-resolve // Turn off name resolution ,( Not necessary )
relay_log = mysql-relay-bin // open Mysql journal , The log format is binary
read_only = 1 // Set read-only permissions
log_slave_updates = 1 // Make the updated data written in the binary log
auto_increment_offset = 2 // Indicates the number from which the growth field starts
auto_increment_increment = 2 // Represents the amount of each increment of the self growing field

Because we implement the dual master mode , So we have to create a copy account on each machine :


Let's check the status of the two servers , So as to lay a foundation for our next setting :


2.3.5 Start replication thread
Let's set up the two machines separately :
First , First, check the first one master The machine is set :
MariaDB [(none)]> change master to master_host='192.168.37.222',master_user='slave',master_password='keer',master_log_file='mysql-bin.000003',master_log_pos=245; MariaDB [(none)]> start slave;
next , Let's check his status :

Now? , Let's check the second one master Set it up :
MariaDB [(none)]> change master to master_host='192.168.37.111',master_user='slave',master_password='keer',master_log_file='mysql-bin.000002',master_log_pos=245; MariaDB [(none)]> start slave;
It can be seen that , Both of our machines are set up , Next , We can test it .
In our configuration file , We set the start value and the growth value of the self growth field , Now let's create a self - growing table :
MariaDB [keer]> create table test(id int PRIMARY KEY AUTO_INCREMENT,name char(20) not null);
Because we set up master-slave , So use this command on any machine .
After the table is created , We can insert data for testing , Let's insert multiple pieces of data to see the effect :
MariaDB [keer]> insert into test(name) value('zhao'),('qian'),('sun'),('li'); Query OK, 4 rows affected (0.00 sec) Records: 4 Duplicates: 0 Warnings: 0
MariaDB [keer]> insert into test(name) value('zhou'),('wu'),('zheng'),('wang'); Query OK, 4 rows affected (0.00 sec) Records: 4 Duplicates: 0 Warnings: 0
We have all inserted the data , Let's see how it works :

It can be seen that , The data inserted in two tables will not be duplicated .
But now it's not as continuous as we think id , This is because , Both of our machines are plugged in at the same time 4 Data , And it is not inserted synchronously , So there will be a sequence , On the first machine sql After the execution of the statement, the... On the second machine is executed . So this happens .
however , In this way, duplicate data will not be inserted . Our goal has also been achieved .
边栏推荐
- Least squares system identification class II: recursive least squares
- Calculate the sum of the main diagonals of the array
- Leetcode 1169. 查询无效交易(如果数据量不大,这种题还是得暴力枚举解决)
- Toupper function
- In a bad mood, I just write code like this
- TCP拥塞控制详解 | 1. 概述
- Stm32f103c8t6 realize breathing lamp code
- Call the random function to generate 20 different integers and put them in the index group of institute a
- Teach you to learn dapr - 5 Status management
- 牛客编程题--必刷101之动态规划(一文彻底了解动态规划)
猜你喜欢
![[Li Kou brush questions] 11 Container holding the most water //42 Rain water connection](/img/45/1e712300ea655856762394fba09066.png)
[Li Kou brush questions] 11 Container holding the most water //42 Rain water connection

When a programmer is disturbed 10 times a day, the consequences are amazing!

无需人工先验!港大&同济&LunarAI&旷视提出基于语义分组的自监督视觉表征学习,显著提升目标检测、实例分割和语义分割任务!...

Discussion: the next generation of stable coins

5G未平6G再启,中国引领无线通信,6G的最大优势在哪里?

Summary of all knowledge points of C language

Turtle cartography

GUI+SQLServer考试系统

防火 疏散 自救…这场安全生产暨消防培训干货满满!

Leetcode 1169. 查询无效交易(如果数据量不大,这种题还是得暴力枚举解决)
随机推荐
[from database deletion to running] JDBC conclusion (finish the series in one day!! run as soon as you finish learning!)
QT 5.9.8 installation tutorial
内存分区模型
Screenshot of the answers to C language exercises
Knowing these commands allows you to master shell's own tools
Memory partition model
JUnit unit test
[understanding of opportunity -31]: Guiguzi - Daoyu [x ī] Crisis is the coexistence of danger and opportunity
Apache APIs IX has the risk of rewriting the x-real-ip header (cve-2022-24112)
[learn FPGA programming from scratch -46]: Vision - development and technological progress of integrated circuits
C语言所有知识点小结
LeetCode Algorithm 24. Exchange the nodes in the linked list in pairs
Codeforces Round #802 (Div. 2)
Find all primes less than or equal to Lim, store them in AA array, and return the number of primes
[matlab project practice] prediction of remaining service life of lithium ion battery based on convolutional neural network and bidirectional long short time (cnn-lstm) fusion
基于Kubebuilder开发Operator(入门使用)
Leetcode 1170. 比较字符串最小字母出现频次(可以,已解决)
C language --- basic function realization of push box 01
基於Kubebuilder開發Operator(入門使用)
经典同步问题