当前位置:网站首页>ROS observation [57]: configure arm robots to grasp things
ROS observation [57]: configure arm robots to grasp things
2022-06-23 11:59:00 【Mr anhydrous】
( Original name :Configuring an arm robot to grasp things (Part 1) )
Learn Robotics from Zero - Robotics & ROS Online Courses
This module will show you how to create... For your industrial robot Moveit package . By completing this unit , You will be able to create a package , Let your robot perform motion planning .
One 、 Purpose of the document
The most interesting thing about having a robot is to let it bring you something . So , Grasping is an essential skill .
Grasping means that the robot can recognize and grasp objects from the plane
In this real-time course , We will only deal with the problem of grabbing objects from the table 3 A basic step , Premise is :
- The robot faces the object correctly
- There is a perception system that provides us with the location of objects , With robots base_link Frame Association
The prerequisite for this live course is :
- ROS Basic knowledge of concepts , For example, theme 、 Publish and subscribe 、ROS service 、ROS operation . If you don't know , Please check this course
- ROS TF Basic knowledge of framework . If you don't know , Please check this course
- Love of robots
- ... this is it !!
Two 、 How to use this ROSject
ROSject It's a ROS project , It is packed in such a way that it contains all the materials (ROS Code 、Gazebo Simulations and notebooks ) Can only use Web Link to share with any organization . This is our right to Live Class What all the participants did , We shared this with them ROSject( So they can access everything they contain ROS material ).
View this webinar , Learn about ROSject And how to create your own ROSject For more information .
You need to ROS Development studio (ROSDS) Have a free account . Get account , Then follow the instructions below .
3、 ... and 、 What is? MoveIt?
MoveIt It's a ROS frame , Allows you to perform motion planning using specific robots . also …… What's the meaning of this? ? ok , It basically means that it allows you to plan from A Point to B The movement of points ( motion ), Without colliding with anything .
MoveIt Is a very complex and useful tool . therefore , In this micro course , We're not going to go deep into MoveIt Details of how it works or all the functions it provides . If you are interested in learning about MoveIt For more information , You can view the official website here :MoveIt Motion Planning Framework
Fortunately, ,MoveIt Provides a very beautiful and easy to use GUI, This will help us to interact with robots to perform motion planning . however , When it can be used in practice MoveIt Before , We need to build a package . The software package will generate the robot we define ( stay URDF Robots defined in the file ) And MoveIt Use all required configuration and startup files together .
To generate this package , Just follow all the steps described in the following exercise !
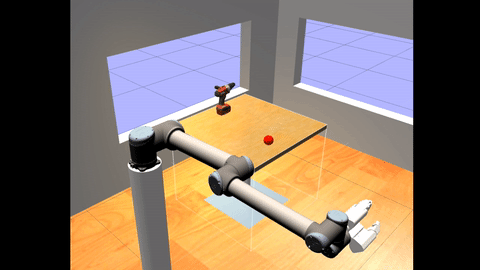
Four 、 Simulation
Today, we will use a simulation of a grasping system , Including an industrial arm and a gripper
To start it , Please select simulation from my workspace -> And then choose shadown_gazebo/main.launch file .
Generate MoveIt! Use the configuration package of the setup assistant tool
4.1 Case study
a) First , You need to start MoveIt Setup assistant . You can do this by typing the following command :
stay WebShell #1 In the implementation of
roslaunch moveit_setup_assistant setup_assistant.launch
This opens a... In the graphics tool QT window ( Menu tools -> Graphical tools )
Great ! You are now in MoveIt Settings assistant . Next you need to load your robot file . So let's go on !
b) single click “ Create a new MoveIt Configuration package ” Button . A new section like this will appear :

Now? , Just click “ Browse ” Button , Select at smart_grasping_sandbox/fh_desc It's called model.urdf Of URDF file , And then click “ Load the file ” Button . You may need to copy this file to your workspace . You should now see the following :

Great ! Now? , You have put the robot's xacro File loading to MoveIt Setup assistant . Now? , Let's start configuring something .
c) go to “Self-Collisions” tab , And then click “Regenerate Default Collision Matrix” Button . You'll end up like this :

ad locum , You just defined some link pairs that you don't need to consider when performing a collision check . for example , Because they are adjacent links , So they always conflict .
d) Next , Move to “ Virtual joint ” tab . ad locum , You will define a virtual joint for the base of the robot . single click “ Add virtual joints ” Button , Set the name of this joint to FixedBase, Set the parent node to world. like this :

Last , single click “ preservation ” Button . Basically , What you do here is create a “ Fictitious ” The joints , Connect the base of the robot to the simulation world .
e) Now? , open “ Planning Group ” Tab and click “ add group ” Button . Now? , You will create a new one called arm The new group of , This group will use KDLKinematicsPlugin. like this :

Besides , by OMPL Planning select one of the default planners . for example ,RRT or RRTConnect.

Next , You will click “ Add joints ” Button , You will select all the joints that make up the robot arm , Not including grippers . like this :

Last , Click on “ preservation ” Button , You will get the result :

So now , You've defined a set of links to execute your exercise plan , And you have defined the plug-ins to use to calculate these plans .
Now? , Repeat the same process , But this time it's a grab . under these circumstances , You don't have to define any kinematic solvers . If you're not sure which joints to add to your hand , You can see the figure below .

Last , You should get something like this :

f) Now? , You will create several predefined poses for your robot . go to “ Robot posture ” tab , And then click “ Add pose ” Button . On the left side of the screen , You will be able to define the name of the pose and the plan group it refers to . under these circumstances , We name the first pose open, It's obviously related to the hand group .

Now? , You must define the joint position associated with this pose . In this case , You can set them as shown in the figure below :

Now? , Repeat the operation , But this time we'll define the closing pose . for example , It might look something like this :

Last , Let's create a start pose for the arm group . It might look something like this :

Last , You should have something similar :
g) The next step is to set up the end effector of the robot . So , Just go to the end effector tab , And then click “ Add end effector ” Button . We will name our end effector hand .

h) Now? , Just in “ The author information ” Tab, enter your name and email .
i) Last , go to “ The configuration file ” Tab and click “ Browse ” Button . Navigate to catkin_ws/src Catalog , Create a new directory , And named it myrobot_moveit_config. “ choice ” The directory you just created .

Now? , single click “ Build package ” Button . If all goes well , You should see the following :

 this is it ! You just created a... For the articulated robot  MoveIt  package .

 practice  2.1  end
practice 2.1 The data of Check the notes below to complete the exercise : Be careful 1: If for any reason , You need to edit MoveIt package ( for example , In future exercises, you will detect that you have made a mistake ), You can edit an existing by selecting Edit in the settings assistant Moveit Configure package options to do this , Then select your package .
Be careful 2: If you modify MoveIt package , You need to restart the simulation for the changes to take effect . |
|---|

this is it ! You have created... For your robot MoveIt package . however …… Now? ?
Now that you have created one MoveIt package , And some work has been done on it , So let's take a closer look Moveit Some key aspects of .
Let's take a quick look at MoveIt Architecture starts . understand MoveIt The architecture of ! It helps to program the robot and connect it to MoveIt. ad locum , You can view the display MoveIt Diagram of Architecture .

move_group node
Exercise 2.2
a) Execute the following command in order to start the MoveIt RViz demo environment.
Execute in WebShell #1 |
|---|
In [ ]:
roslaunch myrobot_moveit_config demo.launch
NOTE: It may happen that the Moveit Rviz window appears out of focus. Like this:

It can be said that the mobile group is MoveIt At the heart of , Because this node acts as the integrator of various components of the robot , And provide operation according to the needs of users / service .
Mobile group nodes collect robot information in the form of topics and services , Point clouds, for example 、 The joint state of the robot and the transformation of the robot (TF).
It collects robot kinematics data from the parameter server , For example, Robot Description (URDF)、SRDF( Semantic robot description format ) And configuration files . SRDF Files and configuration files are generated before we MoveIt Generated on ! Pack our robots . The configuration file contains information for setting joint limits 、 perception 、 kinematics 、 Parameter file of end effector, etc . These are in your package config Files created in folders .
When moving it ! Get all this information about the robot and its configuration , We can say that it is configured correctly , We can start to command the robot from the user interface . We can use C++ or Python MoveIt! Used to command the mobile group node to perform operations API, Pick up, for example / place 、IK or FK etc. . Use RViz Motion planning plug-in , We can RViz GUI Itself commands the robot . This is what you will do in the next section !
Basic motion planning
Um. ... First , You can start MoveIt Rviz Environment and start some tests on Motion Planning . therefore , Please follow the next exercise !
If that's the case , Just click on the following button displayed in the upper right corner of the screen :

after , Click again RViz The screen . Now? , Your MoveIt Rviz The window should look like this :

Now? , You can just double-click the colored part at the top of the window to maximize .
If all goes well , You will see the following :

b) Now? , Move to the schedule tab . here :

c) Before you start planning anything , It's best to update the current start status .

d) In the target state of the query section , You can choose the start option ( One of the poses you defined in the previous exercise ), And then click “ to update ” Button . Your robot scene will be updated with the new location you have selected .

e) Now? , You can click “ command ” Part of the “ plan ” Button . The robot will start planning the trajectory to reach this point .

f) Last , If you click “ perform ” Button , The robot will execute the trajectory .
g) Play with new tools now ! You can repeat the same process many times . for example , You can set a random valid location as the target , Instead of moving the robot to its starting position . You can also try to check and uncheck the top “ Show ” Different visualization options shown in the section .
End of Exercise 2.2
You now know how to pass MoveIt RViz GUI Perform some basic motion planning , And you are right MoveIt More familiar with . therefore ...... Let's discuss some interesting points !
MoveIt! planning scene
The term “ Plan the scene ” Used to represent the world around the robot , It is also used to store the state of the robot itself . move_group Representation of planned maintenance scenarios . move_group The node consists of another part called the world geometry monitor , It constructs the world geometry based on the robot's sensors and user input .
The planning scene monitor reads the joint status from the robot , Read sensor information and world geometry from the world geometry monitor . The world scene monitor reads data from the occupancy map monitor , The monitor uses 3D Perception to build the environment 3D Express , be called Octomap. Octomap It can be downloaded from PointCloud Generate ,PointCloud from PointCloud Update plug-in processing of occupancy graph , The depth image is processed by the depth image occupancy map Updater . When we introduce Perception when , You'll see this in the next chapter .
MoveIt! kinematics handling
 Compared with the analytical solver , The numerical solver may take some time to solve  IK. be known as  IKFast  The package can be used to generate solutions using analytical methods  IK  Of  C++  Code , It can be used for different types of robot manipulators , If  DOF  Less than  6, Better performance . this  C++  The code can also be converted to  MoveIt ! The use of some ROS Tool plugins .

 Forward kinematics and Jacobian search have been integrated into  MoveIt  in ! RobotState  class , So we don't need to use plug-ins to solve  FK.
MoveIt! collision checking
MoveIt  Medium  CollisionWorld  object ! Used to find collisions in the planning scene , These collisions use  FCL( Flexible collision library ) Package as back end . move ! Support for different types of objects ( For example, grid ) Collision check ; The original shape , For example, a box 、 Cylinder 、 Cone 、 Sphere, etc ; And figure eight .

 Collision checking is one of the most computationally demanding tasks in motion planning . To reduce this calculation ,MoveIt! There is one provided called  ACM(Allowed Collision Matrix) Matrix . It contains a binary value , Corresponding to the need to check the collision between two pairs of objects . If the value of the matrix is 1, It means that there is no need to deal with the collision . We can set the value to  1, The object is always so far away , So that they will never collide with each other . Optimize  ACM  It can reduce the total amount of calculation required to avoid collision . If you remember , This is done when you create the package !
Moving the real robot
 however , up to now , You can only  Moveit  Mobile robots in the application . This is very useful , Because you can do many tests without worrying about any damage . in any case , The ultimate goal is always to move real robots , Right ?

 You created  MoveIt  The package can provide the necessary  ROS  Services and operations to plan and execute tracks , But it can't transfer this trajectory to a real robot . All the kinematics you've been doing is  MoveIt  Executed in the internal simulator provided . In order to communicate with real robots , It is necessary to review the... Created at the beginning of this chapter  MoveIt  Make some changes to the package .

 obviously , In this course , You don't have a real robot to do this , So you'll apply the same approach , But for mobile simulation robots . In order to view, you need to  MoveIt  Changes in the package , Just perform the next exercise .
Exercise 2.3
a) First , You need to create a file to define how to control “ real ” Robot joints . stay moveit Bag config In the folder , Create a file called controllers.yaml The new document of . Copy the following :
In [ ]:
controller_list:
- name: arm_controller
action_ns: follow_joint_trajectory
type: FollowJointTrajectory
joints:
- shoulder_pan_joint
- shoulder_lift_joint
- elbow_joint
- wrist_1_joint
- wrist_2_joint
- wrist_3_joint
- name: hand_controller
action_ns: follow_joint_trajectory
type: FollowJointTrajectory
joints:
- H1_F1J1
- H1_F1J2
- H1_F1J3
- H1_F2J1
- H1_F2J2
- H1_F2J3
- H1_F3J1
- H1_F3J2
- H1_F3J3
 So basically , Here you define a motion server for controlling robot joints .

 First , You are setting up a joint trajectory controller for controlling the robot arm  Action Server  The name of . How did you know that? ? ok , If you are in any  Web Shell  Create a  rostopic  list , You will find the following structure between your topics :

 So in this way , You can know that your robot has a joint trajectory controller  Action Server, be called  /arm_controller/follow_joint_trajectory/.

 Besides , You can check the message used by this operation to determine that it is of type “FollowJointTrajectory”.

 Last , You already know the name of the joint used by the robot . You are creating  MoveIt  I saw them when I packed them , You can also  model.urdf  Of documents  fh_desc  Find them in the bag .

 then , It just repeats the process just described , But for the  /hand_controller/follow_joint/trajectory  Action server .

b) Next , You must create a file to define the name of the robot joint . Again in config Directory , Create a file called joint_names.yaml The new document of , And copy the following in it :
In [ ]:
controller_joint_names: [shoulder_pan_joint, shoulder_lift_joint, elbow_joint, wrist_1_joint, wrist_2_joint, wrist_3_joint, H1_F1J1, H1_F1J2, H1_F1J3, H1_F2J1, H1_F2J2, H1_F2J3, H1_F3J1, H1_F3J2, H1_F3J3]
c) Now? , If you open... Located in the startup directory smart_grasping_sandbox_moveit_controller_manager.launch.xml, You will see that it is empty . Put the next content in it :
In [ ]:
<launch>
<rosparam file="$(find myrobot_moveit_config)/config/controllers.yaml"/>
<param name="use_controller_manager" value="false"/>
<param name="trajectory_execution/execution_duration_monitoring" value="false"/>
<param name="moveit_controller_manager" value="moveit_simple_controller_manager/MoveItSimpleControllerManager"/>
</launch>
 What you're doing here is basically loading what you just created controllers.yaml  Document and MoveItSimpleControllerManager  plug-in unit , This will allow you to put in MoveIt  Send the plan calculated in to your “ real ” robot , In this case, it is to simulate the robot .

d)  Last , You must create a new startup file to set up all systems to control your robot . therefore , In the startup directory , Create a file called  myrobot_planning_execution.launch  New startup file .
In [ ]:
<launch>
<rosparam command="load" file="$(find myrobot_moveit_config)/config/joint_names.yaml"/>
<include file="$(find myrobot_moveit_config)/launch/planning_context.launch" >
<arg name="load_robot_description" value="true" />
</include>
<node name="joint_state_publisher" pkg="joint_state_publisher" type="joint_state_publisher">
<param name="/use_gui" value="false"/>
<rosparam param="/source_list">[/joint_states]</rosparam>
</node>
<include file="$(find myrobot_moveit_config)/launch/move_group.launch">
<arg name="publish_monitored_planning_scene" value="true" />
</include>
<include file="$(find myrobot_moveit_config)/launch/moveit_rviz.launch">
<arg name="config" value="true"/>
</include>
</launch>
 So finally here , We're loading joint_names.yaml  file , And start some startup files we need to set MoveIt  Environmental Science . if necessary , You can check the function of these startup files . however , Let's focus on what's starting joint_state_publisher  node .

 If you execute again  rostopic  list , You will see that there is a named  /joint_states  The theme of . In this topic, the joint state of simulated robot is released . therefore , We need to put this topic into  /source_list  Parameters in , In order to  MoveIt  You can know the position of the robot at every moment .

f)  Last , You just need to start the startup file you just created  (myrobot_planning_execution.launch)  And plan the trajectory , As you learned in the last exercise . Once the trajectory is planned , You can press “ perform ” Button to execute the trajectory in the simulated robot .
边栏推荐
- 开源之夏中选名单已公示,基础软件领域成为今年的热门申请
- Redis 入门-第一篇-数据结构与对象-简单动态字符串(SDS)
- 某问答社区App x-zse-96签名分析
- 『忘了再学』Shell流程控制 — 39、特殊流程控制语句
- Simulation questions and answers of the latest national fire-fighting facility operators (primary fire-fighting facility operators) in 2022
- ROS知识:librviz库的调用实践
- 想学习eTS开发?教你开发一款IQ-EQ测试应用
- 请问,maxcompute执行sql查询有时特别慢是什么原因
- Video data annotation tools and platforms (data annotation company)
- Signature analysis of app x-zse-96 in a Q & a community
猜你喜欢

Blue Bridge Cup single chip microcomputer (I) -- turn off peripherals and turn off led

ROS2知识(2):网络设施
Getting started with redis - Chapter 4 - data structures and objects - jump table

The list of open source summer winners has been publicized, and the field of basic software has become a hot application this year

64路电话+2路千兆以太网64路PCM电话光端机语音电话转光纤

Introduction to redis - Chapter 3 - data structures and objects - Dictionary

Want to learn ETS development? Teach you to develop an iq-eq test application

Leetcode 1209. Delete all adjacent duplicates II in the string

并购增资或将有望启动东软越通新动能?

php 手写一个完美的守护进程
随机推荐
使用单调栈解题
HMS Core 视频编辑服务开放模板能力,助力用户一键Get同款酷炫视频
[cloud based co creation] overview of the IOT of Huawei cloud HCIA IOT v2.5 training series
4路电话+1路千兆以太网4路PCM电话光端机
ROS知识:点云文件.pcd格式
公开课丨玩的就是短视频!今晚教你精准变现!
开源之夏中选名单已公示,基础软件领域成为今年的热门申请
64路电话+2路千兆以太网64路PCM电话光端机语音电话转光纤
【无标题】2022年压力管道巡检维护试题及在线模拟考试
2022施工员-设备方向-岗位技能(施工员)考题模拟考试平台操作
某问答社区App x-zse-96签名分析
【云驻共创】华为云HCIA-IoT V2.5培训系列内容之物联网概览
ROS知识:读取点云数据文件
How to use note taking software flowus and note for interval repetition? Based on formula template
请问连接oracle时,这个version 1.54 是什么的version?
全国进入主汛期,交通运输部:不具备安全运行条件的线路坚决停运!
十大劵商如何开户?在线开户安全么?
Leetcode 1209. Delete all adjacent duplicates II in the string
Meta said that the UK security law may "scan all private information" or infringe privacy
Is there any regulation on the redemption time of financial products?