当前位置:网站首页>Basic concept and deployment of kubernetes
Basic concept and deployment of kubernetes
2022-07-23 16:18:00 【Drunk mortal ¢ world1y】
Catalog
1.1 Evolution of application deployment mode
1.2 kubernetes brief introduction
Two 、kubernetes Cluster architecture and components
3、 ... and 、 Kubernetes The core concept
3.2.1 Label Selectors (Label selector )
Four 、kubernetes Cluster environment construction
4.1.2 Installation requirements
4.3 Environment initialization
4.3.1 Check the version of the operating system
4.3.4 Ban iptable and firewalld service
4.3.7 modify linux Kernel parameters of
4.3.8 To configure ipvs function
4.3.9 install docker( Be careful docker The version should be consistent )
4.4 install Kubernetes Components
4.5.2 stay master View node information on
4.5.3 Install network plug-ins (CNI)
5、 ... and 、k8s Common commands
introduction
Kubernetes It's a portable 、 Scalable open source platform , For managing containerized workloads and services , Help with declarative configuration and Automation . It has a huge and rapidly developing ecosystem .
One 、 Kubernetes Introduce
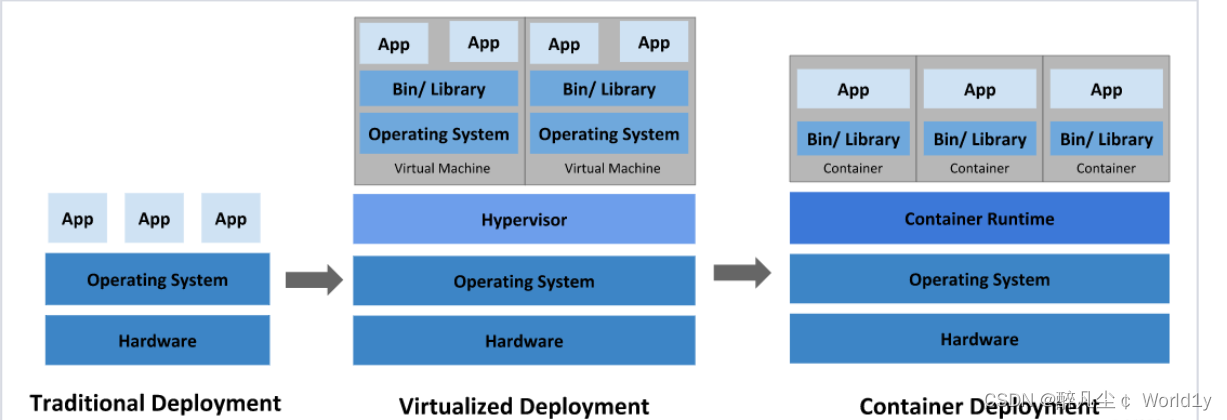
1.1 Evolution of application deployment mode
In the way applications are deployed , Mainly experienced three times :
Traditional deployment : In the early days of the Internet , The application will be deployed directly on the physical machine
advantage : Simple , Without the involvement of other technologies
shortcoming : Resource usage boundaries cannot be defined for an application , It is difficult to allocate computing resources reasonably , And it's easy to have an impact between programs
Virtualization deployment : You can run multiple virtual machines on a single physical machine , Each virtual machine is a separate environment
advantage : The application environment does not affect each other , Provides a degree of security
shortcoming : Added operating system , Wasted some resources
Containerized deployment : And virtualization similar , But shared the operating system
advantage :
You can ensure that each container has its own file system 、CPU、 Memory 、 Process space, etc
The resources needed to run the application are wrapped in containers , And decoupled from the underlying infrastructure
Containerized applications can cross cloud service providers 、 Span Linux Operating system distribution for deployment
Container deployment brings a lot of convenience to , But there are also some problems , for instance :
- One of the containers is out of order , How to make another container start immediately to replace the shutdown container
- When the amount of concurrent access becomes larger , How to expand the number of containers horizontally
These container management issues are collectively referred to as Container arrangement problem , To solve these container choreography problems , Some container choreography Software :
- Swarm:Docker Own container choreography tools
- Mesos:Apache A tool for unified resource management and control , Need and Marathon Use a combination of
- Kubernetes:Google Open source container choreography tools

1.2 kubernetes brief introduction
Kubernetes( Often referred to as K8s,K8s Yes, it will 8 Letters “ubernete” Replace with “8” Abbreviation ) It's a container centric infrastructure , You can schedule and run containers on physical clusters or virtual machine clusters , Provide automatic container deployment 、 An open source platform for expansion and management . It meets some common requirements of applications in production environment : Application instance copy 、 Horizontal auto expansion 、 Naming and discovery 、 Load balancing 、 Rolling upgrade 、 Resource monitoring, etc .
Kubernetes It's a portable 、 Scalable open source platform , For managing containerized workloads and services , Help with declarative configuration and Automation . It has a huge and rapidly developing ecosystem .
kubernetes, Is a new container technology based distributed architecture leading solution , It's a secret weapon that Google has kept secret for more than ten years ----Borg An open source version of the system , On 2014 year 9 Release the first version in ,2015 year 7 First official version released in .
effect :
- For automatic deployment 、 Expand and manage “ Containerization ( containerized) Applications " Open source system .
- Can be interpreted as K8S It is responsible for automatic operation and maintenance management of multiple container programs ( such as Docker) The cluster of , It is an ecologically rich container choreography framework tool .
1.3 Why use kubernetes
Well known kubernetes It's a container choreographer , Can be efficient 、 Manage containers in batches ; Then someone will ask ,docker It has its own docker-compose( Single machine arrangement ) and docker-Swarm( Multi machine arrangement ), Why use k8s,Docker-Compose The application of can make full use of the performance of a single physical server , And can deliver continuously and quickly , How to efficiently monitor the healthy operation of each container and how to migrate services after a crash ? That is, common cluster management problems , At this time docker Swarm Technology solves this problem , But how to be more efficient 、 Intelligent management container cluster ? At this time, Google has been used internally for a long time k8s Born in the sky , Seized nearly 80% Market share , Become the industry leader , Why? k8s Can beat docker Swarm Well ? That's because kubernetes These advantages of :
- Rapid deployment capabilities : Define corresponding charts, It is convenient to deploy large-scale applications .
- Intelligent capacity expansion and contraction mechanism : When deploying, it will automatically consider which server the container should be deployed on , And the number of copies can be customized .
- Self healing function : The service of a node crashed , You can automatically migrate to another server node for recovery to achieve high availability .
- Intelligent load balancing : utilize Ingress, When the traffic is accessed through the domain name , Divert traffic to different servers .
- Intelligent rolling lifting stage : When upgrading or demoting , Will replace one by one , When a custom number of services are upgraded OK after , Will carry out other upgrades and really destroy the old Services .
| technology | Application scenarios | Resource occupancy ratio |
|---|---|---|
| docker | Single machine deployment simple application | low |
| Docker-Compose | stand-alone / A few machines deploy applications | low |
| kubernetes | Cluster deployment of highly available applications | low |
1.4 Kubernetes characteristic
- portable : Support for public clouds , Private cloud , A hybrid cloud , Multiple cloud (multi-cloud)
- Scalable : modularization , pluggable , Can be mounted , Can be combined
- automation : Automatic deployment , Automatic restart , Automatic replication , Automatic telescopic / Expand
- Rapid deployment application , Rapid application expansion
- Seamlessly connect to new application features
- Save resources , Optimize the use of hardware resources
1.5 kubernetes characteristic
1. Lightweight
Use go Language ; A compiled language , Language level supports process management , There is no need for human control , So go The resource consumption of development is small .
Some explanatory language : for example Python/Javascript / Perl /Shell, Low efficiency , Occupy more memory resources
2. Open source
3. Self repair
Restart failed containers on node failure , Replacement and redeployment , Guaranteed number of copies expected ; Kill the container that failed the health check , And will not process client requests until they are ready , Make sure the online service is uninterrupted .
That is, restart or rebuild the container in an abnormal state ( Delete first 、 To create a ), The purpose is to ensure that the line of business is uninterrupted .
4. Stretch and stretch
Use command UI Or based on CPU Usage auto rapid expansion and reduction of application instances , Ensure high availability during application business peak concurrency ; Recovery of resources at low peak of business , Run services at minimum cost .
Telescopic : Expand and shrink
elastic : People just specify rules , When conditions are met , It will automatically trigger the expansion or shrinkage operation
5. Service discovery and load balancing
K8S For multiple pod Provide a unified access portal ( Inside IP Address and a DNS name ), And all containers associated with load balancing , Allows users to think about no containers IP problem .
Service discovery : A service can find the services it depends on in the form of automatic discovery
Load balancing : If a service starts multiple containers , It can automatically realize the load balancing of requests
6. Version rollback
If you find a problem with the newly released version of the program , You can immediately go back to the original version
7. Storage choreography
Mount external storage system , Whether it's from local storage , Public cloud ( Such as AWS), Or networked storage 〈 Such as NES、GlusterFS、Ceph) Are used as part of cluster resources , Greatly improve storage flexibility .
Support plug-in storage and arrange plug-in storage resources
8. The batch
Provide one-time tasks (job), Timing task (cronjob); Scenarios for batch data processing and analysis
9. Automatic deployment and rollback
KBS Update application with rolling update strategy , Update one at a time Pod, Instead of deleting all at the same time Pod, If there is a problem during the update process , Changes will be rolled back , Make sure the upgrade is not affected by the business .
10. Confidentiality and configuration management (secret——》 Security / Authenticate encrypted data )
Manage confidential data and application configuration , Instead of exposing sensitive data in a mirror image , Improve sensitive data security . And can store some common configurations in K8S in , Easy to use for applications .
Two 、kubernetes Cluster architecture and components
2.1 kubernetes Components
K8S It belongs to the master-slave device model (Master-slave framework ), That is to say Master The node is responsible for the scheduling of the cluster 、 Management and operation and maintenance ,Slave Nodes are computing workload nodes in the cluster .
stay K8S in , The master node is generally called Master node , And the slave node is called Worker Node node , Every Node Will be Master Allocate some workload .
Master Components can run on any computer in the cluster , But the advice Master The node occupies a separate server . because Master It's the brain of the whole cluster , If Master The node is down or unavailable , Then all control commands will fail . except Master, stay K8S The other machines in the cluster are called Worker Node node , When a Node outage , The workload on it will be Master Automatically transfer to other nodes .
2.1.1 master Components
master: The control plane of the cluster , Responsible for cluster decision making ( management )
① kube-apiserver
Kubernetes API, Unified entrance to the cluster , Component coordinator , With Restful API Providing interface services , Add, delete, change, check and monitor all object resources APIServer Process and submit to Etcd Storage .
kube-apiserver Horizontal expansion is considered in the design , in other words , It can scale by deploying multiple instances . You can run kube-apiserver Multiple instances of , And balance traffic between these instances .
② kube-controller-manager ( Controller management center - Define resource types )
Handles regular background tasks in the cluster , A resource corresponds to a controller , and ControllerManager Those are the ones that manage these controllers .
These controllers include :
– ● Node controller (Node Controller): Responsible for notification and response in case of node failure
– ● Mission controller (Job controller): Monitoring represents a one-time task Job object , Then create Pods To run these tasks until they're done
– ● Endpoint controller (Endpoints Controller): Fill in the endpoint (Endpoints) object ( I.e. join Service And Pod)
– ● Service account and token controller (Service Account & Token Controllers): Create a default account and API The access token
③ kube-scheduler
According to the scheduling algorithm ( primary / Preferred strategy ) For the newly created Pod Select a Node node , Can be deployed at will , Can be deployed on the same node , It can also be deployed on different nodes .
The factors considered in scheduling decision include single Pod and Pod Aggregate resource requirements 、 Hardware / Software / Policy constraints 、 Affinity and anti affinity norms 、 Data location 、 Interference between workloads and deadlines .
④ etcd
Distributed key-value storage system ( characteristic : Service auto discovery ). Used to save cluster state data , such as Pod、Service Equal object information
PS:etcd V2 edition : Data is stored in memory
v3 edition : Introduce local volume Persistence of volumes ( It can be recovered according to the disk ), Service discovery , Distributed ( Convenient expansion , Shrinkage capacity )
etcd It is a regular full backup + Persistent mode of continuous incremental backup , Finally stored on disk
but kubernetes 1.11 Not supported before version v3, What I use K8S 1.15
ETCD Usually as 3 Replica mechanism ( Odd way ), Distributed in three stations master On ( Some companies deploy with servers alone ETCD )
master: Deploy in an odd number of ways ( When it comes to multiple nodes )
⑤ AUTH : Authentication module
K8S Internal support for the use of RBAC The way of authentication
⑥ cloud-controller-manager
Cloud controller manager refers to the control logic embedded in a specific cloud Control plane assembly . The cloud controller manager allows you to link the cluster to the cloud provider's application programming interface , And separate the components that interact with the cloud platform from those that only interact with your cluster .
cloud-controller-manager Run only cloud platform specific control loops . If you run it in your own environment Kubernetes, Or run the learning environment on your local computer , No cloud controller manager is required in the deployed environment .
And kube-controller-manager similar ,cloud-controller-manager Put some logically independent The control loops are combined into the same executable file , For you to run in the same process . You can expand the execution level ( Run more than one copy ) To improve performance or enhance fault tolerance .
The following controllers all contain the dependence on the cloud platform driver :
– ● Node controller (Node Controller): It is used to check the cloud provider after the node terminates the response to determine whether the node has been deleted
– ● Routing controller (Route Controller): For routing in the underlying cloud infrastructure
– ● Service controller (Service Controller): Used to create 、 Update and remove cloud provider load balancers
2.1.2 node Components
① kubelet
kubelet yes Master stay Node nodes Agent, Manages the life cycle of the native run container , Like creating a container 、Pod Mount the data volume 、 download secret、 Get container and node states and so on .kubelet Each one Pod Convert to a set of containers .
kubelet —》 The first and docker The engine interacts —》docker Containers ( A group of containers ran in Pod in )
② kube-proxy( four layers )
stay Node Node-on-node implementation Pod Network proxy , Maintain network rules 、pod Communication and four layer load balancing . The rule will be written to by default iptables , At present, we support IPVS、 It also supports namespaces
For a seven story load ,k8s The official offers a solution ;ingress-nginx
③docker or rocket
Container engine , Run container .
2.1.3 Overall process
① Use kubectl The authority will be verified before the command (AUTH)
② adopt API-server Operate on the resources of the container cloud

2.2 k8s Workflow

below , To deploy a nginx Service to illustrate kubernetes The calling relationship of each component of the system :
- First of all, make it clear , once kubernetes After the environment starts ,master and node Will store their own information in etcd In the database
- One nginx The installation request of the service will be sent to master Node apiServer( The only access to resource operations ) Components
- apiServer The component will call scheduler Components ( Responsible for cluster resource scheduling ) To decide which service should be installed node Node , At this time , It will be from etcd Read each node Node information , Then choose according to a certain algorithm , And inform them of the results apiServer
- apiServer call controller-manager( Responsible for maintaining the status of the cluster ) To dispatch Node Node installation nginx service
- kubelet( Responsible for maintaining the life cycle of the container ) After receiving the instruction , Will inform docker, Then from docker To start a nginx Of pod,pod yes kubernetes The smallest operating unit , The container must run in pod So far ,
- One nginx The service runs , If you need to visit nginx, It needs to pass kube-proxy( Responsible for service discovery and load balancing within the cluster ) Come on pod Agents that generate access
such , External users can access the data in the cluster nginx Yes
3、 ... and 、 Kubernetes The core concept
Kubernetes Contains multiple types of resource objects : Pod、 Label、 Service、 Replication Controller etc. .
All resource objects can be accessed through Kubernetes Provided kubectl Tools to add 、 Delete 、 Change 、 Check the operations such as , And save it in etcd Medium persistent storage .
Kubernets In fact, it is a highly automatic resource control system , Through tracking and comparison etcd The difference between the expected state of resources stored in the storage and the actual state of resources in the current environment , To realize advanced functions such as automatic control and automatic error correction .
3.1 Pod
Pod yes Kubernetes Create or deploy the smallest / The simplest basic unit , One Pod Represents a running process on the cluster .
- You can put Pod Understood as pea pods , And the same Pod Each container inside is Peas .
- One Pod Consisting of one or more containers ,Pod Container sharing network 、 Storage and computing resources , At the same table Docker Run on main engine .
- One Pod It can run multiple containers , It's also called side car mode (SideCara) Pattern . In the production environment, one Generally, a single container or multiple containers with strong correlation and complementarity form a individual Pod.
- The same Pod The containers between can pass through localhost Visit each other , And it can be mounted Pod All the data volumes in ; But different Pod Containers between cannot be used localhost visit , You can't mount other Pod The data volume .
3.1.1 Pod controller
Pod The controller is Pod A template for startup , To make sure that K8S It's started in the library Pod It should always run according to the user's expectations ( replications 、 Life cycle 、 Health check, etc ).
K8s There are many Pod controller , There are several commonly used :
1.Deployment: Stateless application deployment .Deployment  The role of management is to manage and control Pod and ReplicaSet,  Control them to run in the desired state .
2.Replicaset: Ensure expected Pod  Copy number .Replicaset  The role of management is to manage and control Pod,  I want them to work hard . however ,ReplicaSet  Controlled by Deployment.
 Can be interpreted as Deployment  It's the general contractor foreman , It's mainly responsible for supervising the workers under it Pod  work , Make sure that the number of... Required by users is available all the time Pod at work . If you find a worker Pod  That won't be possible , Just pull a new one Pod  Come and replace it . and ReplicaSet  It's the small package foreman under the general contractor foreman .
 from K8S From the user's point of view , The user will operate it directly Deployment  Deployment Services , And when Deployment  When deployed ,K8S  The request will be generated automatically ReplicaSet and Pod. Users just need to care Deployment  Instead of worrying about ReplicaSet.
 Resource objects Replication Controller  yes ReplicaSet  The forerunner of , The official recommendation is Deployment  replace Replication Controller  To deploy Services .
3.Daemonset:  Ensure that all nodes run the same class Pod, Make sure that every   On each node - - Categories Pod function , Typically used to implement system-level background tasks .
4.Statefulset:  Stateful application deployment
5.Job: One time task .  According to the user's settings ,Job Managed Pod If you finish the task successfully, you will automatically quit .
6.Cronjob: Periodic planned tasks 
3.2 Label
- label , yes K8S Characteristic management way , Easy to classify and manage resource objects .
- Label It can be attached to various resource objects . On , for example Node、Pod、Service、 RC etc. , Used to associate objects 、 Query and filter .
- One Label It's a key-value The key/value pair , among key And value Specified by the user .
- A resource object can be defined in any number of Label, The same Label It can also be added to any number of resource objects , You can also add or delete objects dynamically after they are created .
- You can bind one or more different resources to a specified resource object Label, To achieve multi-dimensional resource grouping management function .
- And Label Allied , also Annotation ( notes )
- The difference is that a valid tag value must be 63 Characters or less , And must be empty or in alphanumeric characters ( [a-z0-9A-Z]) The beginning and the end , The middle can contain a horizontal bar (-)、 Underline (_)、 spot (.) And letters or numbers . The comment value has no character length limit .
3.2.1 Label Selectors (Label selector )
Define a resource object Label, It's like giving it a label ; You can then use the label selector ( Label selector) Queries and filters have some Label Resource object .
There are currently two types of label selectors : Based on equivalence ( be equal to 、 It's not equal to ) And based on set relations ( Belong to 、 Do not belong to 、 There is ).
3.3 Service
stay K8s In the cluster of , Although each of them Pod Will be assigned a - Separate IP Address , But because of Pod There is a life cycle ( They can be created , And it doesn't start after it's destroyed ), It may change at any time due to business changes , Lead to this IP The address will follow Pod Destroy and disappear .
Service This is the core concept that is used to solve this problem .
K8S Medium Service It's not what we often say “ service " The meaning of , It's more like the gateway layer , Think of it as a group of people that provide the same service Pod External access interface 、 Traffic equalizer .
Service On what Pod It's defined by the tag selector .
stay K8S In the cluster ,service Think of it as a group of people that provide the same service Pod External access interface . The services that the client needs to access are service object . Every service There is a fixed virtual ip ( This ip Also known as Cluster IP) , Automatically and dynamically bind the backend Pod, All network requests direct access Service The virtual ip,service It will automatically forward to the back end .
Service In addition to providing a stable way of external access , And load balancing (Load Balance) The function of , Automatically distribute the request traffic to all back-end services . On ,Service It can expand horizontally and transparently to customers (scale).
To achieve service The key to this function , Namely kube-proxy. kube-proxy Running on each node , monitor API Server Changes in service objects in ,
The following three traffic scheduling modes can be used :userspace ( abandoned )、iptables ( On the verge of abandonment )、ipvs ( recommend , Best performance ) To achieve network forwarding .
Service yes K8S The core of the service , Blocked service details , Unified external exposure service interface , And it did “ Microservices ”. For example, one of our services A, Deployed 3 Copies , That is to say 3 individual Pod;
For users , Just focus on one Service It's just the entrance to , Instead of worrying about which one to ask Pod.
The advantages are obvious : a party External users do not need to be aware because Pod. On Service The unexpected collapse of 、K8S Pull up again Pod Caused by IP change , External users don't need to be aware of the upgrade 、 Change service brings Pod Caused by replacement IP change .
3.4 Ingress
Service Mainly responsible for K8S The network topology inside the cluster , So how can the outside of the cluster access the inside of the cluster ? This is the time Ingress 了 .Ingress As a whole K8S The access layer of the cluster , Be responsible for internal and external communication of the cluster .
Ingress yes K8S Working in a cluster oSI Under the network reference model , The first 7 Application of layer , Exposed interface , The typical way to visit is http/https.
Service Only the traffic scheduling of the fourth layer can be carried out , The form of expression is iptport. Ingress Then different business domains can be scheduled 、 Different URL Access path traffic .
such as : Client request http://www. kgc.com:port ---> Ingress ---> Service ---> Pod
3.5 Name
because K8S Inside , Use “ resources ” To define every logical concept ( function ), So every one of them “ resources ”, All should have their own “ name ”.
“ resources ” Yes api edition (apiversion) 、 Category (kind) 、 Metadata (metadata) 、 Definition list (spec) 、 state (status) Wait for configuration information .
“ name ” Usually defined in “ resources ” Of “ Metadata ” In the message . In the same namespace Must be unique in space .
3.6 Namespace
As the number of projects increases 、 Increase in personnel 、 The expansion of cluster size , It takes a year . Kind of logic . Upper isolation K8S Internal variety “ resources ” Methods , This is it. Namespace .
Namespace It's to put a K8S The cluster is divided into several virtual cluster groups whose resources can not be shared .
Different Namespace Internal “ resources ” The name can be the same , identical Namespace The same species in “ resources ”,“ name ” Cannot be the same .
Fair use K8S Of Namespace, It can enable the Cluster Administrator to better manage the delivery to K8S The services in are classified, managed and browsed .
K8S In the default Namespace Yes : default、kube-system、kube-public etc. .
Inquire about K8S In particular “ resources ” Bring the corresponding Namespace.
Four 、kubernetes Cluster environment construction
4.1 Pre knowledge points
The current production deployment Kubernetes There are two main ways to cluster :
1. kubeadm
Kubeadm It's a K8s Deployment tools , Provide kubeadm init and kubeadm join, For rapid deployment Kubernetes colony .
Official address :https://kubernetes.io/docs/reference/setup-tools/kubeadm/kubeadm/
2. Binary package
from github Download the distribution's binary package , Manually deploy each component , form Kubernetes colony .
Kubeadm Lower deployment threshold , But it's a lot of detail , It's hard to troubleshoot problems . If you want to be more controllable , Binary package deployment is recommended Kubernetes colony , Although manual deployment is troublesome , You can learn a lot about how it works , It's also good for later maintenance .

4.1.1 kubeadm How to deploy
kubeadm It's an official community launch for rapid deployment kubernetes Clustering tools , This tool can complete one by two instructions kubernetes Cluster deployment :
- Create a Master node kubeadm init
- take Node Nodes join the current cluster $ kubeadm join <Master Node IP And port >
4.1.2 Installation requirements
Before we start , Deploy Kubernetes Cluster machines need to meet the following conditions :
- One or more machines , operating system CentOS7.x-86_x64
- hardware configuration :2GB Or more RAM,2 individual CPU Or more CPU, Hard disk 30GB Or more
- Network interworking among all machines in the cluster
- Access to the Internet , Need to pull image
- prohibit swap Partition
4.1.3 ultimate objective
- Install on all nodes Docker and kubeadm
- Deploy Kubernetes Master
- Deploy container network plug in
- Deploy Kubernetes Node, Join nodes Kubernetes In the cluster
- Deploy Dashboard Web page , Visual view Kubernetes resources
4.2 Environmental preparation

role | IP Address | Components |
master | 192.168.111.20 | docker,kubectl,kubeadm,kubelet |
node01 | 192.168.111.30 | docker,kubectl,kubeadm,kubelet |
node02 | 192.168.111.40 | docker,kubectl,kubeadm,kubelet |
4.3 Environment initialization
4.3.1 Check the version of the operating system
#  Install in this way kubernetes Cluster requirements Centos The version should be in 7.5 Or above
[[email protected] ~]# cat /etc/redhat-release

4.3.2 Host name resolution
In order to facilitate the direct call between cluster nodes , In this configuration, the host name resolution , Internal... Is recommended in enterprises DNS The server
#  The host name cannot be resolved   Edit the of three servers /etc/hosts file , Add the following
192.168.111.20 master
192.168.111.30 node01
192.168.111.40 node02

4.3.3 Time synchronization
kubernetes It is required that the node time in the cluster must be accurate , Use here chronyd The service synchronizes time from the network
It is recommended to configure an internal meeting synchronization server in the enterprise
#  start-up chronyd service
[[email protected] ~]# systemctl start chronyd
[[email protected] ~]# systemctl enable chronyd
[[email protected] ~]# date

4.3.4 Ban iptable and firewalld service
kubernetes and docker There will be a lot of iptables The rules , In order not to confuse system rules with them , The rule to shut down the system directly
# 1  close firewalld service
[[email protected] ~]# systemctl stop firewalld
[[email protected] ~]# systemctl disable firewalld
# 2  close iptables service
[[email protected] ~]# systemctl stop iptables
[[email protected] ~]# systemctl disable iptables

4.3.5 Ban selinux
selinux yes linux A security service under the system , If you don't turn it off , In the installation cluster, there will be a variety of exotic problems
#  edit  /etc/selinux/config  file , modify SELINUX The value of is disable
#  Note that you need to restart after the modification linux service
SELINUX=disabled
4.3.6 Ban swap Partition
swap The partition value is the virtual memory partition , Its function is to use up the physical memory , Then virtual disk space into memory to use , Enable sqap Devices can have a very negative impact on the performance of the system , therefore kubernetes Every node is required to be disabled swap equipment
#  Edit partition configuration file /etc/fstab, Comment out swap Partition a row
#  Note that you need to restart after the modification linux service
vim /etc/fstab
 Comment out  /dev/mapper/centos-swap swap
# /dev/mapper/centos-swap swap

swapoff -a #  Temporarily Closed
sed -ri 's/.*swap.*/#&/' /etc/fstab # Permanent ban

4.3.7 modify linux Kernel parameters of
#  modify linux Number of kernel adoptions , Add bridge filtering and address forwarding functions
#  edit /etc/sysctl.d/kubernetes.conf file , Add the following configuration :
net.bridge.bridge-nf-call-ip6tables = 1
net.bridge.bridge-nf-call-iptables = 1
net.ipv4.ip_forward = 1

#  Reload configuration
[[email protected] ~]# sysctl -p    perhaps  sysctl --system  #  take effect
#  Load the bridge filter module
[[email protected] ~]# modprobe br_netfilter
#  Check whether the bridge filter module is loaded successfully
[[email protected] ~]# lsmod | grep br_netfilter

4.3.8 To configure ipvs function
stay Kubernetes in Service There are two models , One is based on iptables Of , One is based on ipvs If you compare the two ,ipvs The performance of the system is obviously higher , But if you want to use it , You need to load it manually ipvs modular
# 1. install ipset and ipvsadm
[[email protected] ~]# yum install ipset ipvsadmin -y
# 2. Add the module to be loaded and write it to the script file
[[email protected] ~]# cat <<EOF> /etc/sysconfig/modules/ipvs.modules
#!/bin/bash
modprobe -- ip_vs
modprobe -- ip_vs_rr
modprobe -- ip_vs_wrr
modprobe -- ip_vs_sh
modprobe -- nf_conntrack_ipv4
EOF
# 3. Add execution rights to the script
[[email protected] ~]# chmod +x /etc/sysconfig/modules/ipvs.modules
# 4. Execute script file
[[email protected] ~]# /bin/bash /etc/sysconfig/modules/ipvs.modules
# 5. Check whether the corresponding module is loaded successfully
[[email protected] ~]# lsmod | grep -e -ip_vs -e nf_conntrack_ipv4
nf_conntrack_ipv4      15053  10
nf_defrag_ipv4         12729  1 nf_conntrack_ipv4
nf_conntrack          133095  10 ip_vs,nf_nat,nf_nat_ipv4,nf_nat_ipv6,xt_conntrack,nf_nat_masquerade_ipv4,nf_nat_masquerade_ipv6,nf_conntrack_netlink,nf_conntrack_ipv4,nf_conntrack_ipv6


4.3.9 install docker( Be careful docker The version should be consistent )
# 1、 Switch image source
                 yum install wget -y
[[email protected] ~]# wget https://mirrors.aliyun.com/docker-ce/linux/centos/docker-ce.repo -O /etc/yum.repos.d/docker-ce.repo

# 2、 View the supported in the current mirror source docker edition
[[email protected] ~]# yum list docker-ce --showduplicates

# 3、 Install a specific version of docker-ce
#  Must develop a --setopt=obsoletes=0, otherwise yum Higher versions will be automatically installed
[[email protected] ~]# yum install --setopt=obsoletes=0 docker-ce-20.10.17 -y

# 4、 Add a configuration file
#Docker  Used by default Vgroup Driver by cgroupfs, and Kubernetes Recommended systemd To replace cgroupfs
[[email protected] ~]# mkdir /etc/docker
[[email protected] ~]# cat <<EOF> /etc/docker/daemon.json
{
	"exec-opts": ["native.cgroupdriver=systemd"],
	"registry-mirrors": ["https://kn0t2bca.mirror.aliyuncs.com"]
}
EOF

# 5、 start-up dokcer
[[email protected] ~]# systemctl restart docker
[[email protected] ~]# systemctl enable docker


4.4 install Kubernetes Components
# 1、 because kubernetes My mirror image is abroad , Relatively slow , Here, switch to the domestic mirror source
# 2、 edit /etc/yum.repos.d/kubernetes.repo, Add the following configuration
cat <<EOF > /etc/yum.repos.d/kubernetes.repo
[kubernetes]
name=Kubernetes
baseurl=https://mirrors.aliyun.com/kubernetes/yum/repos/kubernetes-el7-x86_64
enabled=1
gpgcheck=0
repo_gpgcheck=0
gpgkey=https://mirrors.aliyun.com/kubernetes/yum/doc/yum-key.gpg https://mirrors.aliyun.com/kubernetes/yum/doc/rpm-package-key.gpg
EOF
[[email protected] ~]# yum makecache
# 3、 install kubeadm、kubelet and kubectl
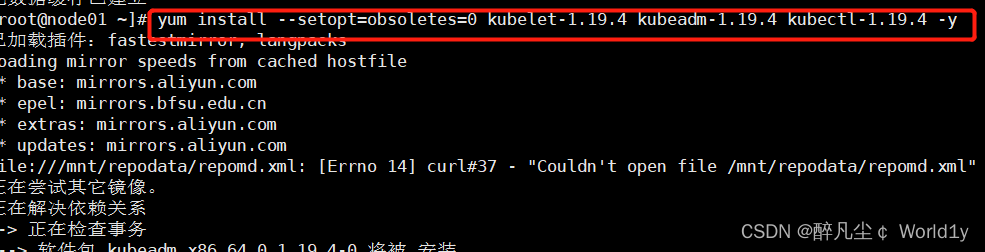
[[email protected] ~]# yum install --setopt=obsoletes=0 kubelet-1.19.4 kubeadm-1.19.4 kubectl-1.19.4 -y
# 4、 To configure kubelet Of cgroup
# edit /etc/sysconfig/kubelet, Add the following configuration
KUBELET_CGROUP_ARGS="--cgroup-driver=systemd"
KUBE_PROXY_MODE="ipvs"
# 5、 Set up kubelet Boot from boot
[[email protected] ~]# systemctl enable --now kubelet
# 6、 Check whether the installation is successful
yum list installed | grep kubelet
yum list installed | grep kubeadm
yum list installed | grep kubectl

Version view
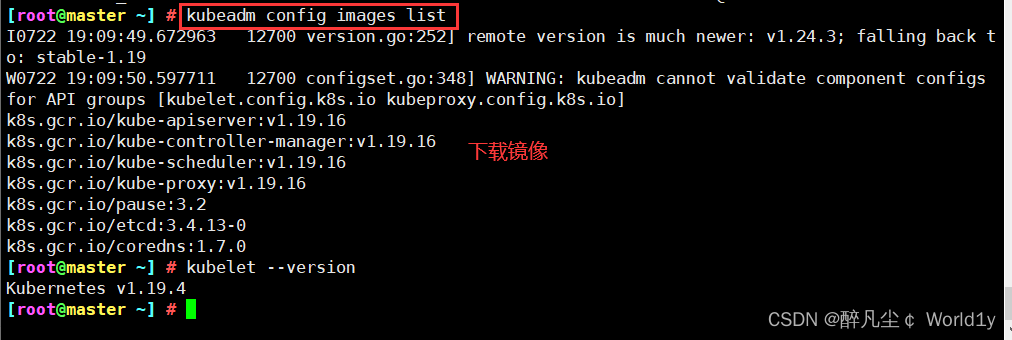
[[email protected] ~]# kubelet --version
Kubernetes v1.19.4

4.5 Prepare cluster image
#  In the installation kubernetes The cluster before , You must prepare the image required by the cluster in advance , The required image can be viewed through the following command
[[email protected] ~]# kubeadm config images list

#  Download mirroring
#  This image kubernetes In the warehouse , Because of the Internet , Unable to connect , An alternative is provided below
images=(
	kube-apiserver:v1.17.4
	kube-controller-manager:v1.17.4
	kube-scheduler:v1.17.4
	kube-proxy:v1.17.4
	pause:3.1
	etcd:3.4.3-0
	coredns:1.6.5
)

for imageName in ${images[@]};do
	docker pull registry.cn-hangzhou.aliyuncs.com/google_containers/$imageName
	docker tag registry.cn-hangzhou.aliyuncs.com/google_containers/$imageName k8s.gcr.io/$imageName
	docker rmi registry.cn-hangzhou.aliyuncs.com/google_containers/$imageName
done
Expand : Half way summary
If it is installed here correctly , More than half of them have been successfully installed , The above configurations need to be configured on all nodes . It can be done by xshell The tool sends all instructions to all virtual machines , The operation is as follows .

in addition , Some configurations need to be restarted to take effect , therefore , You can restart here .
4.5.1 Cluster initialization
The following operations only need to be performed in master Execute on the node
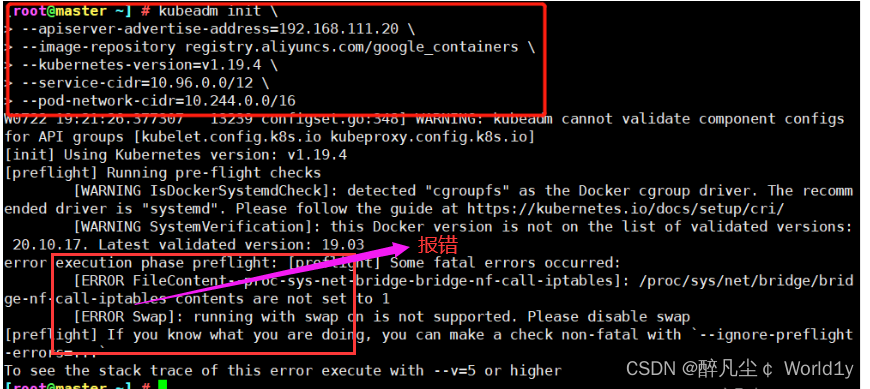
#  Create clusters
[[email protected] ~]# kubeadm init \
	--apiserver-advertise-address=192.168.111.20 \
	--image-repository registry.aliyuncs.com/google_containers  \
	--kubernetes-version=v1.19.4 \
	--service-cidr=10.96.0.0/12  \
	--pod-network-cidr=10.244.0.0/16 \
    --ignore-preflight-errors=all

--apiserver-advertise-address  Cluster notification address
--image-repository  Because the default pull image address k8s.gcr.io No domestic access , Here is the address of Alibaba cloud image warehouse
--kubernetes-version K8s edition , Same as above
--service-cidr  Cluster internal virtual network ,Pod Unified access portal
--pod-network-cidr Pod The Internet , With the following deployment of CNI Network components yaml Consistent in
#####################################################################

#  Create the necessary files , Copy k8s authenticated document
[[email protected] ~]# mkdir -p $HOME/.kube
[[email protected] ~]# sudo cp -i /etc/kubernetes/admin.conf $HOME/.kube/config
[[email protected] ~]# sudo chown $(id -u):$(id -g) $HOME/.kube/config
192.168.111.20 Is the address of the primary node , Modify it by yourself . Others need not be modified .


#  congratulations Kubernetes control-plane Create success
Your Kubernetes control-plane has initialized successfully!

#  Next, you need to run the following three paragraphs
To start using your cluster, you need to run the following as a regular user:

  mkdir -p $HOME/.kube
  sudo cp -i /etc/kubernetes/admin.conf $HOME/.kube/config
  sudo chown $(id -u):$(id -g) $HOME/.kube/config

Alternatively, if you are the root user, you can run:

  export KUBECONFIG=/etc/kubernetes/admin.conf

#  You should deploy one on the top of the cluster pod The Internet .
You should now deploy a pod network to the cluster.
Run "kubectl apply -f [podnetwork].yaml" with one of the options listed at:
  https://kubernetes.io/docs/concepts/cluster-administration/addons/

# You can add as many control-plane, Use the following command :
You can now join any number of control-plane nodes by copying certificate authorities
and service account keys on each node and then running the following as root:

  kubeadm join master-cluster-endpoint:6443 --token 9ezt8v.yx2owzdiaif06so8 \
    --discovery-token-ca-cert-hash sha256:a637ba2a840714a375e6bbc7212123bf8cdd1333317e53731425b6d39af9eafe \
    --control-plane

# You can add as many worker-nodes , Use the following command :
Then you can join any number of worker nodes by running the following on each as root:

kubeadm join master-cluster-endpoint:6443 --token 9ezt8v.yx2owzdiaif06so8 \
    --discovery-token-ca-cert-hash sha256:a637ba2a840714a375e6bbc7212123bf8cdd1333317e53731425b6d39af9eafe
Expand : Errors and sets
Be careful : If an error occurs as shown in the figure below , To restart the virtual machine , I think some of the above configurations can take effect only after restarting
The following operations only need to be performed in node Execute on the node
Here, copy a series of commands generated above , I'm just an example here , The command is copied according to your actual generation node Node execution
kubeadm join 192.168.111.20:6443 --token vdtu41.kqhcyqz81znpt27y \
> --discovery-token-ca-cert-hash sha256:2c72f117703200a5004e8e4466941aeab693e57bd71a628a86aed32a863dba05

Expand : Default token Valid for 24 Hours , When it expires , The token It's not available . Now you need to recreate token, You can use commands directly to generate :
kubeadm token create --print-join-command
4.5.2 stay master View node information on
kubectl get nodesWhen viewing, all nodes areNotReadystate .

4.5.3 Install network plug-ins (CNI)
Choose one of the following two plug-ins ,master On the implementation , If it is ECS recommends following flannel,calico It may conflict with the cloud network environment
1. install flannel plug-in unit ( Lightweight for quick build use , Beginner recommendation )
download yaml file
wget https://raw.githubusercontent.com/coreos/flannel/master/Documentation/kube-flannel.ymlmodify net-conf.json The following network segment is the above init pod-network-cidr The segment address of ( It must be correct, otherwise it will cause cluster network problems )
sed -i 's/10.240.0.0/10.244.0.0/' kube-flannel.yml
After modifying the installation plug-in , perform
kubectl apply -f kube-flannel.yml

kubectl get pods -n kube-system
2. install calico plug-in unit ( For complex network environment )
download yaml file
wget https://docs.projectcalico.org/v3.9/manifests/calico.yaml
Modify the network segment of the configuration file to the above init pod-network-cidr The segment address of ( It must be correct, otherwise it will cause cluster network problems )
sed -i 's/192.168.0.0/10.244.0.0/g' calico.yaml
After modifying the installation plug-in , perform
kubectl apply -f calico.yaml

 Make sure calico Is the installation successful ( Wait patiently ,coredns and calico by Running After the status, carry out the following operations )
kubectl get pods --all-namespaces -w

kubectl get pod --all-namespaces -o wide
Because the Internet is not easy to access , If there's an inaccessible situation , You can use the following Remember that the file name is kube-flannel.yml, Location :/root/kube-flannel.yml Content :
https://github.com/flannel-io/flannel/tree/master/Documentation/kube-flannel.yml
wget https://raw.githubusercontent.com/coreos/flannel/master/Documentation/kube-flannel.yml

kubectl apply -f kube-flannel.yml.1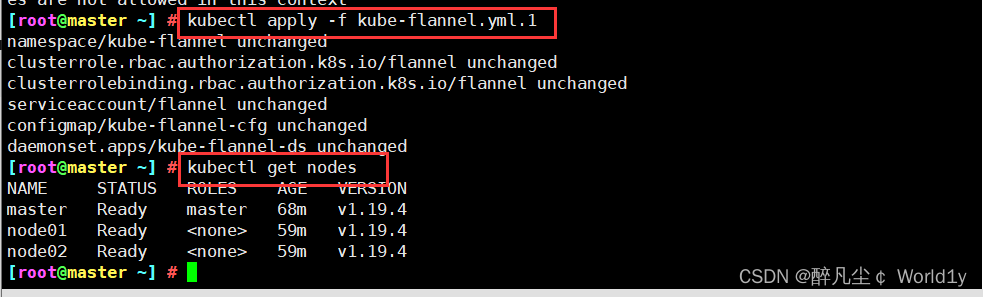
thus , Cluster building completed !
4.6 Cluster testing
4.6.1 Create a nginx service
kubectl create deployment nginx --image=nginx
4.6.2 Exposed port
[[email protected] ~]# kubectl expose deployment nginx --port=80 --type=NodePort
service/nginx exposed

4.6.3 View service
[[email protected] ~] # kubectl get pod,svc
NAME                         READY   STATUS    RESTARTS   AGE
pod/nginx-6799fc88d8-76pkf   1/1     Running   0          3m32s

NAME                 TYPE        CLUSTER-IP       EXTERNAL-IP   PORT(S)        AGE
service/kubernetes   ClusterIP   10.96.0.1        <none>        443/TCP        80m
service/nginx        NodePort    10.102.151.167   <none>        80:30214/TCP   90s
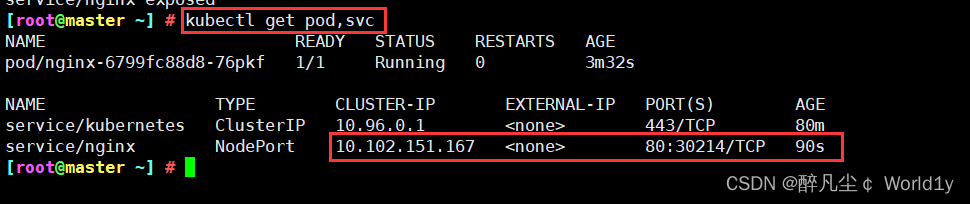
Browser test results :

Expand : Experience pod
1. Definition pod.yml file , such as pod_nginx_rs.yaml
cat > pod_nginx_rs.yaml <<EOF
apiVersion: apps/v1
kind: ReplicaSet
metadata:
  name: nginx
  labels:
    tier: frontend
spec:
  replicas: 3
  selector:
    matchLabels:
      tier: frontend
  template:
    metadata:
      name: nginx
      labels:
        tier: frontend
    spec:
      containers:
      - name: nginx
        image: nginx
        ports:
        - containerPort: 80
EOF
2. according to pod_nginx_rs.yml File creation pod
kubectl apply -f pod_nginx_rs.yaml
3. see pod
kubectl get pods
kubectl get pods -o wide
kubectl describe pod nginx
4. Feel through ReplicaSet take pod Capacity expansion
kubectl scale rs nginx --replicas=5
kubectl get pods -o wide
5. Delete pod
kubectl delete -f pod_nginx_rs.yaml5、 ... and 、k8s Common commands
see pod,service,endpoints,secret Wait, wait
kubectl get  Component name
#  for example kubectl get pod    To view the details, you can add -o wide    other namespace The specified  -n namespace name

establish 、 Change one yaml Resources in the file , It can also be a directory , The directory contains a set of yaml file ( In actual use, it is based on yaml Document oriented , Use the command directly to create pod Very few , It is recommended to use more yaml file )
kubectl apply -f xxx.yaml
#  for example kubectl apply -f nginx.yaml    Here is to create if not , If any, change , Than create To use
Delete one yaml Resources in the file , It can also be a directory , The directory contains a set of yaml file
kubectl delete -f xxx.yaml
#  for example kubectl delete -f nginx.yaml
View resource status , For example, there is a group of deployment Internal pod Didn't get up , Commonly used in pod Troubleshooting of problems in the scheduling process
kubectl describe pod pod name
#  First use kubectl get pod see    There is abnormal replication pod Name use this command
see pod journal , be used for pod Troubleshooting with status not ready
kubectl logs pod name
#  First use kubectl get pod see    There is abnormal replication pod Name use this command
see node Node or pod resources (cpu, Memory resources ) usage
kubectl top  Component name
 #  for example kubectl top node  kubectl top pod
Get into pod Inside
kubectl exec -ti pod name  /bin/bash
#  First use kubectl get pod see    Copy if necessary pod Name use this command
summary :
kubernetes The essence of is a group of server clusters , It can run specific programs on each node of the cluster , To manage containers in nodes . The purpose is to realize the automation of resource management , It mainly provides the following main functions :
- Self repair : Once a container crashes , In the 1 Start the new container quickly in about seconds
- Stretch and stretch : As needed , Automatically adjust the number of running containers in the cluster
- Service discovery : A service can find the services it depends on in the form of automatic discovery
- Load balancing : If a service starts multiple containers , It can automatically realize the load balancing of requests
- Version rollback : If you find a problem with the newly released version of the program , You can immediately go back to the original version
- Storage choreography : Storage volumes can be created automatically according to the needs of the container itself
Kubernetes Core components
Kubernetes Master It is the main control unit of the cluster , It is used to manage its workload and guide the communication of the whole system .Kubernetes The control plane consists of respective processes , Each component can run on a single master node , Can also be in support high-availability clusters Run on multiple master nodes of .
| Component name | effect |
| etcd | Save the state of the entire cluster ; |
| apiserver | Provides a unique entry point for resource operations , And provide certification 、 to grant authorization 、 Access control 、API Mechanisms such as registration and discovery ; |
| controller manager | Responsible for maintaining the status of the cluster , Like fault detection 、 Automatic extension 、 Rolling updates, etc. ; |
| scheduler | Responsible for resource scheduling , According to the scheduled scheduling policy Pod Dispatch to the corresponding machine ; |
| kubelet | Responsible for maintaining the life cycle of the container , Also responsible for Volume(CVI) And the Internet (CNI) Management of ; |
| Container runtime | Responsible for mirror management and Pod And the actual running of the container (CRI); |
| kube-proxy | Responsible for Service Provide cluster Internal service discovery and load balancing ; |
Other components
| Component name | effect |
|---|---|
| kube-dns | Responsible for providing for the entire cluster DNS service |
| Ingress Controller | Provide external network access for services |
| Heapster | Provide resource monitoring |
| Dashboard | Provide GUI |
| Federation | Provides clusters across the available zones |
| Fluentd-elasticsearch | Provide cluster log collection 、 Storage and search |
边栏推荐
- [attack and defense world web] difficulty Samsung 9 points introductory question (Part 1): simple_ js、mfw
- 7、 Logic of JMeter sending request
- GO语言学习——复习包、接口、文件操作
- SSB signal modulation and demodulation based on MATLAB (with source code)
- ORA-01654错误:表空间满了,插入失败
- 虚拟主播、偶像代言产品出问题谁负责?律师解析
- 死锁、饥饿、死循环之间的区别
- 中年危机,35岁被退休,打工人拿什么来抗衡资本家?
- From the big guy baptism! 2022 headline first hand play MySQL advanced notes, and it is expected to penetrate P7
- Kubernetes 基本概念和部署
猜你喜欢

Ultra detailed MP4 format analysis

ECS remote monitoring
![[attack and defense world web] difficulty Samsung 9 points introductory question (Part 2): shrink, lottery](/img/05/06dd9f071fe18e4a50d767ec51e557.png)
[attack and defense world web] difficulty Samsung 9 points introductory question (Part 2): shrink, lottery

Bubble sort - just read one

黑马程序员-接口测试-四天学习接口测试-第三天-postman高级用法,newman例集导出导入,常用断言,断言json数据,工作原理,全局,环境变量,时间戳,请求前置脚本,关联,批量执行测试用例

vulnstack红日-4
Summary of server performance tuning experience

Bean Validation入门篇----02

2022蓝帽杯初赛wp

Mysql客户端到服务端字符集的转换
随机推荐
封面 - 电脑知识指南
C language learning notes
Go 接口:深入内部原理
Jianzhi offer II 115. reconstruction sequence: topological sorting construction problem
(Zset) how is the underlying layer of redis stored with a hop table
1060 Are They Equal
CONDA set up proxy
Please initialize the log4j system properly.
Details of task switching
MySQL - six logs
不想dto套dto可以这样写
VRRP+MSTP配置详解【华为eNSP实验】
Bubble sort - just read one
Vinka introduces high anti-interference vk36n series touch IC: vk36n1d, vk36n2p, vk36n3b, vk36n4i, easy to use
W3C introduces decentralized identifier as web standard
Mysql客户端到服务端字符集的转换
TranslucentTB 推荐
Don't want dto set. Dto can be written like this
New infrastructure of enterprise data in the era of digital transformation | love Analysis Report
Without Huawei, Qualcomm will raise prices at will, and domestic mobile phones that lack core technology can only be slaughtered