当前位置:网站首页>High availability solution practice of mongodb advanced applications (4)
High availability solution practice of mongodb advanced applications (4)
2022-06-23 17:43:00 【Tom bomb architecture】
1、MongDB Start and shut down
1.1、 Command line start
./mongod --fork --dbpath=/opt/mongodb/data ----logpath=/opt/mongodb/log/mongodb.log
1.2、 Profile startup
./mongod -f mongodb.cfg
mongoDB Basic configuration /opt/mongodb/mongodb.cfg
dbpath=/opt/mongodb/data
logpath=/opt/mongodb/logs/mongodb.log
logappend=true
fork=true
bind_ip=192.168.209.128
port=27017
Environment variable configuration
export PATH=/opt/mongodb/bin:$PATH
2、MongoDB Master slave building
Mongodb There are three ways to build clusters :Master-Slaver/Replica Set / Sharding. The following is the simplest answer to cluster construction , But it's not exactly a cluster , It can only be said to be active and standby . And the official has not recommended this way , So here is just a brief introduction , The construction method is also relatively simple . Host configuration /opt/mongodb/master-slave/master/mongodb.cfg
dbpath=/opt/mongodb/master-slave/master/data
logpath=/opt/mongodb/master-slave/master/logs/mongodb.log
logappend=true
fork=true
bind_ip=192.168.209.128
port=27001
master=true
source=192.168.209.128:27002
Slave configuration /opt/mongodb/master-slave/slave/mongodb.cfg
dbpath=/opt/mongodb/master-slave/slave/data
logpath=/opt/mongodb/master-slave/slave/logs/mongodb.log
logappend=true
fork=true
bind_ip=192.168.209.128
port=27002
slave=true
source=192.168.209.128:27001
Start the service
cd /opt/mongodb/master-slave/master/
mongod --config mongodb.cfg # Master node
cd /opt/mongodb/master-slave/slave/
mongod --config mongodb.cfg # From the node
Connect the test
# The client connects to the master node
mongo  --host 192.168.209.128 --port 27001
# Client slave node
mongo  --host 192.168.209.128 --port 27002
Basically, just execute these two commands on the primary node and the standby node respectively ,Master-Slaver Even if it's done . I haven't tried whether the backup node can become the primary node after the primary node is hung up , But since it is no longer recommended , You don't have to use it .
3、MongoDB Replica set
Chinese translation is called copy set , But I don't like translating English into Chinese , It always feels weird . In fact, the cluster contains multiple data , Make sure that the master node hangs up , The standby node can continue to provide data services , The premise is that the data needs to be consistent with the primary node . Here's the picture :
Mongodb(M) Represents the master node ,Mongodb(S) Indicates the standby node ,Mongodb(A) Represents the arbitration node . The primary and secondary nodes store data , The arbitration node does not store data . The client connects the primary node and the standby node at the same time , Do not connect arbitration nodes .
By default , The master node provides all add, delete, query and change services , The standby node does not provide any services . However, the standby node can provide query services through settings , This reduces the pressure on the primary node , When the client performs data query , Request to automatically go to the standby node . This setting is called Read Preference Modes, meanwhile Java The client provides a simple way to configure , You don't have to operate the database directly .
Arbitration node is a kind of special node , It does not itself store data , The main function is to decide which standby node is promoted to the primary node after the primary node is hung up , So the client doesn't need to connect to this node . Although there is only one standby node , However, an arbitration node is still needed to upgrade the level of the standby node . At first, I didn't believe that there must be an arbitration node , But I've also tried without arbitration node , Whether the primary node is attached to the standby node or the standby node , So we still need it .
After introducing the cluster scheme , So now it's time to build .
3.1. Create a data folder
Generally, the data directory will not be established in mongodb Under the unzip directory of , But for convenience , Built in mongodb Unzip the directory .
# The three directories correspond to the main , To prepare , Arbitration node
mkdir -p /opt/mongodb/replset/master
mkdir -p /opt/mongodb/replset/slaver
mkdir -p /opt/mongodb/replset/arbiter
3.2. Build profile
Because there are many configurations , So we write the configuration file .
vi /opt/mongodb/replset/master/mongodb.cfg
dbpath=/opt/mongodb/replset/master/data
logpath=/opt/mongodb/replset/master/logs/mongodb.log
logappend=true
replSet=shard002
bind_ip=192.168.209.128
port=27017
fork=true
vi /opt/mongodb/replset/slave/mongodb.cfg
dbpath=/opt/mongodb/replset/slave/data
logpath=/opt/mongodb/replset/slave/logs/mongodb.log
logappend=true
replSet=shard002
bind_ip=192.168.209.129
port=27017
fork=true
vi /opt/mongodb/replset/arbiter/mongodb.cfg
dbpath=/opt/mongodb/replset/arbiter/data
logpath=/opt/mongodb/replset/arbiter/logs/mongodb.log
logappend=true
replSet=shard002
bind_ip=192.168.209.130
port=27017
fork=true
Parameter interpretation :
dbpath: Data storage directory
logpath: Log storage path
logappend: Log in an additional way
replSet:replica set Name
bind_ip:mongodb Bound to ip Address
port:mongodb The port number used by the process , The default is 27017
fork: Run the process in the background mode
3.3、 Distribute to other machines under the cluster
# Send the slave node configuration to 192.168.209.129
scp -r /opt/mongodb/replset/slave [email protected]:/opt/mongodb/replset
# Send quorum node configuration to 192.168.209.130
scp -r /opt/mongodb/replset/arbiter [email protected]:/opt/mongodb/replset
3.4. start-up mongodb
Enter each mongodb Node bin Under the table of contents
# Sign in 192.168.209.128  Start master node
monood -f /opt/mongodb/replset/master/mongodb.cfg
# Sign in 192.168.209.129  Start slave
mongod -f /opt/mongodb/replset/slave/mongodb.cfg
# Sign in 192.168.209.130  Start arbitration node
mongod -f /opt/mongodb/replset/arbiter/mongodb.cfg
Note that the path of the configuration file must be correct , It could be a relative path or it could be an absolute path .
3.5. Configuration master , To prepare , Arbitration node
You can connect through the client mongodb, You can also directly select one of the three nodes mongodb.
#ip and port Is the address of a node
mongo 192.168.209.128:27017
use admin
cfg={_id:"shard002",members:[{_id:0,host:'192.168.209.128:27017',priority:9},{_id:1,host:'192.168.209.129:27017',priority:1},{_id:2,host:'192.168.209.130:27017',arbiterOnly:true}]};
# Make configuration effective
rs.initiate(cfg)
Be careful :cfg Is equivalent to setting a variable , It can be any name , Of course, it's better not to be mongodb Key words of ,conf,config Fine . The outermost _id Express replica set Name ,members It contains the address and priority of all nodes . The highest priority is the primary node , That is here 192.168.209.128:27017. Special note , For arbitration nodes , There needs to be a special configuration ——arbiterOnly:true. This must not be less , Otherwise, the active standby mode cannot take effect .
The effective time of configuration varies according to different machine configurations , If the configuration is good, it will take effect in more than ten seconds , Some configurations take a minute or two . If it works , perform rs.status() The command will see the following information :
{
            "set" : "testrs",
            "date" : ISODate("2013-01-05T02:44:43Z"),
            "myState" : 1,
            "members" : [
                    {
                            "_id" : 0,
                            "name" : "192.168.209.128:27004",
                            "health" : 1,
                            "state" : 1,
                            "stateStr" : "PRIMARY",
                            "uptime" : 200,
                            "optime" : Timestamp(1357285565000, 1),
                            "optimeDate" : ISODate("2017-12-22T07:46:05Z"),
                            "self" : true
                    },
                    {
                            "_id" : 1,
                            "name" : "192.168.209.128:27003",
                            "health" : 1,
                            "state" : 2,
                            "stateStr" : "SECONDARY",
                            "uptime" : 200,
                            "optime" : Timestamp(1357285565000, 1),
                            "optimeDate" : ISODate("2017-12-22T07:46:05Z"),
                            "lastHeartbeat" : ISODate("2017-12-22T02:44:42Z"),
                            "pingMs" : 0
                    },
                    {
                            "_id" : 2,
                            "name" : "192.168.209.128:27005",
                            "health" : 1,
                            "state" : 7,
                            "stateStr" : "ARBITER",
                            "uptime" : 200,
                            "lastHeartbeat" : ISODate("2017-12-22T02:44:42Z"),
                            "pingMs" : 0
                    }
            ],
            "ok" : 1
    }
If the configuration is in effect , It will contain the following information :
"stateStr" : "STARTUP"
At the same time, you can view the log of the corresponding node , Found waiting for another node to take effect or allocating data files .
Now we have basically completed all the construction of the cluster . As for testing , You can leave it to everyone to try . One is to insert data into the master node , The previously inserted data can be found from the standby node ( You may encounter a problem when querying the standby node , You can check it online ). The second is to stop the master node , The standby node can become the primary node to provide services . Third, restore the primary node , The standby node can also restore its standby role , Instead of continuing to be the master . Two and three can pass rs.status() Command to view the changes of the cluster in real time .
4、MongoDB Data fragmentation
and Replica Set similar , You need an arbitration node , however Sharding You also need to configure nodes and routing nodes . In terms of three cluster building methods , This is the most complex .
4.1、 Configure data nodes
mkdir -p /opt/mongodb/shard/replset/replica1/data
mkdir -p /opt/mongodb/shard/replset/replica1/logs
mkdir -p /opt/mongodb/shard/replset/replica2/data
mkdir -p /opt/mongodb/shard/replset/replica2/logs
mkdir -p /opt/mongodb/shard/replset/replica3/data
mkdir -p /opt/mongodb/shard/replset/replica3/logs
vi /opt/mongodb/shard/replset/replica1/mongodb.cfg
dbpath=/opt/mongodb/shard/replset/replica1/data
logpath=/opt/mongodb/shard/replset/replica1/logs/mongodb.log
logappend=true
fork=true
bind_ip=192.168.209.128
port=27001
replSet=shard001
shardsvr=true
vi /opt/mongodb/shard/replset/replica2/mongodb.cfg
dbpath=/opt/mongodb/shard/replset/replica2/data
logpath=/opt/mongodb/shard/replset/replica2/logs/mongodb.log
logappend=true
fork=true
bind_ip=192.168.209.128
port=27002
replSet=shard001
shardsvr=true
vi /opt/mongodb/shard/replset/replica3/mongodb.cfg
dbpath=/opt/mongodb/shard/replset/replica3/data
logpath=/opt/mongodb/shard/replset/replica3/logs/mongodb.log
logappend=true
fork=true
bind_ip=192.168.209.128
port=27003
replSet=shard001
shardsvr=true
4.2、 Start data node
mongod -f /opt/mongodb/shard/replset/replica1/mongodb.cfg #192.168.209.128:27001
mongod -f /opt/mongodb/shard/replset/replica2/mongodb.cfg #192.168.209.128:27002
mongod -f /opt/mongodb/shard/replset/replica3/mongodb.cfg #192.168.209.128:27003
4.3、 Make the data node cluster effective
mongo 192.168.209.128:27001   #ip and port Is the address of a node
cfg={_id:"shard001",members:[{_id:0,host:'192.168.209.128:27001'},{_id:1,host:'192.168.209.128:27002'},{_id:2,host:'192.168.209.128:27003'}]};
rs.initiate(cfg)  # Make configuration effective
4.4、 To configure configsvr
mkdir -p /opt/mongodb/shard/configsvr/config1/data
mkdir -p /opt/mongodb/shard/configsvr/config1/logs
mkdir -p /opt/mongodb/shard/configsvr/config2/data
mkdir -p /opt/mongodb/shard/configsvr/config2/logs
mkdir -p /opt/mongodb/shard/configsvr/config3/data
mkdir -p /opt/mongodb/shard/configsvr/config3/logs
/opt/mongodb/shard/configsvr/config1/mongodb.cfg
dbpath=/opt/mongodb/shard/configsvr/config1/data
configsvr=true
port=28001
fork=true
logpath=/opt/mongodb/shard/configsvr/config1/logs/mongodb.log
replSet=configrs
logappend=true
bind_ip=192.168.209.128
/opt/mongodb/shard/configsvr/config2/mongodb.cfg
dbpath=/opt/mongodb/shard/configsvr/config2/data
configsvr=true
port=28002
fork=true
logpath=/opt/mongodb/shard/configsvr/config2/logs/mongodb.log
replSet=configrs
logappend=true
bind_ip=192.168.209.128
/opt/mongodb/shard/configsvr/config3/mongodb.cfg
dbpath=/opt/mongodb/shard/configsvr/config3/data
configsvr=true
port=28003
fork=true
logpath=/opt/mongodb/shard/configsvr/config3/logs/mongodb.log
replSet=configrs
logappend=true
bind_ip=192.168.209.128
4.5、 start-up configsvr node
mongod -f /opt/mongodb/shard/configsvr/config1/mongodb.cfg #192.168.209.128:28001
mongod -f /opt/mongodb/shard/configsvr/config2/mongodb.cfg #192.168.209.128:28002
mongod -f /opt/mongodb/shard/configsvr/config3/mongodb.cfg #192.168.209.128:28003
4.6、 send configsvr Node clusters take effect
mongo 192.168.209.128:28001   #ip and port Is the address of a node
use admin  # Switch to admin
cfg={_id:"configrs",members:[{_id:0,host:'192.168.209.128:28001'},{_id:1,host:'192.168.209.128:28002'},{_id:2,host:'192.168.209.128:28003'}]};
rs.initiate(cfg)  # Make configuration effective
Configure routing nodes
mkdir -p /opt/mongodb/shard/routesvr/logs
# Be careful : The routing node does not data Folder
vi /opt/mongodb/shard/routesvr/mongodb.cfg
configdb=configrs/192.168.209.128:28001,192.168.209.128:28002,192.168.209.128:28003
port=30000
fork=true
logpath=/opt/mongodb/shard/routesvr/logs/mongodb.log
logappend=true
bind_ip=192.168.209.128
4.7. Start the routing node
./mongos -f /opt/mongodb/shard/routesvr/mongodb.cfg #192.168.209.128:30000
Here we don't use the configuration file to start , The meaning of the parameters should be understood by everyone . Generally speaking, a data node corresponds to a configuration node , The arbitration node does not need the corresponding configuration node . Note that when starting the routing node , Write the configuration node address into the startup command .
4.8. To configure Replica Set
It may be a little strange here why Sharding You will need to configure Replica Set. In fact, I can understand when I think about it , The data of multiple nodes must be associated , If you don't deserve one Replica Set, How to identify the same cluster . This is also someone else mongodb The provisions of the , Let's abide by it . The configuration method is the same as before , Order one cfg, Then initialize the configuration .
4.9. To configure Sharding
mongo 192.168.209.128:30000   # The routing node must be connected here
sh.addShard("shard001/192.168.209.128:27001");
sh.addShard("shard002/192.168.209.128:27017");
 #shard001、shard002 Express replica set Name   When adding a master node to shard in the future , Will be found automatically set The Lord of the city , To prepare , Decision node
use testdb
sh.enableSharding("testdb")    #testdb is database name
sh.shardCollection("testdb.testcon",{"name":”hashed”})
db.collection.status()
The first command is easy to understand , The second command is to modify the required Sharding Configure the database , The third command is to Sharding Of Collection To configure , there testcon That is to say Collection Name . There's another one key, This is the key thing , It will have a great impact on query efficiency .
Come here Sharding It has also been built , The above is just the simplest way to build , Some of these configurations still use the default configuration . If not set properly , It will lead to abnormal inefficiency , Therefore, it is recommended that you read more official documents and then modify the default configuration .
The above three cluster construction methods are preferred Replica Set, Only really big data ,Sharding To show power , After all, it takes time for the standby node to synchronize data .Sharding Multiple pieces of data can be concentrated on the routing node for some comparison , Then return the data to the client , But the efficiency is still relatively low .
I have tested myself , But I don't remember the specific machine configuration .Replica Set Of ips When the data reaches 1400W It can basically achieve 1000 about , and Sharding stay 300W It has dropped to 500 IPS, The unit data size of the two is about 10kb. We should do more performance tests when applying , Not like after all. Redis Yes benchmark.
边栏推荐
- Réponse 02: pourquoi le cercle Smith peut - il "se sentir haut et bas et se tenir à droite et à droite"?
- [network communication -- webrtc] analysis of webrtc source code -- supplement of pacingcontroller related knowledge points
- JSON - learning notes (message converter, etc.)
- qYKVEtqdDg
- How to use SQL window functions
- 开户券商怎么选择?现在网上开户安全么?
- What does websocket do?
- JMeter stress testing tutorial
- MySQL事务提交流程
- The company recruited a tester with five years' experience and saw the real test ceiling
猜你喜欢

Google Play Academy 组队 PK 赛,火热进行中!

《MPLS和VP体系结构》
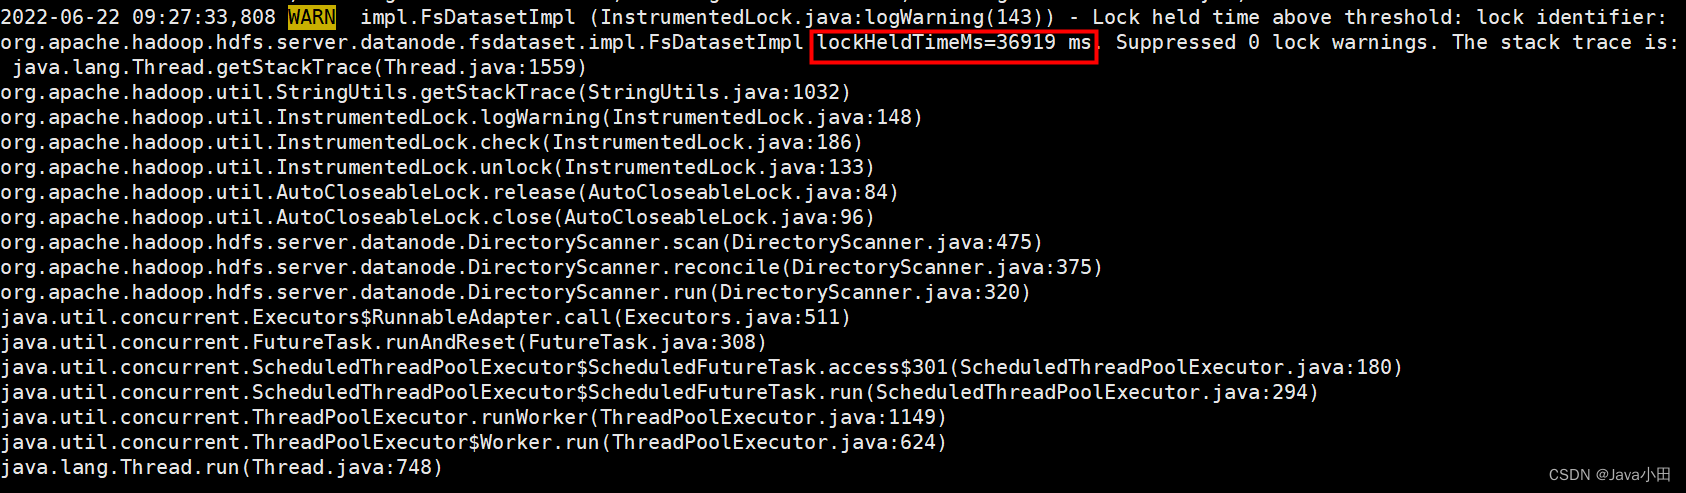
DataNode进入Stale状态问题排查

Network remote access raspberry pie (VNC viewer)

时间戳90K是什么意思?

Self supervised learning (SSL)
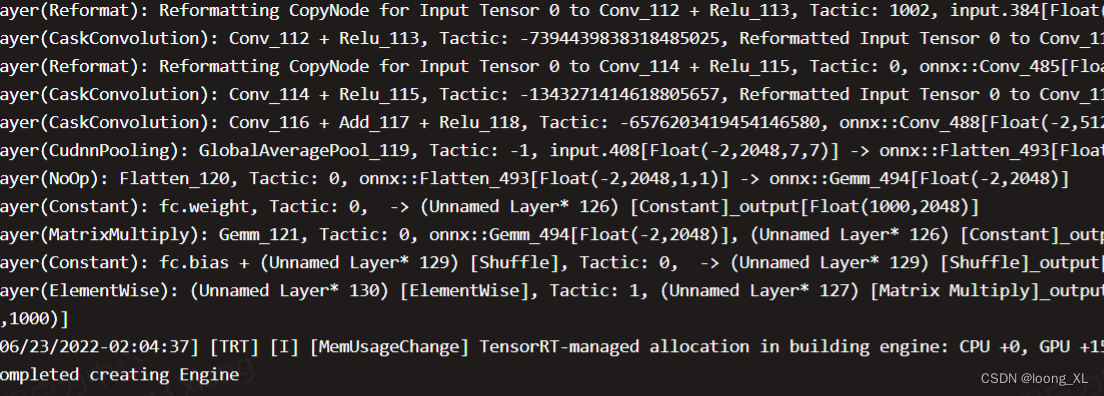
Tensorrt Paser loading onnx inference use

hands-on-data-analysis 第二单元 第四节数据可视化

Another breakthrough! Alibaba cloud enters the Gartner cloud AI developer service Challenger quadrant
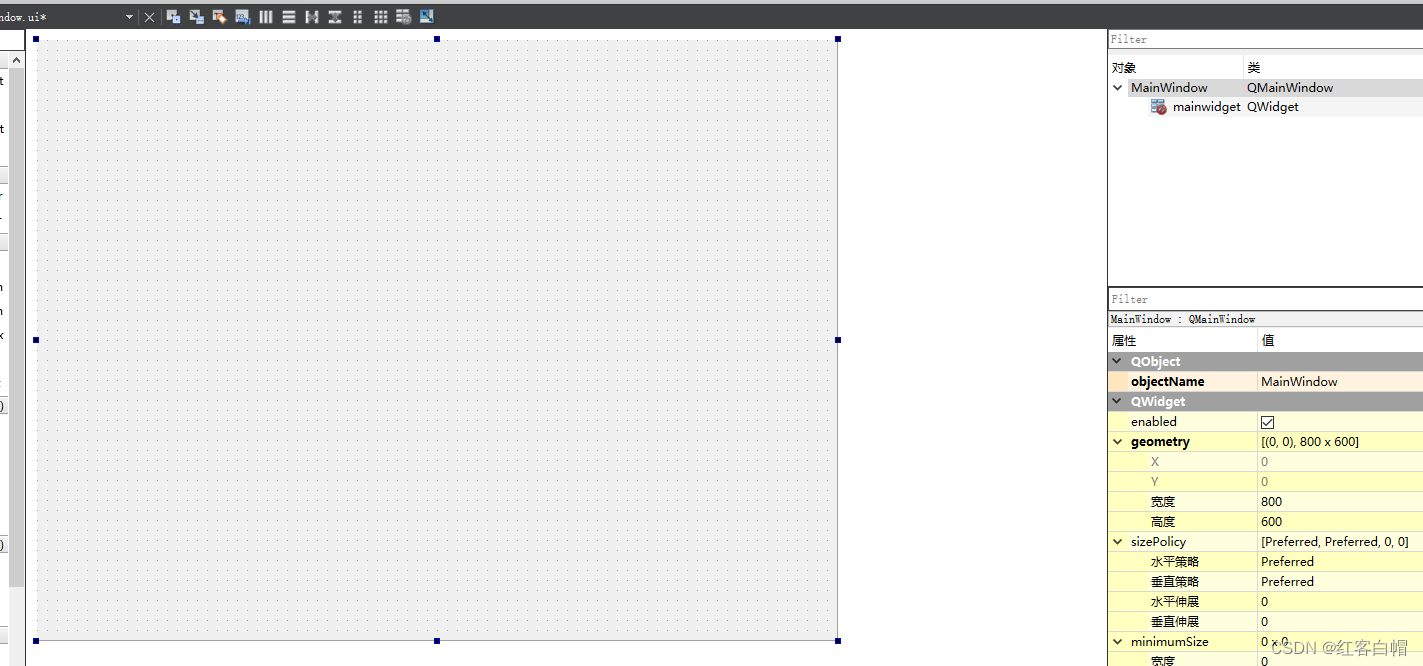
QT布局管理器【QVBoxLayout,QHBoxLayout,QGridLayout】
随机推荐
MySQL installation, configuration and uninstall
一文读懂麦克风典型应用电路
QT布局管理器【QVBoxLayout,QHBoxLayout,QGridLayout】
Tencent Qianfan scene connector: worry and effort saving automatic SMS sending
Analytic analog-to-digital (a/d) converter
I successfully joined the company with 27K ByteDance. This interview notes on software testing has benefited me for life
接口的所有权之争
[qsetting and.Ini configuration files] and [create resources.qrc] in QT
Redis ubuntu18.04.6 intranet deployment
Rongyun: let the bank go to the "cloud" easily
Look, this is the principle analysis of modulation and demodulation! Simulation documents attached
Practice sharing of chaos engineering in stability management of cloud native Middleware
Date转换为LocalDateTime
How important is 5g dual card dual access?
酒店入住时间和离店时间的日期选择
Thymeleaf - learning notes
MySQL事务提交流程
Discussion on five kinds of zero crossing detection circuit
History of storage technology: from tape to hardware liquefaction
Why do we say that the data service API is the standard configuration of the data midrange?