当前位置:网站首页>Bld3 getting started UI
Bld3 getting started UI
2022-06-24 21:35:00 【Druid_ C】
1. Interface UI
This is from steam Download the open interface after installation . The upper right corner is the current version number . In addition, if you do not use steam, It can also be seen from the Release Notes Open the official website to download the software , Development Fund There are some backgrounds in the site , You can also add... There blender Community , Called a member or something . Sinister New File You can quickly create the types of jobs you need ——General For general purpose , This is usually used more ;2D Animation Make for 2d Animation ;Sculpting carving ;VFX For visual effects ;Video Editing Video editing .
More about VFX
This summary is not the main content , However, if you can properly understand it, there will be no loss .VFX Can use its several major modules to complete the corresponding work :
- particle system (Particle system): Can simulate light , electric , fire , Dust and smoke , The grass , Wool , Outlets, etc , At the same time, it can also cooperate with web The front-end development , combination python, complete three.js or WebGL And other things that consume resources ;Houdini,C4D And so on
- Rigid body simulation (Rigid body simulation): It can simulate the motion of solids
- soft simulation (Soft body simulation): Simulate body parts , Water drop , Oil and other aggregates with certain deformation and fluidity
- Clothing simulation (Cloth simulation): Simulate clothes , Fold , Motion is collision, etc . May replace Marvleous Designer
- Fluid simulation (Fluid simulation): Simulated liquid , Especially water
- Motion tracking (Motion tracking): Track the motion state of an object or use the tracking data for 3d object
- synthesis (Compositing): Assemble images or movies that use composite nodes ,nuke Substitution of
- Video sequencer (Video sequencer): Video clip ,pr Substitution of
Interface details
Press and hold here to drag or directly click on the axis to make quick navigation , Move to the perspective you want to see .
On the numeric keypad of the keyboard , Press down 0 Indicates entering the current camera view ;1,3,7,9 They correspond to each other y Axis ,x Axis ,z Axis and -z View angle switch of axis ;2,4,6,8 To rotate in their respective directions at an angle .5 To switch between perspective view and non perspective view . Among them, the number keys 5 Corresponding to the grid icon below the coordinate axis .
The top right corner of the interface is the view mode , As shown in the following figure, they are object modes ( Present various parts of the model , Some changes can be made ), Edit mode ( Edit the model ), Engraving mode , The vertices , The weight , Material painting .

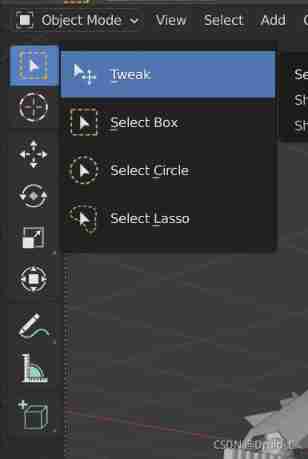
The menu bar on the left ( Press t To invoke or conceal ) From top to bottom, select (select box), cursor (cursor), Move , The zoom , transformation ,Annotate Pencil tools and measuring tools , And add boxes . Pay attention to these things object Mode of , The content of the toolbar on the left is different in different modes . Notice when zooming , If you want to xy Zoom in and out , Then press s after , Press and hold shift+z that will do .
Select the sub options of the icon as shown in the figure , The default is tweak, Yes, click to select , You can choose any of the following circle selection methods with your own preferences ,tweat The shortcut key for is w, The remaining three are :b,c,l. Press and hold for multiple selections shift that will do . in addition , When there are multiple choices , The color of the other first selected object is different from that of the last selected object , Pay attention to distinguish between , This color can be adjusted in the settings .
Notice the movement below , Zoom and other icons , After these operations , The toolbar on the right ( Press n To invoke or conceal ) There will be corresponding details in the :

3D cursor, buoy , It is equivalent to a reference , After selecting it, you can move the buoy to any desired position . Then zoom in and out and create objects centered on the buoy .
Adsorption function : Then press the G( Move ),S( The zoom ),R( rotate ) after , Press next x,y,z It will be automatically adsorbed to the required shaft . Or press the middle mouse button , It can be operated with the same line of sight . Be careful , Press and hold after rotating ctrl Every time 5° Move one space ,shift It will enter the fine adjustment .Alt+G/R/S The response operation can be cleared 0.
Transform It is to integrate all the operations mentioned above , But at this time, there will be no function of automatically adsorbing the coordinate axis .
The pictures below are X-ray Pattern , Structure line mode , Object mode , Rendering mode and real-time rendering . The shortcut key to switch from object mode to structure line mode is shift+z

Basic operation
Middle mouse button Rotate the picture
shift+ Middle mouse button translation
alt+ Middle mouse button Automatic adsorption angle to viewpoint, Like every other 45° horn , Or the front , The side , Bottom view, etc , Convenient view .
ctrl+ Middle mouse button Near and far drag 、 The zoom . The default is to move the mouse up and down and drag , Can be in Edit>Preferences>Navigation Set the direction to left and right , Inside Zoom Method:Dolly Indicates that the movement mode is dolly( Mobile camera car or something ), There is also... In the drop-down menu of this continue( This option will cause the original middle mouse button function to fail ) and scale( It seems that there is a difference between dolly not big ).Zoom Axis Set to... According to your habits Vertical( vertical ) or Horizontal( level ) All right .
At the same time, it is suggested that zoom On the label card Auto perspective For the time being, the tick of , Otherwise, in the later modeling process, you may keep jumping from the perspective view to the perspective view , so much trouble .

It is also the lower right corner , Remember to check auto-save perferences, So any changes made here , You don't have to save it . Or after every change , Select... Manually save preferences Save changes .

Modeling basis
add to : there add and shift+a The shortcut keys are the same .

Add presets : Create a new object ( ring , Other basic shapes do not have this option ) after , A form will appear in the lower left corner of the interface , You can do it again Operator Preset Add and save presets on the small plus sign next to them , In this way, it will be created according to the preset .

smooth : For objects that need smoothing , First, the inverted triangle icon on the right ( Object data attributes ) Open in auto-smooth, Then right click shade smooth, Render smooth . If it doesn't open auto-smooth, The whole object will be smoothed together , This is something to be aware of .

Delete :x Key can delete
边栏推荐
- Tdengine can read and write through dataX
- BPF_ PROG_ TYPE_ SOCKET_ Filter function implementation
- Time standard and format
- Apple mobile phone can see some fun ways to install IPA package
- Remove the screen recording reminder (seven cattle cloud demo)
- Rip/ospf protocol notes sorting
- Web automation: web control interaction / multi window processing / Web page frame
- TCP specifies the source port
- HCIA assessment
- database/sql
猜你喜欢

Memcached full profiling – 1 Fundamentals of memcached
Rip/ospf protocol notes sorting

memcached全面剖析–2. 理解memcached的内存存储
Simple analysis of WordPress architecture

Learn to use a new technology quickly

CondaValueError: The target prefix is the base prefix. Aborting.
OSI notes sorting

JMeter basic learning records

123. 买卖股票的最佳时机 III
CondaValueError: The target prefix is the base prefix. Aborting.
随机推荐
Physical layer introduction
Analyse complète Memcached – 2. Comprendre le stockage de mémoire pour Memcached
Appium introduction and environment installation
memcached全面剖析–5. memcached的应用和兼容程序
Distributed basic concepts
Subnet partition operation
Why are life science enterprises on the cloud in succession?
Requests requests for web page garbled code resolution
Pyaudio audio recording
Memcached comprehensive analysis – 2 Understand memcached memory storage
Jar package operation
Curl command
Foundations of Cryptography
An example illustrates restful API
CondaValueError: The target prefix is the base prefix. Aborting.
Axi DMA IP core operation process
Rip/ospf protocol notes sorting
[cloud native learning notes] deploy applications through yaml files
Return of missing persons
Docking of arkit and character creator animation curves