当前位置:网站首页>Day_ 04 smart health project - appointment management - package management
Day_ 04 smart health project - appointment management - package management
2022-06-23 06:22:00 【fat ۣۖ tiger ۣۖ】
The first 4 Chapter Booking Management - Package management
1. Picture storage scheme
1.1 Introduce
In actual development , We'll have a lot of servers that handle different functions . for example :
application server : Responsible for deploying our applications
database server : Run our database
File server : The server responsible for storing the files uploaded by users

The purpose of sub server processing is to let the server perform its own duties , So as to improve the operation efficiency of our project .
Common picture storage schemes :
Scheme 1 : Use nginx Set up picture server
Option two : Use open source distributed file storage system , for example Fastdfs、HDFS etc.
Option three : Using cloud storage , For example, Alibaba cloud 、 Qiniuyun and so on
1.2 Seven cattle cloud storage
Qiniuyun ( It belongs to Shanghai qiniu Information Technology Co., Ltd ) It is a leading enterprise level cloud computing service provider with visual intelligence and data intelligence as the core in China , At the same time, it is also a well-known intelligent video cloud service provider in China , The cumulative for 70 More than 10000 enterprises provide services , It covers the whole country 80% Netizen . Around the rich media scene, we launched object storage 、 The fusion CDN Speed up 、 Container cloud 、 Big data platform 、 Deep learning platform and other products 、 And provide a one-stop intelligent video cloud solution . Provide sustainable intelligent video cloud ecology for various industries and applications , Help enterprises quickly go to the cloud , Create broader business value .
Official website :https://www.qiniu.com/
Through the introduction of qiniu cloud's official website, we can know that it provides a variety of services , We mainly use the object storage service provided by qiniu cloud to store pictures .
1.2.1 register 、 Sign in
To use the service of qiniu cloud , First, you need to register as a member . Address :https://portal.qiniu.com/signup

After registration, you can log in to qiniu cloud with the just registered email and password :
After successful login, click the management console in the upper right corner of the page :

Be careful : After successful login, real name authentication is also required to perform relevant operations .
1.2.2 New storage space
To store pictures , We need to create a new storage space on the qiniu cloud management console . Click the add now button under the object storage on the homepage of the management console , Page jumps to the new storage page :

You can create multiple storage spaces , Each storage space is independent of each other .
1.2.3 View storage space information
After the storage space is created , The created storage space name will be displayed in the storage space list menu on the left , Click the storage space name to view the relevant information of the current storage space

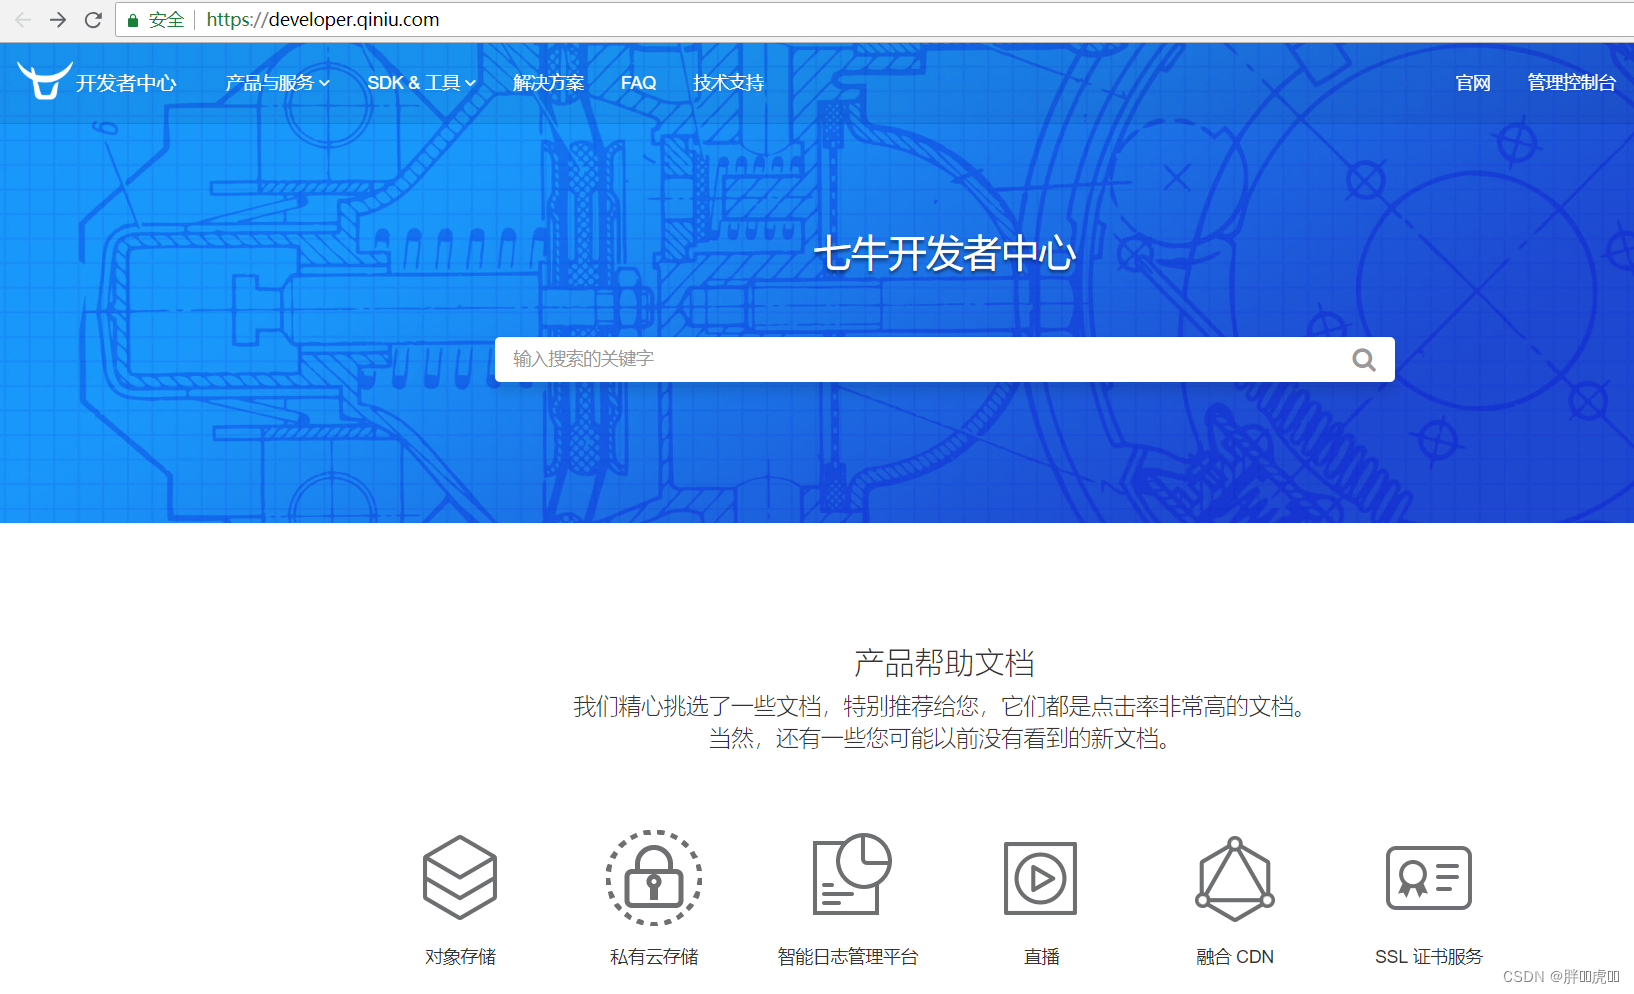
1.2.4 Developer center
You can learn how to operate the qiniu cloud service through the developer center provided by qiniu cloud , Address :https://developer.qiniu.com/

Click on the object store , Jump to the object store development page , Address :https://developer.qiniu.com/kodo
Qiniu cloud provides a variety of ways to operate object storage services , This project adopts Java SDK The way , Address :https://developer.qiniu.com/kodo/sdk/1239/java

Use Java SDK To operate qiniu cloud, you need to import the following maven coordinate :
<dependency>
  <groupId>com.qiniu</groupId>
  <artifactId>qiniu-java-sdk</artifactId>
  <version>7.2.0</version>
</dependency>
1.2.5 authentication
Java SDK All the functions of , All need legal authorization . The signing of the authorization voucher requires a pair of valid documents under the qiniu account Access Key and Secret Key, This pair of keys can be in the personal center of qiniu cloud management console (https://portal.qiniu.com/user/key) get , Here's the picture :
1.2.6 Java SDK Operate seven cattle cloud
In this chapter, we need to use the... Provided by qiniu cloud Java SDK Finish uploading and deleting pictures , We can refer to the official examples .
// Construct a belt designation Zone Object configuration class
Configuration cfg = new Configuration(Zone.zone0());
//... Refer to class notes for other parameters
UploadManager uploadManager = new UploadManager(cfg);
//... Generate upload credentials , Then prepare to upload
String accessKey = "your access key";
String secretKey = "your secret key";
String bucket = "your bucket name";
// If it is Windows Under the circumstances , The format is  D:\\qiniu\\test.png
String localFilePath = "/home/qiniu/test.png";
// Default does not specify key Under the circumstances , Based on the content of the document hash Value as filename
String key = null;
Auth auth = Auth.create(accessKey, secretKey);
String upToken = auth.uploadToken(bucket);
try {

    Response response = uploadManager.put(localFilePath, key, upToken);
    // Analyze the result of successful upload
    DefaultPutRet putRet = new Gson().fromJson(response.bodyString(), DefaultPutRet.class);
    System.out.println(putRet.key);
    System.out.println(putRet.hash);
} catch (QiniuException ex) {

    Response r = ex.response;
    System.err.println(r.toString());
    try {

        System.err.println(r.bodyString());
    } catch (QiniuException ex2) {

        //ignore
    }
}
// Construct a belt designation Zone Object configuration class
Configuration cfg = new Configuration(Zone.zone0());
//... Refer to class notes for other parameters

String accessKey = "your access key";
String secretKey = "your secret key";

String bucket = "your bucket name";
String key = "your file key";

Auth auth = Auth.create(accessKey, secretKey);
BucketManager bucketManager = new BucketManager(auth, cfg);
try {

    bucketManager.delete(bucket, key);
} catch (QiniuException ex) {

    // If something goes wrong , Description deletion failed
    System.err.println(ex.code());
    System.err.println(ex.response.toString());
}
1.2.7 Wrapper utility class
In order to facilitate the operation of qiniu cloud storage service , We can simply transform the official case into a tool class , In our project, we can directly use this tool class to operate :
package com.itheima.utils;

import com.google.gson.Gson;
import com.qiniu.common.QiniuException;
import com.qiniu.common.Zone;
import com.qiniu.http.Response;
import com.qiniu.storage.BucketManager;
import com.qiniu.storage.Configuration;
import com.qiniu.storage.UploadManager;
import com.qiniu.storage.model.DefaultPutRet;
import com.qiniu.util.Auth;
import java.io.File;
import java.io.FileInputStream;
import java.io.InputStream;

/** *  Seven cattle cloud tools  */
public class QiniuUtils {

    public  static String accessKey = "dulF9Wze9bxujtuRvu3yyYb9JX1Sp23jzd3tO708";
    public  static String secretKey = "vZkhW7iot3uWwcWz9vXfbaP4JepdWADFDHVLMZOe";
    public  static String bucket = "qiniutest";

    public static void upload2Qiniu(String filePath,String fileName){

        // Construct a belt designation Zone Object configuration class
        Configuration cfg = new Configuration(Zone.zone0());
        UploadManager uploadManager = new UploadManager(cfg);
        Auth auth = Auth.create(accessKey, secretKey);
        String upToken = auth.uploadToken(bucket);
        try {

            Response response = uploadManager.put(filePath, fileName, upToken);
            // Analyze the result of successful upload
            DefaultPutRet putRet =
              new Gson().fromJson(response.bodyString(), DefaultPutRet.class);
        } catch (QiniuException ex) {

            Response r = ex.response;
            try {

                System.err.println(r.bodyString());
            } catch (QiniuException ex2) {

                //ignore
            }
        }
    }

    // Upload files
    public static void upload2Qiniu(byte[] bytes, String fileName){

        // Construct a belt designation Zone Object configuration class
        Configuration cfg = new Configuration(Zone.zone0());
        //... Refer to class notes for other parameters
        UploadManager uploadManager = new UploadManager(cfg);
        // Default does not specify key Under the circumstances , Based on the content of the document hash Value as filename
        String key = fileName;
        Auth auth = Auth.create(accessKey, secretKey);
        String upToken = auth.uploadToken(bucket);
        try {

            Response response = uploadManager.put(bytes, key, upToken);
            // Analyze the result of successful upload
            DefaultPutRet putRet =
              new Gson().fromJson(response.bodyString(), DefaultPutRet.class);
            System.out.println(putRet.key);
            System.out.println(putRet.hash);
        } catch (QiniuException ex) {

            Response r = ex.response;
            System.err.println(r.toString());
            try {

                System.err.println(r.bodyString());
            } catch (QiniuException ex2) {

                //ignore
            }
        }
    }

    // Delete file
    public static void deleteFileFromQiniu(String fileName){

        // Construct a belt designation Zone Object configuration class
        Configuration cfg = new Configuration(Zone.zone0());
        String key = fileName;
        Auth auth = Auth.create(accessKey, secretKey);
        BucketManager bucketManager = new BucketManager(auth, cfg);
        try {

            bucketManager.delete(bucket, key);
        } catch (QiniuException ex) {

            // If something goes wrong , Description deletion failed
            System.err.println(ex.code());
            System.err.println(ex.response.toString());
        }
    }
}
Put this tool class in health_common In Engineering , We will use .
2. New package
2.1 Demand analysis
The package is actually a collection of inspection groups , For example, there is a package for “ Induction medical package ”, This physical examination package can include multiple examination groups : General inspection 、 routine blood test 、 Urine routine 、 Three items of liver function . Therefore, when adding a package, you need to select the inspection group included in the package .
The entity class corresponding to the package is Setmeal, The corresponding data table is t_setmeal. Packages and inspection groups are many to many , So you need an intermediate table t_setmeal_checkgroup Association .
2.2 Perfect the page
The package management page corresponds to setmeal.html page , According to the prototype of product design, the basic structure of the page has been written , Now we need to improve the dynamic effect of the page .
2.2.1 A new window will pop up
A new window has been provided in the page , Just out of hiding . Just put the attributes that control the presentation state dialogFormVisible Change it to true The interface displays the new window . When you click the new button, the binding method is handleCreate, So in handleCreate Modified in method dialogFormVisible The value of the property is true that will do . At the same time, in order to increase the user experience , You need to clear the form entry every time you click the new button .
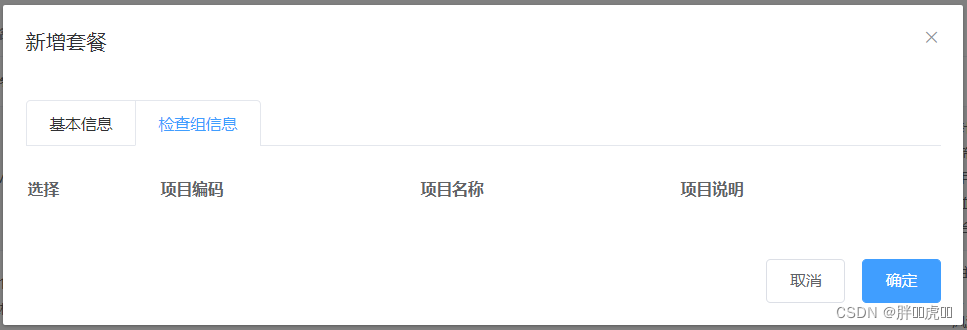
When adding a package, you also need to select the inspection group included in the package , So the new package window is divided into two parts : Basic information and inspection group information , Here's the picture :

New button binding click event , The corresponding processing function is handleCreate
<el-button type="primary" class="butT" @click="handleCreate()"> newly build </el-button>
//  Reset form
resetForm() {

  this.formData = {
    };
  this.activeName='first';
  this.checkgroupIds = [];
  this.imageUrl = null;
}
//  Pop up add window
handleCreate() {

  this.dialogFormVisible = true;
  this.resetForm();
}
2.2.2 Dynamically display the inspection group list
Now, although the pop-up of the new window has been completed , However, in the inspection group information tab, you need to dynamically display all the inspection group information list data , And you can check . The specific operation steps are as follows :
(1) Define model data
tableData:[],// Add check group list data in the form window
checkgroupIds:[],// The check group check box in the add form window corresponds to id
(2) Dynamic display of inspection group list data , The data comes from the... Defined above tableData model data
<table class="datatable">
  <thead>
    <tr>
      <th> choice </th>
      <th> Project code </th>
      <th> Project name </th>
      <th> Project description </th>
    </tr>
  </thead>
  <tbody>
    <tr v-for="c in tableData">
      <td>
        <input :id="c.id" v-model="checkgroupIds" type="checkbox" :value="c.id">
      </td>
      <td><label :for="c.id">{
   {c.code}}</label></td>
      <td><label :for="c.id">{
   {c.name}}</label></td>
      <td><label :for="c.id">{
   {c.remark}}</label></td>
    </tr>
  </tbody>
</table>
(3) perfect handleCreate Method , send out ajax Request to query all inspection group data and assign the result to tableData Model data is used for page table presentation
//  Pop up add window
handleCreate() {

  this.dialogFormVisible = true;
  this.resetForm();
  axios.get("/checkgroup/findAll.do").then((res)=> {

    if(res.data.flag){

      this.tableData = res.data.data;
    }else{

      this.$message.error(res.data.message);
    }
  });
}
(4) Respectively in CheckGroupController、CheckGroupService、CheckGroupServiceImpl、CheckGroupDao、CheckGroupDao.xml Query all inspection group data by the extension method in
CheckGroupController:
// Query all
@RequestMapping("/findAll")
public Result findAll(){

  List<CheckGroup> checkGroupList = checkGroupService.findAll();
  if(checkGroupList != null && checkGroupList.size() > 0){

    Result result = new Result(true, MessageConstant.QUERY_CHECKGROUP_SUCCESS);
    result.setData(checkGroupList);
    return result;
  }
  return new Result(false,MessageConstant.QUERY_CHECKGROUP_FAIL);
}
CheckGroupService:
List<CheckGroup> findAll();
CheckGroupServiceImpl:
public List<CheckGroup> findAll() {

  return checkGroupDao.findAll();
}
CheckGroupDao:
List<CheckGroup> findAll();
CheckGroupDao.xml:
<select id="findAll" resultType="com.itheima.pojo.CheckGroup">
  select * from t_checkgroup
</select>
2.2.3 Upload and preview pictures
What is used here is ElementUI Upload components provided el-upload, Provides a variety of different upload effects , After uploading successfully, you can preview .
Implementation steps :
(1) Define model data , Image preview for later uploaded files :
imageUrl:null,// model data , Used for picture preview after uploading pictures
(2) Define upload component :
<!-- el-upload: Upload components  action: Upload submission address  auto-upload: Whether to automatically upload the selected file  name: The name of the uploaded file , The server can get the uploaded file object according to its name  show-file-list: Whether to display a list of uploaded files  on-success: Hook when the file is uploaded successfully  before-upload: Hook before uploading file  -->
<el-upload class="avatar-uploader" action="/setmeal/upload.do" :auto-upload="autoUpload" name="imgFile" :show-file-list="false" :on-success="handleAvatarSuccess" :before-upload="beforeAvatarUpload">
  <!-- For uploading picture preview -->
  <img v-if="imageUrl" :src="imageUrl" class="avatar">
  <!-- Used to display upload Icon -->
  <i v-else class="el-icon-plus avatar-uploader-icon"></i>
</el-upload>
(3) Define the corresponding hook function :
// Hook after successful file upload ,response The value returned for the server ,file Package the currently uploaded file into js object
handleAvatarSuccess(response, file) {

  this.imageUrl = "http://pqjroc654.bkt.clouddn.com/"+response.data;
  this.$message({

    message: response.message,
    type: response.flag ? 'success' : 'error'
  });
  // Set up model data ( Image name ), Subsequent submission ajax The request will be submitted to the background and finally saved to the database
  this.formData.img = response.data;
}

// Hook before uploading file
beforeAvatarUpload(file) {

  const isJPG = file.type === 'image/jpeg';
  const isLt2M = file.size / 1024 / 1024 < 2;
  if (!isJPG) {

    this.$message.error(' Uploading package pictures can only be  JPG  Format !');
  }
  if (!isLt2M) {

    this.$message.error(' Upload package image size cannot exceed  2MB!');
  }
  return isJPG && isLt2M;
}
(4) establish SetmealController, Receive uploaded files
package com.itheima.controller;

import com.alibaba.dubbo.config.annotation.Reference;
import com.itheima.constant.MessageConstant;
import com.itheima.entity.PageResult;
import com.itheima.entity.QueryPageBean;
import com.itheima.entity.Result;
import com.itheima.pojo.CheckGroup;
import com.itheima.pojo.Setmeal;
import com.itheima.service.CheckGroupService;
import com.itheima.service.SetmealService;
import com.itheima.utils.QiniuUtils;
import org.springframework.web.bind.annotation.RequestBody;
import org.springframework.web.bind.annotation.RequestMapping;
import org.springframework.web.bind.annotation.RequestParam;
import org.springframework.web.bind.annotation.RestController;
import org.springframework.web.multipart.MultipartFile;
import javax.servlet.ServletContext;
import javax.servlet.http.HttpServletRequest;
import java.io.File;
import java.util.List;
import java.util.UUID;
/** *  Package management  */
@RestController
@RequestMapping("/setmeal")
public class SetmealController {

    @Reference
    private SetmealService setmealService;

  	// Image upload
    @RequestMapping("/upload")
    public Result upload(@RequestParam("imgFile")MultipartFile imgFile){

        try{

            // Get the original file name
            String originalFilename = imgFile.getOriginalFilename();
            int lastIndexOf = originalFilename.lastIndexOf(".");
            // Get file suffix
            String suffix = originalFilename.substring(lastIndexOf - 1);
            // Use UUID Randomly generated file name , Prevent files with the same name from overwriting
            String fileName = UUID.randomUUID().toString() + suffix;
            QiniuUtils.upload2Qiniu(imgFile.getBytes(),fileName);
            // Image upload succeeded
            Result result = new Result(true, MessageConstant.PIC_UPLOAD_SUCCESS);
            result.setData(fileName);
            return result;
        }catch (Exception e){

            e.printStackTrace();
            // Picture upload failed
            return new Result(false,MessageConstant.PIC_UPLOAD_FAIL);
        }
    }
}
Be careful : Don't forget it. spring Configuration file upload component in configuration file
<!-- File upload component -->
<bean id="multipartResolver" class="org.springframework.web.multipart.commons.CommonsMultipartResolver">
  <property name="maxUploadSize" value="104857600" />
  <property name="maxInMemorySize" value="4096" />
  <property name="defaultEncoding" value="UTF-8"/>
</bean>
2.2.4 Submit a request
Send when the user clicks the OK button in the new window ajax Request to submit the data to the background for database operation . The data submitted to the background is divided into two parts : Basic package information ( The corresponding model data is formData) And the inspection team id Array ( The corresponding model data is checkgroupIds).
Bind the click event for the OK button , The corresponding processing function is handleAdd
<el-button type="primary" @click="handleAdd()"> determine </el-button>
perfect handleAdd Method
// add to
handleAdd () {

  axios.post("/setmeal/add.do?checkgroupIds=" + this.checkgroupIds,this.formData).
  then((response)=> {

    this.dialogFormVisible = false;
    if(response.data.flag){

      this.$message({

        message: response.data.message,
        type: 'success'
      });
    }else{

      this.$message.error(response.data.message);
    }
  }).finally(()=> {

    this.findPage();
  });
}
2.3 Background code
2.3.1 Controller
stay SetmealController Add method in
// newly added
@RequestMapping("/add")
public Result add(@RequestBody Setmeal setmeal, Integer[] checkgroupIds){

  try {

    setmealService.add(setmeal,checkgroupIds);
  }catch (Exception e){

    // Failed to add package
    return new Result(false,MessageConstant.ADD_SETMEAL_FAIL);
  }
  // Successfully added package
  return new Result(true,MessageConstant.ADD_SETMEAL_SUCCESS);
}
2.3.2 Service interface
establish SetmealService Interface and provide new methods
package com.itheima.service;

import com.itheima.entity.PageResult;
import com.itheima.pojo.CheckGroup;
import com.itheima.pojo.Setmeal;
import java.util.List;
/** *  Physical examination package service interface  */
public interface SetmealService {

    public void add(Setmeal setmeal, Integer[] checkgroupIds);
}
2.3.3 Service implementation class
establish SetmealServiceImpl The service implements the class and implements the new method
package com.itheima.service;

import com.alibaba.dubbo.config.annotation.Service;
import com.github.pagehelper.Page;
import com.github.pagehelper.PageHelper;
import com.itheima.dao.SetmealDao;
import com.itheima.entity.PageResult;
import com.itheima.pojo.Setmeal;
import org.springframework.beans.factory.annotation.Autowired;
import org.springframework.transaction.annotation.Transactional;
import java.util.HashMap;
import java.util.List;
import java.util.Map;
/** *  Physical examination package service implementation class  */
@Service(interfaceClass = SetmealService.class)
@Transactional
public class SetmealServiceImpl implements SetmealService {

    @Autowired
    private SetmealDao setmealDao;

    // New package
    public void add(Setmeal setmeal, Integer[] checkgroupIds) {

        setmealDao.add(setmeal);
        if(checkgroupIds != null && checkgroupIds.length > 0){

            // Bind the many to many relationship between the package and the inspection group
            setSetmealAndCheckGroup(setmeal.getId(),checkgroupIds);
        }
    }
    // Bind the many to many relationship between the package and the inspection group
    private void setSetmealAndCheckGroup(Integer id, Integer[] checkgroupIds) {

        for (Integer checkgroupId : checkgroupIds) {

            Map<String,Integer> map = new HashMap<>();
            map.put("setmeal_id",id);
            map.put("checkgroup_id",checkgroupId);
            setmealDao.setSetmealAndCheckGroup(map);
        }
    }
}
2.3.4 Dao Interface
establish SetmealDao Interface and provide related methods
package com.itheima.dao;

import com.itheima.pojo.Setmeal;
import java.util.Map;

public interface SetmealDao {

    public void add(Setmeal setmeal);
    public void setSetmealAndCheckGroup(Map<String, Integer> map);
}
2.3.5 Mapper The mapping file
establish SetmealDao.xml Document and define the relevant SQL sentence
<?xml version="1.0" encoding="UTF-8" ?>
<!DOCTYPE mapper PUBLIC "-//mybatis.org//DTD Mapper 3.0//EN" "http://mybatis.org/dtd/mybatis-3-mapper.dtd" >
<mapper namespace="com.itheima.dao.SetmealDao" >
    <!-- newly added -->
    <insert id="add" parameterType="com.itheima.pojo.Setmeal">
        <selectKey resultType="java.lang.Integer" order="AFTER" keyProperty="id">
            SELECT LAST_INSERT_ID()
        </selectKey>
        insert into t_setmeal
      		(code,name,sex,age,helpCode,price,remark,attention,img)
        		values
      		(#{code},#{name},#{sex},#{age},#{helpCode},#{price},#{remark},#{attention},#{img})
    </insert>
    <!-- Bind packages and check group many to many relationships -->
    <insert id="setSetmealAndCheckGroup" parameterType="hashmap">
        insert into t_setmeal_checkgroup
      		(setmeal_id,checkgroup_id)
      			values
      		(#{setmeal_id},#{checkgroup_id})
    </insert>
</mapper>
2.4 Improve file uploading
We have finished uploading the file , The pictures are stored in the qiniu cloud server . But there is a problem with this process , That is, if the user only uploads the picture but does not finally save the package information to our database , At this time, the pictures we upload become junk pictures . For these junk images, we need to clean them regularly to free up disk space . This requires us to be able to distinguish which are junk images , Which are not junk pictures . How to achieve it ?
The solution is to use redis To save the picture name , The specific method is :
1、 When users upload pictures , Save the picture name to redis One of the Set Collection , For example, the collection name is setmealPicResources
2、 When users add packages , Save the picture name to redis Another Set Collection , For example, the collection name is setmealPicDbResources
3、 Calculation setmealPicResources Assemble with setmealPicDbResources The difference between sets , The result is a collection of names of spam images , Just clean up these pictures
In this section, let's finish the previous 2 A link , The first 3 A link ( Clean up picture link ) Later, it will be realized through scheduled tasks .
Implementation steps :
(1) stay health_backend Provided in the project Spring The configuration file spring-redis.xml
<?xml version="1.0" encoding="UTF-8"?>
<beans xmlns="http://www.springframework.org/schema/beans" xmlns:xsi="http://www.w3.org/2001/XMLSchema-instance" xmlns:p="http://www.springframework.org/schema/p" xmlns:context="http://www.springframework.org/schema/context" xmlns:dubbo="http://code.alibabatech.com/schema/dubbo" xmlns:mvc="http://www.springframework.org/schema/mvc" xsi:schemaLocation="http://www.springframework.org/schema/beans http://www.springframework.org/schema/beans/spring-beans.xsd http://www.springframework.org/schema/mvc http://www.springframework.org/schema/mvc/spring-mvc.xsd http://code.alibabatech.com/schema/dubbo http://code.alibabatech.com/schema/dubbo/dubbo.xsd http://www.springframework.org/schema/context http://www.springframework.org/schema/context/spring-context.xsd">

	<!--Jedis Related configuration of connection pool -->
	<bean id="jedisPoolConfig" class="redis.clients.jedis.JedisPoolConfig">
		<property name="maxTotal">
			<value>200</value>
		</property>
		<property name="maxIdle">
			<value>50</value>
		</property>
		<property name="testOnBorrow" value="true"/>
		<property name="testOnReturn" value="true"/>
	</bean>
	<bean id="jedisPool" class="redis.clients.jedis.JedisPool">
		<constructor-arg name="poolConfig" ref="jedisPoolConfig" />
		<constructor-arg name="host" value="127.0.0.1" />
		<constructor-arg name="port" value="6379" type="int" />
		<constructor-arg name="timeout" value="30000" type="int" />
	</bean>
</beans>
(2) stay health_common Provide... In the project Redis Constant class
package com.itheima.constant;

public class RedisConstant {

    // Package picture all picture names
    public static final String SETMEAL_PIC_RESOURCES = "setmealPicResources";
    // The picture name of the package picture saved in the database
    public static final String SETMEAL_PIC_DB_RESOURCES = "setmealPicDbResources";
}
(3) perfect SetmealController, After the file is uploaded successfully, save the picture name to redis Collection
@Autowired
private JedisPool jedisPool;
// Image upload
@RequestMapping("/upload")
public Result upload(@RequestParam("imgFile")MultipartFile imgFile){

  try{

    // Get the original file name
    String originalFilename = imgFile.getOriginalFilename();
    int lastIndexOf = originalFilename.lastIndexOf(".");
    // Get file suffix
    String suffix = originalFilename.substring(lastIndexOf - 1);
    // Use UUID Randomly generated file name , Prevent files with the same name from overwriting
    String fileName = UUID.randomUUID().toString() + suffix;
    QiniuUtils.upload2Qiniu(imgFile.getBytes(),fileName);
    // Image upload succeeded
    Result result = new Result(true, MessageConstant.PIC_UPLOAD_SUCCESS);
    result.setData(fileName);
    // Save the name of the uploaded picture into Redis, be based on Redis Of Set Collective storage
    jedisPool.getResource().sadd(RedisConstant.SETMEAL_PIC_RESOURCES,fileName);
    return result;
  }catch (Exception e){

    e.printStackTrace();
    // Picture upload failed
    return new Result(false,MessageConstant.PIC_UPLOAD_FAIL);
  }
}
(4) stay health_service_provider Provided in the project Spring The configuration file applicationContext-redis.xml
<?xml version="1.0" encoding="UTF-8"?>
<beans xmlns="http://www.springframework.org/schema/beans" xmlns:xsi="http://www.w3.org/2001/XMLSchema-instance" xmlns:p="http://www.springframework.org/schema/p" xmlns:context="http://www.springframework.org/schema/context" xmlns:dubbo="http://code.alibabatech.com/schema/dubbo" xmlns:mvc="http://www.springframework.org/schema/mvc" xsi:schemaLocation="http://www.springframework.org/schema/beans http://www.springframework.org/schema/beans/spring-beans.xsd http://www.springframework.org/schema/mvc http://www.springframework.org/schema/mvc/spring-mvc.xsd http://code.alibabatech.com/schema/dubbo http://code.alibabatech.com/schema/dubbo/dubbo.xsd http://www.springframework.org/schema/context http://www.springframework.org/schema/context/spring-context.xsd">

	<!--Jedis Related configuration of connection pool -->
	<bean id="jedisPoolConfig" class="redis.clients.jedis.JedisPoolConfig">
		<property name="maxTotal">
			<value>200</value>
		</property>
		<property name="maxIdle">
			<value>50</value>
		</property>
		<property name="testOnBorrow" value="true"/>
		<property name="testOnReturn" value="true"/>
	</bean>
	<bean id="jedisPool" class="redis.clients.jedis.JedisPool">
		<constructor-arg name="poolConfig" ref="jedisPoolConfig" />
		<constructor-arg name="host" value="127.0.0.1" />
		<constructor-arg name="port" value="6379" type="int" />
		<constructor-arg name="timeout" value="30000" type="int" />
	</bean>
</beans>
(5) perfect SetmealServiceImpl Service , After saving the package information, store the picture name in redis Collection
@Autowired
private JedisPool jedisPool;
// New package
public void add(Setmeal setmeal, Integer[] checkgroupIds) {

  setmealDao.add(setmeal);
  if(checkgroupIds != null && checkgroupIds.length > 0){

    setSetmealAndCheckGroup(setmeal.getId(),checkgroupIds);
  }
  // Save the picture name to Redis
  savePic2Redis(setmeal.getImg());
}
// Save the picture name to Redis
private void savePic2Redis(String pic){

  jedisPool.getResource().sadd(RedisConstant.SETMEAL_PIC_DB_RESOURCES,pic);
}
3. Physical examination package page
3.1 Perfect the page
3.1.1 Define paging related model data
pagination: {
    // Paging related model data
  currentPage: 1,// The current page number
  pageSize:10,// Number of records per page
  total:0,// Total number of records
  queryString:null// Query criteria
},
dataList: [],// Page list data to be displayed on the current page
3.1.2 Define paging methods
Provided in the page findPage Method is used for paging queries , In order to be able to setmeal.html After the page is loaded, the paging data can be displayed directly , Can be in VUE The hook function provided created Call in findPage Method
// Hook function ,VUE Automatically execute after object initialization
created() {

  this.findPage();
}
// Paging query
findPage() {

  // Paging parameters
  var param = {

    currentPage:this.pagination.currentPage,// Page number
    pageSize:this.pagination.pageSize,// Number of records per page
    queryString:this.pagination.queryString// Query criteria
  };
  // Request backstage
  axios.post("/setmeal/findPage.do",param).then((response)=> {

    // Assign values to model data , be based on VUE The two-way binding is displayed to the page
    this.dataList = response.data.rows;
    this.pagination.total = response.data.total;
  });
}
3.1.3 Improve the execution time of paging method
In addition to the created Call in hook function findPage Method to query paging data , When users click the query button or click the page number in the page bar, they also need to call findPage Method to reissue the query request .
Bind the click event for the query button , call findPage Method
<el-button @click="findPage()" class="dalfBut"> Inquire about </el-button>
Bind... To the paging bar component current-change event , This event is defined by the paging bar component itself , Trigger when the page number changes , The corresponding processing function is handleCurrentChange
<el-pagination class="pagiantion" @current-change="handleCurrentChange" :current-page="pagination.currentPage" :page-size="pagination.pageSize" layout="total, prev, pager, next, jumper" :total="pagination.total">
</el-pagination>
Definition handleCurrentChange Method
// Switch page numbers
handleCurrentChange(currentPage) {

  //currentPage Is the page number after switching
  this.pagination.currentPage = currentPage;
  this.findPage();
}
3.2 Background code
3.2.1 Controller
stay SetmealController Add paging query method in
// Paging query
@RequestMapping("/findPage")
public PageResult findPage(@RequestBody QueryPageBean queryPageBean){

  PageResult pageResult = setmealService.pageQuery(
    queryPageBean.getCurrentPage(),
    queryPageBean.getPageSize(),
    queryPageBean.getQueryString()
  );
  return pageResult;
}
3.2.2 Service interface
stay SetmealService Expand paging query method in service interface
public PageResult pageQuery(Integer currentPage, Integer pageSize, String queryString);
3.2.3 Service implementation class
stay SetmealServiceImpl Implement paging query method in service implementation class , be based on Mybatis The paging assistant plug-in implements paging
public PageResult pageQuery(Integer currentPage, Integer pageSize, String queryString) {

  PageHelper.startPage(currentPage,pageSize);
  Page<CheckItem> page = checkGroupDao.selectByCondition(queryString);
  return new PageResult(page.getTotal(),page.getResult());
}
3.2.4 Dao Interface
stay SetmealDao Expand paging query method in interface
public Page<Setmeal> selectByCondition(String queryString);
3.2.5 Mapper The mapping file
stay SetmealDao.xml Add to file SQL Definition
<!-- Query... According to the conditions -->
<select id="selectByCondition" parameterType="string" resultType="com.itheima.pojo.Setmeal">
  select * from t_setmeal
  <if test="value != null and value.length > 0">
    where code = #{value} or name = #{value} or helpCode = #{value}
  </if>
</select>
4. Timed task component Quartz
4.1 Quartz Introduce
Quartz yes Job scheduling( Job scheduling ) An open source project in the field ,Quartz It can be used alone or with spring Framework integration uses , The latter is generally used in practical development . Use Quartz One or more scheduled tasks can be developed , The execution time of each scheduled task can be specified separately , For example, every 1 Once per hour 、 On the morning of the first day of each month 10 Click to execute once 、 On the afternoon of the last day of each month 5 Click to execute once and wait .
Official website :http://www.quartz-scheduler.org/
maven coordinate :
<dependency>
  <groupId>org.quartz-scheduler</groupId>
  <artifactId>quartz</artifactId>
  <version>2.2.1</version>
</dependency>
<dependency>
  <groupId>org.quartz-scheduler</groupId>
  <artifactId>quartz-jobs</artifactId>
  <version>2.2.1</version>
</dependency>
4.2 Quartz Introductory cases
This case is based on Quartz and spring Use... In an integrated way . Specific steps :
(1) establish maven engineering quartzdemo, Import Quartz and spring Related coordinates ,pom.xml The documents are as follows
<?xml version="1.0" encoding="UTF-8"?>
<project xmlns="http://maven.apache.org/POM/4.0.0" xmlns:xsi="http://www.w3.org/2001/XMLSchema-instance" xsi:schemaLocation="http://maven.apache.org/POM/4.0.0 http://maven.apache.org/xsd/maven-4.0.0.xsd">
    <modelVersion>4.0.0</modelVersion>
    <groupId>com.itheima</groupId>
    <artifactId>quartdemo</artifactId>
    <version>1.0-SNAPSHOT</version>
    <dependencies>
        <dependency>
            <groupId>org.springframework</groupId>
            <artifactId>spring-context-support</artifactId>
            <version>5.0.2.RELEASE</version>
        </dependency>
        <dependency>
            <groupId>org.springframework</groupId>
            <artifactId>spring-tx</artifactId>
            <version>5.0.2.RELEASE</version>
        </dependency>
        <dependency>
            <groupId>org.quartz-scheduler</groupId>
            <artifactId>quartz</artifactId>
            <version>2.2.1</version>
        </dependency>
        <dependency>
            <groupId>org.quartz-scheduler</groupId>
            <artifactId>quartz-jobs</artifactId>
            <version>2.2.1</version>
        </dependency>
    </dependencies>
</project>
(2) Customize a Job
package com.itheima.jobs;
/** *  Customize Job */
public class JobDemo {

    public void run(){

        System.out.println("job execute...");
    }
}
(3) Provide Spring The configuration file spring-jobs.xml, Configure customization Job、 Task description 、 trigger 、 Dispatch plant, etc
<?xml version="1.0" encoding="UTF-8"?>
<beans xmlns="http://www.springframework.org/schema/beans" xmlns:xsi="http://www.w3.org/2001/XMLSchema-instance" xmlns:context="http://www.springframework.org/schema/context" xmlns:dubbo="http://code.alibabatech.com/schema/dubbo" xmlns:mvc="http://www.springframework.org/schema/mvc" xsi:schemaLocation="http://www.springframework.org/schema/beans http://www.springframework.org/schema/beans/spring-beans.xsd http://www.springframework.org/schema/mvc http://www.springframework.org/schema/mvc/spring-mvc.xsd http://code.alibabatech.com/schema/dubbo http://code.alibabatech.com/schema/dubbo/dubbo.xsd http://www.springframework.org/schema/context http://www.springframework.org/schema/context/spring-context.xsd">
	<!--  Register custom Job -->
    <bean id="jobDemo" class="com.itheima.jobs.JobDemo"></bean>
	<!--  register JobDetail, The function is responsible for calling the specified through reflection Job -->
    <bean id="jobDetail" class="org.springframework.scheduling.quartz.MethodInvokingJobDetailFactoryBean">
        <!--  Inject the target object  -->
        <property name="targetObject" ref="jobDemo"/>
        <!--  Inject target method  -->
        <property name="targetMethod" value="run"/>
    </bean>
    <!--  Register a trigger , Specify when the task is triggered  -->
    <bean id="myTrigger" class="org.springframework.scheduling.quartz.CronTriggerFactoryBean">
        <!--  Inject JobDetail -->
        <property name="jobDetail" ref="jobDetail"/>
        <!--  Specify the trigger time , be based on Cron expression  -->
        <property name="cronExpression">
            <value>0/10 * * * * ?</value>
        </property>
    </bean>
    <!--  Register a unified dispatching factory , Through this scheduling factory, scheduling tasks  -->
    <bean id="scheduler" class="org.springframework.scheduling.quartz.SchedulerFactoryBean">
        <!--  Inject multiple triggers  -->
        <property name="triggers">
            <list>
                <ref bean="myTrigger"/>
            </list>
        </property>
    </bean>
</beans>
(4) To write main Method to test
package com.itheima.jobs.com.itheima.app;

import org.springframework.context.support.ClassPathXmlApplicationContext;

public class App {

    public static void main(String[] args) {

        new ClassPathXmlApplicationContext("spring-jobs.xml");
    }
}
Execute above main Methods observe the console , It can be found that every 10 It will output once a second , Explain every 10 Second custom Job Be called once .
4.3 cron expression
In the above introductory case, we specified an expression :0/10 * * * * ?
This expression is called cron expression , adopt cron The expression can flexibly define the execution time of the program that meets the requirements . Let's learn this section cron How to use expressions . Here's the picture :

cron The expression is divided into seven fields , Use spaces between . The last of these domains ( year ) Can be null . Each field has its own allowed values and some special characters . Using these special characters can make the expression we define more flexible .
The following is an introduction to these special characters :
comma (,): Specify a list of values , For example, in the month field 1,4,5,7 Express 1 month 、4 month 、5 The month and 7 month
Horizontal bar (-): Specify a range , For example, in the time domain 3-6 Express 3 Point to 6 spot ( namely 3 spot 、4 spot 、5 spot 、6 spot )
asterisk (*): Indicates that this field contains all legal values . for example , Using an asterisk in the month field means that... Is triggered every month
Oblique line (/): Indicates incremental , For example, in the second field 0/15 each 15 second
question mark (?): It can only be used in day and week fields , But it can't be used on both domains at the same time . Means not to specify
Well No (#): Can only be used on the perimeter field , Used to specify the day of the week in the month , for example 6#3, It means the third Friday of a month (6= Friday ,3 It means the third week of the month )
L: The last value allowed on a field . Can only be used in the day and week fields . When used in the solar field , Represents the last day of the month specified in the month field . When used on the perimeter , Indicates the last day of the week , It's Saturday
W:W The character represents the working day ( Monday to Friday ), It can only be used in the day field , It is used to specify the nearest working day from the specified day
4.4 cron Expression online generator
Previously, I introduced cron expression , But there are still some difficulties in writing your own expressions , We can use some cron The online expression generator can generate expressions according to our needs .
http://cron.qqe2.com/

5. Regularly clean up garbage pictures
We have completed the management of the physical examination package , When adding a package, the basic information and pictures of the package are submitted to the background for operation in two times . That is, the user first uploads the image to the qiniu cloud server , Then submit other information entered in the new window . If the user just uploads the picture without submitting other entered information , At this time, the picture becomes a garbage picture , Because its existence is not recorded in the database . At this point, how do we deal with these garbage pictures ?
The solution is to clean up these garbage pictures regularly through the scheduled task component . In order to be able to distinguish which pictures are junk pictures , After uploading the file successfully, we saved the picture to a redis Collection , When the package data is inserted into the database, we save the picture name to another redis Collection , By calculating the difference between the two sets, you can get the names of all spam images .
This chapter will be based on Quartz Timing task , By calculation redis Find all the junk pictures by the difference between the two sets , You can clean up the garbage pictures .
Operation steps :
(1) establish maven engineering health_jobs, The packing method is war, Import Quartz And so on
<?xml version="1.0" encoding="UTF-8"?>
<project xmlns="http://maven.apache.org/POM/4.0.0" xmlns:xsi="http://www.w3.org/2001/XMLSchema-instance" xsi:schemaLocation="http://maven.apache.org/POM/4.0.0 http://maven.apache.org/xsd/maven-4.0.0.xsd">
    <parent>
        <artifactId>health_parent</artifactId>
        <groupId>com.itheima</groupId>
        <version>1.0-SNAPSHOT</version>
    </parent>
    <modelVersion>4.0.0</modelVersion>
    <artifactId>health_jobs</artifactId>
    <packaging>war</packaging>
    <name>health_jobs Maven Webapp</name>
    <url>http://www.example.com</url>
    <properties>
        <project.build.sourceEncoding>UTF-8</project.build.sourceEncoding>
        <maven.compiler.source>1.8</maven.compiler.source>
        <maven.compiler.target>1.8</maven.compiler.target>
    </properties>
    <dependencies>
        <dependency>
            <groupId>com.itheima</groupId>
            <artifactId>health_interface</artifactId>
            <version>1.0-SNAPSHOT</version>
        </dependency>
        <dependency>
            <groupId>org.quartz-scheduler</groupId>
            <artifactId>quartz</artifactId>
        </dependency>
        <dependency>
            <groupId>org.quartz-scheduler</groupId>
            <artifactId>quartz-jobs</artifactId>
        </dependency>
    </dependencies>
    <build>
        <plugins>
            <plugin>
                <groupId>org.apache.tomcat.maven</groupId>
                <artifactId>tomcat7-maven-plugin</artifactId>
                <configuration>
                    <!--  Designated port  -->
                    <port>83</port>
                    <!--  Request path  -->
                    <path>/</path>
                </configuration>
            </plugin>
        </plugins>
    </build>
</project>
(2) To configure web.xml
<!DOCTYPE web-app PUBLIC "-//Sun Microsystems, Inc.//DTD Web Application 2.3//EN" "http://java.sun.com/dtd/web-app_2_3.dtd" >
<web-app>
  <display-name>Archetype Created Web Application</display-name>
  <!--  load spring Containers  -->
  <context-param>
    <param-name>contextConfigLocation</param-name>
    <param-value>classpath*:applicationContext*.xml</param-value>
  </context-param>
  <listener>
    <listener-class>org.springframework.web.context.ContextLoaderListener</listener-class>
  </listener>
</web-app>
(3) To configure log4j.properties
### direct log messages to stdout ###
log4j.appender.stdout=org.apache.log4j.ConsoleAppender
log4j.appender.stdout.Target=System.err
log4j.appender.stdout.layout=org.apache.log4j.PatternLayout
log4j.appender.stdout.layout.ConversionPattern=%d{ABSOLUTE} %5p %c{1}:%L - %m%n

### direct messages to file mylog.log ###
log4j.appender.file=org.apache.log4j.FileAppender
log4j.appender.file.File=c:\\mylog.log
log4j.appender.file.layout=org.apache.log4j.PatternLayout
log4j.appender.file.layout.ConversionPattern=%d{ABSOLUTE} %5p %c{1}:%L - %m%n

### set log levels - for more verbose logging change 'info' to 'debug' ###

log4j.rootLogger=info, stdout
(4) To configure applicationContext-redis.xml
<?xml version="1.0" encoding="UTF-8"?>
<beans xmlns="http://www.springframework.org/schema/beans" xmlns:xsi="http://www.w3.org/2001/XMLSchema-instance" xmlns:p="http://www.springframework.org/schema/p" xmlns:context="http://www.springframework.org/schema/context" xmlns:dubbo="http://code.alibabatech.com/schema/dubbo" xmlns:mvc="http://www.springframework.org/schema/mvc" xsi:schemaLocation="http://www.springframework.org/schema/beans http://www.springframework.org/schema/beans/spring-beans.xsd http://www.springframework.org/schema/mvc http://www.springframework.org/schema/mvc/spring-mvc.xsd http://code.alibabatech.com/schema/dubbo http://code.alibabatech.com/schema/dubbo/dubbo.xsd http://www.springframework.org/schema/context http://www.springframework.org/schema/context/spring-context.xsd">

	<!--Jedis Related configuration of connection pool -->
	<bean id="jedisPoolConfig" class="redis.clients.jedis.JedisPoolConfig">
		<property name="maxTotal">
			<value>200</value>
		</property>
		<property name="maxIdle">
			<value>50</value>
		</property>
		<property name="testOnBorrow" value="true"/>
		<property name="testOnReturn" value="true"/>
	</bean>
	<bean id="jedisPool" class="redis.clients.jedis.JedisPool">
		<constructor-arg name="poolConfig" ref="jedisPoolConfig" />
		<constructor-arg name="host" value="127.0.0.1" />
		<constructor-arg name="port" value="6379" type="int" />
		<constructor-arg name="timeout" value="30000" type="int" />
	</bean>
</beans>
(5) To configure applicationContext-jobs.xml
<?xml version="1.0" encoding="UTF-8"?>
<beans xmlns="http://www.springframework.org/schema/beans" xmlns:xsi="http://www.w3.org/2001/XMLSchema-instance" xmlns:context="http://www.springframework.org/schema/context" xmlns:dubbo="http://code.alibabatech.com/schema/dubbo" xmlns:mvc="http://www.springframework.org/schema/mvc" xsi:schemaLocation="http://www.springframework.org/schema/beans http://www.springframework.org/schema/beans/spring-beans.xsd http://www.springframework.org/schema/mvc http://www.springframework.org/schema/mvc/spring-mvc.xsd http://code.alibabatech.com/schema/dubbo http://code.alibabatech.com/schema/dubbo/dubbo.xsd http://www.springframework.org/schema/context http://www.springframework.org/schema/context/spring-context.xsd">
	<context:annotation-config></context:annotation-config>
	<bean id="clearImgJob" class="com.itheima.jobs.ClearImgJob"></bean>
	<bean id="jobDetail" class="org.springframework.scheduling.quartz.MethodInvokingJobDetailFactoryBean">
		<!--  Inject the target object  -->
		<property name="targetObject" ref="clearImgJob"/>
		<!--  Inject target method  -->
		<property name="targetMethod" value="clearImg"/>
	</bean>
	<!--  Register a trigger , Specify when the task is triggered  -->
	<bean id="myTrigger" class="org.springframework.scheduling.quartz.CronTriggerFactoryBean">
		<!--  Inject JobDetail -->
		<property name="jobDetail" ref="jobDetail"/>
		<!--  Specify the trigger time , be based on Cron expression  -->
		<property name="cronExpression">
			<value>0 0 2 * * ?</value>
		</property>
	</bean>
	<!--  Register a unified dispatching factory , Through this scheduling factory, scheduling tasks  -->
	<bean id="scheduler" class="org.springframework.scheduling.quartz.SchedulerFactoryBean">
		<!--  Inject multiple triggers  -->
		<property name="triggers">
			<list>
				<ref bean="myTrigger"/>
			</list>
		</property>
	</bean>
</beans>
(6) establish ClearImgJob Scheduled tasks
package com.itheima.jobs;

import com.itheima.constant.RedisConstant;
import com.itheima.utils.QiniuUtils;
import org.springframework.beans.factory.annotation.Autowired;
import redis.clients.jedis.JedisPool;
import java.util.Set;

/** *  Customize Job, Realize regular cleaning of garbage pictures  */
public class ClearImgJob {

    @Autowired
    private JedisPool jedisPool;
    public void clearImg(){

        // according to Redis Two saved in set Set for difference calculation , Get the garbage picture name collection
        Set<String> set =
            jedisPool.getResource().sdiff(RedisConstant.SETMEAL_PIC_RESOURCES,
                                          RedisConstant.SETMEAL_PIC_DB_RESOURCES);
        if(set != null){

            for (String picName : set) {

                // Delete the image on qiniu ECS
                QiniuUtils.deleteFileFromQiniu(picName);
                // from Redis Delete picture name from collection
                jedisPool.getResource().
                    srem(RedisConstant.SETMEAL_PIC_RESOURCES,picName);
            }
        }
    }
}
边栏推荐
- exe闪退的原因查找方法
- [cocos2d-x] screenshot sharing function
- Day_ 13 smart health project - Chapter 13
- Pyqt5 setting window top left Icon
- Runc symbolic link mount and container escape vulnerability alert (cve-2021-30465)
- WordPress contact form entries cross cross site scripting attack
- Pyinstaller sklearn报错的问题
- jvm-01. Instruction rearrangement
- Remove duplicates from sorted list II of leetcode topic resolution
- Radar canvas
猜你喜欢
Day_04 傳智健康項目-預約管理-套餐管理

学习太极创客 — ESP8226 (十一)用 WiFiManager 库配网

Efficient office of fintech (I): automatic generation of trust plan specification

Summary of ant usage (I): using ant to automatically package apk

Jour 13 Projet de santé mentale - chapitre 13
Pyqt5 setting window top left Icon
CPU的功能和基本结构

【Leetcode】431. Encode n-ary tree to binary tree (difficult)

Day_11 传智健康项目-图形报表、POI报表

程序员的真实想法 | 每日趣闻
随机推荐
[cocos2d-x] erasable layer:erasablelayer
Leetcode topic resolution valid Sudoku
Pat class B 1025 reverse linked list
Long substring without repeating characters for leetcode topic resolution
Kotlin interface
Activity startup mode and life cycle measurement results
【Cocos2d-x】截图分享功能
Day_01 传智健康项目-项目概述和环境搭建
exe闪退的原因查找方法
Day_05 传智健康项目-预约管理-预约设置
Pat class B 1021 digit statistics
SQL表名与函数名相同导致SQL语句错误。
Day_09 传智健康项目-移动端开发-手机快速登录、权限控制
去除防火墙和虚拟机对live555启动IP地址的影响
Redis 哨兵
Word pattern for leetcode topic analysis
Leetcode topic resolution valid anagram
Network packet capturing tcpdump User Guide
Given a node of a binary tree, return the successor node of the node
Add and multiply two polynomials using linked list