当前位置:网站首页>Day_ 13 smart health project - Chapter 13
Day_ 13 smart health project - Chapter 13
2022-06-23 06:15:00 【fat ۣۖ tiger ۣۖ】
Smart health project The first 13 Chapter
In this chapter, our topic is Redis, at present Redis It has been widely used in enterprises , meanwhile Redis It is also the key content in the interview .
1. Redis Cache related issues
1.1 Cache penetration
Cache penetration It means to query data that does not exist in a database .
We used to use it normally Redis The process of caching is roughly :
1、 The data query starts with the cache query
2、 If the data exists, the cached data is returned directly
3、 If the data doesn't exist , Just query the database , And put the queried data into the cache
4、 If the database query data is empty , It's not put into the cache
For example, the primary key in our data table is generated by self increment , All primary key values are greater than 0. At this time, if the parameter passed in by the user is -1, What will happen ? This -1, Is the object that must not exist . The program will query the database every time , And every query is empty , It doesn't cache every time . If someone maliciously attacks , You can take advantage of this loophole , Put pressure on the database , Even crush our database .
In order to prevent someone from using this vulnerability to maliciously attack our database , We can take the following measures :
If the object queried from the database is empty , Also put it in the cache ,key The primary key value submitted for the user ,value by null, Only the cache expiration time is set to be shorter , For example, set to 60 second . In this way, the next time the user will use this key Inquire about redis The cache can query the value ( Of course, the value is null), To protect our database from attacks .
1.2 Cache avalanche
Cache avalanche , At a certain time , Expiration in cache set . The access query of data in the time period when the cache set expires , It's all in the database , For databases , There will be periodic pressure peaks .
In order to avoid cache avalanche , We can set different expiration times for cached data , In this way, we can avoid the failure of cached data in a certain period of time . For example, for hot data ( Data with high access frequency ) It can be cached for a longer time , For unpopular data, you can cache for some time . Even for some particularly popular data, you can set it never to expire .
1.3 Cache breakdown
Cache breakdown , It means a key Very hot ( For example, the data of commodities snapped up during the double 11 ), Constantly carrying big concurrency , Large concurrent centralized access to this point , When this key At the moment of failure , Continuous large concurrency breaks through the cache , Request directly to the database , It's like cutting a hole in a barrier .
We can also set these hot data to never expire to solve the problem of cache breakdown .
2. Redis Cluster solution
stand-alone Redis The speed of reading and writing is very fast , It can support the access of a large number of users . although Redis High performance , But for large websites , The data to be obtained per second is far more than that of a single machine redis The pressure that service can withstand , Therefore, we urgently need a solution that can solve the problem of single Redis Insufficient service performance . This requires the use of Redis The cluster of .Redis There are many schemes for clustering , Let's talk about it .
2.1 Master slave copy Replication
redis Support master-slave replication mode .
In master-slave mode Redis Nodes are divided into two roles : Master node ( Also known as master) And slave nodes ( Also known as slave). This mode cluster is composed of one master node and multiple slave nodes .
principle :Master Will synchronize data to slave, and slave Data will not be synchronized to master.Slave Will be connected at startup master To synchronize data .

This is a typical distributed read-write separation model . We can use master To handle write operations ,slave Provides read operations . This can effectively reduce the number of concurrent accesses of a single machine .
To implement master-slave replication, this mode is very simple , The master node does not need to be modified , Start the service directly . The slave node needs to be modified redis.conf The configuration file , Add configuration :slaveof < Master node ip Address > < Primary node port number >, for example master Of ip The address is 192.168.200.129, The port number is 6379, that slave Only need redis.conf Configuration in file slaveof 192.168.200.129 6379 that will do .
Connect the master node and the slave node respectively , The test found that the write operation of the master node , The same data can be seen immediately from the node . But when writing from the node , Tips READONLY You can't write against a read only slave Data cannot be written to the slave node .
Now we can configure multiple slave nodes to read in this way , The master node performs write operations , Read and write separation .
2.2 sentry sentinel
We have now given Redis The master-slave replication is realized , The master node data can be synchronized to the slave node , Read and write separation is achieved , Improve Redis Performance of . But there is still a problem , In the master-slave replication mode, there is only one master node , Once the primary node goes down , You can't write anymore . In other words, the master-slave replication mode does not achieve high availability . So what is high availability ? How to achieve high availability ?
2.2.1 High availability introduction
High availability (HA) It is one of the factors that must be considered in the design of distributed system architecture , It is through architecture design to reduce system 不 Time when services can be provided . Ensuring high availability usually follows the following points :
- Single point is the enemy of high availability , We should try to avoid single point in the process of system design .
- Ensure high availability of the system through architecture design , Its core criterion is : redundancy .
- Automatic failover .
2.2.2 Redis sentinel Introduce
sentinel( sentry ) It's for monitoring redis In the cluster Master State tools , It is also an independent process , yes Redis High availability solutions for ,sentinel Sentinel mode has been integrated into redis2.4 Later versions .
sentinel You can monitor one or more redis master service , And these master All services from service ; When a master When the service is offline , The master Upgrade from service to master Services replace offline master The service continues to process the request , And the remaining nodes start copying data from the new master node .
stay redis After installation , There will be one. redis-sentinel The file of , This is the start sentinel Script file for , And there's another one sentinel.conf file , This is sentinel Configuration file for .
sentinel Working mode :

Be careful : Maybe some students have questions , Now we've been based on sentinel High availability , But if sentinel What can I do if I hang up ? Actually sentinel Clustering can also be realized by itself , in other words sentinel It's also highly available .
2.2.3 Redis sentinel Use
2.2.3.1 To configure sentinel
Sentinel stay redis There are... In the installation package of , We can use it directly , But first you need to modify the configuration file , Carry out orders :
cd /usr/local/redis/

#  Copy sentinel The configuration file
cp /root/redis-4.0.14/sentinel.conf sentinel01.conf

#  Modify the configuration file :
vi sentinel01.conf
stay sentinel01.conf Add... To the configuration file :
#  Externally accessible
bind 0.0.0.0
sentinel monitor mymaster 127.0.0.1 6379 1
sentinel down-after-milliseconds mymaster 10000
sentinel failover-timeout mymaster 60000
sentinel parallel-syncs mymaster 1
Be careful : If there is sentinel monitor mymaster 127.0.0.1 6379 2 To configure , Then comment out .
Parameter description :
sentinel monitor mymaster 192.168.200.129 6379 1
mymasterMain roll call , You can call it anything , But it must be consistent with the following configuration .192.168.200.128 6379Master node connection address .1Voting is required to judge the primary server as invalid , The setting here requires at least 1 individual Sentinel agree! .sentinel down-after-milliseconds mymaster 10000
Set up Sentinel Think service 器 The number of milliseconds it takes to be disconnected .
sentinel failover-timeout mymaster 60000
Set up failover( Fail over ) The expiration time of . When failover After start , There is still no trigger for failover operation , At present
sentinel Will think that this time failover Failure .sentinel parallel-syncs mymaster 1
Set in execution mode 行 When failing over , How many slave servers can be connected to the new master service at the same time 器 Into the 行 Sync , The smaller the number , Indicates that fewer slave servers synchronize at the same time , Then the longer it takes to complete the failover .
2.2.3.2 start-up sentinel
After the configuration file is modified , Execute the following command , start-up sentinel:
/root/redis-4.0.14/src/redis-sentinel sentinel01.conf
The effect is as follows :

You can see ,6379 It's the main service ,6380 and 6381 It's from service .
2.2.3.3 test sentinel
We are 6379 perform shutdown, Turn off the main service ,Sentinel The tips are as follows :
+sdown master mymaster 192.168.200.129 6379	# The primary node is down
+odown master mymaster 192.168.200.129 6379 #quorum 1/1
+new-epoch 1
+try-failover master mymaster 192.168.200.129 6379 # Try failover
+vote-for-leader 00a6933e0cfa2b1bf0c3aab0d6b7a1a6455832ec 1 # Elected leaders
+elected-leader master mymaster 192.168.200.129 6379
+failover-state-select-slave master mymaster 192.168.200.129 6379 # Failover select from service
+selected-slave slave 192.168.200.129:6380 192.168.200.129 6380 @ mymaster 192.168.200.129 6379
# Failover status is sent   Send to 6380
+failover-state-send-slaveof-noone slave 192.168.200.129:6380 192.168.200.129 6380 @ mymaster 192.168.200.129 6379
+failover-state-wait-promotion slave 192.168.200.129:6380 192.168.200.129 6380 @ mymaster 192.168.200.129 6379
+promoted-slave slave 192.168.200.129:6380 192.168.200.129 6380 @ mymaster 192.168.200.129 6379
+failover-state-reconf-slaves master mymaster 192.168.200.129 6379
+slave-reconf-sent slave 192.168.200.129:6381 192.168.200.129 6381 @ mymaster 192.168.200.129 6379
+slave-reconf-inprog slave 192.168.200.129:6381 192.168.200.129 6381 @ mymaster 192.168.200.129 6379
+slave-reconf-done slave 192.168.200.129:6381 192.168.200.129 6381 @ mymaster 192.168.200.129 6379
+failover-end master mymaster 192.168.200.129 6379 # The end of the failover , The original main service was 6379
+switch-master mymaster 192.168.200.129 6379 192.168.200.129 6380 # Transform the main service , From the original 6379 To the present 6380
+slave slave 192.168.200.129:6381 192.168.200.129 6381 @ mymaster 192.168.200.129 6380
+slave slave 192.168.200.129:6379 192.168.200.129 6379 @ mymaster 192.168.200.129 6380
+sdown slave 192.168.200.129:6379 192.168.200.129 6379 @ mymaster 192.168.200.129 6380
Follow the prompt , We can see ,6379 It's time to fail over 6380, Choose by vote 6380 For the new master server .
stay 6380 perform info
# Replication
role:master
connected_slaves:1
slave0:ip=127.0.0.1,port=6381,state=online,offset=80531,lag=1
stay 6381 perform info
# Replication
role:slave
master_host:127.0.0.1
master_port:6380
master_link_status:up
Failover is shown in the figure below :
2.3 Redis Built in cluster cluster
2.3.1 Redis cluster Introduce
Redis Cluster yes Redis Built in cluster , stay Redis3.0 The implementation scheme . stay Redis3.0 There was no built-in cluster before .Redis Cluster It is a cluster architecture without a central node , rely on Gossip The protocol cooperates to automatically repair the state of the cluster .
Redis cluster In design , It's about decentralization , Go to middleware , in other words , Every node in the cluster is an equal relationship , They are all equal , Each node holds its own data and the state of the entire cluster . Each node is connected to all other nodes , And those connections stay active , This ensures that we only need to connect to any node in the cluster , You can get data from other nodes .
Redis cluster The cluster architecture is as follows :
[ Failed to transfer the external chain picture , The origin station may have anti-theft chain mechanism , It is suggested to save the pictures and upload them directly (img-tnICJY0p-1655532042629)(5.
)]
2.3.2 Allocate data by hash slot
It should be noted that , In this cluster mode, the data saved by each node in the cluster is not all data , It's just part of the data . So how to reasonably allocate data to different nodes ?
Redis Clustering uses a method called Hash slot (hash slot) To allocate data .redis cluster By default 16384 individual slot, When we set One key when , Will use CRC16 Algorithm to get the module to belong to slot, And then put this key It is distributed to the nodes in the hash slot interval , The specific algorithm is :CRC16(key) % 16384.
Suppose there are now 3 The nodes have formed a cluster , Namely :A, B, C Three nodes , They can be three ports on a machine , It can also be three different servers . that , use Hash slot (hash slot) How to allocate 16384 individual slot Words , The three nodes are responsible for slot The interval is :
- node A Cover 0-5460
- node B Cover 5461-10922
- node C Cover 10923-16383
that , Now set up a key , For example my_name:
set my_name itcast
according to redis cluster Hash slot algorithm :CRC16('my_name')%16384 = 2412. Then you'll take this key Is allocated to node A Yes .
2.3.3 Redis cluster The master-slave mode of
redis cluster In order to ensure the high availability of data , Added master-slave mode , A master node corresponds to one or more slave nodes , The master node provides data access , The slave node pulls data backup from the master node , When the master node hangs up , One of these slave nodes will be selected to act as the master node , So that the cluster doesn't hang up .
redis cluster The effect of adding master-slave mode is as follows :
2.3.4 Redis cluster build
2.3.4.1 Get ready Redis node
To ensure that a vote can be taken , You need at least 3 Main node .
Each master node needs at least one slave node , So at least 3 Slave nodes .
Total needs 6 platform redis The server , Here we use 6 individual redis example , The port number is 7001~7006.
First prepare a clean redis Environmental Science , Copy the original bin Folder , After cleaning, as the first redis node , The specific command is as follows :
#  Get into redis The installation directory
cd /usr/local/redis
#  Copy redis
mkdir cluster
cp -R bin/ cluster/node1
#  Delete persistent files
cd cluster/node1
rm -rf dump.rdb
rm -rf appendonly.aof
#  Delete the original configuration file
rm -rf redis.conf
#  Copy the new configuration file
cp /root/redis-4.0.14/redis.conf ./
#  Modify the configuration file
vi redis.conf
Cluster environment redis The configuration file of the node is as follows :
#  Cannot set password , Otherwise, the cluster will not be connected when it starts
# Redis Servers can be accessed across the network
bind 0.0.0.0
#  Modify port number
port 7001
# Redis Background start
daemonize yes
#  Turn on aof Persistence
appendonly yes
#  Open clusters
cluster-enabled yes
#  Configuration of cluster   The configuration file is automatically generated for the first time
cluster-config-file nodes.conf
#  request timeout
cluster-node-timeout 5000
first redis node node1 When you're ready , Copy them separately 5 Share ,
cp -R node1/ node2
Modify the port number of six nodes to 7001~7006, modify redis.conf Configuration file
Script the startup node :
vi start-all.sh
The content is :
cd node1
./redis-server redis.conf
cd ..
cd node2
./redis-server redis.conf
cd ..
cd node3
./redis-server redis.conf
cd ..
cd node4
./redis-server redis.conf
cd ..
cd node5
./redis-server redis.conf
cd ..
cd node6
./redis-server redis.conf
cd ..
Set script permissions , And start the :
chmod 744 start-all.sh
./start-all.sh
Use command ps -ef | grep redis Check the effect as follows :
[ Failed to transfer the external chain picture , The origin station may have anti-theft chain mechanism , It is suggested to save the pictures and upload them directly (img-ySuI7BQ5-1655532042630)(7.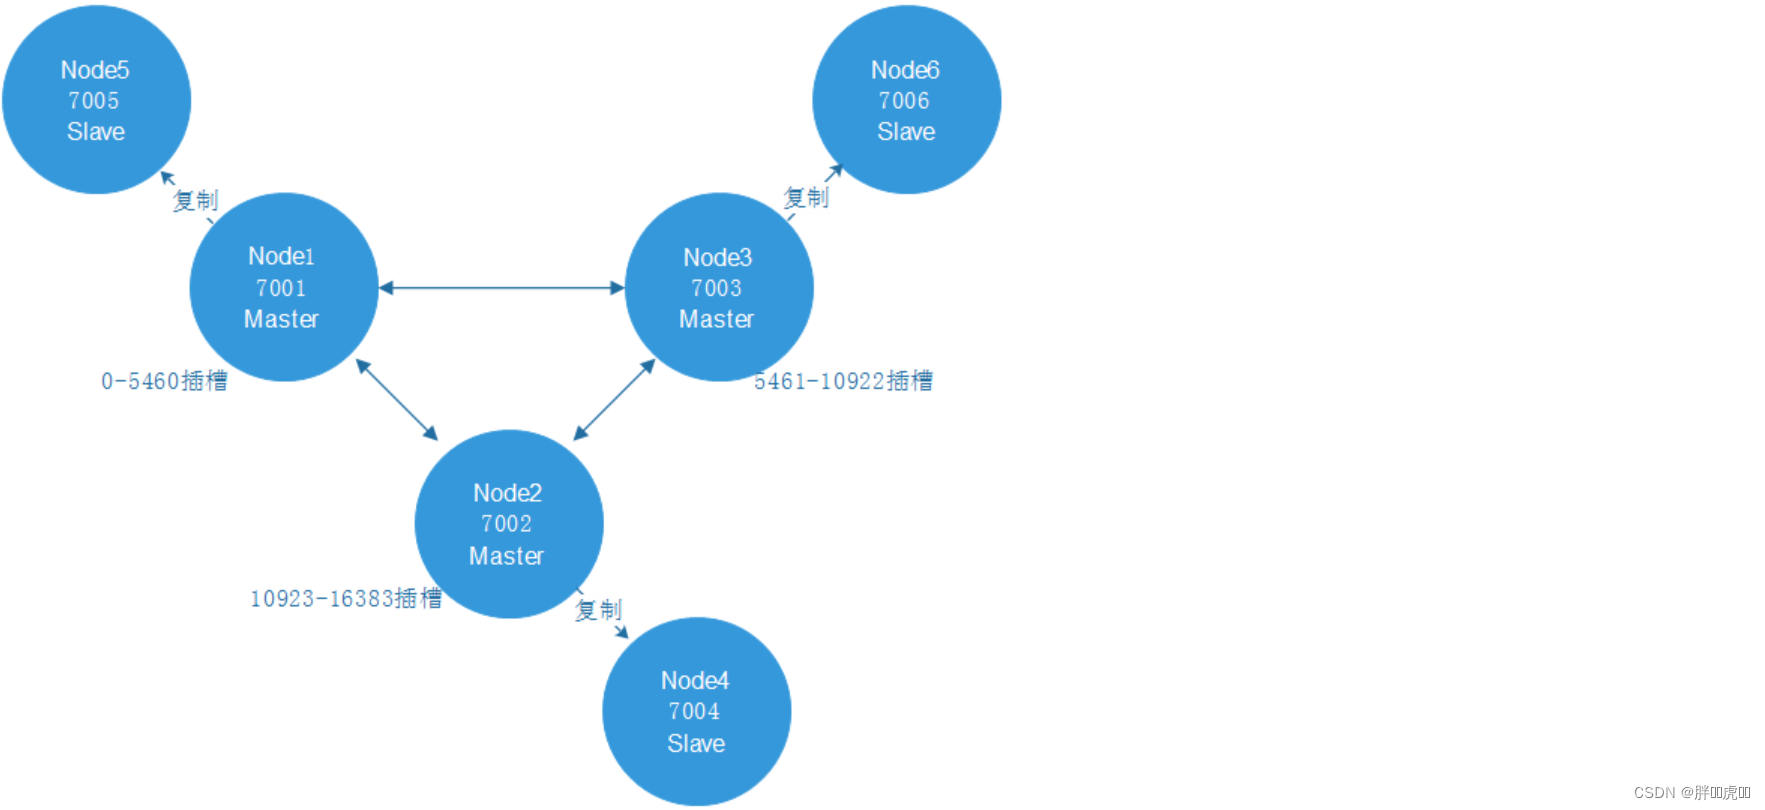
)]
2.3.4.2 start-up Redis colony
redis The cluster management tool uses ruby Scripting language , Installing the cluster requires ruby Environmental Science , Install first ruby Environmental Science :
#  install ruby
yum -y install ruby ruby-devel rubygems rpm-build

#  upgrade ruby edition ,redis4.0.14 Cluster environment requires 2.2.2 The above ruby edition
yum install centos-release-scl-rh
yum install rh-ruby23  -y
scl enable rh-ruby23 bash

#  see ruby edition
ruby -v
Download environment compliant gem, The download address is as follows :
https://rubygems.org/gems/redis/versions/4.1.0
Course materials already provide redis-4.1.0.gem, Directly upload and install , Installation command :
gem install redis-4.1.0.gem
Get into redis The installation directory , Use redis Built in cluster management script , Carry out orders :
#  Get into redis Installation package
cd /root/redis-4.0.14/src/
#  View the cluster management script
ll *.rb
#  Start the cluster using the cluster management script , In the following command 1 Represents the creation of... For each master node 1 Slave nodes
./redis-trib.rb create --replicas 1 127.0.0.1:7001 127.0.0.1:7002 \
127.0.0.1:7003 127.0.0.1:7004 127.0.0.1:7005 127.0.0.1:7006
The effect is as follows :
>>> Creating cluster
>>> Performing hash slots allocation on 6 nodes...
Using 3 masters:
192.168.200.129:7001
192.168.200.129:7002
192.168.200.129:7003
Adding replica 192.168.200.129:7005 to 192.168.200.129:7001
Adding replica 192.168.200.129:7006 to 192.168.200.129:7002
Adding replica 192.168.200.129:7004 to 192.168.200.129:7003
>>> Trying to optimize slaves allocation for anti-affinity
[WARNING] Some slaves are in the same host as their master
M: f0094f14b59c023acd38098336e2adcd3d434497 192.168.200.129:7001
   slots:0-5460 (5461 slots) master
M: 0eba44418d7e88f4d819f89f90da2e6e0be9c680 192.168.200.129:7002
   slots:5461-10922 (5462 slots) master
M: ac16c5545d9b099348085ad8b3253145912ee985 192.168.200.129:7003
   slots:10923-16383 (5461 slots) master
S: edc7a799e1cfd75e4d80767958930d86516ffc9b 192.168.200.129:7004
   replicates ac16c5545d9b099348085ad8b3253145912ee985
S: cbd415973b3e85d6f3ad967441f6bcb5b7da506a 192.168.200.129:7005
   replicates f0094f14b59c023acd38098336e2adcd3d434497
S: 40fdde45b16e1ac85c8a4c84db75b43978d1e4d2 192.168.200.129:7006
   replicates 0eba44418d7e88f4d819f89f90da2e6e0be9c680
Can I set the above configuration? (type 'yes' to accept): yes # Note that the choice is yes
>>> Nodes configuration updated
>>> Assign a different config epoch to each node
>>> Sending CLUSTER MEET messages to join the cluster
Waiting for the cluster to join..
>>> Performing Cluster Check (using node 192.168.200.129:7001)
M: f0094f14b59c023acd38098336e2adcd3d434497 192.168.200.129:7001
   slots:0-5460 (5461 slots) master
   1 additional replica(s)
M: ac16c5545d9b099348085ad8b3253145912ee985 192.168.200.129:7003
   slots:10923-16383 (5461 slots) master
   1 additional replica(s)
S: cbd415973b3e85d6f3ad967441f6bcb5b7da506a 192.168.200.129:7005
   slots: (0 slots) slave
   replicates f0094f14b59c023acd38098336e2adcd3d434497
S: 40fdde45b16e1ac85c8a4c84db75b43978d1e4d2 192.168.200.129:7006
   slots: (0 slots) slave
   replicates 0eba44418d7e88f4d819f89f90da2e6e0be9c680
M: 0eba44418d7e88f4d819f89f90da2e6e0be9c680 192.168.200.129:7002
   slots:5461-10922 (5462 slots) master
   1 additional replica(s)
S: edc7a799e1cfd75e4d80767958930d86516ffc9b 192.168.200.129:7004
   slots: (0 slots) slave
   replicates ac16c5545d9b099348085ad8b3253145912ee985
[OK] All nodes agree about slots configuration.
>>> Check for open slots...
>>> Check slots coverage...
[OK] All 16384 slots covered.
2.3.5 Use Redis colony
according to redis cluster Characteristics , It's decentralized , Each node is peer-to-peer , Therefore, any node connected can obtain and set data .
Use redis Client connections for redis colony , The order is as follows :
./redis-cli -h 192.168.200.129 -p 7001 -c
among -c Be sure to add. , This is redis When the cluster is connected , Parameters for node jump .
After connecting to the cluster, you can set some values , You can see that these values are scattered and stored on different nodes according to the hash slot method mentioned above .
边栏推荐
- Centos7部署radius服务-freeradius-3.0.13-15.el7集成mysql
- Vant web app calendar component performance optimization calendar add min date the minimum date page loads slowly
- 【Leetcode】431. Encode n-ary tree to binary tree (difficult)
- ant使用总结(一):使用ant自动打包apk
- JS面试题----防抖函数
- Tcp/ip explanation (version 2) notes / 3 link layer / 3.3 full duplex, energy saving, automatic negotiation mechanism, 802.1x flow control / 3.3.3 link layer flow control
- Learning Tai Chi Maker - esp8226 (11) distribution network with WiFi manager Library
- 【DaVinci Developer专题】-42-如何生成APP SWC的Template和Header文件
- Eight data analysis models: ogsm model
- 新课上线 | 每次 5 分钟,轻松玩转阿里云容器服务!
猜你喜欢
![[cocos2d-x] erasable layer:erasablelayer](/img/6e/1ee750854dfbe6a0260ca12a4a5680.png)
[cocos2d-x] erasable layer:erasablelayer

Progress of layer 2 technical scheme

(1) Basic learning - Common shortcut commands of vim editor

Data migration from dolphin scheduler 1.2.1 to dolphin scheduler 2.0.5 and data test records after migration
Layer 2技术方案进展情况

jvm-01.指令重排

【Leetcode】431. Encode n-ary tree to binary tree (difficult)

学习太极创客 — ESP8226 (十一)用 WiFiManager 库配网

jvm-04. Object's memory layout

How to specify the output path of pig register Project Log
随机推荐
App SHA1 acquisition program Baidu map Gaode map simple program for acquiring SHA1 value
Pyqt5 设置窗口左上角图标
Redis 哨兵
How to add libraries for Arduino ide installation
jvm-01. Instruction rearrangement
Dolphin scheduler dolphin scheduling upgrade code transformation -upgradedolphin scheduler
WordPress Core 5.8.2 - 'WP_ Query'SQL injection
Explicability of counter attack based on optimal transmission theory
Multiple strings for leetcode topic resolution
Visual Studio调试技巧
Extend your kubernetes API using the aggregation API
如何指定pig-register项目日志的输出路径
jvm-03.jvm内存模型
Cryptography series: certificate format representation of PKI X.509
[DaVinci developer topic] -41-app how SWC reads and writes NVM block data
Runc symbolic link mount and container escape vulnerability alert (cve-2021-30465)
Pyinstaller package exe setting icon is not displayed
Microsoft interview question: creases in origami printing
WordPress contact form entries cross cross site scripting attack
The difference between SaaS software and traditional software delivery mode