当前位置:网站首页>Install Kali on the U disk and persist it
Install Kali on the U disk and persist it
2022-06-24 11:32:00 【Luyuan 3306】
Beginners kali-linux, Learn from good examples kali, I'm not afraid of doing anything in the future !
First, prepare three things ( The software download addresses provided are all cloud disk addresses , You can also download the latest version from the official website )
kali U disc ISO Mirror image : link : https://pan.baidu.com/s/1n0eD4hs_KCplLmDu3b1ztA Extraction code : 9zcw
U Plate burning tool : link : https://pan.baidu.com/s/1yNWJyTRfl6PkcwULJQDk3A Extraction code : i59s
System partitioning tools : link : https://pan.baidu.com/s/1du7KTQ0n_dkjBRPnt_Ya1g Extraction code : 5y5x
Start firing u disc :
- Double-click to open Win32DiskImager2.0.1.8.exe

The number in the figure indicates :1 choice kali Image file , 2 To be fired U Disk letter 3 Click write directly after the first two steps , And make sure to wait for the complete write to succeed
- Double-click to open Win32DiskImager2.0.1.8.exe
- Double click to open the partition tool :MiniTool Partition Wizard
We'll find a disk2, This is the system disk we fired , findUnallocatedThis partition , ChooseRight mouse buttonChoose to clickcreateAnd clickyescontinue , The following screenshot will appear
Fill in according to the above screenshot 1 Fill in :persistence, 2 It's about choiceExt4, In turn, click 3 and 4 Wait for execution to complete , here kali The mirror is finished
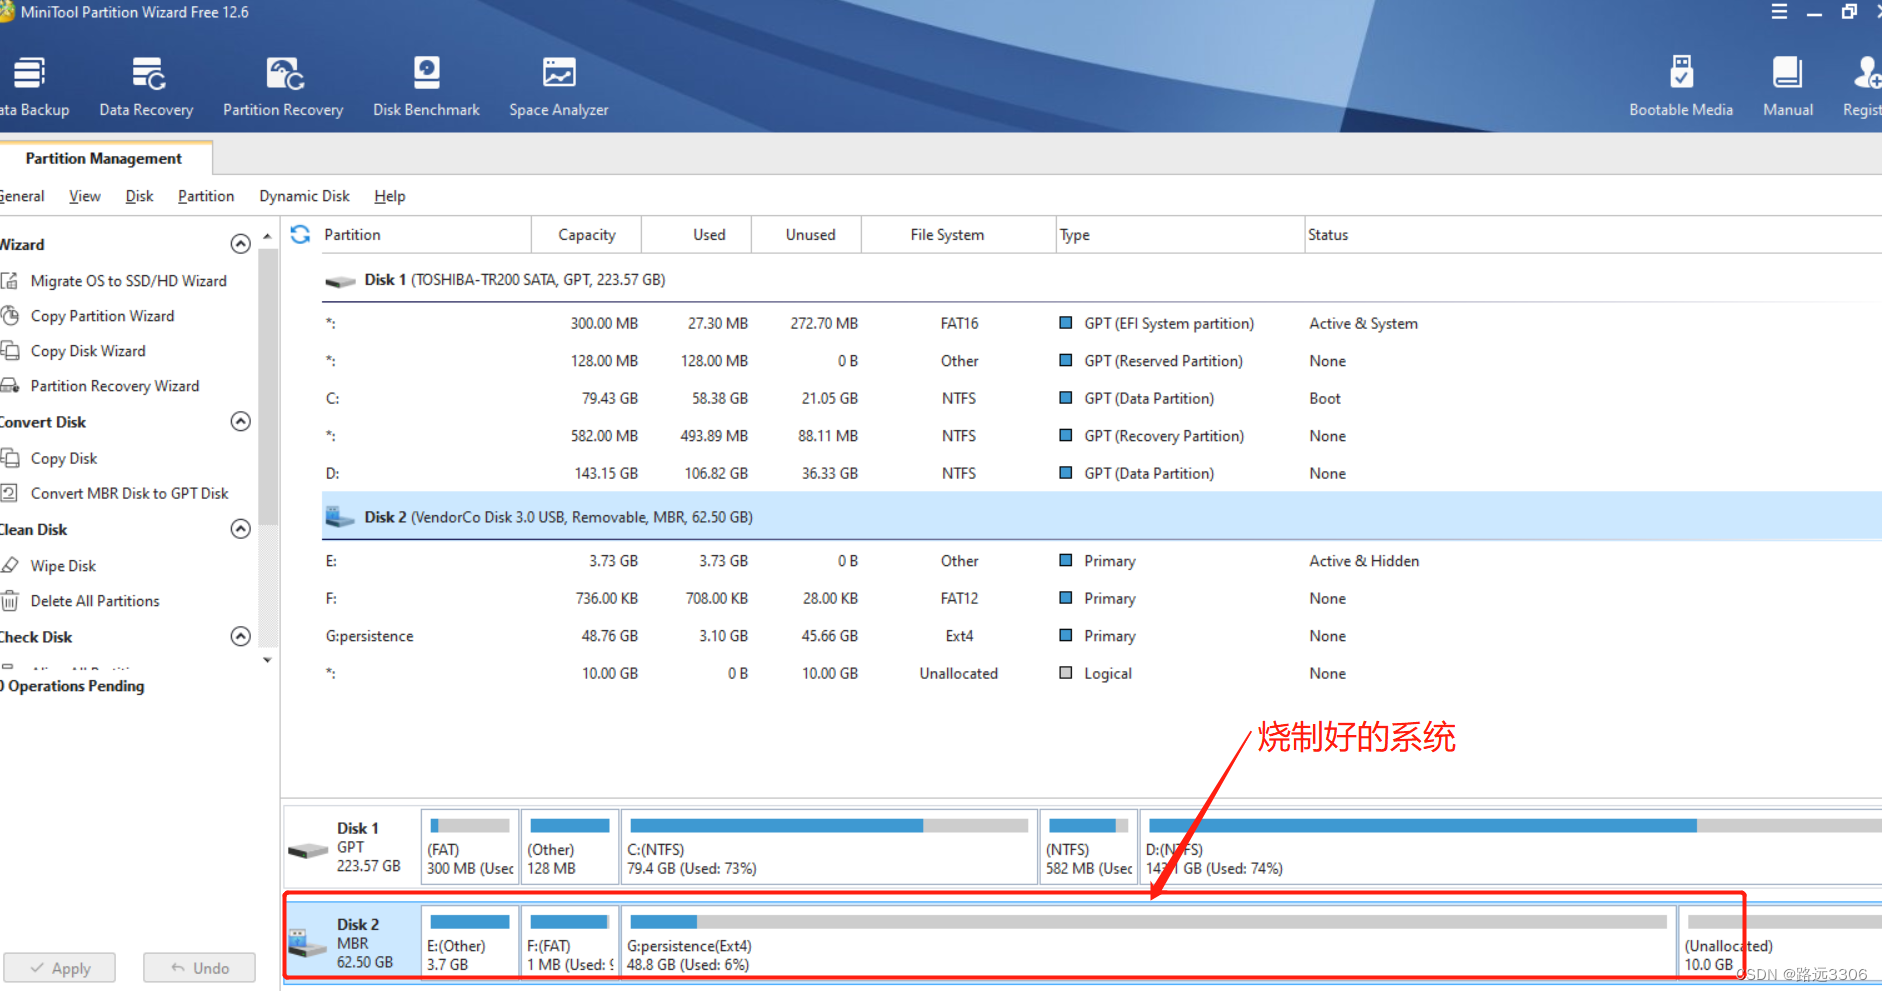 Be careful : The above screenshot is partitioned and formatted
3. Bios Some of the settings are configured according to your computer , start-up kali Time finding persistence Wording kali start-up ( Generally, it is the fourth from top to bottom )
4. kali Persistence
- open kali Command interface :
- Enter the following commands in sequence and press
enterconfirm
fdisk -l  #  View partition
sudo su  #  Switch to super managed account
mkdir -p  /mnt/linux  #  Create file directory
chmod 777 /mnt/linux  #  Give the created directory permission
mount /dev/sdb3  /mnt/linux  #  Hang in the directory  ‘/dev/sdb3’ The directory is selected according to the personal system , That's what we set up  **persistence**  Partition
echo "/ union" > /mnt/linux/persistence.conf  #
umount /dev/sdb3 #
The persistence can be realized after the above commands are executed in sequence , The software or files downloaded and installed later can continue to be used the next time the system is started !!!!
边栏推荐
- What is wireless WiFi? What are the benefits of wireless WiFi
- How to use data analysis tools to deal with emergencies in retail industry
- Why choose b+ tree as storage engine index structure
- 如何优雅的写 Controller 层代码?
- Ppt drawing related, shortcut keys, aesthetics
- How to develop hospital information system (his) with SMS notification and voice function
- Disaster recovery series (II) -- enterprises' one-stop disaster recovery construction with the help of cloud platform?
- 美团基于 Flink 的实时数仓平台建设新进展
- Why use a firewall? What is the function of firewall?
- PF_ Ring ZC | high speed traffic processing dpdk alternative
猜你喜欢

math_ Summation and derivation of proportional series & derivation of sum and difference of equal powers / difference between two nth power numbers/

【毕业季·进击的技术er】绕树三匝,何枝可依?

把腾讯搬到云上,治愈了他们的技术焦虑

程序员大部分时间不是写代码,而是。。。

Turn 2D photos into 3D models to see NVIDIA's new AI "magic"!

Tools and methods - use code formatting tools in source insight
Programmers spend most of their time not writing code, but...

《opencv学习笔记》-- 分离颜色通道、多通道混合
程序员大部分时间不是写代码,而是。。。

Understanding of homogeneous coordinates
随机推荐
Fizz gateway secondary development integration tutorial
Any 与 TypeVar,让 IDE 的自动补全更好用
u盘安装kali并且持久化
Déplacer Tencent sur le cloud a guéri leur anxiété technologique
Turn 2D photos into 3D models to see NVIDIA's new AI "magic"!
Why choose b+ tree as storage engine index structure
Why does the virtual machine Ping the host but not the virtual machine
Adobe Photoshop using the box selection tool for selection tutorial
What is wireless WiFi? What are the benefits of wireless WiFi
如何只导出word文档中的标题?(即将正文内容都删除,只保留标题)B站牛逼
ArrayList#subList这四个坑,一不小心就中招
《opencv学习笔记》-- 离散傅里叶变换
PHP短信通知+语音播报自动双呼
[net action!] Cos data escort helps SMEs avoid content security risks!
集群控制管理
软件测试 对前一日函数的基本路径测试
RPM installation percona5.7.34
Tencent geek challenge small - endless!
How to open a video number?
Coinbase将推出首个针对零售交易员的加密衍生产品