当前位置:网站首页>One of QT desktop whiteboard tools (to solve the problem of unsmooth curve -- Bezier curve)
One of QT desktop whiteboard tools (to solve the problem of unsmooth curve -- Bezier curve)
2022-07-23 21:00:00 【Larry_ Yanan】
Qt One of the desktop whiteboard tools ( Solve the problem of unsmooth curve —— Bessel curve )
Preface :
of Qt The painting of 、 Whiteboard 、 Sketchpad and other applications , I have studied it several times , Every time, there are new gains and experiences . This time, I finally understood , How to solve the obvious broken lines caused by the computer configuration and application of Caton 、 There is a problem with Caton . Yes , What is said on the Internet is Bessel curve , But the research for a long time did not clearly solve my needs , So here I also combined my own thinking , Give the following solution and code .
One 、 Core implementation code
We're going to start with mousePressEvent and mouseMoveEvent It collects our mouse click and move points , Or the moving point of the touch screen .
void BezierTestWidget::mousePressEvent(QMouseEvent *event)
{

    if(flag_bezier)
    {

        bezier_points.clear();
        bezier_points.append(event->pos());
    }
}

void BezierTestWidget::mouseMoveEvent(QMouseEvent *event)
{

    if((event->buttons() & Qt::LeftButton))// Left click or not
    {

        QImage image = last_image;
        if(flag_bezier)
        {

            // When collecting points , Filter some close points properly , Otherwise, the effect of smoothing will be affected
            if(qAbs(bezier_points.last().x()-event->pos().x())>15 || qAbs(bezier_points.last().y()-event->pos().y())>15)
            {

                bezier_points.append(event->pos());
            }

            QPainter painter(&image);
            painter.setRenderHint(QPainter::Antialiasing, true);

            QPen pen;
            QColor brush_color(0,255,0,100);
            pen.setBrush(brush_color);
            pen.setWidth(5);
            painter.setPen(pen);

            drawBezier(&painter, &image);
            painter.end();
        }

        *draw_image = image;
        repaint();
    }
}
This is the code that is really drawn on the image :
void BezierTestWidget::drawBezier(QPainter *painter, QImage *image)
{

    if(bezier_points.size()<=0)
        return;

	// The resulting point queue
    QList<QPointF> points;

    // Traverse to add midpoint , Take the actual point as the control point
    if(bezier_points.count() > 2)
    {

        points.append(bezier_points[0]);
        points.append(bezier_points[1]);// According to the algorithm , No midpoint is added between the first and second points
        for (int i = 2; i <bezier_points.count(); i++) {

            points.append((bezier_points[i]+bezier_points[i-1])/2);
            points.append(bezier_points[i]);
        }
    }

    QPainterPath draw_path;

    if(bezier_points.count() > 2)
    {

        int i = 0;
        while(i < points.count())
        {

            if(i+3 <= points.count())// Process Bezier curve in order , And add it to the drawing path
            {

                QPainterPath path;
                path.moveTo(points[i]);
                path.quadTo(points[i+1],points[i+2]);
                draw_path.addPath(path);
            }else{

                int a = i;
                QPolygon polypon;
                while(a < points.count())
                {

                    polypon << points[a].toPoint();
                    a++;
                }
                draw_path.addPolygon(polypon);
            }

            i = i + 2;
        }
    }

    // draw path
    painter->drawPath(draw_path);
}
About the principle and logic of how to implement , Put it in the back and unfold it carefully . Next, I will briefly introduce the basic idea of my Sketchpad implementation .
Two 、 Sketchpad implementation ideas
I found a lot of information on the Internet , About Sketchpad 、 Desktop whiteboard and other implementation solutions , There are only two kinds .
#1.QGraphicsView and QGraphicsScene
By adding elements . About this , In fact, I don't know much , It's actually quite complicated . My understanding is that , Create separate primitive objects , And then add QGraphicsScene Inside .
For example, the simplest ,QGraphicsLineItem *addLine(qreal x1, qreal y1, qreal x2, qreal y2, const QPen &pen = QPen(), In fact, it is to add a straight line to the drawing scene , The straight line here is actually an object , Added to the entire scene canvas .
We know , Move the mouse to draw a curve , In fact, it is composed of many points , And if every point is connected by a straight line , It's just a curve . The reason why we use Bezier curve processing to pursue smoothness , It's just the time when the computer is stuck ,mouseMoveEvent Mouse events are not triggered enough , As a result, there are too few sample points , Otherwise, it's usually very smooth .
shortcoming :
(1)QGraphicsScene Drawing of can realize drawing rectangle 、 Text and other functions , But because it was added one by one , Instead of actually drawing on the canvas directly , Therefore, it cannot be well realized “ Eraser ”、“ eliminate ” The function of .
If you want to use an eraser , You can only constantly judge the current point of mouse movement , Whether it intersects with the elements in the element queue , Remove if there is . This is not a good customer experience , Because of this, the development of eraser was cancelled in my project .
(2) Said just now , In fact, the curve is formed by the superposition of countless curves between points . The problem is coming. , If our brush is set as a highlighter , That is, with transparency , What will it become ? The result is that some of the colors superimposed by the line segments will also be superimposed , If you move fast, you can clearly see the superimposed points , And if the moving speed is slow , The points basically coincide , There is no effect of transparency .
Sum up , Although this method is well encapsulated , The extended function is also done well , And it seems that there is hardware acceleration or some ghost function , But in fact, it can not well realize the painting Sketchpad in our traditional imagination , So I now use the second .
2. utilize QImage Indirect drawing window
If you've been in contact QPainter and paintEvent(), You should know that the refresh of windows is done in this , You can reload paintEvent(), Draw what you want in the widget . Of course , This can also draw your mouse click path .
The reason in paintEvent() Continue to draw QImage, and mouseMoveEvent When triggered, draw the path in QImage Inside , In fact, it's about revocation . To undo, you need to record the previous step , Instead of remembering complicated path points , Why don't you just remember the last picture QImage Forget it , And limit the maximum revocation 10 Time , Then I can store at most 10 individual QImage nothing more , Memory has not increased much .
advantage :
(1) The drawing can be drawn directly on it , And make use of QPainter Methods drawPath or drawPolyline, The drawn curve does not have the color superposition problem of the above coincidence points . In addition, the eraser is also very easy to realize , Directly erase QImage The pixel , You can even set the shape and size of the eraser . Words can also be painted , Add something like triangle and rectangle .
in general , There are few restrictions on this implementation , It is easy to realize the functions we want .
The key is ,QPainter dependent QPainterPath The following two methods are provided , To achieve Bezier curve processing :
 void cubicTo(const QPointF &ctrlPt1, const QPointF &ctrlPt2, const QPointF &endPt);
 void quadTo(const QPointF &ctrlPt, const QPointF &endPt);
3、 ... and 、 Detailed idea of realizing Bezier curve
First , We need to make it clear what Bessel curve is , Many articles are also referred here , If you are interested, you can go and have a look for yourself .
Functions and characteristics of Bezier curve
QPainterPath Detailed explanation
Qt Draw smooth curve with Algorithm (cubicTo)
We don't need to delve into the mathematical concept of Bezier curve , But we need to know every parameter of the interface method . Simply speaking
Curve effect between two points , Or it is decided by one or two control points . chart 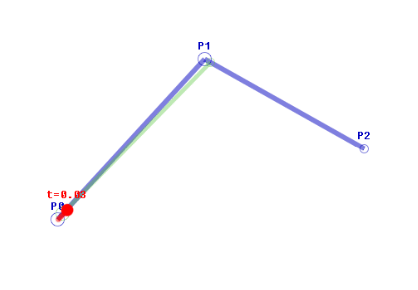
Figure 1 , Corresponding void quadTo(const QPointF &ctrlPt, const QPointF &endPt);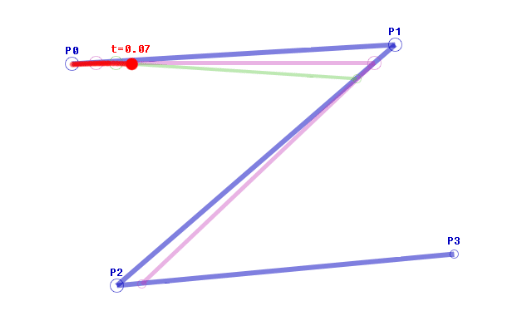
Figure 2 , Corresponding void cubicTo(const QPointF &ctrlPt1, const QPointF &ctrlPt2, const QPointF &endPt);
The smooth curve effect we expect , Just use figure 1 .
First , We use it QVetor Obtained a series of QPointF Is it right ? Then we'll see , How to get the information algorithm of the second-order Bessel curve ( Refer to the third article ):
Suppose we have a problem when we move the mouse A、B、C、D、E、F、G、 this 6 A little bit . How to draw a smooth curve , We take B Point and C Midpoint of point B1
As the end of the first Bezier curve ,B Point as control point . Pictured : Bessel curve
The next? Work out cd The midpoint of c1 With B1 As a starting point , c Control point , c1 Draw the following figure for the end point : Continuous curve


These two figures are very intuitive , I'll describe it again if I don't understand . When we have a series ABCD Point set of , Start from the second point , A new midpoint is calculated between the point and the next point ( Add and divide directly ), Then add it to the point set queue . such , We have other practical points besides the first point , Will become parameters as control points , And the first point and the midpoint we calculated manually , Instead, it becomes a practical point , Connect with curve .
This is actually a very sophisticated and concise algorithm , Use the existing points to generate multiple points , Then skillfully smooth the curve , Successfully achieved the broken line phenomenon caused by the application of the equipment .
If you don't understand , I can only watch it a few more times, haha . Specific code implementation , It's also very simple . Take the points we collected , Except for the first point , Insert a midpoint for the rest . then , We can traverse again and draw it in the form of Bezier curve .
This is the implementation of inserting midpoint ,bezier_points Is my mouse The point set collected by the event .
	// The resulting point queue
    QList<QPointF> points;
    // Traverse to add midpoint , Take the actual point as the control point
    if(bezier_points.count() > 2)
    {

        points.append(bezier_points[0]);
        points.append(bezier_points[1]);// According to the algorithm , No midpoint is added between the first and second points
        for (int i = 2; i <bezier_points.count(); i++) {

            points.append((bezier_points[i]+bezier_points[i-1])/2);
            points.append(bezier_points[i]);
        }
    }
Let's continue to traverse , Every three points are a group , use QPainterPath To achieve .moveTo The parameter is the starting point ,quadTo The parameters of are control point and end point . The final will be QPainterPath Draw in total QPainterPath among , After the traversal, draw the total QPainterPath( It can avoid the coincidence point problem of transparent brushes ). If not enough Three points , Then draw a straight line directly ( Broken line ) Forget it .
	QPainterPath draw_path;
    if(bezier_points.count() > 2)
    {

        int i = 0;
        while(i < points.count())
        {

            if(i+3 <= points.count())// Process Bezier curve in order , And add it to the drawing path
            {

                QPainterPath path;
                path.moveTo(points[i]);
                path.quadTo(points[i+1],points[i+2]);
                draw_path.addPath(path);
            }else{

                int a = i;
                QPolygon polypon;
                while(a < points.count())
                {

                    polypon << points[a].toPoint();
                    a++;
                }
                draw_path.addPolygon(polypon);
            }

            i = i + 2;
        }
    }

    // draw path
    painter->drawPath(draw_path);
in addition , There are many times when the painting is too slow , Points are too close to each other , So when collecting , Just filter out some points properly , So as not to affect the treatment effect .
// When collecting points , Filter some close points properly , Otherwise, the effect of smoothing will be affected
if(qAbs(bezier_points.last().x()-event->pos().x())>15 || qAbs(bezier_points.last().y()-event->pos().y())>15)
{

	bezier_points.append(event->pos());
}
Four 、 The final demonstration effect
The first red one is the ordinary broken line effect ; The second is the comparison between broken line and Bessel treatment ; The third green one is the effect processed by Bezier curve .
5、 ... and 、 ending
It finally solved the problem , I feel that there are still quite a lot of goods . But there are still some shortcomings , For example 4K The drawing on the screen is still too laggy , I don't know what method can be optimized . in addition , This is just a simple example of Bezier curve , Write an eraser again if you have a chance in the future , triangle , Text input, etc , Try to make a relatively perfect and good-looking whiteboard tool in the future .
边栏推荐
猜你喜欢
模块化开发

Unity解决动画不可用:The AnimationClip ‘XXX‘ used by the Animation component ‘XXX‘ must be marked as Legacy.

网络学习型红外模块,8路发射独立控制
Visual slam learning | basic chapter 01
221. 最大正方形 ●● & 1277. 统计全为 1 的正方形子矩阵 ●●

【攻防世界WEB】难度四星12分进阶题:Confusion1

TypeScript基础

OpenLayers实例-Advanced Mapbox Vector Tiles-高级Mapbox矢量贴图

2022.7.11mySQL作业

第三届SLAM技术论坛-吴毅红教授
随机推荐
ES6 feature: Promise (custom encapsulation)
最小生成树:Prim
Today's sleep quality record 81 points
-2021最新对比学习(Contrastive Learning)相关必读论文整理分享
[Yunxiang book club No. 13] Chapter IV packaging format and coding format of audio files
MySQL(3)
Educational Codeforces Round 132 A-D题解
Green-Tao 定理 (4): 能量增量方法
OpenIM重大升级-群聊读扩散模型发布 群管理功能升级
Network learning infrared module, 8-way emission independent control
比较关注证券公司究竟哪个佣金最低?请问网上开户安全么?
【复数 重载运算符】
【LeetCode】Day101-旋转图像
221. 最大正方形 ●● & 1277. 统计全为 1 的正方形子矩阵 ●●
[kernel] platform bus model for driving development and learning
How to introduce your project experience in the interview
[shader realizes roundwave circular ripple effect _shader effect Chapter 6]
Read the five flow indicators of R & D efficiency insight
[leetcode] day101 rotating image
Opencv image processing Laplace pyramid