当前位置:网站首页>openvino系列 19. OpenVINO 与 PaddleOCR 实现视频实时OCR处理
openvino系列 19. OpenVINO 与 PaddleOCR 实现视频实时OCR处理
2022-06-23 07:28:00 【破浪会有时】
openvino系列 19. OpenVINO 与 PaddleOCR 实现视频实时OCR处理
此案例展示了如何在OpenVINO上本地实时视频流运行PPOCR模型。 无需将PaddlePaddle模型导出到 ONNX,然后通过 OpenVINO 模型优化器转换为中间表示 (IR) 格式,我们现在可以直接从 PaddlePaddle 模型中读取。PaddleOCR是一个使用PaddlePaddle深度学习框架训练的超轻OCR模型,旨在创建多语言实用的OCR工具。
案例中使用的paddleOCR预训练模型参考Chinese and English ultra-lightweight PP-OCR model (9.4M)。
环境描述:
- 本案例运行环境:Win10,9代i7笔记本
- IDE:VSCode
- openvino版本:2022.1
- 代码链接
提示:写完文章后,目录可以自动生成,如何生成可参考右边的帮助文档
文章目录
0 代码的运行
将Gitee代码下载下来后,进入14-realtime-paddleOcr,你需要新建一个虚拟环境,并下载相关的依赖(关于OpenVINO的安装和使用,这里就不再赘述,需要了解的同学可以直接打开Gitee的链接,在前几个章节或主路径下的README文件有介绍)。进入虚拟环境后,直接在terminal中运行python main.py即可。
1 模型的下载和导入
此案例包含了两个模型:文本检测以及文本识别模型。
和其他的案例一样,我们先导入对应的预训练模型,并进行编译。概念这里就不再赘述,代码如下:
1.1 文本检测模型
''' text detection model '''
det_model_url = "https://paddleocr.bj.bcebos.com/dygraph_v2.0/ch/ch_ppocr_mobile_v2.0_det_infer.tar"
det_model_file_path = Path("model/ch_ppocr_mobile_v2.0_det_infer/inference.pdmodel")
print("1 - Download and load model for text detection.")
run_model_download(det_model_url, det_model_file_path)
# initialize inference engine for text detection
core = Core()
det_model = core.read_model(model=det_model_file_path)
det_compiled_model = core.compile_model(model=det_model, device_name="CPU")
# get input and output nodes for text detection
det_input_layer = det_compiled_model.input(0)
det_output_layer = det_compiled_model.output(0)
print("- Text detection Model Input layer: ", det_input_layer)
print("- Text detection Model Output layer: ", det_output_layer)
Terminal打印:
1 - Download and load model for text detection.
Model already exists
- Text detection Model Input layer:  <ConstOutput: names[x] shape{?,3,640,640} type: f32>
- Text detection Model Output layer:  <ConstOutput: names[save_infer_model/scale_0.tmp_1] shape{?,1,640,640} type: f32>
需要注意,这个文本检测模型的输入是640x640的图像,所以我们输入之前需要进行一些预处理;模型的输出也是640x640,所以我们还需从中找到对应的文本框,然后才能进行下一步文本识别。
1.2 文本识别模型
''' text recognition model '''
print("2 - Download and load model for text recognition.")
rec_model_url = "https://paddleocr.bj.bcebos.com/dygraph_v2.0/ch/ch_ppocr_mobile_v2.0_rec_infer.tar"
rec_model_file_path = Path("model/ch_ppocr_mobile_v2.0_rec_infer/inference.pdmodel")
run_model_download(rec_model_url, rec_model_file_path)
# 当我们完成文本检测模型后,系统会输出一系列的Bounding Box,这些框会作为下一个文本识别模型的输入。
# 这里需要注意,不同的框大小不同。所以我们需要将文本识别模型的输入大小从固定修改为动态。
# 动态的大小设计即将需要动态的那一个维度改为-1。
# 字体识别原本的输入尺寸是:{?,3,32,100},我们希望将第四个维度的值由100(固定值)变为?(动态值)
# read the model and corresponding weights from file
rec_model = core.read_model(model=rec_model_file_path)

# assign dynamic shapes to every input layer on the last dimension
for input_layer in rec_model.inputs:
    input_shape = input_layer.partial_shape
    input_shape[3] = -1
    rec_model.reshape({
    input_layer: input_shape})

rec_compiled_model = core.compile_model(model=rec_model, device_name="CPU")

# get input and output nodes
rec_input_layer = rec_compiled_model.input(0)
rec_output_layer = rec_compiled_model.output(0)

print("- Text recognition Model Input layer: ", rec_input_layer)
print("- Text recognition Model Output layer: ", rec_output_layer)
Terminal打印:
2 - Download and load model for text recognition.
Model already exists
- Text recognition Model original input:  [<Output: names[x] shape{?,3,32,100} type: f32>]
- Text recognition Model original output:  [<Output: names[save_infer_model/scale_0.tmp_1] shape{?,25,6625} type: f32>]
- Text recognition Model Input layer:  <ConstOutput: names[x] shape{?,3,32,?} type: f32>
- Text recognition Model Output layer:  <ConstOutput: names[save_infer_model/scale_0.tmp_1] shape{?,?,6625} type: f32>
需要注意的是,原模型的输入是{?,3,32,100}。第一个维度对应的是Batch,第二个维度代表Channel,第三和第四个维度则是输入图像的宽和长。这里的尺寸是定死的。在我们的案例中,文本识别后,我们可以提取出包含文本的Bounding Box,然后从输入图像中抠出对应的图,再进行一些resize。但这些图片的尺寸不可能都是32X100,比如我们可以让所有的图宽是32,但长不可能都是100。这个时候我们就需要进行一些修改,让文本识别的输入,在第四个维度可以是动态的,而不是固定的。所以,我们读取模型后(core.read_model(model=rec_model_file_path)),对输入的第四个维度赋值为-1(input_shape[3] = -1),最后compile一下即可(core.compile_model(model=rec_model, device_name="CPU"))。
1.3 模型下载代码
模型下载(run_model_download)相关代码如下:
# Define the function to download text detection and recognition models from PaddleOCR resources
def run_model_download(model_url, model_file_path):
    """ Download pre-trained models from PaddleOCR resources Parameters: model_url: url link to pre-trained models model_file_path: file path to store the downloaded model """
    model_name = model_url.split("/")[-1]

    if model_file_path.is_file():
        print("Model already exists")
    else:
        # Download the model from the server, and untar it.
        print("Downloading the pre-trained model... May take a while...")

        # create a directory
        os.makedirs("model", exist_ok=True)
        urllib.request.urlretrieve(model_url, f"model/{
      model_name} ")
        print("Model Downloaded")

        file = tarfile.open(f"model/{
      model_name} ")
        res = file.extractall("model")
        file.close()
        if not res:
            print(f"Model Extracted to {
      model_file_path}.")
        else:
            print("Error Extracting the model. Please check the network.")
2 模型的使用
在解释细节之前,我们来学习如何输入一张照片,输出OCR检测结果相关的流程。这里我们先附上代码:
import matplotlib.pyplot as plt

''' Let's try to do some test based on images '''
# Read the image
image = cv2.imread("data/label4.png")
print("- Now we test paddle OCR with image.")
print("1 - Input image size: {}".format(image.shape))
# N,C,H,W = batch size, number of channels, height, width
# if frame larger than full HD, reduce size to improve the performance
scale = 1280 / max(image.shape)
if scale < 1:
    image = cv2.resize(src=image, dsize=None, fx=scale, fy=scale,
                        interpolation=cv2.INTER_AREA)
# preprocess image for text detection
textDetectionImage = processing.image_preprocess_textDetection(image, 640)
print("2 - Text detection image preprocessing. Image is resized into {}".format(image.shape))

# perform the inference step
det_results = det_compiled_model([textDetectionImage])[det_output_layer]
print("3 - Text detection inference result scale {}".format(det_results.shape))

# Postprocessing for Paddle Detection
dt_boxes = processing.post_processing_detection(image, det_results)
print("4 - Transform text detection inference result into bounding boxes: {}".format(dt_boxes.shape))
# Preprocess detection results for recognition
# Sort text boxes in order from top to bottom, left to right
dt_boxes = processing.sorted_boxes(dt_boxes)

# preprocess for text recognition
img_crop_list, img_num, indices = processing.prep_for_rec(dt_boxes, image)
print("5 - Text recognition image recognition. {} texts detected, and related images are cropped.".format(img_num))
print("- Text1 scale: {}; Text2 scale: {}".format(img_crop_list[0].shape, img_crop_list[1].shape))

# For storing recognition results, include two parts:
# txts are the recognized text results, scores are the recognition confidence level
rec_res = [['', 0.0]] * img_num
txts = []
scores = []
batch_num = 1

for beg_img_no in range(0, img_num, batch_num):

    # Recognition starts from here
    norm_img_batch = processing.batch_text_box(
        img_crop_list, img_num, indices, beg_img_no, batch_num)

    print("- Transform the cropped image from different scale to shape ?,3,32,? , where first ? is batch size, and second ? is dynamic image height: {}".format(norm_img_batch.shape))

    # Run inference for text recognition
    rec_results = rec_compiled_model([norm_img_batch])[rec_output_layer]
    print("6 - Text recognition inference result scale {}. The last dimension 6625 indicates to dictionary of ground truth texts.".format(rec_results.shape))

    # Postprocessing recognition results
    postprocess_op = processing.build_post_process(processing.postprocess_params)
    rec_result = postprocess_op(rec_results)
    print("- Text recognition result is: ", rec_result)

    for rno in range(len(rec_result)):
        rec_res[indices[beg_img_no + rno]] = rec_result[rno]
    if rec_res:
        txts = [rec_res[i][0] for i in range(len(rec_res))]
        scores = [rec_res[i][1] for i in range(len(rec_res))]

image = Image.fromarray(cv2.cvtColor(image, cv2.COLOR_BGR2RGB))
boxes = dt_boxes

print("- Finally we draw the results on the image.")

# draw text recognition results beside the image
draw_img = processing.draw_ocr_box_txt(
    image,
    boxes,
    txts,
    scores,
    drop_score=0.5)

# Visualize PaddleOCR results
f_height, f_width = draw_img.shape[:2]
draw_img = cv2.cvtColor(draw_img, cv2.COLOR_RGB2BGR)

plt.figure()
plt.axis("off")
plt.imshow(draw_img, cmap="gray", vmin=0, vmax=255);
Terminal打印:
- Now we test paddle OCR with image.
1 - Input image size: (256, 644, 3)
2 - Text detection image preprocessing. Image is resized into (256, 644, 3)
3 - Text detection inference result scale (1, 1, 640, 640)
4 - Transform text detection inference result into bounding boxes: (2, 4, 2)
5 - Text recognition image recognition. 2 texts detected, and related images are cropped.
- Text1 scale: (77, 464, 3); Text2 scale: (46, 347, 3)
- Transform the cropped image from different scale to shape ?,3,32,? , where first ? is batch size, and second ? is dynamic image height: (1, 3, 32, 192)
6 - Text recognition inference result scale (1, 48, 6625). The last dimension 6625 indicates to dictionary of ground truth texts.
- Text recognition result is:  [('Apple Support', 0.9873969)]
- Transform the cropped image from different scale to shape ?,3,32,? , where first ? is batch size, and second ? is dynamic image height: (1, 3, 32, 241)
6 - Text recognition inference result scale (1, 60, 6625). The last dimension 6625 indicates to dictionary of ground truth texts.
- Text recognition result is:  [('1-800-275-2273', 0.99747336)]
- Finally we draw the results on the image.
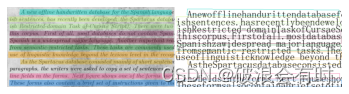
以下是一些结果:


这里没有检测角度的模块,所以带有角度的图片检测效果较差。


从Terminal中的返回我们基本上可以看到整个Pipeline所涉猎的步骤。接下来,我们将一一解释。
3 文本检测模型相关
3.1 预训练
当我们输入了图片后,我们需要进行一些预训练,使得预训练过后,图片的尺寸和文本检测模型的输入尺寸一致。相关代码如下
''' Preprocess for text detection '''
def image_preprocess_textDetection(input_image, size):
    """ Preprocess input image for text detection Parameters: input_image: input image size: value for the image to be resized for text detection model """
    img = cv2.resize(input_image, (size, size))
    img = np.transpose(img, [2, 0, 1]) / 255
    img = np.expand_dims(img, 0)
    # NormalizeImage: {mean: [0.485, 0.456, 0.406], std: [0.229, 0.224, 0.225], is_scale: True}
    img_mean = np.array([0.485, 0.456, 0.406]).reshape((3, 1, 1))
    img_std = np.array([0.229, 0.224, 0.225]).reshape((3, 1, 1))
    img -= img_mean
    img /= img_std
    return img.astype(np.float32)
这里的预训练实际上包括了image resize,dimension调整,以及image normalization。
3.2 文本检测模型推理
然后,我们将预训练完成后的图片作为输入进行文本检测模型推理:
# perform the inference step
det_results = det_compiled_model([textDetectionImage])[det_output_layer]
print("3 - Text detection inference result scale {}".format(det_results.shape))
模型的输出是一个(1, 1, 640, 640)的矩阵。其实这里我不是很明白,为什么不是直接输出检测框。
3.3 后处理
所谓后处理,即将文本检测模型的输出转化成文本框。
# Postprocessing for Paddle Detection
dt_boxes = processing.post_processing_detection(image, det_results)
print("4 - Transform text detection inference result into bounding boxes: {}".format(dt_boxes.shape))
# Preprocess detection results for recognition
# Sort text boxes in order from top to bottom, left to right
dt_boxes = processing.sorted_boxes(dt_boxes)
post_processing_detection的相关代码如下:
def post_processing_detection(frame, det_results):
    """ Postprocess the results from text detection into bounding boxes Parameters: frame: input image det_results: inference results from text detection model """
    ori_im = frame.copy()
    data = {
    'image': frame}
    # data_resize is a dict which contains data_resize['image'] and
    # data_resize['shape'] which contains [src_h, src_w, ratio_h, ratio_w]
    data_resize = DetResizeForTest(data)
    data_list = []
    keep_keys = ['image', 'shape']
    # Convert dict to list (data_list) which contains 2 elements
    for key in keep_keys:
        data_list.append(data_resize[key])
    img, shape_list = data_list
    # Expand 1 dimension
    shape_list = np.expand_dims(shape_list, axis=0)
    pred = det_results[0]
    if isinstance(pred, paddle.Tensor):
        pred = pred.numpy()
    segmentation = pred > 0.3

    boxes_batch = []
    for batch_index in range(pred.shape[0]):
        src_h, src_w, ratio_h, ratio_w = shape_list[batch_index]
        mask = segmentation[batch_index]
        boxes, scores = boxes_from_bitmap(pred[batch_index], mask, src_w, src_h)
        boxes_batch.append({
    'points': boxes})
    post_result = boxes_batch
    dt_boxes = post_result[0]['points']
    dt_boxes = filter_tag_det_res(dt_boxes, ori_im.shape)
    return dt_boxes
4 文本识别模型相关
4.1 预处理
第一步和文本检测模型一样,也是需要进行一些预处理,将Bounding Box的图片抠出来,resize一下,以符合我们的文本识别模型输入的尺寸。
# preprocess for text recognition
img_crop_list, img_num, indices = processing.prep_for_rec(dt_boxes, image)
print("5 - Text recognition image recognition. {} texts detected, and related images are cropped.".format(img_num))
print("- Text1 scale: {}; Text2 scale: {}".format(img_crop_list[0].shape, img_crop_list[1].shape))
prep_for_rec函数中,我们通过检测到的Bounding Box,从原图像中抠图,并返回有多少个文本条被检测出来,以及indices值:
def prep_for_rec(dt_boxes, frame):
    """ Preprocessing of the detected bounding boxes for text recognition Parameters: dt_boxes: detected bounding boxes from text detection frame: original input frame img_crop_list: A list which contains bounding box images (means, images which are cropped by bounding box detected) img_num: Number of bounding box detected by text detection indices: Calculate and sort the aspect ratio of all text bars """
    ori_im = frame.copy()
    img_crop_list = []
    for bno in range(len(dt_boxes)):
        tmp_box = copy.deepcopy(dt_boxes[bno])
        img_crop = get_rotate_crop_image(ori_im, tmp_box)
        img_crop_list.append(img_crop)

    img_num = len(img_crop_list)
    # Calculate the aspect ratio of all text bars
    width_list = []
    for img in img_crop_list:
        width_list.append(img.shape[1] / float(img.shape[0]))

    # Sorting can speed up the recognition process
    indices = np.argsort(np.array(width_list))
    return img_crop_list, img_num, indices
然后,对于每一个检测框以及对应的图像,我们都需要通过batch_text_box函数将其尺寸转化成文字识别模型的输入尺寸:
def batch_text_box(img_crop_list, img_num, indices, beg_img_no, batch_num):
    """ Batch for text recognition Parameters: img_crop_list: processed detected bounding box images img_num: number of bounding boxes from text detection indices: sorting for bounding boxes to speed up text recognition beg_img_no: the beginning number of bounding boxes for each batch of text recognition inference batch_num: number of images for each batch """
    norm_img_batch = []
    max_wh_ratio = 0
    end_img_no = min(img_num, beg_img_no + batch_num)
    for ino in range(beg_img_no, end_img_no):
        h, w = img_crop_list[indices[ino]].shape[0:2]
        wh_ratio = w * 1.0 / h
        max_wh_ratio = max(max_wh_ratio, wh_ratio)
    for ino in range(beg_img_no, end_img_no):
        norm_img = resize_norm_img(img_crop_list[indices[ino]], max_wh_ratio)
        norm_img = norm_img[np.newaxis, :]
        norm_img_batch.append(norm_img)

    norm_img_batch = np.concatenate(norm_img_batch)
    norm_img_batch = norm_img_batch.copy()
    return norm_img_batch
4.2 文本识别模型推理
我们将预训练完成后的图片作为输入进行文本识别模型推理:
# Run inference for text recognition
rec_results = rec_compiled_model([norm_img_batch])[rec_output_layer]
print("6 - Text recognition inference result scale {}. The last dimension 6625 indicates to dictionary of ground truth texts.".format(rec_results.shape))
模型输出的尺寸是(1, ?, 6625)。第三个维度是模型对应的Ground Truth字典的尺寸。第二个维度我不是很懂。
4.3 后处理
最后我们需要做的是,比对Ground Truth字典,然后得到文字识别的结果:
# Postprocessing recognition results
postprocess_op = processing.build_post_process(processing.postprocess_params)
rec_result = postprocess_op(rec_results)
print("- Text recognition result is: ", rec_result)
## Postprocessing for recognition
postprocess_params = {

            'name': 'CTCLabelDecode',
            "character_type": "ch",
            "character_dict_path": "./data/ppocr_keys_v1.txt",
            "use_space_char": True
        }
def build_post_process(config):
    config = copy.deepcopy(config)
    module_name = config.pop('name')
    module_class = eval(module_name)(**config)
    return module_class
6 VideoPlayer 类
这一部分就是我觉得很值得一看的地方了。VideoPlayer 类中,我们通过 cv2.VideoCapture 读取每一帧视频数据,新建一个线程,这个线程负责按照指定的FPS读取视频数据。而主线程需要的时候,可以通过 next 函数调用下一帧图像。这里的代码写的非常好,因为如果我们将推理和读每一帧图像数据放在同一个线程,就可能会发生丢帧导致的各种问题,比如视频卡顿,延迟,甚至是延迟时间太长导致的程序“奔溃”。
三种视频输入方式在source的不同写法:
- 视频文件:比如,…/201-vision-monodepth/data/Coco Walking in Berkeley.mp4
- USB摄像头:比如,0(取决于接口的值,可能是0,或者1,或者其他)
- RTSP流:比如,rtsp://192.168.1.2:8080/out.h264
VIdeoPlayer 类相关的代码如下:
class VideoPlayer:
    """ Custom video player to fulfill FPS requirements. You can set target FPS and output size, flip the video horizontally or skip first N frames. :param source: Video source. It could be either camera device or video file. For rtsp camera, format should be something like: rtsp://192.168.1.2:8080/out.h264 :param size: Output frame size. :param flip: Flip source horizontally. :param fps: Target FPS. :param skip_first_frames: Skip first N frames. """

    def __init__(self, source, size=None, flip=False, fps=None, skip_first_frames=0):
        self.__cap = cv2.VideoCapture(source)
        if not self.__cap.isOpened():
            raise RuntimeError(
                f"Cannot open {
      'camera' if isinstance(source, int) else ''} {
      source}"
            )
        # skip first N frames
        self.__cap.set(cv2.CAP_PROP_POS_FRAMES, skip_first_frames)
        # fps of input file
        self.__input_fps = self.__cap.get(cv2.CAP_PROP_FPS)
        if self.__input_fps <= 0:
            self.__input_fps = 60
        # target fps given by user
        self.__output_fps = fps if fps is not None else self.__input_fps
        self.__flip = flip
        self.__size = None
        self.__interpolation = None
        if size is not None:
            self.__size = size
            # AREA better for shrinking, LINEAR better for enlarging
            self.__interpolation = (
                cv2.INTER_AREA
                if size[0] < self.__cap.get(cv2.CAP_PROP_FRAME_WIDTH)
                else cv2.INTER_LINEAR
            )
        # first frame
        _, self.__frame = self.__cap.read()
        self.__lock = threading.Lock()
        self.__thread = None
        self.__stop = False

    """ Start playing. """

    def start(self):
        self.__stop = False
        self.__thread = threading.Thread(target=self.__run, daemon=True)
        self.__thread.start()

    """ Stop playing and release resources. """

    def stop(self):
        self.__stop = True
        if self.__thread is not None:
            self.__thread.join()
        self.__cap.release()

    def __run(self):
        prev_time = 0
        while not self.__stop:
            t1 = time.time()
            ret, frame = self.__cap.read()
            if not ret:
                break

            # fulfill target fps
            if 1 / self.__output_fps < time.time() - prev_time:
                prev_time = time.time()
                # replace by current frame
                with self.__lock:
                    self.__frame = frame

            t2 = time.time()
            # time to wait [s] to fulfill input fps
            wait_time = 1 / self.__input_fps - (t2 - t1)
            # wait until
            time.sleep(max(0, wait_time))

        self.__frame = None

    """ Get current frame. """

    def next(self):
        with self.__lock:
            if self.__frame is None:
                return None
            # need to copy frame, because can be cached and reused if fps is low
            frame = self.__frame.copy()
        if self.__size is not None:
            frame = cv2.resize(frame, self.__size, interpolation=self.__interpolation)
        if self.__flip:
            frame = cv2.flip(frame, 1)
        return frame
边栏推荐
- 2022 final examination of software project management of School of software, Shandong University (recall version)
- Matlab random volatility SV, GARCH using MCMC Markov chain Monte Carlo method to analyze exchange rate time series
- 深度学习------卷积(conv2D)底层
- 帆软堆积图显示占比
- Vs problems when connecting to SQL myconn OPen(); cannot execute
- Guava Cache 使用小结
- Playwirght深度入门
- NFS 特别注意权限的问题
- Basic experiment of data statistics and analysis - basic grammar and operation
- 左乘右乘矩阵问题
猜你喜欢
![[cloud computing event] vocational skill competition -- container development example pig rapid development framework](/img/4b/393b5980090330602a501867c60089.png)
[cloud computing event] vocational skill competition -- container development example pig rapid development framework

某年某月某公司的面试题(1)
ArcMap批量删除距离较近的点
![[interface automation] software testing the core skills of salary increase to increase salary by 200%](/img/22/be8c5c922307225c34f6205f189c33.png)
[interface automation] software testing the core skills of salary increase to increase salary by 200%

Matlab random volatility SV, GARCH using MCMC Markov chain Monte Carlo method to analyze exchange rate time series

Design of temperature detection and alarm system based on 51 single chip microcomputer

How bootstrap clears floating styles

YGG 西班牙 subDAO——Ola GG 正式成立

HCIP之路
Deploy kubersphere in kubernetes
随机推荐
mysql中多表视图性能疑惑
11 字符串函数
QT project error: -1: error: cannot run compiler 'clang++' Output:mingw32-make. exe
RTMP streaming exception fast recovery scheme
Kwai 350014
利用for循环输出一个字母三角形
The road to hcip MPLS
1.概率论-组合分析
论文写作之WPS安装Mathtype插件编写数学公式
MySQL慢查询记录
Can you think of a better way to solve the problem of string inversion?
C WPF realizes dynamic loading of controls through binding
快速排序 + 冒泡排序 + 插入排序 + 選擇排序
Unity audio visualization scheme
[interface automation] software testing the core skills of salary increase to increase salary by 200%
C WPF additional attribute implementation interface defines decorator
1. probability theory - combination analysis
浅谈ThreadLocal和InheritableThreadLocal,源码解析
[Planet selection] how to efficiently build fine-grained two-way links between roam and thebrain?
[Laoke] how should ordinary people learn technology?