当前位置:网站首页>Eye gaze estimation using webcam
Eye gaze estimation using webcam
2022-06-24 23:52:00 【woshicver】
Let's take a look at the following , You sit in the library , You just saw the most beautiful woman sitting on the other side of the library . Oh dear , She found you staring at her . She thinks your eyes are on her , And you point her eyes at you by understanding , Notice being caught by her .
Eye gaze : The focus of a person's eyes
Just like our amazing brain does many tasks effortlessly , This is a very difficult “ teach ” Computer problems , Because we need to carry out several arduous tasks :
Face recognition
Eye recognition and pupil location
Identify the head and eyes 3D location
Commercial gaze trackers come in a variety of shapes and sizes . Basic solutions from glasses to screens . however , Although these products are highly accurate , But they use proprietary software and hardware , And it's very expensive .
Let's start building our sight tracker
In order to keep the length of this blog reasonable , We will build a basic form of gaze tracking . There are a few rough estimates . And we don't know exactly what to look at , Instead, determine the direction of gaze .
Face recognition and pupil location
For this task , We will use MediaPipe(https://google.github.io/mediapipe/solutions/face_mesh.html), This is a result of Google Developed an amazing framework for deep learning , It will provide us with... In real time 468 individual 2D Face landmarks , And use very few resources .
Let's look at some code :
import mediapipe as mp
import cv2
import gaze

mp_face_mesh = mp.solutions.face_mesh # initialize the face mesh model

# camera stream:
cap = cv2.VideoCapture(1)
with mp_face_mesh.FaceMesh(
        max_num_faces=1,                            # number of faces to track in each frame
        refine_landmarks=True,                      # includes iris landmarks in the face mesh model
        min_detection_confidence=0.5,
        min_tracking_confidence=0.5) as face_mesh:
    while cap.isOpened():
        success, image = cap.read()
        if not success:                            # no frame input
            print("Ignoring empty camera frame.")
            continue
        # To improve performance, optionally mark the image as not writeable to
        # pass by reference.
        image.flags.writeable = False
        image = cv2.cvtColor(image, cv2.COLOR_BGR2RGB) # frame to RGB for the face-mesh model
        results = face_mesh.process(image)
        image = cv2.cvtColor(image, cv2.COLOR_RGB2BGR)

        if results.multi_face_landmarks:
            gaze.gaze(image, results.multi_face_landmarks[0])

        cv2.imshow('output window', image)
        if cv2.waitKey(2) & 0xFF == 27:
            break
cap.release()
There's nothing special here , In the 27 That's ok , We will start from mediapipe The current frame obtained by the frame and the facial landmarks are passed to us gaze function , That's all the fun .
2D turn 3D?
Line of sight tracking is a 3D problem , But we said in the title that we only used a simple webcam , How could it be ?
We will use some magic ( linear algebra ) To achieve it .
First , Let's see how our cameras work “ notice ” The of the world .

come from OpenCV Image of the document
When you look at the screen 2D The image is shown in blue ,3D The world is represented by the world coordinate system . What is the connection between them ? How do we get from 2D Image mapping 3D The world , Or at least get a rough estimate ?
Let's make it clear !
We are all the same
We humans are more similar than we think , We can use the universal face 3D Model , This will be for the majority of the population 3D A good estimate of the proportion .
Let's use this model to define a 3D Coordinate system , We set the tip of the nose as the origin of our coordinate system , Relative to it, we will redefine 5 A little bit , As shown below :
def gaze(frame, points):
    '''
    2D image points.
    relative takes mediapipe points that normelized to [-1, 1] and returns image points
    at (x,y) format
    '''
    image_points = np.array([
        relative(points.landmark[4], frame.shape),    # Nose tip
        relative(points.landmark[152], frame.shape),  # Chin
        relative(points.landmark[263], frame.shape),  # Left eye left corner
        relative(points.landmark[33], frame.shape),   # Right eye right corner
        relative(points.landmark[287], frame.shape),  # Left Mouth corner
        relative(points.landmark[57], frame.shape)    # Right mouth corner
    ], dtype="double")

    # 3D model points.
    model_points = np.array([
        (0.0, 0.0, 0.0),       # Nose tip
        (0, -63.6, -12.5),     # Chin
        (-43.3, 32.7, -26),    # Left eye left corner
        (43.3, 32.7, -26),     # Right eye right corner
        (-28.9, -28.9, -24.1), # Left Mouth corner
        (28.9, -28.9, -24.1)   # Right mouth corner
    ])
    '''
    3D model eye points
    The center of the eye ball
    '''
    Eye_ball_center_right = np.array([[-29.05],[32.7],[-39.5]])
    Eye_ball_center_left = np.array([[29.05],[32.7],[-39.5]])
Now we have 6 From the mediapipe To obtain the 2D spot , And the corresponding in the world coordinate system we defined 3D spot . Our goal is to understand these points 3D The change of position , And by using our 2D Images to do this . What should we do ?
Pinhole camera model rescue
Pinhole camera model is a mathematical model , It describes the 3D The relationship between points in the world and their relationships in 2D Projection on the image plane . From this model , We will get the following equation :

Use this equation , We can get 3D Point projection to image 2D Transformation of image plane . But can we solve it ? ok , At least not through simple algebraic tools , But you don't have to worry , This is it. OpenCV Use solvePnP Where the function is , Please see the link for a more in-depth explanation :
https://docs.opencv.org/4.5.4/d9/d0c/group__calib3d.html#ga549c2075fac14829ff4a58bc931c033d
We will get our 6 Image points and corresponding 3D Model point , And pass them on to solvepnp function . In return , We will get a rotation and translation vector , So we get a transformation , This will help us move a point from 3D The world point is projected to 2D Plane .
Learn how to estimate the camera matrix here :
https://learnopencv.com/approximate-focal-length-for-webcams-and-cell-phone-cameras/
Or learn how to calibrate your own camera here :
https://docs.opencv.org/3.4/dc/dbb/tutorial_py_calibration.html
'''
    camera matrix estimation
    '''
    focal_length = frame.shape[1]
    center = (frame.shape[1] / 2, frame.shape[0] / 2)
    camera_matrix = np.array(
        [[focal_length, 0, center[0]],
         [0, focal_length, center[1]],
         [0, 0, 1]], dtype="double"
    )

    dist_coeffs = np.zeros((4, 1))  # Assuming no lens distortion
    (success, rotation_vector, translation_vector) = cv2.solvePnP(model_points, image_points, camera_matrix,
                                                                  dist_coeffs, flags=cv2.cv2.SOLVEPNP_ITERATIVE)
Use our new transformation , We can 3D Take a point out of space and project it onto 2D Image plane . therefore , We will learn about this 3D Where the point points in space . This is the point (0,0,150) The appearance of .
2D from 3D
Now we will get the pupil 2D Image coordinates and project them onto our 3D Model coordinates . It's just the opposite of what we did in the head pose estimation .
# project image point to world point
_ ,transformation, _ = cv2.estimateAffine3D(image_points1, model_points) # image cord to world cord tramsformation
pupil_world_cord =  transformation @ np.array([[left_pupil[0],left_pupil[1],0,1]]).T # Transformation * pupil image point vector
As the code snippet shows , We will use OpenCV Estimation Affline3D function . This function uses the same principle as the pinhole camera model we discussed . It uses two groups 3D Point and return the conversion between the first group and the second group . But wait. , Our image points are two-dimensional , How could it be ?
ok , We will get the image points (x,y) And use them as (x,y,0) Pass on , Therefore, the conversion between image coordinates and model coordinates will be obtained . Using this method , We can learn from mediapipe Acquired 2D Image point acquisition pupil 3D Model point .
Be careful : This is not a very accurate estimate

I didn't tell you , But if you look at the second code snippet above , You can see that we have eye center model points (3D), We just used estimateAffline3D Got the pupil 3D Model point .
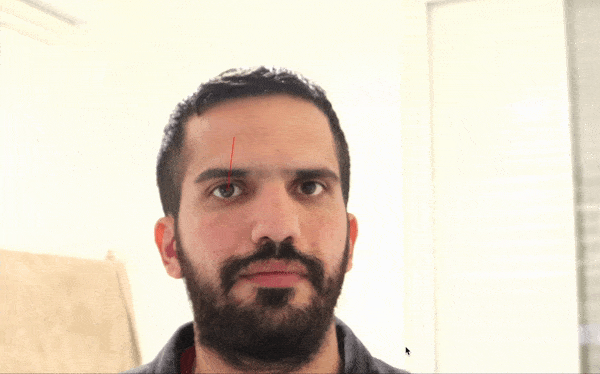
Now find the direction to look , We need to solve this line plane intersection problem , As shown above . What we are trying to find is useful S Express . Let's project a point onto 2D In plane .
# project pupil image point into world point
    pupil_world_cord =  transformation @ np.array([[left_pupil[0],left_pupil[1],0,1]]).T

    # 3D gaze point (10 is arbitrary value denoting gaze distance)
    S = Eye_ball_center_left + (pupil_world_cord - Eye_ball_center_left) * 10

    # Project a 3D gaze point onto the image plane.
    (eye_pupil2D, jacobian) = cv2.projectPoints((int(S[0]), int(S[1]), int(S[2])), rotation_vector,
                                                    translation_vector, camera_matrix, dist_coeffs)
    # Draw gaze line into screen
    p1  = (int(left_pupil[0]), int(left_pupil[1]))
    p2 = (int(eye_pupil2D[0][0][0]) , int(eye_pupil2D[0][0][1]))
    cv2.line(frame, p1, p2, (0, 0, 255), 2)
Be careful : In the 5 In line , We use “ Magic ” Count 10, This is because we don't know the distance between the subject and the camera . So in the figure t The distance between the pupil and the camera is unknown
Have you finished ?
Not yet . Now we need to think about head movements , such , Our eye tracker can adapt to the movement of the head . Let's use our head pose estimates from the beginning .

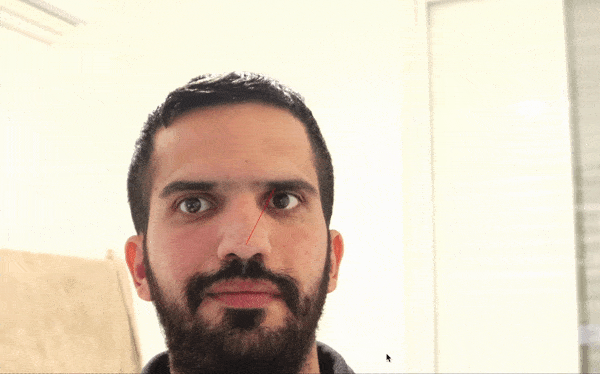
Pupillary 2D The position is determined by the point p Express , spot g It's watching + Head rotation projection , spot h It's a head pose projection . Now in order to get clean gaze information , Let's start with a vector A Construct vector in B.
# Project a 3D gaze direction onto the image plane.
(eye_pupil2D, _) = cv2.projectPoints((int(S[0]), int(S[1]), int(S[2])), rotation_vector,
                                                translation_vector, camera_matrix, dist_coeffs)
# project 3D head pose into the image plane
(head_pose, _) = cv2.projectPoints((int(pupil_world_cord[0]), int(pupil_world_cord[1]), int(40)), rotation_vector,
                                                translation_vector, camera_matrix, dist_coeffs)

# correct gaze for head rotation
gaze = left_pupil + (eye_pupil2D[0][0] - left_pupil) - (head_pose[0][0] - left_pupil)
In the 5 In line , We used “ Magic ” Count 40, The reason is that we used in the code snippet above 10 For the same reason .
end
We're done , At least for now . You can Github See the complete code on the page , And run it on your machine :
https://github.com/amitt1236/Gaze_estimation
But have we really finished ?
We can change something to improve accuracy :
Calibrate the camera correctly , Do not use estimates .
Use both eyes , Calculate the average value between the two positions .( We only used the left eye )
We are using estimateAffine3D Methods will 2d The pupil position is projected to 3d In the space , But this is not an accurate estimate . We can use the eye structure and the pupil position in the eye socket to infer the pupil position 3d Location .
We completely ignore the distance between the subject and the camera . Because of that , We only get a gaze direction, not a gaze point . It is probably the most important part , But it is also the most complicated part .
Through some work , You can implement your solution , And use it for your specific needs .
* END *
If you see this , Show that you like this article , Please forward 、 give the thumbs-up . WeChat search 「uncle_pn」, Welcome to add Xiaobian wechat 「 woshicver」, Update a high-quality blog post in your circle of friends every day .
↓ Scan QR code and add small code ↓

边栏推荐
- 2021-2022 China's financial digitalization "new" insight Industry Research Report
- 7-8 circular scheduling problem
- 企业级~uni-app网络请求封装
- It's 2022, and you still don't know what performance testing is?
- Canvas spiral style animation JS special effect
- Yyds dry goods counting uses xshell to implement agent function
- 美国众议院议员:数字美元将支持美元作为全球储备货币
- Uninstall hero League
- 同济、阿里获CVPR最佳学生论文,李飞飞获黄煦涛奖,近6000人线下参会
- Hello C (VII) - structure
猜你喜欢

单调栈以及单调栈的应用

Fast pace? high pressure? VR panoramic Inn brings you a comfortable life

年薪百万,7年测试经验:守在一个还算不错的赛道,慢慢积累,等风来

First person singular reading notes

It's 2022, and you still don't know what performance testing is?

无鸟用的SAP PA证书,刚入行的同行可以考一考

DO280OpenShift访问控制--加密和ConfigMap

7-6 laying oil well pipeline

抖音实战~实现App端视频上传与发布

Tape SVG animation JS effect
随机推荐
如何化解35岁危机?华为云数据库首席架构师20年技术经验分享
节奏快?压力大?VR全景客栈带你体验安逸生活
Number of bytes corresponding to common data types
Tongji and Ali won the CVPR best student thesis, lifeifei won the Huang xutao award, and nearly 6000 people attended the offline conference
js监听页面或元素scroll事件,滚动到底部或顶部
Helix distance of point
普通人的生活准则
Hello C (V) -- pointer and array
throttle-debounce. JS: a small anti shake throttling function library
The living standards of ordinary people
svg+js键盘控制路径
Quickly build KVM virtual machine on # yyds dry goods inventory # physical machine
Arbitrary file download of file operation vulnerability (7)
Classic interview questions and answers for embedded engineers
Morris遍历
What you must know about time series database!
What are the advantages of VR panoramic production? Why is it favored?
抖音實戰~項目關聯UniCloud
Tomorrow is the PMP Exam (June 25). Have you understood all this?
JS listens for page or element scroll events, scrolling to the bottom or top