当前位置:网站首页>Tkinter module advanced operations (I) -- transparent buttons, transparent text boxes, custom buttons and custom text boxes
Tkinter module advanced operations (I) -- transparent buttons, transparent text boxes, custom buttons and custom text boxes
2022-07-25 17:26:00 【Xiaokang 2022】
【 Write it at the front 】
—— as everyone knows ,tkinter The module comes with Button Classes cannot be made transparent ( At least I can't do it )
【tip: Transparency refers to letting the background color or picture show through the button 】
—— All over the place Button All parameters and operations of class , Can't solve this problem !
—— but ! Is there really no way to make a transparent button ?
—— If you think only by tkinter If the module cannot do it , Please see the following illustration !
This is a little game I made , Use it completely tkinter Module making , No other modules !!!
—— The fact proved that , use tkinter Modules can make transparent buttons !
—— There is also a transparent text box !( The principle is the same )
This is another unfinished work I did , No link yet
—— I don't know if you have thought about how bloggers do it ?
【tip: In fact, you will know the method by reading the article title 】
【 The film begins 】
【 Principle explanation 】
stay tkinter Only built-in Button Class really can't change the fact that it's opaque , And it is an encapsulated class , Even if you inherit it , Re create a class of your own , It is not easy to change this fact ( Because the principle is different ), For buttons (Button class ) for , Its outer frame and inner part are a whole , Cannot divide , Not to mention the connection between its inner part and the pictures of the outside world . Unless ……
—— Some people think that , Isn't it just to make a transparent button ? Who can't be , I put a picture on the background , Then crop the picture to the right position , Last in Button Insert the cropped image on the class, which is “ transparent ” Yes ?
—— Blogger : No, no, no, No , No one really does this ?( In shock ......)
—— Blogger : Now I want 100 million such buttons ? Are you going to cut 100 million times ???
actually , The above is also a way to make buttons transparent , But this kind of transparency is “ Pseudotransparency ”, Not really transparent .
—— Others think , I don't care if it's really transparent ! I wish I could use it ?
—— Blogger : Not to mention whether you waste memory , The next operation “ Pseudotransparency ” Can it be realized? ?
See here , Read about tkinter The module should already know the principle .
This transparency is true , But the button is fake !
The button is our own Canvas Controls “ draw ” Coming out , recycling bind Function to associate some events with it , So you get a button like “ Fake button ”.
It is relative to the “ Pseudotransparency ” Button , The advantage is that we can design the button style by ourselves , and “ Pseudotransparency ” The button of cannot do , Because it is actually inherited from Button Class , It can no longer be modified , What about the disadvantages , It will also be very obvious later , It is this button style that is very annoying , Because the processing of coordinate position is very troublesome (T_T)
Not much said , Here's the code !
【 Code demonstration 】
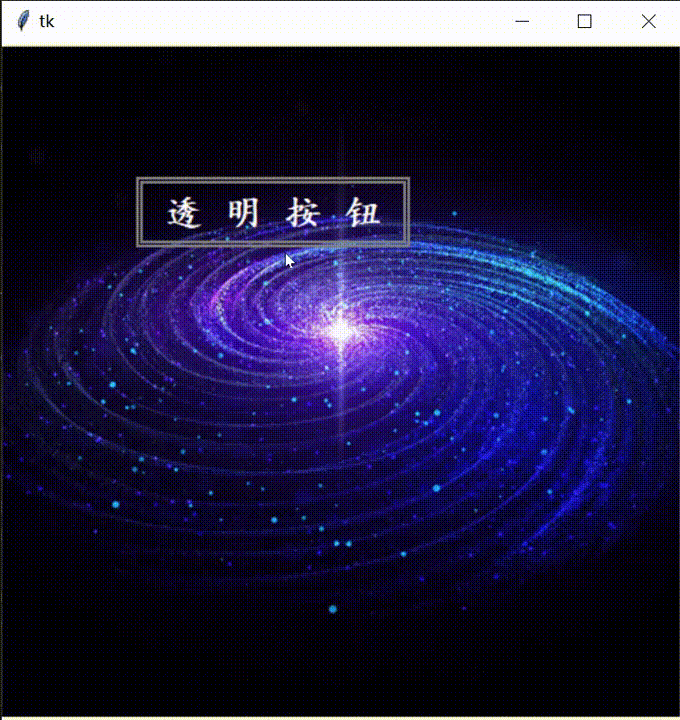
【 Objective requirements 】 Make a rectangular “ It's so transparent ” Button , Add a little style appropriately
【 Function realization 】 Click to print Out “Hello Python!”
Here I'll give you the background picture first ( as follows )

Come on ! Code up !!!
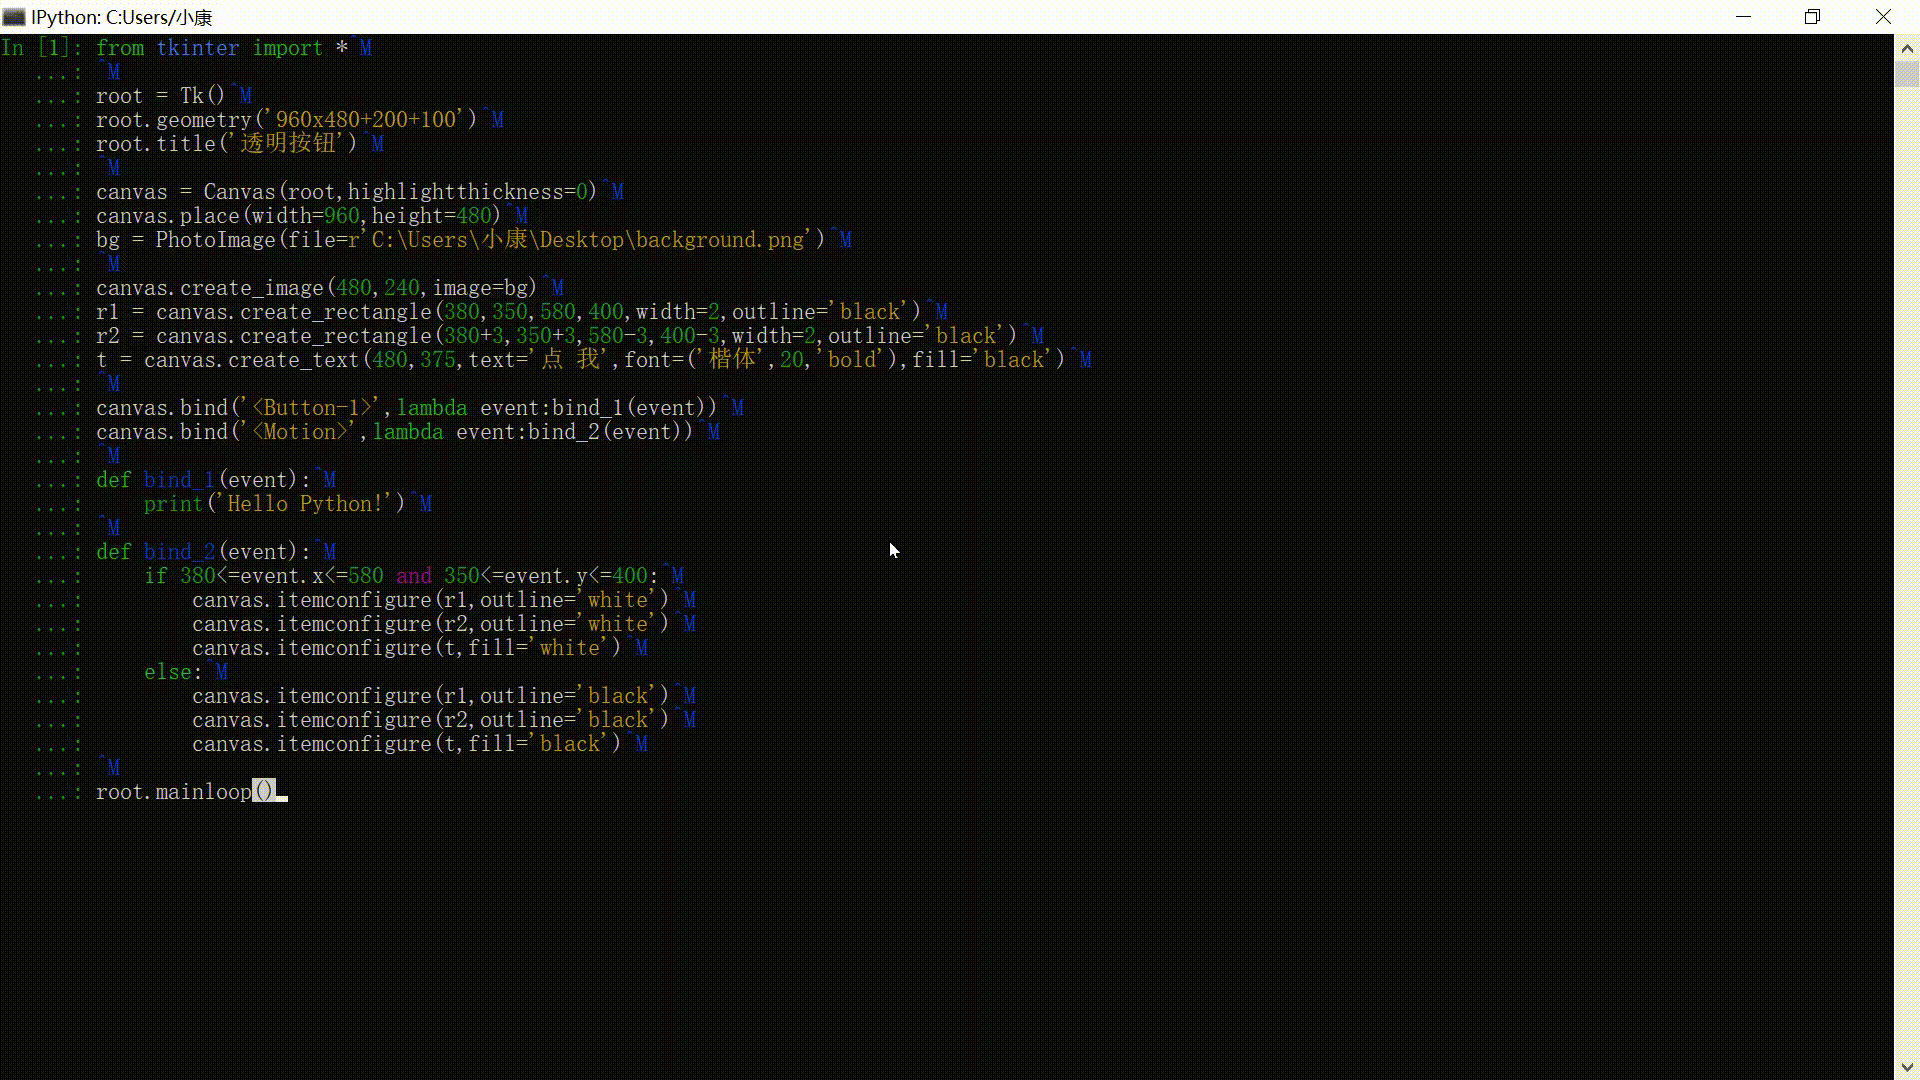
from tkinter import *#  Introduce modules

root = Tk()#  establish Tk Control
root.geometry('960x480+200+100')#  Set window size and position
root.title(' Transparent button ')#  Set the window title

canvas = Canvas(root,highlightthickness=0)#  establish Canvas Control , And set the border thickness to 0
canvas.place(width=960,height=480)#  Set up Canvas Control size and position
bg = PhotoImage(file='background.png')# 【 Remember to change the corresponding path here 】

canvas.create_image(480,240,image=bg)#  Add background image
r1 = canvas.create_rectangle(380,350,580,400,width=2,outline='black')#  Button outline
r2 = canvas.create_rectangle(380+3,350+3,580-3,400-3,width=2,outline='black')#  Button inner box
t = canvas.create_text(480,375,text=' spot   I ',font=(' Regular script ',20,'bold'),fill='black')#  Button to display text

canvas.bind('<Button-1>',lambda event:bind_1(event))#  Associate mouse click events
canvas.bind('<Motion>',lambda event:bind_2(event))#  Associate mouse passing events

def bind_1(event):#  Click the response function
    print('Hello Python!')#  Print

def bind_2(event):#  The mouse passes the response function
    if 380<=event.x<=580 and 350<=event.y<=400:#  Location of response
        canvas.itemconfigure(r1,outline='white')#  Reset the outline color
        canvas.itemconfigure(r2,outline='white')#  Reset the inner frame color
        canvas.itemconfigure(t,fill='white')#  Reset the display text color
    else:
        canvas.itemconfigure(r1,outline='black')#  Restore the default color of the outline
        canvas.itemconfigure(r2,outline='black')#  Restore the default color of the inner box
        canvas.itemconfigure(t,fill='black')#  Restore the default color of the display text

root.mainloop()#  The window enters the message event loop
The effect is as follows
There are more styles that we can develop by ourselves !( Perfect interpretation of what is Customize !)
For example, the following style ( Although not transparent , But its shape uses Button Class absolutely cannot !)
【tip: The style of the mouse changes when passing the button !】

What about code? , as follows ( In fact, compared with the above code , Only a little change )
from tkinter import *#  Introduce modules

root = Tk()#  establish Tk Control
root.geometry('960x480+200+100')#  Set window size and position
root.title(' Custom buttons ')#  Set the window title

canvas = Canvas(root,highlightthickness=0)#  establish Canvas Control , And set the border thickness to 0
canvas.place(width=960,height=480)#  Set up Canvas Control size and position
bg = PhotoImage(file='background.png')# 【 Remember to change the corresponding path here 】

canvas.create_image(480,240,image=bg)#  Add background image
r = canvas.create_rectangle(380,350-1,580,400+1,width=0,fill='yellow')#  Button outline
c1 = canvas.create_oval(355,350,405,400,width=0,fill='yellow')#  Button left circle
c2 = canvas.create_oval(555,350,605,400,width=0,fill='yellow')#  Button right circle
t = canvas.create_text(480,375,text=' spot   I ',font=(' Regular script ',20,'bold'),fill='black')#  Button to display text

canvas.bind('<Button-1>',lambda event:bind_1(event))#  Associate mouse click events
canvas.bind('<Motion>',lambda event:bind_2(event))#  Associate mouse passing events

def bind_1(event):#  Click the response function
    print('Hello Python!')#  Print

def bind_2(event):#  The mouse passes the response function
    if 380<=event.x<=580 and 350<=event.y<=400:#  Location of response
        canvas.itemconfigure(r,fill='orange')#  Reset the outline color
        canvas.itemconfigure(c1,fill='orange')#  Reset the left circle color
        canvas.itemconfigure(c2,fill='orange')#  Reset the right circle color
        canvas.itemconfigure(t,fill='white')#  Reset the display text color
        canvas.configure(cursor='hand2')#  Reset the mouse style
    else:
        canvas.itemconfigure(r,fill='yellow')#  Restore the default color of the outline
        canvas.itemconfigure(c1,fill='yellow')#  Restore the default color of the left circle
        canvas.itemconfigure(c2,fill='yellow')#  Restore the default color of the right circle
        canvas.itemconfigure(t,fill='black')#  Restore the default color of the display text
        canvas.configure(cursor='arrow')#  Restore mouse style

root.mainloop()#  The window enters the message event loop
that , See here , You must also know how transparent text boxes are made ? In short ,“ draw ” Coming out ! Of course , To solve the need for a large number of transparent buttons and transparent text boxes , We definitely can't do this , Set the position of each button or text box , Style or something ( Too much repetitive work ), therefore , We can implement it with classes ! You don't have to write classes , I'm here Specially prepared a big gift bag for everyone !( as follows ) However, you can also modify the following classes , Make it meet your own design requirements !
Code up !
【 package 】
【 Canvas button class 】
class Button_Canvas:
    ## -------  Canvas button class  ------- ##
    def __init__(self,canvas:Canvas,x1:int,y1:int,x2:int,y2:int,text:str,fontsize:int=15,d_outline:str='gray',d_fill:str='gray',image:PhotoImage=None):
        self.canvas = canvas# Parent control
        self.value = text
        self.tag = text

        self.x1 = x1# top left corner x coordinate
        self.y1 = y1# top left corner y coordinate
        self.x2 = x2# The lower right corner x coordinate
        self.y2 = y2# The lower right corner y coordinate
        self.d_outline = d_outline# Default outline color
        self.d_fill = d_fill# Default text color

        self.rec = self.canvas.create_rectangle(x1,y1,x2,y2,width=2,outline=self.d_outline,tag=self.tag)
        self.tex = self.canvas.create_text((x1+x2)//2,(y1+y2)//2,text=self.value,font=(' Regular script ',fontsize),justify='center',fill=self.d_fill,tag=self.tag)

        if image != None:
            self.canvas.create_image((x1+x2)//2,(y1+y2)//2,image=image)

    def focus_on(self,color:str):
        ## ------  Focus has acquired status  ------ ##
        self.canvas.itemconfig(self.rec,fill=color)

    def focus_off(self):
        ## ------  Focus does not get status  ------ ##
        self.canvas.itemconfig(self.rec,fill='')

    def Focus(self,event:Event,color:str):
        ## ------  Focus acquisition state detection  ------ ##
        if self.x1<=event.x<=self.x2 and self.y1<=event.y<=self.y2:
            self.focus_on(color)
        else:
            self.focus_off()

    def move_on(self,color:str):
        ## ------  Focus half get state  ------ ##
        self.canvas.itemconfig(self.rec,outline=color)
        self.canvas.itemconfig(self.tex,fill=color)

    def move_off(self):
        ## ------  The focus is not a semi acquired state  ------ ##
        self.canvas.itemconfig(self.rec,outline=self.d_outline)
        self.canvas.itemconfig(self.tex,fill=self.d_fill)

    def Move(self,event:Event,color:str):
        ## ------  Focus half acquisition state detection  ------ ##
        if self.x1<=event.x<=self.x2 and self.y1<=event.y<=self.y2:
            self.move_on(color)
        else:
            self.move_off()

    def execute(self,event:Event,function=None):
        ## -------  Execute the correlation function  ------- ##
        if self.x1<=event.x<=self.x2 and self.y1<=event.y<=self.y2:
            self.focus_off()
            self.move_off()

            if function != None:
                return function()

    def value_change(self,value:str):
        ## ------  The display value changes  ------ ##
        self.value = value
        self.canvas.itemconfig(self.tex,text=self.value)

    def destroy(self):
        ## ------  Button delete  ------ ##
        self.canvas.delete(self.tag)
【 Canvas text box class 】
class Entry_Canvas:
    ## -------  Canvas text box class  ------- ##
    def __init__(self,canvas:Canvas,x:int,y:int,r_width:int,r_height:int,text1:str,text2:str,pw_mode:bool=False,d_outline:str='gray',d_fill:str='gray',fontsize:int=15):
        self.canvas = canvas# Parent control
        self.focus = False# Whether to get the current focus
        self.mode = pw_mode# Password mode

        self.value = ''# True value
        self.info = ''# Surface value

        self.x1 = x-r_width# top left corner x coordinate
        self.y1 = y-r_height# top left corner y coordinate
        self.x2 = x+r_width# The lower right corner x coordinate
        self.y2 = y+r_height# The lower right corner y coordinate
        self.info1 = text1# When the focus is not obtained, the text is displayed
        self.info2 = text2# The text is displayed when the focus is half taken
        self.d_outline = d_outline# Default outline color
        self.d_fill = d_fill# Default text color

        self.rec = self.canvas.create_rectangle(x-r_width,y-r_height,x+r_width,y+r_height,width=2,outline=d_outline)
        self.tex = self.canvas.create_text(x,y,text=self.info1,font=(' Regular script ',fontsize),fill=d_fill)

    def focus_on(self,color:str):
        ## ------  Focus has acquired status  ------ ##
        self.focus = True
        self.canvas.itemconfig(self.rec,outline=color)
        self.canvas.itemconfig(self.tex,text=self.info+'|')

    def focus_off(self):
        ## ------  Focus does not get status  ------ ##
        self.focus = False
        self.canvas.itemconfig(self.rec,outline=self.d_outline)

        if self.info == '':
            self.canvas.itemconfig(self.tex,text=self.info1)
        else:
            self.canvas.itemconfig(self.tex,text=self.info)

    def Focus(self,event:Event,color:str='white'):
        ## -------  Focus acquisition state detection  ------- ##
        if self.x1<=event.x<=self.x2 and self.y1<=event.y<=self.y2:
            self.focus_on(color)
        else:
            self.focus_off()

    def move_on(self,color:str):
        ## ------  Focus half get state  ------ ##
        if self.focus == False:
            self.canvas.itemconfig(self.rec,outline=color)
            if self.canvas.itemcget(self.tex,'text') == self.info1:
                self.canvas.itemconfig(self.tex,text=self.info2)

    def move_off(self):
        ## ------  The focus is not a semi acquired state  ------ ##
        if self.focus == False:
            self.canvas.itemconfig(self.rec,outline=self.d_fill)
            if self.canvas.itemcget(self.tex,'text') == self.info2:
                self.canvas.itemconfig(self.tex,text=self.info1)

    def Move(self,event:Event,color:str='white'):
        ## -------  Focus half acquisition state detection  ------- ##
        if self.x1<=event.x<=self.x2 and self.y1<=event.y<=self.y2:
            self.move_on(color)
        else:
            self.move_off()

    def input(self,char:str,length:int=10):
        ## ------  Text input  ------ ##
        if self.focus == True:

            value = ord(char)
            if value == 8:
                self.value = self.value[:-1]
            elif value<=47 or 58<=value<=64 or 91<=value<=96 or 123<=value<=256:
                pass
            else:
                if len(self.value) < length and not char.isspace():
                    self.value += char

            if self.mode == True:
                self.info = '•'*len(self.value)
            else:
                self.info = self.value

            self.canvas.itemconfig(self.tex,text=self.info+'|')
【 Take it ! You're welcome ! I'll be satisfied with your praise and collection !】
边栏推荐
- 01.两数之和
- 备考过程中,这些“谣言”千万不要信!
- [target detection] yolov5 Runtong visdrone data set
- What are the free low code development platforms?
- Technical difficulties and applications of large humanoid robots
- HCIP笔记十二天
- 约瑟夫环问题
- I want to manage money. I don't understand. Is there a principal guaranteed financial product?
- 用秩讨论线性方程组的解/三个平面的位置关系
- 02. Add two numbers
猜你喜欢

STM32 PAJ7620U2手势识别模块(IIC通信)程序源码详解

Hcip notes 11 days

win10如何删除微软拼音输入法

如何看一本书
![[knowledge atlas] practice -- Practice of question answering system based on medical knowledge atlas (Part4): problem analysis and retrieval sentence generation combined with problem classification](/img/22/01297d28e5bfb105fc65ee29248a7c.png)
[knowledge atlas] practice -- Practice of question answering system based on medical knowledge atlas (Part4): problem analysis and retrieval sentence generation combined with problem classification
![[target detection] tph-yolov5: UAV target detection based on Transformer's improved yolov5](/img/be/5348170fb460cbafbdb848d70fea15.png)
[target detection] tph-yolov5: UAV target detection based on Transformer's improved yolov5
![[target detection] yolov5 Runtong voc2007 dataset (repair version)](/img/b6/b74e93ca5e1986e0265c58f750dce3.png)
[target detection] yolov5 Runtong voc2007 dataset (repair version)

在华为昇腾Ascend910上复现swin_transformer

ACL 2022 | 基于最优传输的对比学习实现可解释的语义文本相似性

Mindoc makes mind map
随机推荐
理财有保本产品吗?
Don't believe these "rumors" in the process of preparing for the exam!
【Cadence Allegro PCB设计】永久修改快捷键(自定义)~亲测有效~
"Digital security" alert NFT's seven Scams
Wu Enda logistic regression 2
Data analysis and privacy security become the key factors for the success or failure of Web3.0. How do enterprises layout?
Ultimate doll 2.0 | cloud native delivery package
HCIP笔记十一天
哈夫曼树的构建
无聊发文吐槽工作生活
Text translation software - text batch translation converter free of charge
博云容器云、DevOps平台斩获可信云“技术最佳实践奖”
Chapter V: process control
Is there a principal guaranteed product for financial management?
stm32F407------SPI
EDI docking commercehub orderstream
用秩讨论线性方程组的解/三个平面的位置关系
咨询下flink sql-client怎么处理DDL后,fink sql里面映射表加字段以及JOb?
02.两数相加
【知识图谱】实践篇——基于医疗知识图谱的问答系统实践(Part3):基于规则的问题分类