当前位置:网站首页>Openvino series 18 Real time object recognition through openvino and opencv (RTSP, USB video reading and video file reading)
Openvino series 18 Real time object recognition through openvino and opencv (RTSP, USB video reading and video file reading)
2022-06-23 08:00:00 【Breaking the waves sometimes】
openvino series 18. adopt OpenVINO and OpenCV Realize real-time object recognition (RTSP,USB Video reading and video file reading )
In this case , We will OpenVINO Of SSDLite MobileNetV2 The object recognition algorithm makes inference in the video stream . in addition , How to read video through multithreading , And video analysis , This code is worth learning . This case involves :
- Read Tensorflow Object recognition pre training model
- take Tensorflow Model to IR middleware
- adopt OpenCV Implement video but read by a separate thread , Main thread call , When needed ( This code is worth reading )
- Real time object recognition results are presented , Realization USB,RTSP Video streaming , And video analysis of video files .
Description of the environment :
- Operation environment of this case :Win10,9 generation i7 The notebook
- IDE:VSCode
- openvino edition :2022.1
- Code link
List of articles
0 Code running
take Gitee After downloading the code , Get into 13-realtime-objectdetection, You need to create a new virtual environment , And download the related dependencies ( About OpenVINO Installation and use , No more details here , Students who need to know can directly open Gitee Link to , In the previous chapters or under the main path README The document introduces ). After entering the virtual environment , Directly in terminal Run in python realtime-objectdetection.py that will do . If you are interested in step-by-step debugging , You can look at it realtime-objectdetection.ipynb.
1 About SSDLite MobileNetV2
As always, let's take a look at this pre training model first .Intel Of Open Model Zoo Many training models are provided in , Interested students can go to see .SSDLite MobileNetV2 The model can be seen as SSDLite+MobileNetV2 An object recognition model . We won't repeat the concept , Describe its IR Input and output of the model ( Here we need to download TensorFlow Version of the original model , To convert IR Model ):
The size of the input image is 1, 300, 300, 3, The format is [B, H, W, C], namely [batch size,image height,image width,number of channels], The image is BGR Format ;
The size of the model output is 1, 1, N, 7,N To identify the number of frames ,7 refer to [image_id, label, conf, x_min, y_min, x_max, y_max].
2 Model download , Convert and load
The code is attached directly here , Here is the download of the model , Translation and loading are explained in detail , Interested students can refer to the previous blog or code , such as 4-model-optimizer-convert2IR.
import collections
import os
import sys
import time

import cv2
import numpy as np
from IPython import display
from openvino.runtime import Core
import threading

'''  download ssdlite_mobilenet_v2 The original model , And put it in model In the folder . '''
base_model_dir = "model"
# model name as named in Open Model Zoo
model_name = "ssdlite_mobilenet_v2"

download_command = f"omz_downloader " \
                   f"--name {
      model_name} " \
                   f"--output_dir {
      base_model_dir} " \
                   f"--cache_dir {
      base_model_dir}"
! $download_command
print("1 - Download ssdlite_mobilenet_v2 original TensorFlow model.")

'''  take TensorFlow Model to IR Model , Here our model accuracy is adjusted to FP16, The default is FP32 '''

precision = "FP16"

# output path for the conversion
converted_model_path = f"model/public/{
      model_name}/{
      precision}/{
      model_name}.xml"

if not os.path.exists(converted_model_path):
    convert_command = f"omz_converter " \
                      f"--name {
      model_name} " \
                      f"--download_dir {
      base_model_dir} " \
                      f"--precisions {
      precision}"
    ! $convert_command
print("2 - Transform original model into IR format.")

''' Load the Model  We download the model and convert it into IR After the model , Load model  '''
# initialize inference engine
ie_core = Core()
# read the network and corresponding weights from file
model = ie_core.read_model(model=converted_model_path)
# compile the model for the CPU (you can choose manually CPU, GPU, MYRIAD etc.)
# or let the engine choose the best available device (AUTO)
compiled_model = ie_core.compile_model(model=model, device_name="CPU")
print("3 - Load model and compile model.")
# get input and output nodes
input_layer = compiled_model.input(0)
output_layer = compiled_model.output(0)
print("- Input layer info: ", input_layer)
print("- Output layer info: ", output_layer)
# get input size
height, width = list(input_layer.shape)[1:3]
Terminal Print in :
################|| Downloading ssdlite_mobilenet_v2 ||################
========== Retrieving model\public\ssdlite_mobilenet_v2\ssdlite_mobilenet_v2_coco_2018_05_09.tar.gz from the cache
========== Unpacking model\public\ssdlite_mobilenet_v2\ssdlite_mobilenet_v2_coco_2018_05_09.tar.gz

1 - Download ssdlite_mobilenet_v2 original TensorFlow model.
2 - Transform original model into IR format.
3 - Load model and compile model.
- Input layer info:  <ConstOutput: names[image_tensor, image_tensor:0] shape{1,300,300,3} type: u8>
- Output layer info:  <ConstOutput: names[detection_boxes, detection_boxes:0] shape{1,1,100,7} type: f32>
3 VideoPlayer class
This part is what I think is worth seeing .VideoPlayer Class , We go through cv2.VideoCapture Read each frame of video data , Create a new thread , This thread is responsible for following the specified FPS Read video data . When the main thread needs it , Can pass next Function to call the next frame of image . The code here is very well written , Because if we put the reasoning and reading of each frame of image data in the same thread , Various problems caused by frame loss may occur , For example, video Caton , Delay , Even the program caused by too long delay “ Run away ”.
The three video input modes are source Different ways of writing :
- Video file : such as ,…/201-vision-monodepth/data/Coco Walking in Berkeley.mp4
- USB camera : such as ,0( Depends on the value of the interface , May be 0, perhaps 1, Or other )
- RTSP flow : such as ,rtsp://192.168.1.2:8080/out.h264
VIdeoPlayer Class related code is as follows :
class VideoPlayer:
    """ Custom video player to fulfill FPS requirements. You can set target FPS and output size, flip the video horizontally or skip first N frames. :param source: Video source. It could be either camera device or video file. For rtsp camera, format should be something like: rtsp://192.168.1.2:8080/out.h264 :param size: Output frame size. :param flip: Flip source horizontally. :param fps: Target FPS. :param skip_first_frames: Skip first N frames. """

    def __init__(self, source, size=None, flip=False, fps=None, skip_first_frames=0):
        self.__cap = cv2.VideoCapture(source)
        if not self.__cap.isOpened():
            raise RuntimeError(
                f"Cannot open {
      'camera' if isinstance(source, int) else ''} {
      source}"
            )
        # skip first N frames
        self.__cap.set(cv2.CAP_PROP_POS_FRAMES, skip_first_frames)
        # fps of input file
        self.__input_fps = self.__cap.get(cv2.CAP_PROP_FPS)
        if self.__input_fps <= 0:
            self.__input_fps = 60
        # target fps given by user
        self.__output_fps = fps if fps is not None else self.__input_fps
        self.__flip = flip
        self.__size = None
        self.__interpolation = None
        if size is not None:
            self.__size = size
            # AREA better for shrinking, LINEAR better for enlarging
            self.__interpolation = (
                cv2.INTER_AREA
                if size[0] < self.__cap.get(cv2.CAP_PROP_FRAME_WIDTH)
                else cv2.INTER_LINEAR
            )
        # first frame
        _, self.__frame = self.__cap.read()
        self.__lock = threading.Lock()
        self.__thread = None
        self.__stop = False

    """ Start playing. """

    def start(self):
        self.__stop = False
        self.__thread = threading.Thread(target=self.__run, daemon=True)
        self.__thread.start()

    """ Stop playing and release resources. """

    def stop(self):
        self.__stop = True
        if self.__thread is not None:
            self.__thread.join()
        self.__cap.release()

    def __run(self):
        prev_time = 0
        while not self.__stop:
            t1 = time.time()
            ret, frame = self.__cap.read()
            if not ret:
                break

            # fulfill target fps
            if 1 / self.__output_fps < time.time() - prev_time:
                prev_time = time.time()
                # replace by current frame
                with self.__lock:
                    self.__frame = frame

            t2 = time.time()
            # time to wait [s] to fulfill input fps
            wait_time = 1 / self.__input_fps - (t2 - t1)
            # wait until
            time.sleep(max(0, wait_time))

        self.__frame = None

    """ Get current frame. """

    def next(self):
        with self.__lock:
            if self.__frame is None:
                return None
            # need to copy frame, because can be cached and reused if fps is low
            frame = self.__frame.copy()
        if self.__size is not None:
            frame = cv2.resize(frame, self.__size, interpolation=self.__interpolation)
        if self.__flip:
            frame = cv2.flip(frame, 1)
        return frame
besides , There are also some visualization related functions . We list all available classes and create colors for them . then , In the post-processing stage , We will normalize the coordinates to [0, 1] The box of is converted to pixel coordinates of [0, image_size_in_px] Box of . after , We use non maximum suppression to delete overlapping boxes and below the threshold of 0.5 Box of . Last , We can draw the remaining draw boxes and labels in the video .
# https://tech.amikelive.com/node-718/what-object-categories-labels-are-in-coco-dataset/
classes = [
    "background", "person", "bicycle", "car", "motorcycle", "airplane", "bus", "train",
    "truck", "boat", "traffic light", "fire hydrant", "street sign", "stop sign",
    "parking meter", "bench", "bird", "cat", "dog", "horse", "sheep", "cow", "elephant",
    "bear", "zebra", "giraffe", "hat", "backpack", "umbrella", "shoe", "eye glasses",
    "handbag", "tie", "suitcase", "frisbee", "skis", "snowboard", "sports ball", "kite",
    "baseball bat", "baseball glove", "skateboard", "surfboard", "tennis racket", "bottle",
    "plate", "wine glass", "cup", "fork", "knife", "spoon", "bowl", "banana", "apple",
    "sandwich", "orange", "broccoli", "carrot", "hot dog", "pizza", "donut", "cake", "chair",
    "couch", "potted plant", "bed", "mirror", "dining table", "window", "desk", "toilet",
    "door", "tv", "laptop", "mouse", "remote", "keyboard", "cell phone", "microwave", "oven",
    "toaster", "sink", "refrigerator", "blender", "book", "clock", "vase", "scissors",
    "teddy bear", "hair drier", "toothbrush", "hair brush"
]

# colors for above classes (Rainbow Color Map)
colors = cv2.applyColorMap(
    src=np.arange(0, 255, 255 / len(classes), dtype=np.float32).astype(np.uint8),
    colormap=cv2.COLORMAP_RAINBOW,
).squeeze()
print("4 -  We list all available classes and create colors for them .")

print("5 -  We use non maximum suppression to delete overlapping boxes and below the threshold of 0.5 Box of . Last , We can draw the remaining draw boxes and labels in the video .")
def process_results(frame, results, thresh=0.6):
    # size of the original frame
    h, w = frame.shape[:2]
    # results is a tensor [1, 1, 100, 7]
    results = results.squeeze()
    boxes = []
    labels = []
    scores = []
    for _, label, score, xmin, ymin, xmax, ymax in results:
        # create a box with pixels coordinates from the box with normalized coordinates [0,1]
        boxes.append(
            tuple(map(int, (xmin * w, ymin * h, (xmax - xmin) * w, (ymax - ymin) * h)))
        )
        labels.append(int(label))
        scores.append(float(score))

    # apply non-maximum suppression to get rid of many overlapping entities
    # see https://paperswithcode.com/method/non-maximum-suppression
    # this algorithm returns indices of objects to keep
    indices = cv2.dnn.NMSBoxes(
        bboxes=boxes, scores=scores, score_threshold=thresh, nms_threshold=0.6
    )

    # if there are no boxes
    if len(indices) == 0:
        return []

    # filter detected objects
    return [(labels[idx], scores[idx], boxes[idx]) for idx in indices.flatten()]


def draw_boxes(frame, boxes):
    for label, score, box in boxes:
        # choose color for the label
        color = tuple(map(int, colors[label]))
        # draw box
        x2 = box[0] + box[2]
        y2 = box[1] + box[3]
        cv2.rectangle(img=frame, pt1=box[:2], pt2=(x2, y2), color=color, thickness=3)

        # draw label name inside the box
        cv2.putText(
            img=frame,
            text=f"{
      classes[label]} {
      score:.2f}",
            org=(box[0] + 10, box[1] + 30),
            fontFace=cv2.FONT_HERSHEY_COMPLEX,
            fontScale=frame.shape[1] / 1000,
            color=color,
            thickness=1,
            lineType=cv2.LINE_AA,
        )

    return frame
4 The main program
Last , We attach the main program , The main program that puts object recognition into video stream for processing and visualization .
'''  The main program  - source:  Three video input modes are supported here : -  Video file :../201-vision-monodepth/data/Coco Walking in Berkeley.mp4 - USB camera :0( Depends on the value of the interface , May be 0, perhaps 1, Or other ) - RTSP flow :rtsp://192.168.1.2:8080/out.h264 - flip:  Some of the images from the camera are inverted , Need here flip once . - use_popup:  If we are .py Run under , A pop-up window is required to display the video results , So set it to True, If we are notebook Run in , Set to false. '''
def run_object_detection(source=0, flip=False, use_popup=False, skip_first_frames=0):
    player = None
    try:
        # create video player to play with target fps
        player = VideoPlayer(
            source=source, flip=flip, fps=25, skip_first_frames=skip_first_frames
        )
        # start capturing
        player.start()
        if use_popup:
            title = "Press ESC to Exit"
            cv2.namedWindow(
                winname=title, flags=cv2.WINDOW_GUI_NORMAL | cv2.WINDOW_AUTOSIZE
            )

        processing_times = collections.deque()
        while True:
            # grab the frame
            frame = player.next()
            if frame is None:
                print("Source ended")
                break
            # if frame larger than full HD, reduce size to improve the performance
            scale = 1280 / max(frame.shape)
            if scale < 1:
                frame = cv2.resize(
                    src=frame,
                    dsize=None,
                    fx=scale,
                    fy=scale,
                    interpolation=cv2.INTER_AREA,
                )

            # resize image and change dims to fit neural network input
            input_img = cv2.resize(
                src=frame, dsize=(width, height), interpolation=cv2.INTER_AREA
            )
            # create batch of images (size = 1)
            input_img = input_img[np.newaxis, ...]

            # measure processing time

            start_time = time.time()
            # get results
            results = compiled_model([input_img])[output_layer]
            stop_time = time.time()
            # get poses from network results
            boxes = process_results(frame=frame, results=results)

            # draw boxes on a frame
            frame = draw_boxes(frame=frame, boxes=boxes)

            processing_times.append(stop_time - start_time)
            # use processing times from last 200 frames
            if len(processing_times) > 200:
                processing_times.popleft()

            _, f_width = frame.shape[:2]
            # mean processing time [ms]
            processing_time = np.mean(processing_times) * 1000
            fps = 1000 / processing_time
            cv2.putText(
                img=frame,
                text=f"Inference time: {
      processing_time:.1f}ms ({
      fps:.1f} FPS)",
                org=(20, 40),
                fontFace=cv2.FONT_HERSHEY_COMPLEX,
                fontScale=f_width / 1000,
                color=(0, 0, 255),
                thickness=1,
                lineType=cv2.LINE_AA,
            )

            # use this workaround if there is flickering
            if use_popup:
                cv2.imshow(winname=title, mat=frame)
                key = cv2.waitKey(1)
                # escape = 27
                if key == 27:
                    break
            else:
                # encode numpy array to jpg
                _, encoded_img = cv2.imencode(
                    ext=".jpg", img=frame, params=[cv2.IMWRITE_JPEG_QUALITY, 100]
                )
                # create IPython image
                i = display.Image(data=encoded_img)
                # display the image in this notebook
                display.clear_output(wait=True)
                display.display(i)
    # ctrl-c
    except KeyboardInterrupt:
        print("Interrupted")
    # any different error
    except RuntimeError as e:
        print(e)
    finally:
        if player is not None:
            # stop capturing
            player.stop()
        if use_popup:
            cv2.destroyAllWindows()
边栏推荐
- Check the file through the port
- 2. probability theory - axiom of probability theory
- Acwing第 56 場周賽【完結】
- The road to hcip MPLS
- 11 字符串函数
- 1. probability theory - combination analysis
- vtk.js鼠標左鍵滑動改變窗比特和窗寬
- MySQL gets the system time period
- Test APK exception control nettraffic attacker development
- Take you to tiktok. That's it
猜你喜欢

Eureka服务注册与发现

vtk.js鼠标左键滑动改变窗位和窗宽

Active Directory之AD对象

黄蓉真的存在吗?
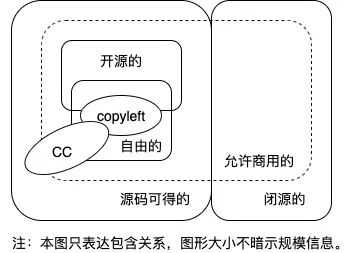
开源软件、自由软件、Copyleft、CC都是啥,傻傻分不清楚?

1278_FreeRTOS_借助prvAddCurrentTaskToDelayedList接口理解delayed task

PHP 文件包含 -ctf
Talk about routing design in service governance
VTK. Le bouton gauche de la souris JS glisse pour changer le niveau et la largeur de la fenêtre
![Acwing game 56 [End]](/img/f6/cd650331c819a27f17c9ce6cd0c569.png)
Acwing game 56 [End]
随机推荐
快速排序 + 冒泡排序 + 插入排序 + 选择排序
C# richTextBox控制最大行数
Distributed ID generation
MIT CMS. 300 session 12 – identity construction Part 2
Hcip Road
Capturing packets to find repeated acks and a large number of TCP retransmissions in TCP sessions -- sack (selective acknowledgement) technology
启动appium
帆软堆积图显示占比
How do I install MySQL on my computer?
Talk about routing design in service governance
Unity audio visualization scheme
分布式ID生成
Kwai 350014
30 sets of report templates necessary for the workplace, meeting 95% of the report needs, and no code is required for one click application
PHP file contains -ctf
C restart application
深度学习------卷积(conv2D)底层
Query on the performance of multi table view in MySQL
openni. utils. OpenNIError: (OniStatus.ONI_STATUS_ERROR, b‘DeviceOpen using default: no devices found‘
MySQL慢查询记录