当前位置:网站首页>Small record of neural network learning 71 - tensorflow2 deep learning with Google Lab
Small record of neural network learning 71 - tensorflow2 deep learning with Google Lab
2022-06-26 03:49:00 【Bubbliiiing】
Small records of neural network learning 71——Tensorflow2 Use Google Colab Deep learning
matters needing attention
This article takes VOC Data sets, for example , Therefore, there is no modification during training classes_path etc. , If it's training your own data set , You must pay attention to revising classes_path And other parameters !
Learn foreword
Colab It is a cloud learning platform provided by Google ,Very Nice, Recently, the card is not enough. I decided to go whoring for nothing . The blog will only explain how to use Colab Train the existing deep learning warehouse , It doesn't say how to access the Internet 、 How to register, etc .
This blog is just for demonstrating Colab Use , Mainly for you to be familiar with Colab operation , Specific analysis of specific problems , Improper operation and version change will lead to step errors , If something goes wrong, baidu is recommended , Look more at code and instructions , Check the cause of the error , At the same time, the suggestion is There is a certain foundation for students to use Colab.
What is? Google Colab
Google Colab It's free from Google Jupyter Notebook environment , You don't need any settings and environment configuration to use , Run entirely in the cloud . Does not affect local use .
Google Colab Provide researchers with some free GPU, You can write and execute code , All of these can be used for free through the browser . Students can run easily on it Tensorflow、Pytorch Equal depth learning framework .
Even though Google Colab Provide some free resources , But the amount of resources is limited , all Colab The runtime will reset after a period of time .Colab Pro Subscriber usage will still be limited , But it's about twice as much as non subscribers .Colab Pro+ Subscribers can also enjoy higher stability .
Colab Official website
https://colab.research.google.com/
( You need an external network to enter )
utilize Colab Training
This article takes YoloV4-Tiny-TF2 Take the training of version as an example , Conduct Colab Use demonstration of .
One 、 Upload of data set and pre training weight
1、 Data set upload
Colab and Google The built-in cloud disk linkage is very good , Therefore, we need to upload the data set to the cloud disk first , The upload process is actually very simple , Prepare the data set locally .
Because the library I uploaded , All used VOC Data sets , We need to follow VOC Data sets are well placed . In this paper, we will take VOC07+12 Data set as an example .
JPEGImages What is stored inside is a picture file ,Annotations The label file stored inside ,ImageSets Inside is the distinguished authentication set 、 Training set 、 Test set txt file .
And then VOCdevkit Package the whole file . It should be noted that , Instead of packaging the above three folders , It's right VOCdevkit package , Only in this way can we meet the format of data processing .
After obtaining the packed compressed package , Upload the compressed package to Google cloud disk . I created a new one on Google cloud disk VOC_datasets Folder to store compressed packages .
At this time, the upload of the data set has been completed .
2、 Upload the pre training weight
Create folders on Google cloud disk , First create Models, And then in Models It creates yolov4-tiny-tf2, And then in yolov4-tiny-tf2 It creates logs and model_data.
model_data Pre training files are placed .
logs The weights generated in the process of network training are placed .
Because we are using YoloV4-Tiny-Tf2 The library of , We upload its pre training weight to model_data Folder .
Two 、 open Colab And configure the environment
1、 Creation of notebook
In this step , Let's turn on... First Colab Its official website .
Then click file , Create a notebook , A... Is created jupyter The notebook .
After creation, change the name of the file , Look better .
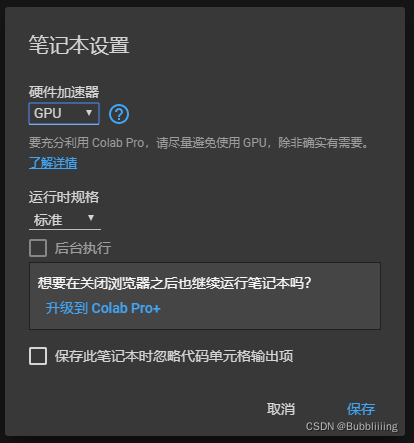
Then click code execution program , Then click Change runtime type , In the hardware accelerator part, select GPU,Colab You will be configured with GPU Machine , The notebook is now created .
2、 Simple configuration of the environment
Set it up tensorflow Environment . Then configure Google cloud disk .
%tensorflow_version 2.x

from google.colab import drive
drive.mount('/content/gdrive')
We input the above code into the notebook and execute . The first line of code is used to configure the deep learning environment , The last two lines of code are used to configure Google cloud disk , Mount the cloud disk to the server . Then click Run .
#pic_center)
Click... In the left column , Something like a folder , You can open the folder , Look at the file deployment .gdrive Is the Google cloud disk we configured . If not, go to the left to refresh .
open gdrive, Among them is our data set .
3、 Download of deep learning library
This step , We need to complete the download of deep learning warehouse , We use git clone Command to download . After executing the following instructions , There are more files on the left yolov4-tiny-tf2 Folder . If not, go to the left to refresh .
And then we passed cd The instruction moves the root directory to yolov4-tiny-tf2 Folder .
!git clone https://github.com/bubbliiiing/yolov4-tiny-tf2.git
%cd yolov4-tiny-tf2/

4、 Replication and decompression of data sets
Directly placing data sets on Google cloud disk will lead to a large number of cloud disk data transmission , Far slower than local files , Therefore, we need to copy the data set to the local for processing .
We input the following code to copy and decompress the file . The first execution is the delete instruction , Empty the original VOCdevkit Folder to delete . Then decompress .
Because it's used here zip So the file is unzip Instructions , If it is a compressed package of other forms , You need to modify the instructions according to the format of the compressed package ( Please Baidu ). After executing the following instructions , You can find , The file on the left has been unzipped VOC Data sets . If not, go to the left to refresh .
!rm -rf ./VOCdevkit
!cp /content/gdrive/MyDrive/VOC_datasets/VOC07+12+test.zip ./
!unzip ./VOC07+12+test.zip -d ./

5、 Save path settings
The default save path of the code provided in this article is logs Folder , but Colab There is a problem of instability , Disconnection will occur after running for a period of time .
If the weights are saved in the original root directory logs Folder , In case of disconnection, the network will be in vain , Waste a lot of time .
Can be google Connect the cloud disk to the root directory , So even if the line is broken , The weights are also kept in the cloud disk .
Before this article, I created... In the cloud disk logs Folder . Link this folder to .
!rm -rf logs
!ln -s /content/gdrive/MyDrive/Models/yolov4-tiny-tf2/logs logs

3、 ... and 、 Start training
1、 Processing of annotation files
open voc_annotation.py file , Because the direct we use now is VOC Data sets , We have divided the training set, verification set and test set , So we're going to annotation_mode Set to 2.
Then input instructions to complete the label processing , Generate 2007_train.txt and 2007_val.txt.
!python voc_annotation.py

2、 Processing of training documents
Processing training files mainly includes three parts :
1、 Use of pre training files .
2、 Save cycle settings , This setting is because the storage space of the cloud disk is limited , Saving every generation will cause the storage space to be full .
a、 Use of pre training files
The first change model_path, Point to the weight file we uploaded to Google cloud disk . In the left file column , find models/yolov4-tiny-tf2/model_data, Copy weight path .
Replace the... On the right model_path.
b、 Save cycle settings
Some warehouses have been updated , Added saving parameters every several generations , Directly modifying save_period As well as , In this paper , We will save_period Set to 4, That is, every 4 Save once for .
Warehouses that have not been updated can only be saved for each generation , Remember to go occasionally google Delete the cloud disk .
3、 Start training
At this time, enter... In the notebook :
!python train.py
Start training .
What if the line is broken ?
1、 Anti dropping measures
It's said that you can reduce the frequency of dropping lines by clicking automatically .
stay Google colab Press F12, Click on the console of the web page , Paste the following code :
function ConnectButton(){

	console.log("Connect pushed");
	document.querySelector("#top-toolbar > colab-connect-button").shadowRoot.querySelector("#connect").click()
}
setInterval(ConnectButton,60000);
2、 It's over or off the line ?
There's no way , Cheap things must have its disadvantages .
Follow the steps to do it again , Then set the pre training weight to logs The weight files trained in the folder can be used .
besides ,Init_epoch And other parameters also need to be adjusted .
summary
Use Colab Training is more important to deal with the relationship between paths , Find out which file is where , Where is the execution directory of the folder , You can simply run the program , however Colab There is indeed a disconnection problem , We need to keep the files at all times , So I save the weights directly on the cloud disk , So you won't lose .
边栏推荐
- 360 second understanding of smartx hyper converged infrastructure
- An easy-to-use tablayout
- MySQL advanced part (IV: locking mechanism and SQL optimization)
- Redux thunk simple case, advantages, disadvantages and thinking
- 神经网络学习小记录71——Tensorflow2 使用Google Colab进行深度学习
- Uni app custom selection date 2 (September 16, 2021)
- TiFlash 函数下推必知必会丨十分钟成为 TiFlash Contributor
- 169. most elements
- “再谈”协议
- ABP framework Practice Series (III) - domain layer in depth
猜你喜欢

Partition, column, list

MySQL高级部分( 四: 锁机制、SQL优化 )

栖霞消防开展在建工地消防安全培训

使用SOAPUI访问对应的esb工程

Camera memory memory leak analysis (III)

MySQL addition, deletion, query and modification (primary level)

如何解决 Iterative 半监督训练 在 ASR 训练中难以落地的问题丨RTC Dev Meetup

“再谈”协议

Solve the problem that the uniapp plug-in Robin editor reports an error when setting the font color and background color

How to prepare for a moving wedding
随机推荐
Android gap animation translate, scale, alpha, rotate
Popupwindow utility class
Uni app swiper rotation chart (full screen / card)
The kotlin project is running normally and the R file cannot be found
Uni app, the text implementation expands and retracts the full text
763. 划分字母区间
Machine learning notes - trend components of time series
Kotlin uses viewpager2+fragment+bottomnavigationview to implement the style of the switching module of the bottom menu bar.
Some mobile phones open USB debugging, and the solution to installation failure
Drag and drop
2022.6.20-----leetcode. seven hundred and fifteen
Open camera anomaly analysis (I)
Navicat16 wireless trial
Analysis of camera memory memory leakage (II)
Mysql database foundation
“再谈”协议
2020 summary: industrial software development under Internet thinking
Nepal graph learning Chapter 3_ Multithreading completes 6000w+ relational data migration
动态线段树leetcode.715
2022.6.23-----leetcode.30