当前位置:网站首页>002_ Kubernetes installation configuration
002_ Kubernetes installation configuration
2022-07-24 03:51:00 【Adventures of procedural ape】
List of articles
1. k8s Environmental platform planning
1.1 single master colony
Single master node , Then manage multiple node node

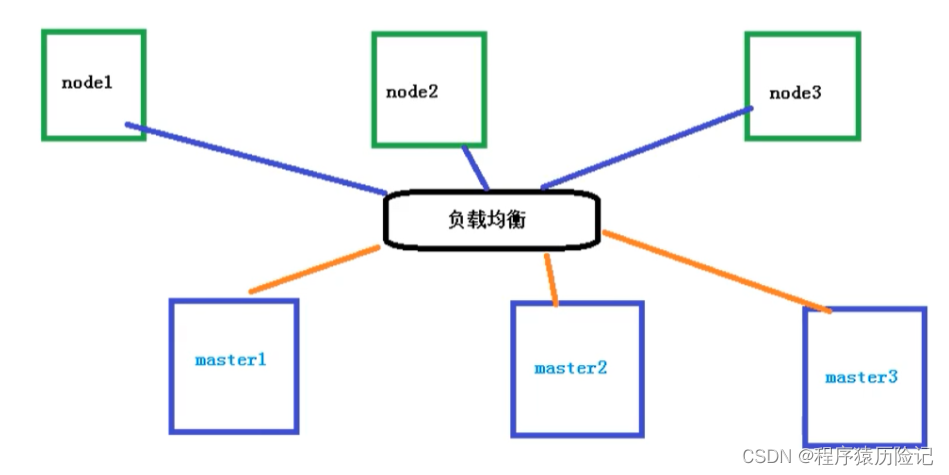
1.2 many master colony
Multiple master node , Manage multiple node node , At the same time, there is a load balancing process in the middle
2. Configuration requirements
| Environmental Science | node | requirement |
|---|---|---|
| Test environment | master | 2 nucleus 4G 20G |
| Test environment | node | 4 nucleus 8G 40G |
| Production environment | master | 8 nucleus 16G 100G |
| Production environment | node | 16 nucleus 64G 200G |
about Kubernetes Beginners are recommended to purchase the following configurations from Alibaba cloud or Tencent cloud :( You can also use your own virtual machine 、 Private cloud is the most accessible Linux Environmental Science )
- At least 2 platform 2 nucleus 4G Server for
- Cent OS 7.6 / 7.7 / 7.8
3. Kubernetes There are two main ways to cluster
3.1 kubeadm
kubeadm It's a K8S Deployment tools , Provide kubeadm init and kubeadm join, For rapid deployment Kubernetes colony
3.2 Binary package
from github Download the distribution's binary package , Manually deploy each component , form Kubernetes colony .
Kubeadm Lower deployment threshold , But it's a lot of detail , It's hard to troubleshoot problems . If you want to be more controllable , Binary package deployment is recommended Kubernetes colony , Although manual deployment is troublesome , You can learn a lot about how it works , It's also good for later maintenance .
4. kubeadm、 kubectl 、kubelet difference
kubeadm
kubeadm It's an official community launch for rapid deployment kubernetes Clustering tools .
This tool can complete one by two instructions kubernetes Cluster deployment :# Create a Master node kubeadm init # Will a Node Nodes join the current cluster kubeadm join <Master Node IP And port >kubectl
kubectl yes Kubernetes Command line tools for clustering , adopt kubectl Be able to manage the cluster itself , And can install and deploy container applications on the clusterkubelet
Kubelet:master Send to node Nodes represent , Manage native containers
- Agents running on each node in a cluster , It ensures that the container is running in Pod in
- Responsible for maintaining the life cycle of the container , Also responsible for Volume(CSI) and The Internet (CNI) Management of
5. Use kubeadm Way to build K8s The cluster is mainly divided into the following steps
- Prepare three virtual machines , Install the operating system at the same time CentOS 7.x
- Initialize the three installed operating systems
- Install on three nodes docker kubelet kubeadm kubectl
- stay master Node execution kubeadm init Command initialization
- stay node Execution on node kubeadm join command , hold node The node is added to the current cluster
- To configure CNI The network plugin , Used for connectivity between nodes 【 If you fail, you can try a few more times 】
- By pulling one nginx To test , Whether to conduct external network test
5. Installation steps
1. Check centos / hostname
#  stay  master  Nodes and  worker  All nodes need to execute
cat /etc/redhat-release

#  here  hostname  The output of will be the machine in  Kubernetes  The node name in the cluster
#  Out of commission  localhost  As the name of the node
hostname

#  Please use  lscpu  command , check  CPU  Information
# Architecture: x86_64  This installation document does not support  arm  framework
# CPU(s): 2 CPU  The number of cores cannot be less than  2
lscpu

modify hostname
#  modify  hostname
hostnamectl set-hostname your-new-host-name
#  View the modification results
hostnamectl status
#  Set up  hostname  analysis
echo "127.0.0.1 $(hostname)" >> /etc/hosts
2. install docker And kubelet
Install the reference :https://www.kuboard.cn/install/history-k8s/install-k8s-1.18.x.html
Carefully check the following options
- My arbitrary nodes centos Version is 7.6 / 7.7 or 7.8
- My arbitrary nodes CPU The number of cores is greater than or equal to 2, And the memory is greater than or equal to 4G
- My arbitrary nodes hostname No localhost, And does not contain underscores 、 decimal point 、 Capital
- Any node of mine has a fixed intranet IP Address
- Any node of mine has only one network card , If there is a special purpose , I can finish K8S Add a new network card after installation
- On any of my nodes Kubelet The use of IP Address Can communicate with each other ( There is no need to NAT Mapping allows mutual access ), And no firewall 、 Security group isolation
- Any of my nodes will not directly use docker run or docker-compose Run container
Use root The identity executes the following code at all nodes , To install the software :
- docker
- nfs-utils
- kubectl / kubeadm / kubelet
Execute the following code manually , The result is the same as a quick install . Please add the script to } Replace with the version number you need , for example 1.18.9
docker hub Please choose one image according to your own network
	#  stay  master  Nodes and  worker  All nodes need to execute
	#  Last parameter  1.18.9  Is used to specify the  kubenetes  edition , Support all  1.18.x  Version installation
	#  Tencent cloud  docker hub  Mirror image
	# export REGISTRY_MIRROR="https://mirror.ccs.tencentyun.com"
	# DaoCloud  Mirror image
	# export REGISTRY_MIRROR="http://f1361db2.m.daocloud.io"
	#  Alibaba cloud  docker hub  Mirror image
	export REGISTRY_MIRROR=https://registry.cn-hangzhou.aliyuncs.com
#!/bin/bash # stay master Nodes and worker All nodes need to execute # install docker # The reference documents are as follows # https://docs.docker.com/install/linux/docker-ce/centos/ # https://docs.docker.com/install/linux/linux-postinstall/ # Uninstall old version yum remove -y docker \ docker-client \ docker-client-latest \ docker-ce-cli \ docker-common \ docker-latest \ docker-latest-logrotate \ docker-logrotate \ docker-selinux \ docker-engine-selinux \ docker-engine # Set up yum repository yum install -y yum-utils \ device-mapper-persistent-data \ lvm2 yum-config-manager --add-repo http://mirrors.aliyun.com/docker-ce/linux/centos/docker-ce.repo # Install and start docker yum install -y docker-ce-19.03.8 docker-ce-cli-19.03.8 containerd.io systemctl enable docker systemctl start docker # install nfs-utils # Must be installed first nfs-utils To mount nfs Network storage yum install -y nfs-utils yum install -y wget # close A firewall systemctl stop firewalld systemctl disable firewalld # close SeLinux The container can read the host file system setenforce 0 sed -i "s/SELINUX=enforcing/SELINUX=disabled/g" /etc/selinux/config # close swap Turn off the use of swap space swapoff -a yes | cp /etc/fstab /etc/fstab_bak cat /etc/fstab_bak |grep -v swap > /etc/fstab # modify /etc/sysctl.conf # If you have configuration , The modified sed -i "s#^net.ipv4.ip_forward.*#net.ipv4.ip_forward=1#g" /etc/sysctl.conf sed -i "s#^net.bridge.bridge-nf-call-ip6tables.*#net.bridge.bridge-nf-call-ip6tables=1#g" /etc/sysctl.conf sed -i "s#^net.bridge.bridge-nf-call-iptables.*#net.bridge.bridge-nf-call-iptables=1#g" /etc/sysctl.conf sed -i "s#^net.ipv6.conf.all.disable_ipv6.*#net.ipv6.conf.all.disable_ipv6=1#g" /etc/sysctl.conf sed -i "s#^net.ipv6.conf.default.disable_ipv6.*#net.ipv6.conf.default.disable_ipv6=1#g" /etc/sysctl.conf sed -i "s#^net.ipv6.conf.lo.disable_ipv6.*#net.ipv6.conf.lo.disable_ipv6=1#g" /etc/sysctl.conf sed -i "s#^net.ipv6.conf.all.forwarding.*#net.ipv6.conf.all.forwarding=1#g" /etc/sysctl.conf # There may be no , Additional # The main purpose is to When linux When the host has multiple network cards, whether the information received by one network card can be transmitted to other network cards If I set it to 1 Words Packet forwarding is possible Can achieve VxLAN And so on . To be bridged IPv4 Flow to iptables Chain echo "net.ipv4.ip_forward = 1" >> /etc/sysctl.conf echo "net.bridge.bridge-nf-call-ip6tables = 1" >> /etc/sysctl.conf # It means that the layer-2 bridge will also be iptables Of FORWARD Rules filter echo "net.bridge.bridge-nf-call-iptables = 1" >> /etc/sysctl.conf # Set disable IPv6 echo "net.ipv6.conf.all.disable_ipv6 = 1" >> /etc/sysctl.conf echo "net.ipv6.conf.default.disable_ipv6 = 1" >> /etc/sysctl.conf echo "net.ipv6.conf.lo.disable_ipv6 = 1" >> /etc/sysctl.conf #IPv6 Forwarding must be enabled echo "net.ipv6.conf.all.forwarding = 1" >> /etc/sysctl.conf # Execute a command to apply sysctl -p # To configure K8S Of yum Source cat <<EOF > /etc/yum.repos.d/kubernetes.repo [kubernetes] name=Kubernetes baseurl=http://mirrors.aliyun.com/kubernetes/yum/repos/kubernetes-el7-x86_64 enabled=1 gpgcheck=0 repo_gpgcheck=0 gpgkey=http://mirrors.aliyun.com/kubernetes/yum/doc/yum-key.gpg http://mirrors.aliyun.com/kubernetes/yum/doc/rpm-package-key.gpg EOF # Uninstall old version yum remove -y kubelet kubeadm kubectl # install kubelet、kubeadm、kubectl # take ${1} Replace with kubernetes Version number , for example 1.17.2 yum install -y kubelet-${1} kubeadm-${1} kubectl-${1} # modify docker Cgroup Driver by systemd # # take /usr/lib/systemd/system/docker.service This line in the file ExecStart=/usr/bin/dockerd -H fd:// --containerd=/run/containerd/containerd.sock # # It is amended as follows ExecStart=/usr/bin/dockerd -H fd:// --containerd=/run/containerd/containerd.sock --exec-opt native.cgroupdriver=systemd # If not modified , Adding worker The following errors may be encountered when a node # [WARNING IsDockerSystemdCheck]: detected "cgroupfs" as the Docker cgroup driver. The recommended driver is "systemd". # Please follow the guide at https://kubernetes.io/docs/setup/cri/ sed -i "s#^ExecStart=/usr/bin/dockerd.*#ExecStart=/usr/bin/dockerd -H fd:// --containerd=/run/containerd/containerd.sock --exec-opt native.cgroupdriver=systemd#g" /usr/lib/systemd/system/docker.service # Set up docker Mirror image , Improve docker Image download speed and stability # If you visit https://hub.docker.io The speed is very stable , You can also skip this step curl -sSL https://kuboard.cn/install-script/set_mirror.sh | sh -s ${REGISTRY_MIRROR} # restart docker, And start the kubelet systemctl daemon-reload systemctl restart docker systemctl enable kubelet && systemctl start kubelet docker versioninitialization master node
#  Only in  master  Node execution
#  Replace  x.x.x.x  by  master  Node actual  IP( Please use the Intranet  IP)
# export  The order is only in the current  shell  Effective in conversation , Open a new  shell  After window , If you want to continue the installation process , Please re execute  export  command
export MASTER_IP=x.x.x.x
#  Replace  apiserver.demo  by   What you want  dnsName
export APISERVER_NAME=apiserver.demo
# Kubernetes  The network segment of the container group , After the installation of the network segment , from  kubernetes  establish , It doesn't exist in your physical network in advance
export POD_SUBNET=10.100.0.1/16
echo "${MASTER_IP} ${APISERVER_NAME}" >> /etc/hosts
curl -sSL https://kuboard.cn/install-script/v1.18.x/init_master.sh | sh -s 1.18.9
Check master Initialization result
#  Only in  master  Node execution

#  Execute the following command , wait for  3-10  minute , Until all the container groups are in  Running  state
watch kubectl get pod -n kube-system -o wide

#  see  master  Node initialization result
kubectl get nodes -o wide
initialization worker node
get join Command parameter
stay master Execution on node# Only in master Node execution kubeadm token create --print-join-commandAvailable kubeadm join Commands and parameters , As shown below
# kubeadm token create  Output of command
kubeadm join apiserver.demo:6443 --token mpfjma.4vjjg8flqihor4vt     --discovery-token-ca-cert-hash sha256:6f7a8e40a810323672de5eee6f4d19aa2dbdb38411845a1bf5dd63485c43d303
For all worker Node execution
#  Only in  worker  Node execution
#  Replace  x.x.x.x  by  master  Node's intranet  IP
export MASTER_IP=x.x.x.x
#  Replace  apiserver.demo  For initialization  master  The... Used in node  APISERVER_NAME
export APISERVER_NAME=apiserver.demo
echo "${MASTER_IP} ${APISERVER_NAME}" >> /etc/hosts

#  Replace with  master  Node  kubeadm token create  Output of command
kubeadm join apiserver.demo:6443 --token mpfjma.4vjjg8flqihor4vt     --discovery-token-ca-cert-hash sha256:6f7a8e40a810323672de5eee6f4d19aa2dbdb38411845a1bf5dd63485c43d303
Check initialization results
stay master Execution on node# Only in master Node execution kubectl get nodes -o wide
3. test kubernetes colony
stay Kubernetes Create a pod, Verify proper operation :
# download nginx 【 Online pull nginx Mirror image 】 kubectl create deployment nginx --image=nginx # Check the status kubectl get podIf we show up Running In state , Indicates that it has run successfully

Expose the port , Allow other outsiders to access
# Exposed port kubectl expose deployment nginx --port=80 --type=NodePort # Check the external port kubectl get pod,svc
4. Errors encountered during installation
# Check the error log
journalctl -xefu kubelet
Cgroup Driver and kubelet Of Cgroup Driver atypism
failed to create kubelet: misconfiguration: kubelet cgroup driver: "cgroupfs" is different from docker cgroup driver: "systemd"vim /var/lib/kubelet/kubeadm-flags.envChange it to the following , increase --cgroup-driver=systemd
KUBELET_KUBEADM_ARGS="--cgroup-driver=systemd --network-plugin=cni --pod-infra-container-image=registry.aliyuncs.com/k8sxio/pause:3.2"Calico problem
Readiness probe failed: caliconode is not ready: BIRD is not ready: BGP not established with 10.1.126.32master perform
kubectl set env daemonset/calico-node -n kube-system IP_AUTODETECTION_METHOD=interface=ens*
6. Common commands
kubectl The syntax of the command is as follows
kubectl [command] [type] [name] [flags]
- comand: Specifies the action to be performed on the resource , for example create、 get、delete
- type: Specify the resource type , such as deployment、pod、 service
- name: Specify the name of the resource , Names are case sensitive
- flags: Specify additional optional parameters
remove worker node
# Only in worker Node execution
kubeadm reset -f
#  Only in  master  Node execution
kubectl get nodes -o wide
# Only in master Node execution demo The name of the node
kubectl delete node demo-worker-x-x
node
| command | explain |
|---|---|
| View server nodes | kubectl get nodes |
| View server node details | kubectl get nodes -o wide |
| View server nodes | kubectl get nodes |
| Remove node | kubectl delete node demo-worker-x-x |
| Node labeling | kubectl label nodes < The name of the node > labelName=< Tag name > |
| Check the node labels | kubectl get node --show-labels |
| Delete the node label | kubectl label node < The name of the node > labelName- |
pod
| command | explain |
|---|---|
| View all pod node | kubectl get pods -A |
| View all namespaces under pod | kubectl get pod --all-namespaces |
| View by namespace pod | kubectl get pod -n test |
| View exceptions pod Log of node | kubectl describe pod <pod name > -n < The name space > |
| according to yaml File creation pod | kubectl apply -f < File name > |
| according to yaml File deletion pod | kubectl delete -f < File name > |
| Delete pod node | kubectl delete pod <pod name > -n < The name space > |
| View exceptions pod Log of node | kubectl describe pod <pod name > -n < The name space > |
| Enter the default namespace pod node | kubectl exec -it <pod name > – /bin/bash |
| Enter... Under a specific namespace pod node | kubectl exec -it <pod name > -n < Namespace > – /bin/bash |
| Normal creation pod | kubectl run <pod name > --image=< Image name > |
deployment
| explain | command |
|---|---|
| deployment Deploy pod( Self healing ability , Automatic shutdown ) | kubectl create deployment <pod name > --image=< Image name > |
| deployment Deploy pod( Multiple copies ) | kubectl create deployment <pod name > --image=< Image name > --replicas=3 |
| see deployment Deploy | kubectl get deploy |
| Delete deployment Deploy | kubectl delete deploy <pod name > |
| deployment Capacity expansion \ Shrinkage capacity pod | kubectl scale deploy/<pod name > --replicas=<5> |
| deployment Capacity expansion \ Shrinkage capacity pod | kubectl edit deploy <pod name > |
| deployment Scroll to update pod | kubectl set image deploy/<pod name > < Container name >=< Image name : Version number > --record |
| deployment see pod Rollback version | kubectl rollout history deploy/<pod name > |
| deployment see pod Fallback version details | kubectl rollout history deploy/<pod name > --revision=1 |
| deployment Back off pod Go to the previous version | kubectl rollout undo deploy/<pod name > |
| deployment Back off pod To the specified version | kubectl rollout undo deploy/<pod name > --to-revision=1 |
| deployment expose pod Cluster internal access (ClusterIP) | kubectl expose deployment <pod name > --port=8080 --target-port=80 --type=ClusterIP |
| deployment expose pod Extranet access (NodePort) | kubectl expose deployment <pod name > --port=8080 --target-port=80 --type=NodePort |
svc
| explain | command |
|---|---|
| View service | kubectl get svc |
| View service details | kubectl get svc -o wide |
| View services under all namespaces | kubectl get svc --all-namespaces |
namespace
| explain | command |
|---|---|
| Look at the namespace | kubectl get namespace |
| Look at the namespace | kubectl get ns |
| Create a namespace | kubectl create ns < name > |
| Delete the namespace | kubectl delete ns < name > |
边栏推荐
- Prosci Lag3 antibody: improve in vitro research and help cancer immunotherapy
- Sqlserver backup restore
- Worthington hydroxysteroid dehydrogenase technical description and determination scheme
- Four characteristics of nb-iot
- Sword finger offer | minimum number of rotation array
- buu web
- An in-depth explanation of CAS is necessary for interview practice
- Introduction to pytorch ecology
- uniapp H5打包后本地图片无法显示问题
- Summary of Zhang Yu's 30 lectures on Advanced Mathematics
猜你喜欢

CVE-2022-29464 WSO2文件上传漏洞
Summary of Zhang Yu's 30 lectures on Advanced Mathematics

Pat grade a 1043 is it a binary search tree

Matlab Fractional Order PID control

Leetcode (Sword finger offer) - 11. Minimum number of rotation array

93. (leaflet chapter) leaflet situation plotting - modification of attack direction

Exercices classiques de langue C (2) - « tri des bulles »

监听div的滚动事件 @scroll

Worthington's test of hepatocyte separation system and related optimization schemes

Anchor point and anchor frame of target detection
随机推荐
【云原生】快速了解Kubernetes
Leetcode (Sword finger offer) - 11. Minimum number of rotation array
Matlab Simulink hydropower and synchronous motor power generation
IO stream sorting
Android Development - lambda expression of kotlin syntax
Cve-2022-29464 wso2 file upload vulnerability
Preliminary use of swagger2
Technical dry goods | evaluation index based on mindspire detailed perflexity language model
Worthington's test of hepatocyte separation system and related optimization schemes
会话技术相关
leetcode hot 100(刷题篇8)(232/88/451/offer10/offer22/344/)
Developers share mindspire Lite experience, one click image segmentation
三菱转以太网模块远创智控YC8000-FX 连接 MCGS操作方法
Problem solution of supporting problem solution of heavy chain dissection example
[development technology] spingboot database and Persistence technology, JPA, mongodb, redis
清单的要快速熟悉并掌昇腾AI处理器支持
Sqlserver backup restore
H7-tool serial port offline burning operation instructions, support TTL serial port, RS232 and RS485 (2022-06-30)
RTOS内功修炼记(十) | 深度解析RTOS内核上下文切换机制
Mongo from start to installation and problems encountered