当前位置:网站首页>Databinding quick start (still using findviewbyid?)
Databinding quick start (still using findviewbyid?)
2022-06-25 00:41:00 【a10615】
One 、DataBinding Introduce
Learn about a new technology , Generally from 2W1H Starting with :
- What is it? ?(What)
- What's the usage? ?(What)
- How to use it? ?(How)
DataBinding Data binding , Bind the data to the control . This article is all about one-way binding , That is, data binding to the control . Two way binding is now supported , in other words , You can also bind controls to data , Follow up .
DataBinding Can replace findViewById, Make the code simpler , And better than the annotation framework ( Such as ButterKnife) Efficient .
Start learning ……
Two 、DataBinding Use
2.1 preparation
Environmental requirements :
- Gradle The plug-in version is not lower than 1.5.0-alpha1
- Android Studio The version is higher than 1.3
stay module( Such as :app) Of build.gradle Add dataBinding Enable switch of
android {
    compileSdkVersion 24
    buildToolsVersion "23.0.2"

    defaultConfig {
        ...
    }

    // add
    dataBinding{
        enabled true
    }

    ...
And then use Sync now Sync .
2.2 Quick to use
2.2.1 Create a Bean class
Create a User class :
public class User{

    String name;
    String nickname;
    boolean isMale;
    int age;

    public User(String name, String nickname, boolean isMale, int age) {
        this.name = name;
        this.nickname = nickname;
        this.isMale = isMale;
        this.age = age;
    }

    /** * Getter and Setter, Omit  */
     ...
}
2.2.2 modify xml Layout file
step :
- Put a layer on the original layout file layout label , Move the namespace to layout tag
- layout The label contains data module and style module ( Original layout )
- The data module uses data label , Define variable name name—— below android:text Property , And type type—— Define the type or class to which the variable refers ( If it's a custom class , You must give the full package name + Class name )
<?xml version="1.0" encoding="utf-8"?>
<layout xmlns:android="http://schemas.android.com/apk/res/android" xmlns:tools="http://schemas.android.com/tools">
<data>
<variable name="user" type="com.zjun.databinding.demo.bean.User" />
</data>
<LinearLayout android:id="@+id/activity_fast_use" android:layout_width="match_parent" android:layout_height="match_parent" android:orientation="vertical" android:padding="@dimen/activity_vertical_margin" tools:context="com.zjun.databinding.demo.FastUseActivity">
<LinearLayout style="@style/StyleItemParent">
<Button android:id="@+id/btn_load" style="@style/StyleBeforeText" android:text=" data 1" />
<Button android:id="@+id/btn_change" style="@style/StyleBeforeText" android:text=" data 2" />
</LinearLayout>
<LinearLayout style="@style/StyleItemParent">
<TextView style="@style/StyleBeforeText" android:text=" full name :" />
<TextView style="@style/StyleAfterText" android:text="@{user.name}" android:onClick="@{user.onNameClick}"/>
</LinearLayout>
<LinearLayout style="@style/StyleItemParent">
<TextView style="@style/StyleBeforeText" android:text=" nickname :" />
<TextView style="@style/StyleAfterText" android:text="@{user.nickname ?? user.name}" android:onLongClick="@{user.onNicknameLongClick}"/>
</LinearLayout>
<LinearLayout style="@style/StyleItemParent">
<TextView style="@style/StyleBeforeText" android:text=" Gender :" />
<TextView style="@style/StyleAfterText" android:textColor="@{user.male ? 0xFF0000FF : 0xFFFF0000}" android:text='@{user.male ? @string/male : @string/female}' />
</LinearLayout>
<LinearLayout style="@style/StyleItemParent">
<TextView style="@style/StyleBeforeText" android:text=" Age :" />
<TextView style="@style/StyleAfterText" android:textColor="@{user.age < 14 || user.age > 65 ? 0xFFFF0000 : 0xFF000000}" android:text='@{String.valueOf(user.age) + " years old"}' />
</LinearLayout>
</LinearLayout>
</layout>2.2.3 xml Usage syntax in
In the above data binding , It mainly displays the data android:text Properties of the ( Click event will not be considered for the time being ), You must pay attention to the grammar :
- Every variable variable All by name name And type type form .name You can use... In layout files , It can also be done through Setter and Getter Used in code .type It can be a basic data type 、 aggregate 、 Adapter 、 Custom classes, etc , Except for the basic types , All others must write the package name in full
- Double quotation marks can be used to enclose “`”(Tab Key up , Non single quotation mark ), Double quotation marks can be set inside single quotation marks ;
- Can't be used directly boolean and int Type value . and int Values will be treated as resource files . So use its value , Must be converted to a string , Such as (boolean Empathy ):
"@{user.age + ``}", or"@{String.valueOf(user.age)}" - Color must be used ARGB system , Specify all its transparency and monochrome values , Former #F00 and #FF0000 Invalid , And you can't add “#”
"@{user.nickname ?? user.name}", representative user.nickname by null Time display user.name, Otherwise, show yourself . Equate to"@{user.nickname == null ? user.name : user.nickname}"- Comparison operator , You must use the escape character :
More than no. “>”——>
Less than no. “<”——< - Cannot use Chinese directly (MD), Such as :
android:text='@{user.male ? " male " : " Woman "}'
Will be an error , Have to use string quote , Change to :android:text='@{user.male ? @string/male : @string/female}'
2.2.4 Modify data in code
public class FastUseActivity extends AppCompatActivity {

    private ActivityFastUseBinding mBinding;

    @Override
    protected void onCreate(Bundle savedInstanceState) {
        super.onCreate(savedInstanceState);

        //  replace setContentView()
    // setContentView(R.layout.activity_fast_use);
        mBinding= DataBindingUtil.setContentView(this, R.layout.activity_fast_use);
    }

    public void onClick(View view) {
        User user = new User(" Zhang Junbao ", " Zhang Sanfeng ", true, 30);
        mBinding.setUser(user);
    }
    ...
}
among :
- ActivityFastUseBinding Is a layout file activity_fast_use.xml Generated by the file name of .
- DataBindingUtil.setContextView() What is generated is an abstract class ViewDataBinding, But it cannot be used as a definition mBinding, Because when setting data , You need to use the method of its implementation class , Such as setUser().
Running results : 
2.3 Monitoring events
You can set the click and long press events of the control .
A. First, define the listening event handling method
stay Bean Class :
public class User{

    String name;
    String nickname;
    boolean isMale;
    int age;

    ...

    public void onNameClick(View view) {
        Toast.makeText(view.getContext(), name + " is Clicked", Toast.LENGTH_SHORT).show();
    }

    public boolean onNicknameLongClick(View view) {
        Toast.makeText(view.getContext(), nickname + " is long Clicked", Toast.LENGTH_SHORT).show();
        return true;
    }
B. stay xml Use in
...
<TextView  ... android:text="@{user.name}" android:onClick="@{user.onNameClick}"/>

...

<TextView  ... android:text="@{user.nickname ?? user.name}" android:onLongClick="@{user.onNicknameLongClick}"/>
...
Be careful :
- Customize the parameters of the event listening method 、 The return value must be the same as the method in the original listening event . For example, the click event must be the same as onClick(View view) equally , Parameter is View, The return value is void; Long press event and onLongCLick(View view) equally , Parameter is View, The return value is boolean
- android:onLongClick You will be prompted that there is no such attribute , But it doesn't matter as long as you don't report an error
2.4 include Parameter transfer of
In layout file , Often used include Sub layout , How to transfer the data in the parent layout to the child layout ? The method is to customize the attributes .
【1】 Sub layout layout_include_params.xml—— Same as before , Define the data module , Then use it OK:
<?xml version="1.0" encoding="utf-8"?>
<layout ... xmlns:tools="http://schemas.android.com/tools">

    <data>

        <variable  name="user" type="com.zjun.databinding.demo.bean.User" />
    </data>

    <LinearLayout  ...>

        <LinearLayout style="@style/StyleItemParent">

            <TextView  ... android:text=" full name :" />

            <TextView  ... android:text="@{user.name}" />
        </LinearLayout>


        <LinearLayout ...>

            <TextView  ... android:text=" Age :" />

            <TextView  ... android:text="@{String.valueOf(user.age) + ` years old`}" />
        </LinearLayout>
    </LinearLayout>
</layout>
【2】 Parent layout activity_include_params_post.xml( Add namespace app, For custom attributes , And then in include Transfer data in the tag app:user="@{user}"):
<?xml version="1.0" encoding="utf-8"?>
<!-- In order to pass data to the sub layout , You need to add custom attributes , Add the namespace first app-->
<layout ... xmlns:app="http://schemas.android.com/apk/res-auto" >

    <data>

        <variable  name="user" type="com.zjun.databinding.demo.bean.User" />
    </data>

    <RelativeLayout  ...>

        <!-- adopt app:user To transfer data -->
        <include  layout="@layout/layout_include_params" app:user="@{user}" />
    </RelativeLayout>
</layout>
2.5 List Set display
there List Display of , Express the List The objects in the collection are displayed separately , Non adapter Adapter. If you put two User Put in List in , Then take the object out of the parent layout , And then pass it to the sub layout .
【1】 Parent layout activity_list_show.xml:
<?xml version="1.0" encoding="utf-8"?>
<layout ... xmlns:app="http://schemas.android.com/apk/res-auto" >
<data>
<!--import Import User class , And java The code does the same thing . In this way, the following can directly quote , Otherwise, write the complete package name + Class name . If you import two classes with the same class name , You can use aliases alias To distinguish between , variable type Write alias -->
<import type="com.zjun.databinding.demo.bean.User" />
<variable name="userList" type="java.util.List<User>" />
</data>
<LinearLayout ... >
<!-- Just like manipulating arrays , Use brackets to get List Objects in the -->
<include layout="@layout/layout_include_list" ... app:user="@{userList[0]}" />
<include layout="@layout/layout_include_list" ... app:user="@{userList[1]}" />
</LinearLayout>
</layout>【2】 Sub layout layout_include_list.xml:
<?xml version="1.0" encoding="utf-8"?>
<layout xmlns:android="http://schemas.android.com/apk/res/android">

    <data>
        <variable  name="user" type="com.zjun.databinding.demo.bean.User" />

    </data>

    <TextView  ... android:text="@{user.name + `[` + user.nickname + `, ` + (user.male ? ` male ` : ` Woman `) + `, ` + user.age +`]`}" />
</layout>
【3】 Set data in code :
@Override
protected void onCreate(Bundle savedInstanceState) {
    super.onCreate(savedInstanceState);
    ActivityListShowBinding binding = DataBindingUtil.setContentView(this, R.layout.activity_list_show);
    List<User> userList = new ArrayList<>();
    userList.add(new User(" pharmacist hwang ", " Dongxie ", true, 30));
    userList.add(new User(" Ouyang Feng ", " Western poison ", true, 33));
    binding.setUserList(userList);
}
result : 
Be careful :
- stay type Generics in also cannot be used ”<” And ”>”, You must use the escape character
"<"and">" - Escape character in type There will be a red error in the , Negligible , When compiling, it can pass
- Can't be used directly
android:text="@{userList[0]}", Even if you want to print the address of the object , Not good either. . The consequence of this use is : Every databing Du Bao “ Package does not exist ” Error of , Even the normal ones were wrong . Will be confused - In the sub layout
(user.male ? ` male ` : ` Woman `), Must be enclosed in parentheses - android:text The combination of data in is very long , But I can only write one line , At present, I don't know how to branch
2.6 Custom properties ——ImageView display picture
2.6.1 Using annotations , Add custom attributes in the code
A special class is used here DBUtils, To encapsulate Databinding Annotations
public class DBUtils {

    /** *  Use DataBinding To load pictures  *  Use @BindingAdapter annotation , Explanatory value ( there imageUrl) You can take whatever you want , The annotation value will become a custom attribute  *  This custom attribute can be found in xml Use... In layout files , The value of the custom attribute is defined here String type url * 《 explain 》: * 1.  The method name can be the same as the annotation name , It's not the same  * 2.  The first parameter must be View, This is where the custom attribute is located View * 3.  The second parameter is the value of the custom attribute , Corresponds to the annotation value . This is an array , Can be more  *  Need here INTERNET jurisdiction , Don't forget  * * @param imageView ImageView Control  * @param url  Picture network address  */
    @BindingAdapter({
   "imageUrl"})
    public static void loadImage(ImageView imageView, String url) {
        if (url == null) {
            imageView.setImageResource(R.mipmap.ic_launcher);
        } else {
            Glide.with(imageView.getContext()).load(url).into(imageView);
        }
    }
}
2.6.2 stay xml Use custom attributes in layout files
Write the namespace first :xmlns:app="http://schemas.android.com/apk/res-auto"
Then use custom attributes imageUrl
<?xml version="1.0" encoding="utf-8"?>
<layout ...
    xmlns:app="http://schemas.android.com/apk/res-auto" >

    <data>

        <variable
            name="imgUrl1"
            type="String" />

        <variable
            name="imgUrl2"
            type="String" />

    </data>

    <RelativeLayout
        ...>

        <!-- Use custom properties imageUrl-->
        <ImageView
            ...
            app:imageUrl="@{imgUrl1}" />

        <ImageView
            ...
            app:imageUrl="@{imgUrl2}" />

    </RelativeLayout>
</layout>
2.6.3 Set custom attribute values in the code
//  obtain Activity***Binding Just omit
binding.setImgUrl1("http://avatar.csdn.net/4/9/8/1_a10615.jpg");
binding.setImgUrl2(null);
Running results : 
2.6 ListView
ListView The display of all depends on BaseAdapter, stay DataBinding There is no exception . This is relatively complicated , Write down the steps first :
- establish BaseAdapter Subclasses of , Because this class can be used universally , So it's called CommonAdapter. Internal implementation core code
- Define variables in the main layout file ,type Type can be BaseAdapter, Or for CommonAdapter. And set the variable to the custom attribute adapter
- Through the sub layout Bean To set variables
- Create... In code CommonAdapter example , And set to DataBinding Variable
Do it step by step :
2.6.1 Create generic adapters CommonAdapter
public class CommonAdapter extends BaseAdapter {

    private Context mContext;
    private List<User> mDataList;
    private int layoutId; //  Item layout ID
    private int variableId; // DataBinding The variable of ID, It can be done by similar R Of documents BR File to get

    public CommonAdapter(Context context, List<User> dataList, int layoutId, int variableId) {
        this.mContext = context;
        this.mDataList = dataList;
        this.layoutId = layoutId;
        this.variableId = variableId;
    }

    @Override
    public int getCount() { return mDataList.size(); }

    @Override
    public Object getItem(int position) { return mDataList.get(position); }

    @Override
    public long getItemId(int position) { return position; }

    @Override
    public View getView(int position, View convertView, ViewGroup parent) {
        //  No, ViewHolder Reuse of , but Databinding Reuse has been implemented internally
        ViewDataBinding binding;
        if (convertView == null) {
            binding = DataBindingUtil.inflate(LayoutInflater.from(mContext), layoutId, parent, false);
        } else {
            binding = DataBindingUtil.getBinding(convertView);
        }
        binding.setVariable(variableId, mDataList.get(position));
        return binding.getRoot();
    }
}
2.6.2 Set adapter in main layout file
<?xml version="1.0" encoding="utf-8"?>
<layout ... xmlns:app="http://schemas.android.com/apk/res-auto" >

    <data >
        <variable  name="lvAdapter" type="com.zjun.databinding.demo.adapter.CommonAdapter" />
            <!-- or :type="android.widget.BaseAdapter" />-->
    </data>

    <RelativeLayout  ...>

        <!-- Use custom properties adapter, Because there is setAdapter() Method , So there is no need to define -->
        <ListView  ... app:adapter="@{lvAdapter}" />
    </RelativeLayout>
</layout>
2.6.3 Set data in item layout
This simple , The above has already been mentioned
<?xml version="1.0" encoding="utf-8"?>
<layout ... xmlns:app="http://schemas.android.com/apk/res-auto">

    <data>
        <variable  name="user" type="com.zjun.databinding.demo.bean.User" />
    </data>

    <LinearLayout  ...>

        <ImageView  ... app:imageUrl="@{user.icon}" />

        <TextView  ... android:text="@{user.name}" />
    </LinearLayout>
</layout>
2.6.4 to ListView Set up Adapter
protected void onCreate(Bundle savedInstanceState) {
        super.onCreate(savedInstanceState);
        ActivityListViewBinding binding = DataBindingUtil.setContentView(this, R.layout.activity_list_view);

        List<User> list = new ArrayList<>();
        for (int i = 0; i < 100; i++) {
            // 3 A network picture 1 Local pictures , In turn, cycle
            User user = new User("user" + i, (i & 0x03) < 3 ? "http://avatar.csdn.net/4/9/8/1_a10615.jpg" : null);
            list.add(user);
        }

        //  establish Adapter.BR Similar to R file , Used to store variable names . Location is also related to R equally , stay app Under the name of the bag
        CommonAdapter adapter = new CommonAdapter(this, list, R.layout.item_list_view, BR.user);
        binding.setLvAdapter(adapter);
    }
result : 
2.7 ListView Item update for
In ordinary ListView in , The updated data should be displayed on the interface immediately , need notifyDataSetChanged(). But here ,Databinding The observer mode is used in .
Implementation steps :
- stay Bean Class inherits the observer BaseObservable
- In the properties that need to be observed getter Add a comment to the method @Bindable. because xml Middle is through getter To get the value of , Here is also for BR File generation this field identifies
- In the updated method , Add attribute update notification method :
notifyPropertyChanged(int variableId);. Usually put it in Setter In the method , Because attribute values are changed here .
Code
Bean class :
// 1、 Inherit BaseObservable
public class Member extends BaseObservable{

    private String name;
    private String icon;

    public Member(String name, String icon) {
        this.name = name;
        this.icon = icon;
    }

    // 2、 In the attribute value Getter Add @Bindable annotation
    @Bindable
    public String getName() {
        return name;
    }

    // 3、 Add a property update notification method in the updated place :notifyPropertyChanged(filedId);
    public void setName(String name) {
        this.name = name;
        notifyPropertyChanged(com.zjun.databinding.demo.BR.name);
    }

    public String getIcon() {
        return icon;
    }

    public void setIcon(String icon) {
        this.icon = icon;
    }

    public void onItemClick(View view) {
        setName(name + "【 Updated 】");
    }
}
Layout file ( Set the click event on the entire entry , It can also be set on a control ):
<?xml version="1.0" encoding="utf-8"?>
<layout ... xmlns:app="http://schemas.android.com/apk/res-auto">

    <data>
        <variable  name="member" type="com.zjun.databinding.demo.bean.Member" />

    </data>

    <!-- Set click event -->
    <LinearLayout  ... android:onClick="@{member.onItemClick}">

        <ImageView  ... app:imageUrl="@{member.icon}" />

        <TextView  ... android:text="@{member.name}" />
    </LinearLayout>
</layout>
Activity The code in is the same as , But I put CommonAdapter Of User Changed to generic , In order to be universal .
result : 
There are two other ways :ObserableField and ObservableMap, See the last reference 1 or 2
2.8 Add a custom attribute with a non static Method
When we loaded the picture , Using annotations @BindingAdapter({"imageUrl"}), and static Static methods to add custom attributes . but static There is nothing wrong static Multi function , Sometimes we need to use objects , What do I do ?
DataBinding You can also go through component The way of components , To achieve non static To add custom attributes :
- In a custom class, add a custom attribute to a non - static Method , add to @BindingAdapter annotation
- Create a custom component class , Realization DataBindingComponent. An error will be reported automatically , Prompt that you need to obtain 1 Methods of classes in ( Static ones are not needed ). Then implement this method
- Set the component object to DataBinding
Code implementation :
2.8.1 Add non - in the custom class static Method , Used to add custom attributes
public class NotStaticUtils {
    @BindingAdapter({
   "imgSrc"})
    public  void showImg(ImageView imageView, String src) {
        if (src == null) {
            imageView.setImageResource(R.mipmap.ic_launcher);
        } else {
            Glide.with(imageView.getContext()).load(src).into(imageView);
        }
    }
}
2.8.2 Create a custom component class , And implementation methods
public class MyComponent implements DataBindingComponent{

    private NotStaticUtils utils;

    @Override
    public NotStaticUtils getNotStaticUtils() {
        if (utils == null) {
            utils = new NotStaticUtils();
        }
        return utils;
    }
}
2.8.3 Set the custom component to DataBinding
@Override
protected void onCreate(Bundle savedInstanceState) {
    super.onCreate(savedInstanceState);

    //  Method 1 、 Set default components
    DataBindingUtil.setDefaultComponent(new MyComponent());

    ActivityNotStaticBinding dataBinding = DataBindingUtil.setContentView(this, R.layout.activity_not_static);

    //  Method 2 、 Pass in directly in the construct , Here is to Ben alone DataBinding Specify custom components
    // ActivityMainBinding binding = DataBindingUtil.setContentView(this, R.layout.activity_main, new Component());

    dataBinding.setSrc1("http://avatar.csdn.net/4/9/8/1_a10615.jpg");
    dataBinding.setSrc2(null);
}
2.8.4 xml Use in
This is the same as the above , It's just a change of name . The core is as follows :
<variable  name="src1" type="String" />

    ...

    <!-- Use custom properties imgSrc-->
    <ImageView  ... app:imgSrc="@{src1}" />
2.9 stay Fragment Use in
Fragment Each has its own layout , As if with Activity It doesn't matter , but DataBinding There is a method that can be bound to View:DataBindingUtil.bind(View root).
2.9.1 Layout file
<layout ...>
    <data>
        <variable name="province" type="String" />
        <variable name="city" type="String" />
    </data>

    <LinearLayout ...>
        <TextView ... android:text="@{province}" />

        <TextView ... android:text="@{city}" />
    </LinearLayout>
</layout>
2.9.2 Fragment In the binding
obtain DataBinding There are three ways :
- stay onCreateView adopt inflate(), And then through getRoot() return View. Then set it directly data A variable's value
- adopt bind() Method , Back to layout Binding( Automatically generated according to the layout ). Then set it directly data A variable's value
- adopt bind() Method , Back to layout Binding Parent class of ViewDataBinding. And then through setVariable() Set a value for the specified variable
private FragmentShowBinding mBinding;

@Override
public View onCreateView(LayoutInflater inflater, ViewGroup container,
                         Bundle savedInstanceState) {
    return inflater.inflate(R.layout.fragment_show, container, false);
    //  or , Get... Here DataBinding
// mBinding = DataBindingUtil.inflate(inflater, R.layout.fragment_show, container, false);
// return mBinding.getRoot();
}

@Override
public void onViewCreated(View view, @Nullable Bundle savedInstanceState) {
    super.onViewCreated(view, savedInstanceState);

    //  binding View
    mBinding = DataBindingUtil.bind(view);
    mBinding.setProvince(" Zhejiang ");
    mBinding.setCity(" ningbo ");

    //  or , Get the parent class ViewDataBinding, And then by setting variables
// ViewDataBinding binding = DataBindingUtil.bind(view);
// binding.setVariable(BR.province, " jiangxi ");
// binding.setVariable(BR.city, " Ganzhou ");
}
2.10 RecyclerView
RecyclerView Follow ListView equally , There is an adapter Adapter. But it should be displayed normally ,RecyclerView I need one more LayoutManager( The first time I accidentally fell into this pit ).
Some methods on the Internet are only in item Use... In the entry Databinding,RecyclerView Or through findViewById To get . But here it is Databinding, So I don't want to findViewById 了 .
stay Databinding In the world of , If this View Yes setter Method , It can be used directly , No, we can customize the properties ( see 2.6). For example, to add a split line , Go and play by yourself .
Look directly at the code to see the step logic :
2.10.1 activity Layout in
activity_recycler_view.xml
<?xml version="1.0" encoding="utf-8"?>
<layout ...>

    <data >
        <variable  name="rvLayoutManager" type="android.support.v7.widget.LinearLayoutManager" />
        <variable  name="rvAdapter" type="com.zjun.databinding.demo.adapter.RVAdapter" />
        <!-- or :type="android.support.v7.widget.RecyclerView.Adapter" />-->
    </data>

    <RelativeLayout ...>

        <android.support.v7.widget.RecyclerView  ... app:layoutManager="@{rvLayoutManager}" app:adapter="@{rvAdapter}" />
    </RelativeLayout>
</layout>
2.10.2 item Item layout
Follow up ListView The layout of the entries is the same
item_recycler_view.xml
<?xml version="1.0" encoding="utf-8"?>
<layout ...>

    <data>
        <variable name="member" type="com.zjun.databinding.demo.bean.Member" />
    </data>

    <LinearLayout ...>

        <ImageView ... app:imageUrl="@{member.icon}" />

        <TextView ... android:text="@{member.name}" />
    </LinearLayout>
</layout>
2.10.3 Adapter and Activity The code in
There are two ways of writing , The first is official , The second one has good universality . Official inside , The item layout is not used ( ha-ha , Is it possible to pretend in front of novices ? But when viewing the code , You cannot jump directly to the layout file , You can also display , According to the last section Fragment Modify it by yourself )
One 、 The official way
public class RVAdapter extends RecyclerView.Adapter<RVAdapter.RVHolder> {

    private Context mContext;
    private List<Member> mDataList;

    public RVAdapter(Context context, List<Member> list) {
        this.mContext = context;
        this.mDataList = list;
    }

    @Override
    public RVHolder onCreateViewHolder(ViewGroup parent, int viewType) {
        return RVHolder.create(LayoutInflater.from(mContext), parent);
    }

    @Override
    public void onBindViewHolder(RVHolder holder, int position) {
        holder.bindTo(mDataList.get(position));
    }

    @Override
    public int getItemCount() {
        return mDataList == null ? 0 :mDataList.size();
    }

    static class RVHolder extends RecyclerView.ViewHolder {
        //  Create a static fetch method
        static RVHolder create(LayoutInflater inflater, ViewGroup parent) {
            ItemRecyclerViewBinding binding = ItemRecyclerViewBinding.inflate(inflater, parent, false);
            return new RVHolder(binding);
        }

        ItemRecyclerViewBinding mBinding;

        private RVHolder(ItemRecyclerViewBinding binding) {
            super(binding.getRoot());
            this.mBinding = binding;
        }

        public void bindTo(Member member) {
            mBinding.setMember(member);
            //  It causes the data binding to refresh all pending changes . The official explanation is hard to understand , Actually, the function is to display the data on the layout immediately
            mBinding.executePendingBindings();
        }
    }
}
activity Use in :
@Override
protected void onCreate(Bundle savedInstanceState) {
    super.onCreate(savedInstanceState);

    ActivityRecyclerViewBinding binding = DataBindingUtil.setContentView(this, R.layout.activity_recycler_view);

    //  Analog data
    List<Member> list = new ArrayList<>();
    for (int i = 0; i < 100; i++) {
        // 1 A network picture 1 Local pictures , In turn, cycle
        Member member = new Member("user" + i, (i & 0x01) == 0 ? "http://avatar.csdn.net/4/9/8/1_a10615.jpg" : null);
        list.add(member);
    }

    //  Set up the layout manager , And adapter
    binding.setRvLayoutManager(new LinearLayoutManager(this, LinearLayoutManager.VERTICAL, false));
    binding.setRvAdapter(new RVAdapter(this, list));
}
Two 、 The general approach
public class RVAdapter extends RecyclerView.Adapter<RVAdapter.RVHolder> {

    private Context mContext;
    private List<Member> mDataList;
    private int mLayoutId;      //  Item layout file ID
    private int mVariableId;    // DataBinding Variable ID

    public RVAdapter(Context context, List<Member> list, int layoutId, int variableId) {
        this.mContext = context;
        this.mDataList = list;
        this.mLayoutId = layoutId;
        mVariableId = variableId;
    }

    @Override

    public RVHolder onCreateViewHolder(ViewGroup parent, int viewType) {
        ViewDataBinding binding = DataBindingUtil.inflate(LayoutInflater.from(mContext), mLayoutId, parent, false);
        RVHolder holder = new RVHolder(binding.getRoot());
        holder.binding = binding;
        return holder;
    }

    @Override
    public void onBindViewHolder(RVHolder holder, int position) {
        holder.binding.setVariable(mVariableId, mDataList.get(position));
        //  Don't forget the code
        holder.binding.executePendingBindings();
    }

    @Override
    public int getItemCount() {
        return mDataList == null ? 0 :mDataList.size();
    }

    class RVHolder extends RecyclerView.ViewHolder {
        ViewDataBinding binding;

        RVHolder(View view) {
            super(view);
        }
    }
}
activity Zhongba setAdapter() Code , Just change it to this sentence :
binding.setRvAdapter(new RVAdapter(this, list, R.layout.item_recycler_view, BR.member));3、 ... and 、 Common pit
DataBinding Your mistakes are hard to find , But it's basically in xml Error in file . Be careful
3.1 Error:(8, 45) error : Package com.zjun.databinding.demo.databinding non-existent
It's hard to find a specific reason , Check one by one :
- see Bean Class getter Method , And getter Whether the method is normal
- Check grammar , Include a pair of braces , See you for the rest 2.2.3 xml Usage syntax in
Four 、 Open source Demo
5、 ... and 、 Reference resources
- Cotton candy to Android It brings Data Bindings( Data binding library )
- Android-MVVM framework -Data Binding Use
- Qianfeng education Android Developing video _DataBinding( To baidu )
- Android Data binding framework DataBinding, It can be called a black technology to solve interface logic
边栏推荐
- Do280openshift access control -- encryption and configmap
- Source code analysis the problem that fragments cannot be displayed in the custom ViewGroup
- ros(25):rqt_ image_ View reports an error unable to load plugin for transport 'compressed', error string
- Hot fix sophix multi-channel patch solution
- [figure database performance and scenario test sharp tool ldbc SNB] series I: introduction to data generator & Application to ges service
- Tiktok wallpaper applet source code
- Unmanned driving: Some Thoughts on multi-sensor fusion
- 百公里加速仅5.92秒,威兰达高性能版以高能产品实力领跑
- Use of navigation and navigationui
- [leaderboard] Carla leaderboard leaderboard leaderboard operation and participation in hands-on teaching
猜你喜欢

不重要的token可以提前停止计算!英伟达提出自适应token的高效视觉Transformer网络A-ViT,提高模型的吞吐量!...

Using tcp/udp tools to debug the yeelight ribbon
Outer screen and widescreen wasted? Harmonyos folding screen design specification teaches you to use it
【微服务|Sentinel】Sentinel快速入门|构建镜像|启动控制台

Practical operation notes - notebook plus memory and ash cleaning
5-minute NLP: summary of 3 pre training libraries for rapid realization of NER

Related operations of ansible and Playbook

2019 summary and 2020 outlook

Decoupling pages and components using lifecycle
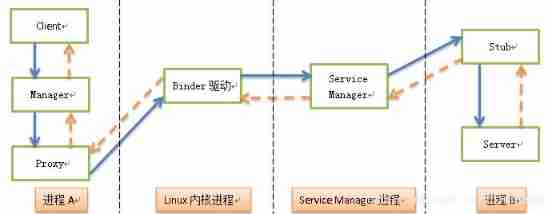
Binder mechanism and Aidl communication example


随机推荐
Network request -volley
Qiniu cloud uploads video to get the first frame of video
The third generation of power electronics semiconductors: SiC MOSFET learning notes (V) research on driving power supply
Usage of ViewModel and livedata in jetpack
Only positive integers can be entered in the text box
Practical operation notes - notebook plus memory and ash cleaning
C WinForm maximizes occlusion of the taskbar and full screen display
Basic summary of MySQL database knowledge
Scrollview height cannot fill full screen
Helm chart warehouse operation
Sliding window technology based on byte in transport layer
Paper review: U2 net, u-net composed of u-net
Paint rounded rectangle
Design and practice of vivo server monitoring architecture
[leaderboard] Carla leaderboard leaderboard leaderboard operation and participation in hands-on teaching
C#和C 的CAN通信实验
Domain Driven Design and coding
The picture of wechat official account can not be displayed normally
Outer screen and widescreen wasted? Harmonyos folding screen design specification teaches you to use it
Im instant messaging development application keeping alive process anti kill