当前位置:网站首页>[cloud native] 2.3 kubernetes core practice (Part 1)
[cloud native] 2.3 kubernetes core practice (Part 1)
2022-06-27 08:26:00 【Procedural ape chase】
hello ~ Hello, everyone , In the previous article, we deployed the cluster and set up the visual interface , Let's move on to the core practical part .
Personal home page : Personal home page
Series column :【 Cloud native series 】
Articles related to this article :
1.5【 Cloud native 】 Docker The advanced combat 【 Cloud native 】1.5 Docker The advanced combat _ Program ape chase blog -CSDN Blog _idea link docker 2.1【 Cloud native 】 Kubernetes Basic concepts 【 Cloud native 】2.1 Kubernetes Basic concepts _ Program ape chase blog -CSDN Blog 2.2【 Cloud native 】 kubeadm Create clusters 【 Cloud native 】2.2 kubeadm Create clusters _ Program ape chase blog -CSDN Blog
Catalog
Four 、 Multiple containers Pod details
5、 ... and 、 Use Deployment Deploy the application
One 、 operation Namespace
Our resource creation methods include command line and YAML.Namespace( The name space ) It is used to isolate resources . notes : The name space , It is used to isolate and partition cluster resources . By default, only resources are isolated , Do not isolate the network . The general system comes with :kube-node-lease、kube-public、kube-system etc. , The default is default. Of course, we can also see from the command line (kubectl get ns And kubectl get pods -A). Before operation, we usually need to build a .yaml file .
Create space
kubectl create ns helloDelete space
kubectl delete ns hello
Two 、 understand Pod
Pod Is a set of containers in operation , yes kubernetes The smallest unit applied in .
Pod What does it have to do with the container ?
We have three nodes , Also install Docker( Provide a containerized operating environment , We call it CRI【Container Runtime Interface】), Add three applications ( In a containerized way ),k8s It is to manage these containers , Then add... To the application Pod, It can be understood as encapsulating them , That's why I have a sentence —— yes kubernetes The smallest unit applied in .(Pod It can run multiple containers )

3、 ... and 、 establish Pod
With the above concept , This is what we are going to create Pod, So it's the same as before , We use commands .
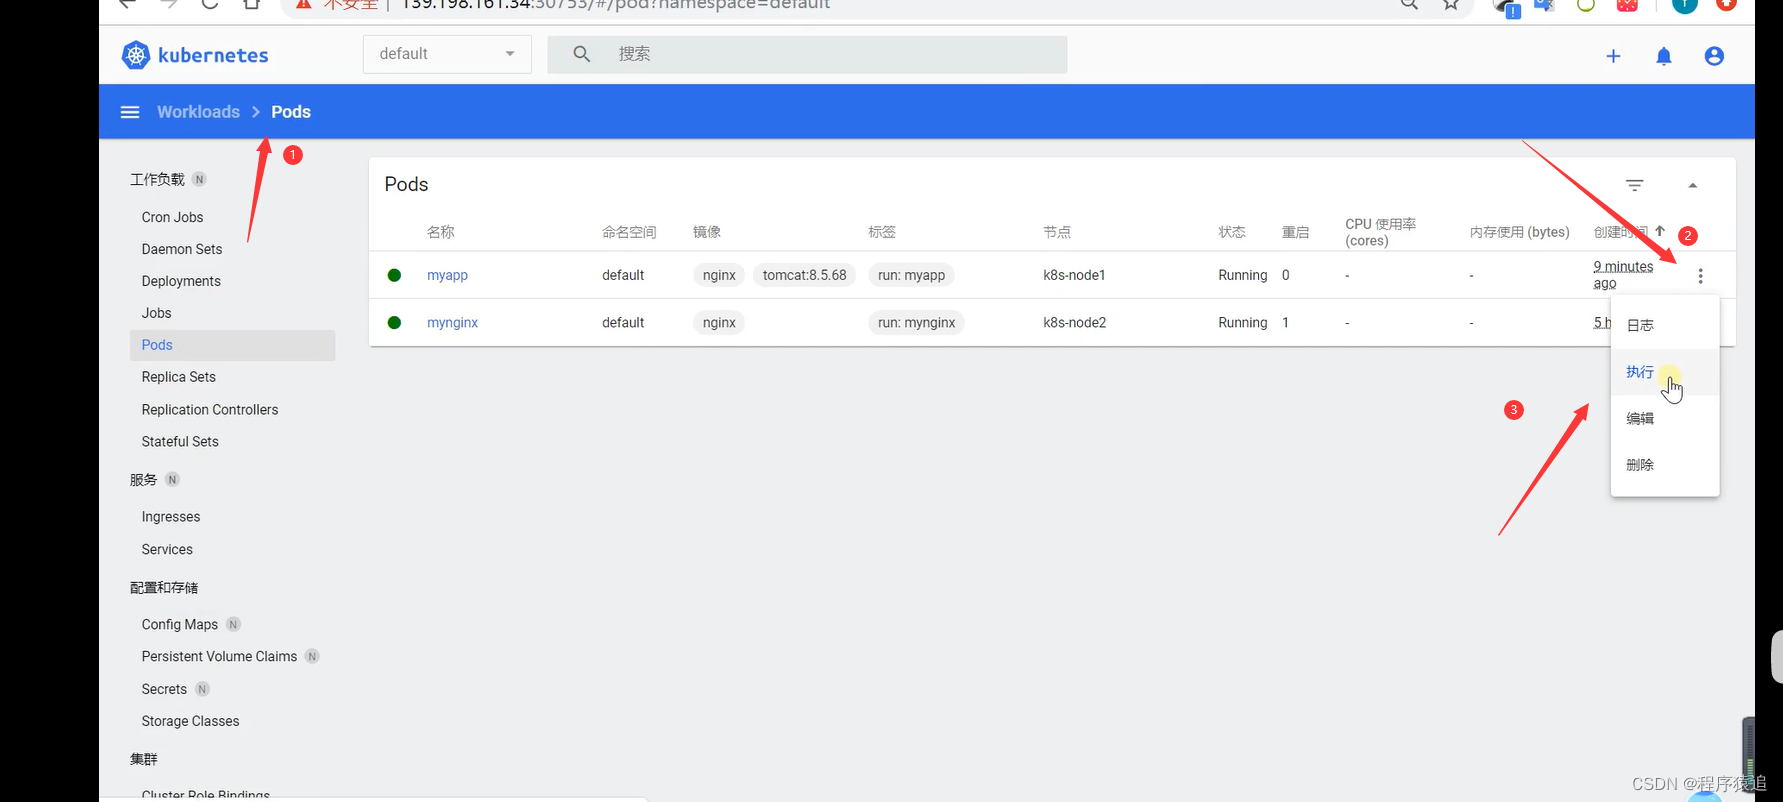
kubectl run mynginx --image=nginxWe have seen so much in detail , Everyone is familiar with this format ?kubectl run + name + Mirror name
Once created, you can use kubectl get pod Check it out. (-A Is to view all )

Check the running container ( Use in batch input )
docker ps|grep mynginx

describe Pod
kubectl describe pod Your own Pod name
Delete Pod
kubectl delete pod Pod name
see Pod Operation log of
kubectl logs Pod name How to create a configuration file Pod Well ?
Input vi pod. yaml, Then enter the following code ( Remember to exit and save )
apiVersion: v1
kind: Pod
metadata:
  labels:
    run: mynginx
  name: mynginx
#  namespace: default
spec:
  containers:
  - image: nginx
    name: mynginx
kubectl apply -f pod. yaml Let's apply
Every Pod - k8s Will be assigned a ip
kubectl get pod -owide
Use Pod Of ip + pod The port in which the container runs
curl 192.168.169.136Four 、 Multiple containers Pod details
In our last article, we talked about using visual interfaces , Here, let's take a look at the use of the command line and interface .
Again, we create a yaml file ——vi mul ticontainer-pod.yaml, Then paste directly .
apiVersion: v1
kind: Pod
metadata:
  labels:
    run: mynginx
  name: mynginx
#  namespace: default
spec:
  containers:
  - image: nginx
    name: mynginx

The visual interface is very friendly to operate , For example, it is very convenient to view resource information 、 state 、 Events, etc. . After downloading , Use curl + ip You can print some htnl Code .

We enter nginx Container come , visit tomcat——curl + Native address :8080, In the same way tomcat Inside visit nginx It only needs tomcat——curl + Native address :80, That's all right.
( Very gingko like ).

5、 ... and 、 Use Deployment Deploy the application
Deployment effect : control Pod, send Pod Have multiple copies , self-healing , Ability to expand, shrink, etc ( Not afraid of machine crash 、 Swing machine , With self recovery function ).
In a word , It's used to control Pod Of .
Create deployment
kubectl create deployment mytomcat --image=tomcat:8.5.68establish 3 Copies
kubectl create deployment my-dep --image=nginx --replicas=3 
The next preview continues 2.4 Kubernetes Core combat
( Please pay attention to ) Ongoing update ……

边栏推荐
- 若xn>0,且x(n+1)/xn>1-1/n(n=1,2,...),证明级数∑xn发散
- 关于el-date-picker点击清空参数变为null的问题
- [batch dos-cmd command - summary and summary] - how to distinguish the internal command and external command of CMD, and the difference between CMD command and run (win+r) command,
- Etcd教程 — 第五章 Etcd之etcdctl的使用
- Analysis log log
- Code source AQS sous - jacent pour la programmation simultanée juc
- Blind survey shows that female code farmers are better than male code farmers
- Matlab tips (18) matrix analysis -- entropy weight method
- 【云原生】2.3 Kubernetes 核心实战(上)
- 2022.6.26-----leetcode. seven hundred and ten
猜你喜欢

The IPO of Yefeng pharmaceutical was terminated: Yu Feng, the actual controller who had planned to raise 540million yuan, made P2P investment
![[batch dos-cmd command - summary and summary] - parameters%0,%1,%2,%[0-9],%0-9 in the batch command and batch command parameter position switching command shift, operator% usage in the DOS command](/img/05/19299c47d54d4ede95322b5a923093.png)
[batch dos-cmd command - summary and summary] - parameters%0,%1,%2,%[0-9],%0-9 in the batch command and batch command parameter position switching command shift, operator% usage in the DOS command

MATLAB小技巧(18)矩阵分析--熵权法

Preliminary understanding of C #

Creation process and memory layout of objects at JVM level

Coggle 30 days of ML July competition learning
JVM层次上的对象的创建过程和内存布局

【12. 最大连续不重复子序列】

Helix QAC is updated to 2022.1 and will continue to provide high standard compliance coverage
盲测调查显示女码农比男码农更优秀
随机推荐
MySQL lock details
浏览器的markdown插件显示不了图片
March into machine learning -- Preface
Order by injection of SQL injection
Redis configuration file details
MySQL锁详解
Correctly understand MySQL mvcc
参考 | 升级 Win11 移动热点开不了或者开了连不上
Redis transactions
Lvgl GUI guide porting code to stm32
Recognize the ordering of O (nlogn)
[batch dos-cmd command - summary and summary] - how to distinguish the internal command and external command of CMD, and the difference between CMD command and run (win+r) command,
Five basic types of redis
(original) custom drawable
Mysql事务中MVCC理解超简单
MySQL索引详解
野風藥業IPO被終止:曾擬募資5.4億 實控人俞蘠曾進行P2P投資
[10. difference]
ArrayList和LinkedList的区别
[notes on c++ primer] Chapter 3 string, vector and array