当前位置:网站首页>Learn Tai Chi Maker - mqtt (VIII) esp8266 subscribe to mqtt topic
Learn Tai Chi Maker - mqtt (VIII) esp8266 subscribe to mqtt topic
2022-06-27 02:14:00 【xuechanba】
The data link :http://www.taichi-maker.com/homepage/esp8266-nodemcu-iot/iot-tuttorial/mqtt-tutorial/esp8266-subscribe-mqtt/

1、 Subscribe to a single topic
/**********************************************************************  Project name /Project :  Zero basic introduction to the Internet of things   Program name /Program name : subscribe_ranye_url  The team /Team :  Taiji maker team  / Taichi-Maker (www.taichi-maker.com)  author /Author : CYNO Shuo   date /Date(YYYYMMDD) : 20200708  Purpose of procedure /Purpose :  The purpose of this program is to demonstrate how to use PubSubClient Library usage ESP8266 towards MQTT Server subscription information . -----------------------------------------------------------------------  This sample program is made by Taiji maker team 《 Zero basic introduction to the Internet of things 》 Sample program in .  This tutorial is designed and produced by friends who are interested in the development of the Internet of things . For more information about this tutorial , Please refer to the following pages : http://www.taichi-maker.com/homepage/esp8266-nodemcu-iot/iot-c/esp8266-nodemcu-web-client/http-request/ ***********************************************************************/
#include <ESP8266WiFi.h>
#include <PubSubClient.h>

//  Set up wifi Access information ( Please according to your WiFi Modify the information )
const char* ssid = "FAST_153C80";
const char* password = "123456798";
const char* mqttServer = "test.ranye-iot.net";
//  As above MQTT The server cannot connect normally , Please go to the following page to find a solution
// http://www.taichi-maker.com/public-mqtt-broker/

WiFiClient wifiClient;
PubSubClient mqttClient(wifiClient);

void setup() {

  pinMode(LED_BUILTIN, OUTPUT);     //  Set up on the board LED Pin is output mode
  digitalWrite(LED_BUILTIN, HIGH);  //  Turn it on and off the board LED
  Serial.begin(9600);               //  Start serial communication

  // Set up ESP8266 The working mode is wireless terminal mode
  WiFi.mode(WIFI_STA);

  //  Connect WiFi
  connectWifi();

  //  Set up MQTT Server and port number
  mqttClient.setServer(mqttServer, 1883);
  //  Set up MQTT Subscription callback function
  mqttClient.setCallback(receiveCallback);

  //  Connect MQTT The server
  connectMQTTserver();
}

void loop() {

  if (mqttClient.connected()) {
     //  If the development board successfully connects to the server
    mqttClient.loop();          //  Process information and heartbeat
  } else {
                          //  If the development board fails to connect to the server
    connectMQTTserver();        //  Then try to connect to the server
  }
}

//  Connect MQTT Server and subscribe to information
void connectMQTTserver(){

  //  according to ESP8266 Of MAC Address generation client ID( Avoid contact with other ESP8266 The client of ID The nuptial )
  String clientId = "esp8266-" + WiFi.macAddress();

  //  Connect MQTT The server
  if (mqttClient.connect(clientId.c_str())) {

    Serial.println("MQTT Server Connected.");
    Serial.println("Server Address:");
    Serial.println(mqttServer);
    Serial.println("ClientId: ");
    Serial.println(clientId);
    subscribeTopic(); //  Subscribe to specific topics
  } else {

    Serial.print("MQTT Server Connect Failed. Client State:");
    Serial.println(mqttClient.state());
    delay(5000);
  }
}

//  Callback function after receiving information
void receiveCallback(char* topic, byte* payload, unsigned int length) {

  Serial.print("Message Received [");
  Serial.print(topic);
  Serial.print("] ");
  for (int i = 0; i < length; i++) {

    Serial.print((char)payload[i]);
  }
  Serial.println("");
  Serial.print("Message Length(Bytes) ");
  Serial.println(length);

  if ((char)payload[0] == '1') {
         //  If you receive a message with “1” For the beginning
    digitalWrite(BUILTIN_LED, LOW);  //  Then light up LED.
    Serial.println("LED ON");
  } else {

    digitalWrite(BUILTIN_LED, HIGH); //  Otherwise, it goes out LED.
    Serial.println("LED OFF");
  }
}

//  Subscribe to specific topics
void subscribeTopic(){


  //  Create a subscription topic . The title of the topic is Taichi-Maker-Sub The prefix , The device is added later MAC Address .
  //  This is to make sure that different devices use the same MQTT When the server tests the message subscription , The topic names you subscribe to are different
  String topicString = "Taichi-Maker-Sub-" + WiFi.macAddress();
  char subTopic[topicString.length() + 1];
  strcpy(subTopic, topicString.c_str());

  //  The serial port monitor outputs whether the topic is successfully subscribed and the name of the subscription topic
  if(mqttClient.subscribe(subTopic)){

    Serial.println("Subscrib Topic:");
    Serial.println(subTopic);
  } else {

    Serial.print("Subscribe Fail...");
  }
}

// ESP8266 Connect wifi
void connectWifi(){


  WiFi.begin(ssid, password);

  // wait for WiFi Connect , Output success information after successful connection
  while (WiFi.status() != WL_CONNECTED) {

    delay(1000);
    Serial.print(".");
  }
  Serial.println("");
  Serial.println("WiFi Connected!");
  Serial.println("");
}
The program runs as follows ,
Let's try again MQTT.fx This software provides Taichi-Maker-Sub-EC:FA:BC:40:6F:5B This topic publishes information , At the same time, observe the output of the serial port monitor .

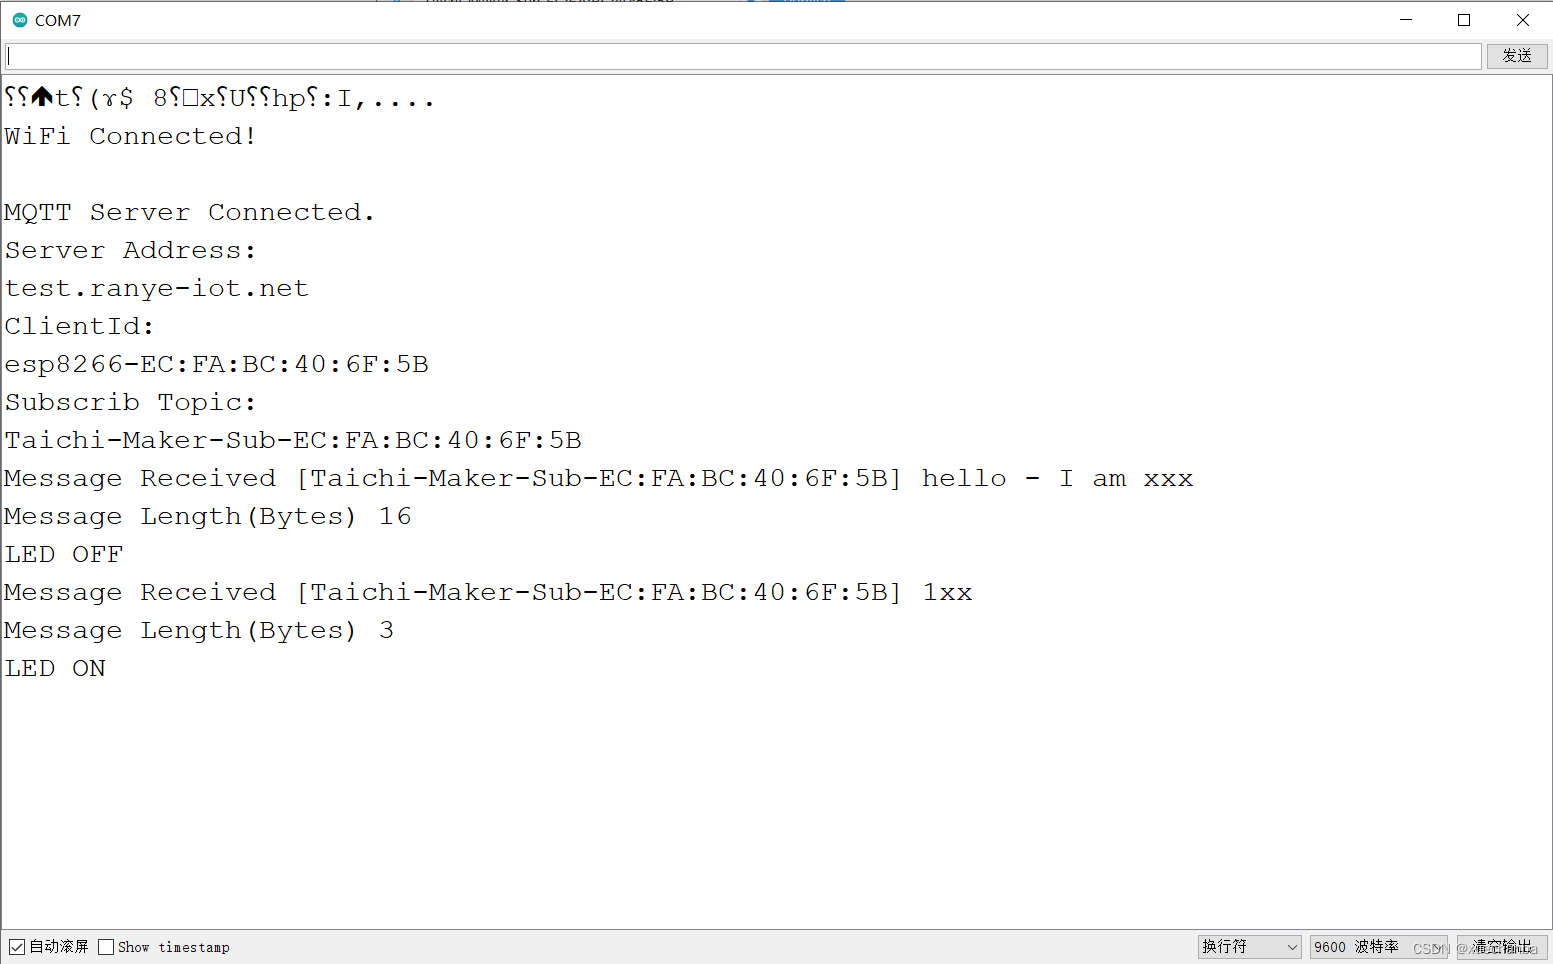
When LED ON when ,ESP8266 On board LED Also lit .
below , To explain the key points of the program .
  //  Set up MQTT Subscription callback function
  mqttClient.setCallback(receiveCallback);
Here ESP8266 The function of the development board is to subscribe MQTT The theme , It is subscribing MQTT After the theme , Whenever you receive this topic message , He will call a callback function receiveCallback , To process the received information .
2、 Subscribe to specific topics
//  The serial port monitor outputs whether the topic is successfully subscribed and the name of the subscription topic
  if(mqttClient.subscribe(subTopic)){

    Serial.println("Subscrib Topic:");
    Serial.println(subTopic);
  } else {

    Serial.print("Subscribe Fail...");
  }
mqttClient.subscribe(subTopic) Will try to subscribe to a topic , The theme is called “Taichi-Maker-Sub-” + WiFi.macAddress(),
If the subscription is successful, it will return 1 .
3、 Callback function after receiving information
void receiveCallback(char* topic, byte* payload, unsigned int length) {

  Serial.print("Message Received [");
  Serial.print(topic);
  Serial.print("] ");
  for (int i = 0; i < length; i++) {

    Serial.print((char)payload[i]);
  }
  Serial.println("");
  Serial.print("Message Length(Bytes) ");
  Serial.println(length);

  if ((char)payload[0] == '1') {
         //  If you receive a message with “1” For the beginning
    digitalWrite(BUILTIN_LED, LOW);  //  Then light up LED.
    Serial.println("LED ON");
  } else {

    digitalWrite(BUILTIN_LED, HIGH); //  Otherwise, it goes out LED.
    Serial.println("LED OFF");
  }
}
Notice the three parameters , The three parameters are fixed format .
topic It's the theme name
payload Is the content of specific information , It's an array type
length Is the length of the specific information
2、 Subscribe to multiple topics
/**********************************************************************  Project name /Project :  Zero basic introduction to the Internet of things   Program name /Program name : subscribe_multitopic_ranye_url  The team /Team :  Taiji maker team  / Taichi-Maker (www.taichi-maker.com)  author /Author : CYNO Shuo   date /Date(YYYYMMDD) : 20201125  Purpose of procedure /Purpose :  The purpose of this program is to demonstrate how to use PubSubClient Library usage ESP8266 towards MQTT The server subscribes to multiple topics  -----------------------------------------------------------------------  This sample program is made by Taiji maker team 《 Zero basic introduction to the Internet of things 》 Sample program in .  This tutorial is designed and produced by friends who are interested in the development of the Internet of things . For more information about this tutorial , Please refer to the following pages : http://www.taichi-maker.com/homepage/esp8266-nodemcu-iot/iot-c/esp8266-nodemcu-web-client/http-request/ ***********************************************************************/
#include <ESP8266WiFi.h>
#include <PubSubClient.h>

//  Set up wifi Access information ( Please according to your WiFi Modify the information )
const char* ssid = "FAST_153C80";
const char* password = "123456798";
const char* mqttServer = "test.ranye-iot.net";
//  As above MQTT The server cannot connect normally , Please go to the following page to find a solution
// http://www.taichi-maker.com/public-mqtt-broker/

WiFiClient wifiClient;
PubSubClient mqttClient(wifiClient);

void setup() {

  pinMode(LED_BUILTIN, OUTPUT);     //  Set up on the board LED Pin is output mode
  digitalWrite(LED_BUILTIN, HIGH);  //  Turn it on and off the board LED
  Serial.begin(9600);               //  Start serial communication

  // Set up ESP8266 The working mode is wireless terminal mode
  WiFi.mode(WIFI_STA);

  //  Connect WiFi
  connectWifi();

  //  Set up MQTT Server and port number
  mqttClient.setServer(mqttServer, 1883);
  mqttClient.setCallback(receiveCallback);

  //  Connect MQTT The server
  connectMQTTserver();
}

void loop() {

  if (mqttClient.connected()) {
     //  If the development board successfully connects to the server
    mqttClient.loop();          //  Process information and heartbeat
  } else {
                          //  If the development board fails to connect to the server
    connectMQTTserver();        //  Then try to connect to the server
  }
}

//  Connect MQTT Server and subscribe to information
void connectMQTTserver(){

  //  according to ESP8266 Of MAC Address generation client ID( Avoid contact with other ESP8266 The client of ID The nuptial )
  String clientId = "esp8266-" + WiFi.macAddress();

  //  Connect MQTT The server
  if (mqttClient.connect(clientId.c_str())) {

    Serial.println("MQTT Server Connected.");
    Serial.println("Server Address:");
    Serial.println(mqttServer);
    Serial.println("ClientId: ");
    Serial.println(clientId);
    subscribeTopic(); //  Subscribe to specific topics
  } else {

    Serial.print("MQTT Server Connect Failed. Client State:");
    Serial.println(mqttClient.state());
    delay(5000);
  }
}

//  Callback function after receiving information
void receiveCallback(char* topic, byte* payload, unsigned int length) {

  Serial.print("Message Received [");
  Serial.print(topic);
  Serial.print("] ");
  for (int i = 0; i < length; i++) {

    Serial.print((char)payload[i]);
  }
  Serial.println("");
  Serial.print("Message Length(Bytes) ");
  Serial.println(length);

  if ((char)payload[0] == '1') {
         //  If you receive a message with “1” For the beginning
    digitalWrite(BUILTIN_LED, LOW);  //  Then light up LED.
  } else {

    digitalWrite(BUILTIN_LED, HIGH); //  Otherwise, it goes out LED.
  }
}

//  Subscribe to specific topics
void subscribeTopic(){


  //  Create a subscription topic 1. The title of the topic is Taichi-Maker-Sub The prefix , The device is added later MAC Address .
  //  This is to make sure that different devices use the same MQTT When the server tests the message subscription , The topic names you subscribe to are different
  String topicString = "Taichi-Maker-Sub-" + WiFi.macAddress();
  char subTopic[topicString.length() + 1];
  strcpy(subTopic, topicString.c_str());

  //  Create a subscription topic 2
  String topicString2 = "Taichi-Maker-Sub2-" + WiFi.macAddress();
  char subTopic2[topicString2.length() + 1];
  strcpy(subTopic2, topicString2.c_str());

  //  Output whether the topic has been successfully subscribed through the serial port monitor 1 And the topics you subscribe to 1 name
  if(mqttClient.subscribe(subTopic)){

    Serial.println("Subscrib Topic:");
    Serial.println(subTopic);
  } else {

    Serial.print("Subscribe Fail...");
  }

  //  Output whether the topic has been successfully subscribed through the serial port monitor 2 And the topics you subscribe to 2 name
  if(mqttClient.subscribe(subTopic2)){

    Serial.println("Subscrib Topic:");
    Serial.println(subTopic2);
  } else {

    Serial.print("Subscribe Fail...");
  }
}

// ESP8266 Connect wifi
void connectWifi(){


  WiFi.begin(ssid, password);

  // wait for WiFi Connect , Output success information after successful connection
  while (WiFi.status() != WL_CONNECTED) {

    delay(1000);
    Serial.print(".");
  }
  Serial.println("");
  Serial.println("WiFi Connected!");
  Serial.println("");
}
The running code is as follows ,
Let's try again MQTT.fx This software is directed to Taichi-Maker-Sub-EC:FA:BC:40:6F:5B and Taichi-Maker-Sub2-EC:FA:BC:40:6F:5B These two topics publish information , At the same time, observe the output of the serial port monitor .


No matter which topic you post on , As long as the first character of the message is 1 , Then light up the onboard LED .
3、 Subscribe to topics using single level wildcards
/**********************************************************************  Project name /Project :  Zero basic introduction to the Internet of things   Program name /Program name : subscribe_single_level_wildcard_ranye  The team /Team :  Taiji maker team  / Taichi-Maker (www.taichi-maker.com)  author /Author : CYNO Shuo   date /Date(YYYYMMDD) : 20200813  Purpose of procedure /Purpose :  The purpose of this procedure is to demonstrate ESP8266 Unipolar wildcard when subscribing to information + application . -----------------------------------------------------------------------  This sample program is made by Taiji maker team 《 Zero basic introduction to the Internet of things 》 Sample program in .  This tutorial is designed and produced by friends who are interested in the development of the Internet of things . For more information about this tutorial , Please refer to the following pages : http://www.taichi-maker.com/homepage/esp8266-nodemcu-iot/iot-c/esp8266-nodemcu-web-client/http-request/ ***********************************************************************/
#include <ESP8266WiFi.h>
#include <PubSubClient.h>

//  Set up wifi Access information ( Please according to your WiFi Modify the information )
const char* ssid = "taichi-maker";
const char* password = "12345678";
const char* mqttServer = "test.ranye-iot.net";
//  As above MQTT The server cannot connect normally , Please go to the following page to find a solution
// http://www.taichi-maker.com/public-mqtt-broker/

WiFiClient wifiClient;
PubSubClient mqttClient(wifiClient);

void setup() {

  pinMode(LED_BUILTIN, OUTPUT);     //  Set up on the board LED Pin is output mode
  digitalWrite(LED_BUILTIN, HIGH);  //  Turn it on and off the board LED
  Serial.begin(9600);               //  Start serial communication

  // Set up ESP8266 The working mode is wireless terminal mode
  WiFi.mode(WIFI_STA);

  //  Connect WiFi
  connectWifi();

  //  Set up MQTT Server and port number
  mqttClient.setServer(mqttServer, 1883);
  mqttClient.setCallback(receiveCallback);

  //  Connect MQTT The server
  connectMQTTserver();
}

void loop() {

  if (mqttClient.connected()) {
     //  If the development board successfully connects to the server
    mqttClient.loop();          //  Process information and heartbeat
  } else {
                          //  If the development board fails to connect to the server
    connectMQTTserver();        //  Then try to connect to the server
  }
}

//  Connect MQTT Server and subscribe to information
void connectMQTTserver(){

  //  according to ESP8266 Of MAC Address generation client ID( Avoid contact with other ESP8266 The client of ID The nuptial )
  String clientId = "esp8266-" + WiFi.macAddress();

  //  Connect MQTT The server
  if (mqttClient.connect(clientId.c_str())) {

    Serial.println("MQTT Server Connected.");
    Serial.println("Server Address:");
    Serial.println(mqttServer);
    Serial.println("ClientId: ");
    Serial.println(clientId);
    subscribeTopic(); //  Subscribe to specific topics
  } else {

    Serial.print("MQTT Server Connect Failed. Client State:");
    Serial.println(mqttClient.state());
    delay(5000);
  }
}

//  Callback function after receiving information
void receiveCallback(char* topic, byte* payload, unsigned int length) {

  Serial.print("Message Received [");
  Serial.print(topic);
  Serial.print("] ");
  for (int i = 0; i < length; i++) {

    Serial.print((char)payload[i]);
  }
  Serial.println("");
  Serial.print("Message Length(Bytes) ");
  Serial.println(length);

  if ((char)payload[0] == '1') {
         //  If you receive a message with “1” For the beginning
    digitalWrite(BUILTIN_LED, LOW);  //  Then light up LED.
  } else {

    digitalWrite(BUILTIN_LED, HIGH); //  Otherwise, it goes out LED.
  }
}

//  Subscribe to specific topics
void subscribeTopic(){


  //  Create a subscription topic . The title of the topic is Taichi-Maker-Sub The prefix , The device is added later MAC Address .
  //  This is to make sure that different devices use the same MQTT When the server tests the message subscription , The topic names you subscribe to are different
  String topicString = "Taichi-Maker-Sub-" + WiFi.macAddress()+"/+/data";
  char subTopic[topicString.length() + 1];
  strcpy(subTopic, topicString.c_str());

  //  The serial port monitor outputs whether the topic is successfully subscribed and the name of the subscription topic
  if(mqttClient.subscribe(subTopic)){

    Serial.println("Subscrib Topic:");
    Serial.println(subTopic);
  } else {

    Serial.print("Subscribe Fail...");
  }
}

// ESP8266 Connect wifi
void connectWifi(){


  WiFi.begin(ssid, password);

  // wait for WiFi Connect , Output success information after successful connection
  while (WiFi.status() != WL_CONNECTED) {

    delay(1000);
    Serial.print(".");
  }
  Serial.println("");
  Serial.println("WiFi Connected!");
  Serial.println("");
}
It is similar to the first program .
4、 Use multi-level wildcards to subscribe to topics
/**********************************************************************  Project name /Project :  Zero basic introduction to the Internet of things   Program name /Program name : subscribe_multi_level_wildcard_ranye  The team /Team :  Taiji maker team  / Taichi-Maker (www.taichi-maker.com)  author /Author : CYNO Shuo   date /Date(YYYYMMDD) : 20200813  Purpose of procedure /Purpose :  The purpose of this procedure is to demonstrate ESP8266 Multipole wildcard when subscribing to information # application . -----------------------------------------------------------------------  This sample program is made by Taiji maker team 《 Zero basic introduction to the Internet of things 》 Sample program in .  This tutorial is designed and produced by friends who are interested in the development of the Internet of things . For more information about this tutorial , Please refer to the following pages : http://www.taichi-maker.com/homepage/esp8266-nodemcu-iot/iot-c/esp8266-nodemcu-web-client/http-request/ ***********************************************************************/
#include <ESP8266WiFi.h>
#include <PubSubClient.h>

//  Set up wifi Access information ( Please according to your WiFi Modify the information )
const char* ssid = "taichi-maker";
const char* password = "12345678";
const char* mqttServer = "test.ranye-iot.net";
//  As above MQTT The server cannot connect normally , Please go to the following page to find a solution
// http://www.taichi-maker.com/public-mqtt-broker/

WiFiClient wifiClient;
PubSubClient mqttClient(wifiClient);

void setup() {

  pinMode(LED_BUILTIN, OUTPUT);     //  Set up on the board LED Pin is output mode
  digitalWrite(LED_BUILTIN, HIGH);  //  Turn it on and off the board LED
  Serial.begin(9600);               //  Start serial communication

  // Set up ESP8266 The working mode is wireless terminal mode
  WiFi.mode(WIFI_STA);

  //  Connect WiFi
  connectWifi();

  //  Set up MQTT Server and port number
  mqttClient.setServer(mqttServer, 1883);
  mqttClient.setCallback(receiveCallback);

  //  Connect MQTT The server
  connectMQTTserver();
}

void loop() {

  if (mqttClient.connected()) {
     //  If the development board successfully connects to the server
    mqttClient.loop();          //  Process information and heartbeat
  } else {
                          //  If the development board fails to connect to the server
    connectMQTTserver();        //  Then try to connect to the server
  }
}

//  Connect MQTT Server and subscribe to information
void connectMQTTserver(){

  //  according to ESP8266 Of MAC Address generation client ID( Avoid contact with other ESP8266 The client of ID The nuptial )
  String clientId = "esp8266-" + WiFi.macAddress();

  //  Connect MQTT The server
  if (mqttClient.connect(clientId.c_str())) {

    Serial.println("MQTT Server Connected.");
    Serial.println("Server Address:");
    Serial.println(mqttServer);
    Serial.println("ClientId: ");
    Serial.println(clientId);
    subscribeTopic(); //  Subscribe to specific topics
  } else {

    Serial.print("MQTT Server Connect Failed. Client State:");
    Serial.println(mqttClient.state());
    delay(5000);
  }
}

//  Callback function after receiving information
void receiveCallback(char* topic, byte* payload, unsigned int length) {

  Serial.print("Message Received [");
  Serial.print(topic);
  Serial.print("] ");
  for (int i = 0; i < length; i++) {

    Serial.print((char)payload[i]);
  }
  Serial.println("");
  Serial.print("Message Length(Bytes) ");
  Serial.println(length);

  if ((char)payload[0] == '1') {
         //  If you receive a message with “1” For the beginning
    digitalWrite(BUILTIN_LED, LOW);  //  Then light up LED.
  } else {

    digitalWrite(BUILTIN_LED, HIGH); //  Otherwise, it goes out LED.
  }
}

//  Subscribe to specific topics
void subscribeTopic(){


  //  Create a subscription topic . The title of the topic is Taichi-Maker-Sub The prefix , The device is added later MAC Address .
  //  This is to make sure that different devices use the same MQTT When the server tests the message subscription , The topic names you subscribe to are different
  String topicString = "Taichi-Maker-Sub-" + WiFi.macAddress()+"/sensor/#";
  char subTopic[topicString.length() + 1];
  strcpy(subTopic, topicString.c_str());

  //  The serial port monitor outputs whether the topic is successfully subscribed and the name of the subscription topic
  if(mqttClient.subscribe(subTopic)){

    Serial.println("Subscrib Topic:");
    Serial.println(subTopic);
  } else {

    Serial.print("Subscribe Fail...");
  }
}

// ESP8266 Connect wifi
void connectWifi(){


  WiFi.begin(ssid, password);

  // wait for WiFi Connect , Output success information after successful connection
  while (WiFi.status() != WL_CONNECTED) {

    delay(1000);
    Serial.print(".");
  }
  Serial.println("");
  Serial.println("WiFi Connected!");
  Serial.println("");
}
It is similar to the first program .
边栏推荐
- Introduction to stm32
- Oracle/PLSQL: NumToDSInterval Function
- SQLite reader plug-in tests SQLite syntax
- Consumers pursue the iPhone because its cost performance exceeds that of domestic mobile phones
- 正则表达式:语法
- Some exception handling for idea plug-in development
- 达梦数据库的卸载
- Oracle/PLSQL: Rtrim Function
- Flink学习4:flink技术栈
- Oracle/PLSQL: Substr Function
猜你喜欢

Binary tree OJ problem

lottie.js创意开关按钮动物头像

解决cherry pick提交报错问题
宁愿去996也不要待业在家啦!24岁,失业7个月,比上班更惨的,是没班可上

Dameng database installation

使用命令行安装达梦数据库

Simply learn the entry-level concepts of googlecolab
Reading a book in idea is too much!

Is the division of each capability domain of Dama, dcmm and other data management frameworks reasonable? Is there internal logic?

学习太极创客 — MQTT(九)ESP8266 同时订阅和发布 MQTT 消息

随机推荐
Oracle/PLSQL: Lpad Function
p5.js死亡星球
执念斩长河暑期规划
dat.gui.js星星圆圈轨迹动画js特效
Look! In June, 2022, the programming language ranking list was released! The first place is awesome
Why pass SPIF_ Sendchange flag systemparametersinfo will hang?
Yalm 100b: 100billion parameter open source large model from yandex, Russia, allowing commercial use
DAMA、DCMM等数据管理框架各个能力域的划分是否合理?有内在逻辑吗?
Oracle/PLSQL: To_Clob Function
Nokov motion capture system makes it possible for multi field cooperative UAV to build independently
Oracle/PLSQL: NumToDSInterval Function
Shell脚本系列篇(1) 入门
达梦数据库安装
Learn the most basic operation of discodiffusion
Getting started with bluecms code auditing
Oracle/PLSQL: Upper Function
Oracle/PLSQL: To_ Clob Function
我靠副业一个月挣了3W块:你看不起的行业,真的很挣钱!
解决cherry pick提交报错问题
Memcached foundations 12