当前位置:网站首页>【USB电压电流表】基于STM32F103C8T6 for Arduino
【USB电压电流表】基于STM32F103C8T6 for Arduino
2022-07-24 05:24:00 【喜暖知寒】
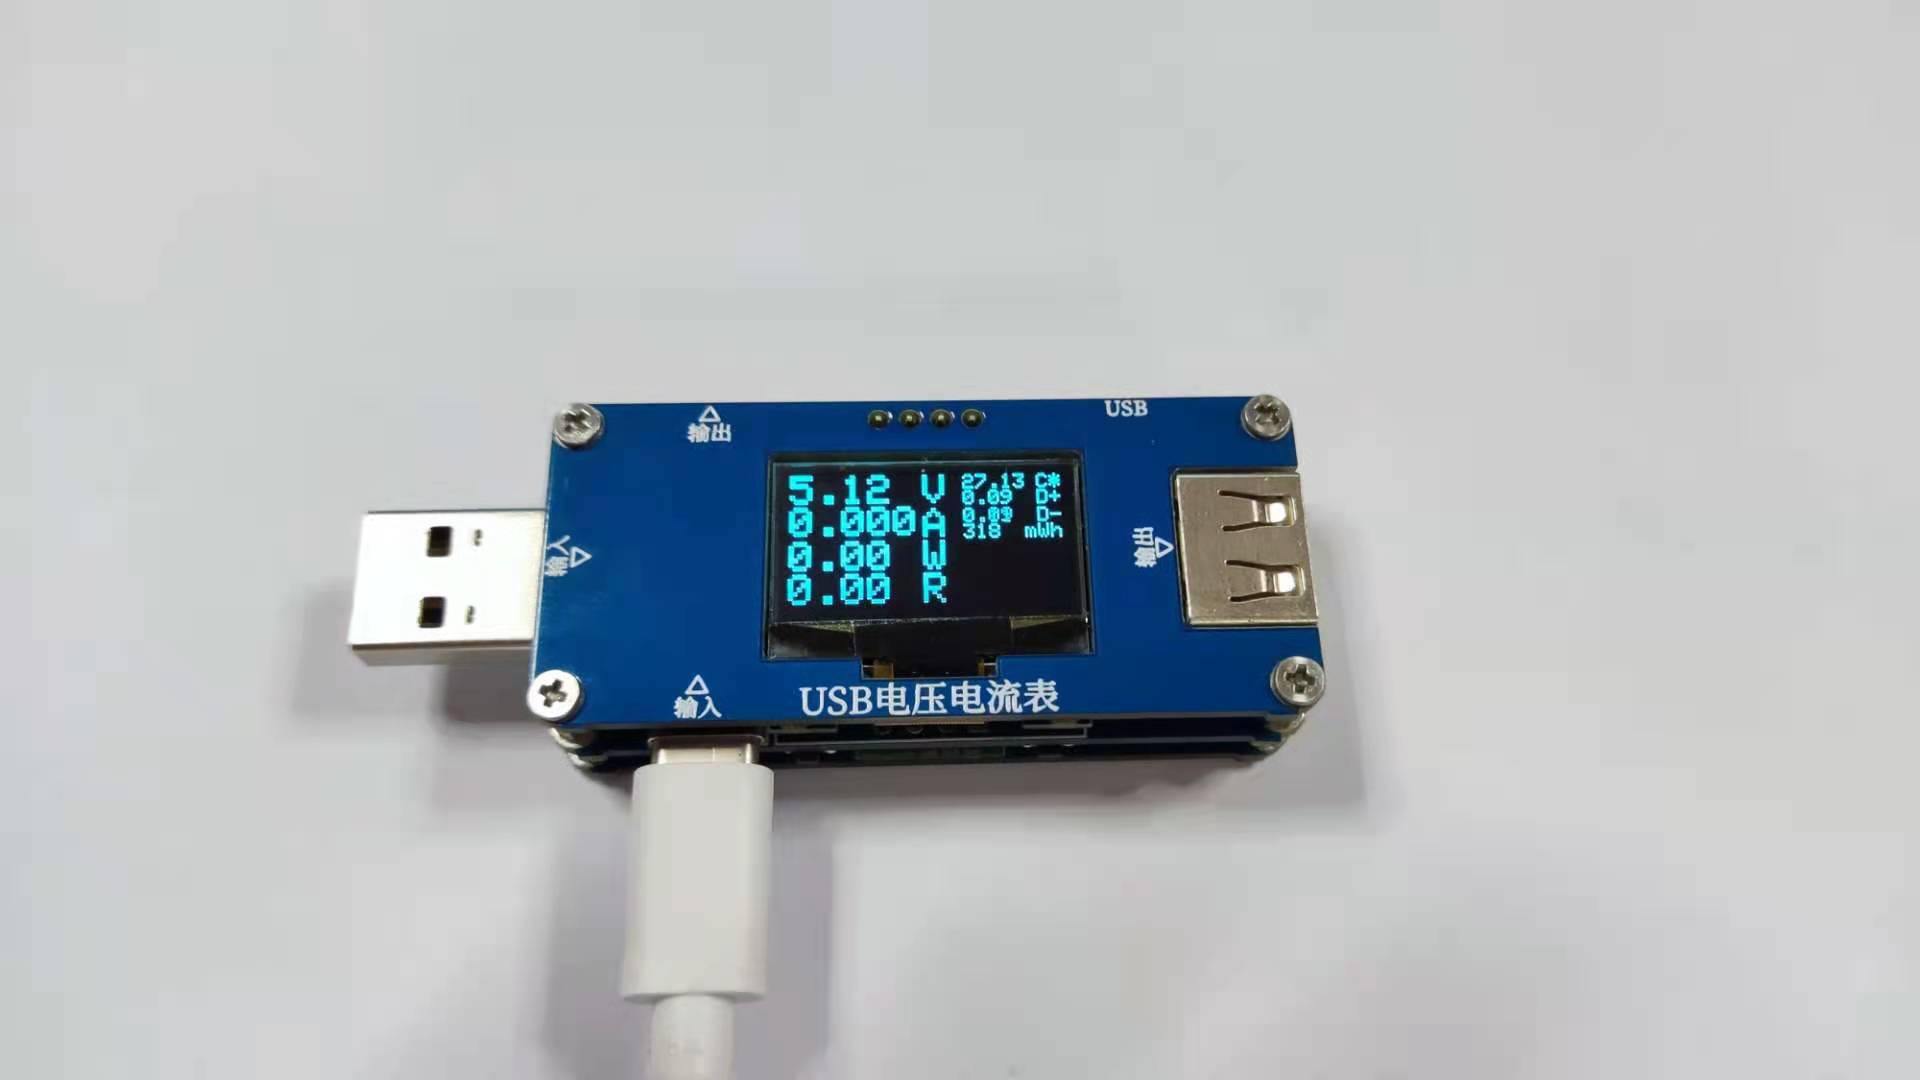
主控芯片为STM32F103C8T6
Arduino 的库确实多
代码也挺简单的,没有多少行。
这个项目主要是想学硬件。
经过验证作者提供了两个版本的源代码,第一版能成功编译,第二版有变量名定义错误,还比较多。经过更改后仍可使用。
输入输出

SMAJ30A:瞬态抑制二极管
供电部分

最上 5V0 部分供电是预备留用的,并没有用到!
部分检测口

- PA0:D+电压采样
- PA3:D- 电压采样
- PA4:热敏电阻采样
- PA5:输出电压采样
- REST:上电自复位
- PA15:KEY1
- PB4:KEY2
- PB10:KEY3
- PB1:KEY4
电流采样


- PA1:大电流采样
- PA2:小电流采样
- PB9:大电流控制
- PB8:小电流控制
OPA2333:运算放大器芯片
啊啊啊啊!!真烦,这一部分看不懂啊!!!!
DGND只跟两个 NMOS 管相连。
️ 电流检测值为:
map(analogRead(a1),0,4095,0,3270)/101/5
/* 这里实际上是 */
map(analogRead(a1),0,4095,0,3270)/101/(1000*0.005)
️ 这样,画了一个示意图:

DGND 的电流 I 流向 GND 时,PA1检测到的电压为:

故,可知电流检测值的公式由来。
很不错,学到了知识点!!!
STM32周围接口

基本都是备用留用的,没有用到!
函数分析
变量定义
//USB测试表
//量程10mA-6.5A
#include <Wire.h>
#include <Adafruit_GFX.h>
#include <Adafruit_SSD1306_STM32.h>

#define OLED_RESET 4
Adafruit_SSD1306 display(OLED_RESET);

byte a1 = PA1;        //大电流采样
byte a2 = PA2;        //小电流采样
byte dn = PA3;        //D-电压采样
byte dp = PA0;        //D+电压采样
byte wd = PA4;        //NTC采样
byte dy = PA5;        //电压采样

byte k1 = PA15;       //按键检测
byte k2 = PB4;        //按键检测
byte k3 = PB10;       //按键检测
byte k4 = PB1;        //按键检测

byte M1 = PB9;        //大电流控制
byte M2 = PB8;        //小电流控制

float V ;             //电源电压
float VN ;            //D-电压
float VP ;            //D+电压

float A ;             //电流
int  uA ;             //电流
float W ;             //功率
float R ;             //负载
float C ;             //温度
int Wh ;              //电量
long int T;           //时间
long int WT ;         //电功
long int i;           //时间

byte K1,K2,K3,K4;     //按键

byte ms = 0;
电流、电压、功率测量
void VA(){
  float vn = map(analogRead(dn),0,4095,0,3300);    //D-电压采样
  VN = vn*2/1000;

  float vp = map(analogRead(dp),0,4095,0,3300);    //D+电压采样
  VP = vp*2/1000;

  float LV = 0;
  float LA = 0;
  for(byte i = 0; i < 100; i++){
    float v = map(analogRead(dy),0,4095,0,3300);    //输出电压采样
    V = v * 11/1000;
    LV = LV + V;

    float a = map(analogRead(a1),0,4095,0,3270);    //大电流采样
    A = a/101/5;
    LA = LA + A;
  }
  V = LV/100;    //平均值
  A = LA/100;

  W = V*A;    //功率
  if( A > 0){
    R = V/A;    //电阻
    if(R >= 100){ R = 99.99; }
    UIT();
  }else{
    R = 0;
  }
  if( A > 6.5){ digitalWrite( M1 ,LOW); }    //设置大电流控制接口低电平
}
- analogRead(pin):读模拟引脚, 返回0-1023之间的值。
- map(value, fromLow, fromHigh, toLow, toHigh):等比例缩放值。
测量电量
void UIT(){
  if(millis() - T > 1000){
    T = millis();
    WT = WT+W;
    Wh = WT/3.6;
  }
}
测量温度
void NTC(){
  pinMode( wd , INPUT_ANALOG);    //模拟量输入
  float r = map(analogRead(wd),0,4095,0,3270);    //NTC采样
  float ntc = (10000 * r)/(3270 - r);    //计算NTC值
  //K =(3950 * 298.15)/(3950 +(298.15 * log( ntc/ 10000)));
  C = (3950 * 298.15)/(3950 +(298.15 * log( ntc/10000))) - 273.15 - 4;    //计算温度
}
0.96OLED显示
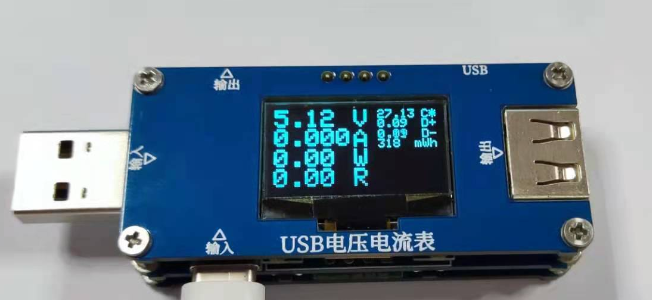
void SSD1306(){
  display.clearDisplay();                //清理1306屏幕,准备显示:
  display.setTextColor(WHITE);           //设置字体颜色
  display.setTextSize(2,2);              //设置字体大小,(X,Y)比

  display.setCursor( 0 , 0 );
  display.print(V);
  display.setCursor(62, 0 );
  display.print("V");

  display.setCursor( 0 , 16 );
  display.print(A,3);
  display.setCursor( 62, 17 );
  display.print("A");

  display.setCursor( 0 , 33);
  display.print(W);
  display.setCursor( 62, 33);
  display.print("W");

  display.setCursor( 0 , 49);
  display.print(R);
  display.setCursor( 62, 49);
  display.print("R");

  display.setTextSize(1);

  display.setCursor( 81, 0 );
  display.print(C);
  display.setCursor(116, 0 );
  display.print("C*");

  display.setCursor( 81, 8 );
  display.print(VP);
  display.setCursor(116, 8 );
  display.print("D+");

  display.setCursor( 81, 17);
  display.print(VN);
  display.setCursor(116, 17);
  display.print("D-");

  display.setCursor( 81, 25);
  display.print(Wh);
  display.setCursor(110, 25);
  display.print("mWh");

  display.display();                     //把缓存都显示
}
初始化
void setup(){
  Serial.begin(9600);

  pinMode( a1 , INPUT_ANALOG);
  pinMode( a2 , INPUT_ANALOG);
  pinMode( dn , INPUT_ANALOG);
  pinMode( dp , INPUT_ANALOG);
  pinMode( wd , INPUT_ANALOG);
  pinMode( dy , INPUT_ANALOG);

  pinMode( k1 , INPUT_PULLUP);
  pinMode( k2 , INPUT_PULLUP);
  pinMode( k3 , INPUT_PULLUP);
  pinMode( k4 , INPUT_PULLUP);

  pinMode( M1, OUTPUT);
  pinMode( M2, OUTPUT);

  digitalWrite( M1 ,HIGH);
  digitalWrite( M2 ,LOW);

  display.begin(SSD1306_SWITCHCAPVCC, 0x3C); //OLED通讯地址
  display.clearDisplay();

}
循环函数
void loop(){
  VA();     //测量各种东西
  NTC();    //温度检测函数,应该加高温断电功能的!
  KEY();    //按键检测,没用上,相关函数没写
  if(millis() - i > 200){     //刷新
    i = millis();
    SSD1306();
  }
}
总结
参考:Adafruit_SSD1306库学习_RenKaixuan0124的博客-CSDN博客_ssd1306库
项目资源,来自于原作者负熵生之光
链接:https://pan.baidu.com/s/1QG5SR7RUGEHU3qOS54ZcHg
提取码:dj85
本项目复刻起来比较容易,软件都是库,主要是硬件问题。
️ 学会了电流检测的方法!很棒!!!!!!!!
加油学习!!!
都是自己分析开源项目的一些笔记,如果对您有些帮助,点点赞吧!

边栏推荐
- Write blog at leisure ~ briefly talk about let, VaR and Const
- Niuke net brush questions
- Work summary of a test Manager / Test Supervisor / test director
- [218] what are the advantages and disadvantages of CS architecture and BS architecture and data on the server and client?
- Sword finger offer jz10 Fibonacci sequence
- Promise (try to implement a promise by yourself) more detailed comments and other interfaces are not completed yet. Let's continue next time.
- 服务器硬件及RAID配置实战
- Leetcode sword finger offer jz25 merges two sorted linked lists
- go语言常用命令和包管理
- Responsive page
猜你喜欢

Animation effect

【LVGL布局】网格布局

Li Kou 986. Intersection of interval lists

Leetcode sword finger offer jz25 merges two sorted linked lists

sed命令

FTP service and experiment
![[218] what are the advantages and disadvantages of CS architecture and BS architecture and data on the server and client?](/img/d8/a367c26b51d9dbaf53bf4fe2a13917.png)
[218] what are the advantages and disadvantages of CS architecture and BS architecture and data on the server and client?

Difference between PX and EM and REM

这些坑你不掌握,你还真不敢用BigDecimal

RAID的配置实验
随机推荐
Iterators and generators
今天聊赖数据库MySQL底层架构设计,你了解多少?
深入了解MySQL 两把锁啥时候用(表锁,行锁)
Luckyframeweb testing platform (a full latitude free open source testing platform that supports interface automation, Web UI automation, APP automation, and distributed testing)
Modeling of XML
磁盘管理和文件系统
Speed pointer in JS linked list
Pycharm set code template
Animation effect
这些坑你不掌握,你还真不敢用BigDecimal
MySQL Index & execution plan
Playing RTSP video stream on webpage
MySQL batch modifies the data table code and character set to utf8mb4
Grid layout
PXE technology network installation
Niuke net brush questions
Leetcode refers to offer jz5 to replace the space string
CentOS operating system security reinforcement
Process and planned task management
SSH远程访问及控制