当前位置:网站首页>[2020 cloud development + source code] 30 minutes to create and launch wechat applet practical project | zero cost | cloud database | cloud function
[2020 cloud development + source code] 30 minutes to create and launch wechat applet practical project | zero cost | cloud database | cloud function
2022-06-25 09:27:00 【Maoningyi】
Click to view the video course ↓↓↓
【2020 Development of cloud + Source code 】( On ) 30 Minutes to create and launch wechat applet practical project | Zero cost | Cloud database | Cloud functions
【2020 Development of cloud + Source code 】( Next )30 Minutes to create and launch wechat applet practical project | Zero cost | Cloud database | Cloud functions
Course text ↓↓↓
Hello everyone , I'm Ning Yi , Some time ago, I recorded a course on the full stack development of wechat apps , We have developed a system called 【 True self-discipline 】 Small program . Many students have followed the course to make small programs
But most students don't have servers or domain names , The project can only be run on your own computer . Some students add my friends and say it's a pity , A project that is not easy to do , I can't share with others .
Let's meet your requirements today , Teach you to use cloud development to deploy the project online for free , You don't need a server or domain name to allow users to access your applet through wechat .
This time we directly use the applet's own language to develop , Because the project logic to be done this time is relatively simple . Later, I will give a separate course to teach you how to use mpvue Framework for cloud development
The course is divided into 6 Parts of
1、 Project introduction
2、 Create project 、 Cloud development initialization 、 Page initialization
3、 Login function ( Creation and calling of cloud functions )
4、 Click the button to generate record data ( Cloud database insertion )
5、 Display the recorded data on the page ( Cloud database reading )
6、 Project deployment online
Now let's start ~
One 、 Project introduction
Let's take a look at the final effect , There are three pages : home page 、 Record 、 my ,
First on my page , Click the login button , Log in , Users' wechat avatars and wechat nicknames will be displayed
Next come to the home page , Click the plus / minus button , The log page will synchronously generate the click log . After our course , The result of running on the mobile phone is like this 
Two 、 Create project 、 Cloud development initialization 、 Page initialization
1、 Create project
Next, let's create the project , Let's first look at what cloud development is
It can be understood as a free server given to us by wechat official , And it helped us deploy the environment of small programs very considerately , Some functions of the server , For example, the addition, deletion, modification and query of the database are encapsulated into interfaces , We only need to call their encapsulated interfaces to operate the database , Very simple
Creating a cloud development project , You need to register an applet account first
Click to view the demo of registered account
We log in to the applet account , Get the unique ID of the applet AppId, To create a cloud development project, you must have AppID
Next, let's go to the wechat developer tool , Create a new applet project , Do not choose the cloud development option , It will create many templates for us that we can't use . Choose this not to use cloud development , Then we configure the cloud development environment by ourselves 
After the project is created , Click the cloud development button , Open the cloud development function 
After opening , We will get the cloud development environment id, This id Is the only one. , To identify your development environment , We'll use it later id
2、 Cloud development initialization
(1) Create a new folder for cloud development cloud
(2) stay project.config.json Add code to file , Specify that the cloud development file is the one we just created cloud Folder
"cloudfunctionRoot": "cloud/",
(3) Come again app.js Replace the original code with the following code in the file
App({

  onLaunch: function () {

    if (!wx.cloud) {

      console.error(' Please use  2.2.3  Or more base libraries to use cloud capabilities ')
    } else {

      //env The environment should be replaced by its own environment id
      //traceUser Record user access to user management , In the console, you can see the information of accessing users , We usually set it to true
      wx.cloud.init({

        env: 'test-59478a',
        traceUser: true
      })
    }
  }
})
After saving it , here cloud The cloud development file will specify what we are creating now test Cloud development environment , There will be a cloud logo on the folder .
If you save the file , Or the unspecified environment shown , Then you can close the wechat developer tool , Reopen this project , It should be normal
3、 Applet page initialization
(1) First processing pages file ,pages The folder contains all the pages of our applet , We need three pages ,index home page 、logs Record page , also me My page , We create a me Folder
stay pages Right click on the folder , Select new directory , Then create a good me Right click on the folder , newly build page
(2) Create another images Catalog , Paste the prepared picture in , Selected pictures and unselected pictures 
(3) Next we come to app.json In file , First modify window Navigation bar color and navigation bar title in the object
"navigationBarBackgroundColor": "#EA5149",
"navigationBarTitleText": " Maoningyi ",
Plus tab bar
"tabBar": {

    "list": [
      {

        "pagePath": "pages/index/index",
        "iconPath": "image/binggan.png",
        "selectedIconPath": "image/binggan-active.png",
        "text": " home page "
      },
      {

        "pagePath": "pages/logs/logs",
        "iconPath": "image/danhuang.png",
        "selectedIconPath": "image/danhuang-active.png",
        "text": " journal "
      },
      {

        "pagePath": "pages/me/me",
        "iconPath": "image/huasheng.png",
        "selectedIconPath": "image/huasheng-active.png",
        "text": " my "
      }
    ]
  },
Now the page is basically set up , Take a look at the effect 
3、 ... and 、 Login function
1、 stay pages/me/me.wxml Add login button to the file
<button open-type="getUserInfo" lang="zh_CN" bindgetuserinfo="onGotUserInfo"> Sign in </button>
2、 stay me.js Add... To the file onGotUserInfo Methods and userInfo Variable
Page({

  data: {

    userInfo:{
    }
  },
  onGotUserInfo: function (e) {

    this.setData({

      userInfo: e.detail.userInfo
    })
    console.log("userInfo", this.data.userInfo)
  },
})
Click the login button , The user information will be printed on the console , as follows 
But there is no such thing as openid This field ,openid It is the unique identification of each micro signal , Wechat nickname , Head portrait 、 The address may change , however openId Will not change , We want to implement the login function and identify customers , You have to get this openid Field .
openid Fields are sensitive information , We need to get... From wechat server , This requires our cloud function , In what we created cloud Create a cloud function in the folder , Right click – newly build Node.js Cloud functions , Name it login
You can see that it will create two files for us by default ,index.js and package.json The configuration file ,package.json Generally, files are not operated , The main operation is index.js file
open index.js file , The default helps us write some code , The first two lines of code are mandatory in every cloud function file SDK The plug-in is http Request processing plug-in , And then again init initialization
We'll delete the code we don't need , As you can see, the following has helped us get openid, Let's delete the others , Leave only openid. Last login/index.js The code in the file is as follows
const cloud = require('wx-server-sdk')
cloud.init()

//  Cloud function entry function
exports.main = async (event, context) => {

  const wxContext = cloud.getWXContext()

  return {

    openid: wxContext.OPENID,
  }
}
important !!! After the cloud function is modified , Be sure to right-click on the cloud function , Select Create and deploy ( Or upload and deploy ) A successful deployment pop-up appears , The changes will take effect
Many people will forget , As long as you modify it, you can upload and deploy again , To see the modified effect 
3、 Next comes pages/me/me.js file , Call cloud function , Still onGotUserInfo Method used in wx.cloud.callFunction call login Cloud functions
Page({

  data: {

    userInfo:{
    },
    // New plus one openid Variable , Save the obtained openid Field
    openid:""
  },
  onGotUserInfo: function(e){

    // take this Object to save to that in
    const that = this
    wx.cloud.callFunction({

      name: 'login',
      success: res => {

        console.log(' The cloud function was called successfully ')
        that.setData({

          openid: res.result.openid,
          userInfo: e.detail.userInfo
        })
        console.log("userInfo", this.data.userInfo)
        console.log("openid", this.data.openid)
      },
      fail: err => {

        console.error('[ Cloud functions ] [login]  Call failed ', err)
      }
    })
  }
})
In this way, the user information and openid, Next , Let's show the obtained user information , And hide the login button
<!--  adopt openid To determine whether the user is logged in   If openid Field is empty , No sign in , Show login button  -->
<view wx:if="{
     {!openid}}">
  <button open-type="getUserInfo" lang="zh_CN" bindgetuserinfo="onGotUserInfo"> Sign in </button>
</view>

<!--  If openid Not empty , It means that the user is logged in   Read the user's nickname and user's Avatar and display them on the page  -->
<view class="uploader-container" wx:if="{
     {openid}}">
  <image class="image" src="{
     {userInfo.avatarUrl}}"></image>
  <view class='name'>{
   {userInfo.nickName}}</view>
</view>
Come again me.wxss Add a style to the file
.image {

  width: 100px;
  height: 100px;
  margin: 0 auto;
  display: block;
  padding-top:20px;
}
.name {

  text-align: center;
  padding-top:10px;
}
button{

  background: #EA5149;
  width: 60%;
  margin-top: 100px;
  color: #ffffff;
}
After logging in, the page displays as follows :
4、 Keep users logged in
Now every refresh , The obtained user information is gone , We want to keep users logged in , You need to get the user information , Save the user information to the cache , After refreshing the page, you can directly check whether there is user information in the cache to determine whether you have logged in , Instead of repeatedly requesting the backend to retrieve user information
Came to me.js In file , modify onGotUserInfo Method , stay success Add code to
success: res => {

  console.log(' Cloud function obtained successfully ', res.result.openid)
  that.setData({

    openid: res.result.openid,
    userInfo: e.detail.userInfo
  })

  // Code to add
  // take openid Add field to userInfo variable
  this.data.userInfo.openid = this.data.openid
  // Print the current userInfo Information about , Check if there is openid Field
  console.log("userInfo", this.data.userInfo)
  // take userinfo Information is stored in the cache
   wx.setStorageSync('ui', this.data.userInfo)
Then add onLoad Applet life cycle functions , Get the user information in the cache , Trigger when the page loads . A page can only be called once
onLoad: function (options) {

  const ui = wx.getStorageSync('ui')
  this.setData({

    userInfo: ui,
    openid:ui.openid
  })
}
So we can refresh the page , It will automatically obtain user information , There is no need to log in again
Four 、 Click the button to generate record data ( Cloud database insertion and query )
1、 Perfect the homepage style
The home page is mainly about creating two buttons , And display the current plus and minus values , take pages/index/index.wxml The code in the file is cleared , add +1 and -1 Two buttons
<view class="container">
  <view class="right button">+ 1</view>
  <view class="left button">- 1</view>
</view>
Come again pages/index/index.wxss The code of the file is cleared , Paste the following code
.button{

  width: 70px;
  height: 70px;
  line-height:70px;
  border-radius: 20%;
  border: none;
  text-align:center;
  font-size: 25px;
  color:#FFFFFF;
  font-weight:bold;
  margin-top:50px;
}

.right{

  background:#EA5149;
  float: right;
}
.left{

  background:#feb600;
}
Now save the file to see the effect , You can see that there is a blank space above ,
We are here app.wxss In file , take padding: 200rpx 0; This style removes , Save the style again 
2、 Click the add / subtract button on the home page , Print the addition and subtraction information in the console
stay pages/index/index.wxml Add... To the two buttons in the file data-add=“1” bindtap=“addLog” Method
<view class="right button" data-add="1" bindtap="addLog">+ 1</view>
<view class="left button" data-add="-1" bindtap='addLog'>- 1</view>
In two buttons , This is something to watch out for addLog It can't be written like this addLog(1), Parameters need to be written in the front data-add in , among add It's our own definition , It's OK to change to another word
Come again pages/index/index.js In file , Clear the original code , And create addLog Method
Page({

  //event We passed data-add The parameter object passed
  addLog(event){

    // Parameters passed event.currentTarget.dataset.add This is how to get
    const add = event.currentTarget.dataset.add
    console.log("add", add)
  }
})
Now click the plus and minus buttons , You can already print out in the console add The number of , Next, we insert this data into the database
3、 Add plus and minus record data to the database
Click the cloud development button on the wechat developer tool , Come to the background of cloud development , You need to create a database collection logs After the collection is created , Click permission setting , Change permissions for data records to 【 All users can read , Creator readable only 】
Come again cloud Create a cloud function in the cloud development file createlog, stay cloud/createlog/index.js In file , To achieve logs The function of inserting a record into a data table
//  Cloud function entry file
const cloud = require('wx-server-sdk')
cloud.init()
const db = cloud.database()

//  Cloud function entry function
exports.main = async (event, context) => {

  try {

    return await db.collection('logs').add({

      //event Is a parameter object passed from the front end , We'll be back in pages/index/index.js In the document addLog Method createlog when , Pass on add、date、openid These parameters
      data: {

        add: event.add,
        date:event.date,
        openid:event.openid
      }
    })
  }catch(e){

    // Insert data error
    console.log(e)
  }
}
Modify the cloud function createlog after , Don't forget to deploy functions , Right click the cloud function , choice 【 Create and deploy : Cloud installation depends on 】 Options
Next edit pages/index/index.js Of documents addlog Method , Call cloud function createlog, And transmission add、date、openid These three parameters
  addLog(event){

    const add = event.currentTarget.dataset.add
    console.log("add", add)

    // What needs to be added
    const that = this
    const ui = wx.getStorageSync('ui')

    // If there is no user information in the cache , Just jump to my page
    if (!ui.openid){

      wx.switchTab({

        url: '/pages/me/me',
      })
    }else{

      // Call cloud function createlog
      wx.cloud.callFunction({

        name: "createlog",
        data: {

          add: add,
          date: Date.now(),
          openid: ui.openid
        },
        success: function (res) {

          console.log(res)
        },
        fail: function (res) {

          console.log(res)
        }
      })
    }
  },
Let's test it , Click the plus / minus button on the home page , It inserts data into the database 
This completes the home page function , Next, let's read out the inserted data , On display in logs Log page
5、 ... and 、 Display the recorded data on the page ( Cloud database reading )
Chief editor pages/logs Folder
First, create a cloud function getlogs, And in cloud/getlogs/index.js Add code to file
//  Cloud function entry file
const cloud = require('wx-server-sdk')
cloud.init()
const db = cloud.database()

//  Cloud function entry function
exports.main = async (event, context) => {

  try {

    // It needs to be transmitted from the front end openid data , adopt openid Field to get log information
    return await db.collection('logs').where({

     openid: event.openid
    }).get()
  } catch (e) {

    // Insert data error
    console.log(e)
  }
}
Come again pages/logs/logs.js Create in file getlogs Method call getlogs Cloud functions , And pass... To the cloud function openid This parameter
// load util.js file , Used to format a date
const util = require('../../utils/util.js')

Page({

  data: {

    logs: []
  },
  getlogs:function(){

    // Get user information from cache
    const ui = wx.getStorageSync('ui')
    // If there is no user information in the cache , Just jump to my page
    if (!ui.openid) {

      wx.switchTab({

        url: '/pages/me/me',
      })
    }else{

      const that = this
      wx.cloud.callFunction({

        name: "getlogs",
        data: {

          openid: ui.openid
        },
        success: function (res) {

          console.log("ni", res)
          that.setData({

            logs: res.result.data.map(log => {

              var date = util.formatTime(new Date(log.date))
              log.date = date
              return log
            })
          })
          console.log("logs", that.data.logs)
        },
        fail: function (res) {

          console.log(res)
        }
      })
    }
  },
  // adopt onShow Life cycle function , call getlogs Method
  // So every time you switch to the log page , Will be called getlogs Method
  // Click the plus / minus button on the home page , Switch to the log page , The new log records will be automatically updated , Improve user experience
  onShow:function(){

    this.getlogs()
  }
})
Finally came pages/logs/logs.wxml Add code to the file to traverse and display log data
<block wx:for="{
     {logs}}" wx:key="key">
  <view class="log-item">
     date :{
   {item.date}}  fraction :{
   {item.add}}
  </view>
</block>
stay pages/logslogs.wxss Add style to file
.log-item {

  text-align: left;
  padding: 10px 10px 0 0;
}
Finally, let's take a look at the effect of the recording page 
6、 ... and 、 Deploy online
We finally tested it on the mobile phone through real machine debugging 
If there is a problem with the test on the mobile phone , But there is no problem in testing in the wechat developer tool , There are generally two situations :
- Cloud functions are not deployed correctly , Right click again and select cloud function to upload , And retest
- There is wrong data in the database , Modify according to the error information returned from real machine debugging
There is no problem with the mobile phone test , We are about to start deploying in the wechat developer tool , Click the upload button in the upper right corner 

Fill in the version and remarks , After clicking upload , You can create an account in the background of the applet – management – In version management , We click the experience version to do the final test , If there is no problem , Click submit for review 
After submission for review , It's a long wait , The general audit time is 1-2 God , Longer ones take a week , Pay more attention to your wechat messages , After the approval, you will receive such a message 
Let's go to the applet background , Click Submit and publish to publish the applet online ,1-2 Hour or so , All users can search your app through wechat 
Of course, there are more messages that fail to pass the audit 
If the audit fails , Log in to the applet background , You can view the specific reasons in the notification center , Modify according to the prompt and resubmit . The audit of personal applet is relatively strict , We should be prepared for a long-term battle ~~
The source code for :
stay 【 Maoningyi 】 Reply in official account 【 Courseware 】 Get the project source code and courses ppt
边栏推荐
- sklearn 高维数据集制作make_circles 和 make_moons
- Work of the 15th week
- 某次比赛wp
- The first techo day Tencent technology open day, 628 waiting for you!
- Chinese solution cannot be entered after webgl is published
- WebGL谷歌提示内存不够(RuntimeError:memory access out of bounds,火狐提示索引超出界限(RuntimeError:index out of bounds)
- Socket programming -- epoll model
- Voiceprint Technology (IV): Engineering deployment of voiceprint recognition
- 高速缓冲存储器Cache的映射方式
- Jmeter中的断言使用讲解
猜你喜欢

四、卷积神经网络(Convolution Neural Networks)

Prediction of pumpkin price based on BP neural network
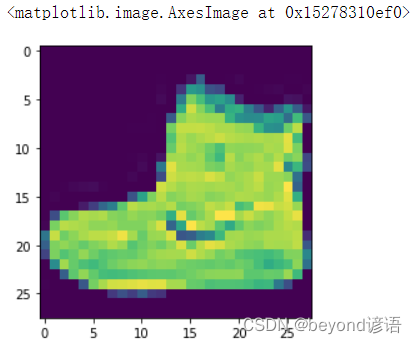
2、 Training fashion_ MNIST dataset

CSV parameterization in JMeter

compiling stm32f4xx_it.c... “.\Objects\BH-F407.axf“ - 42 Error(s), 1 Warning(s).
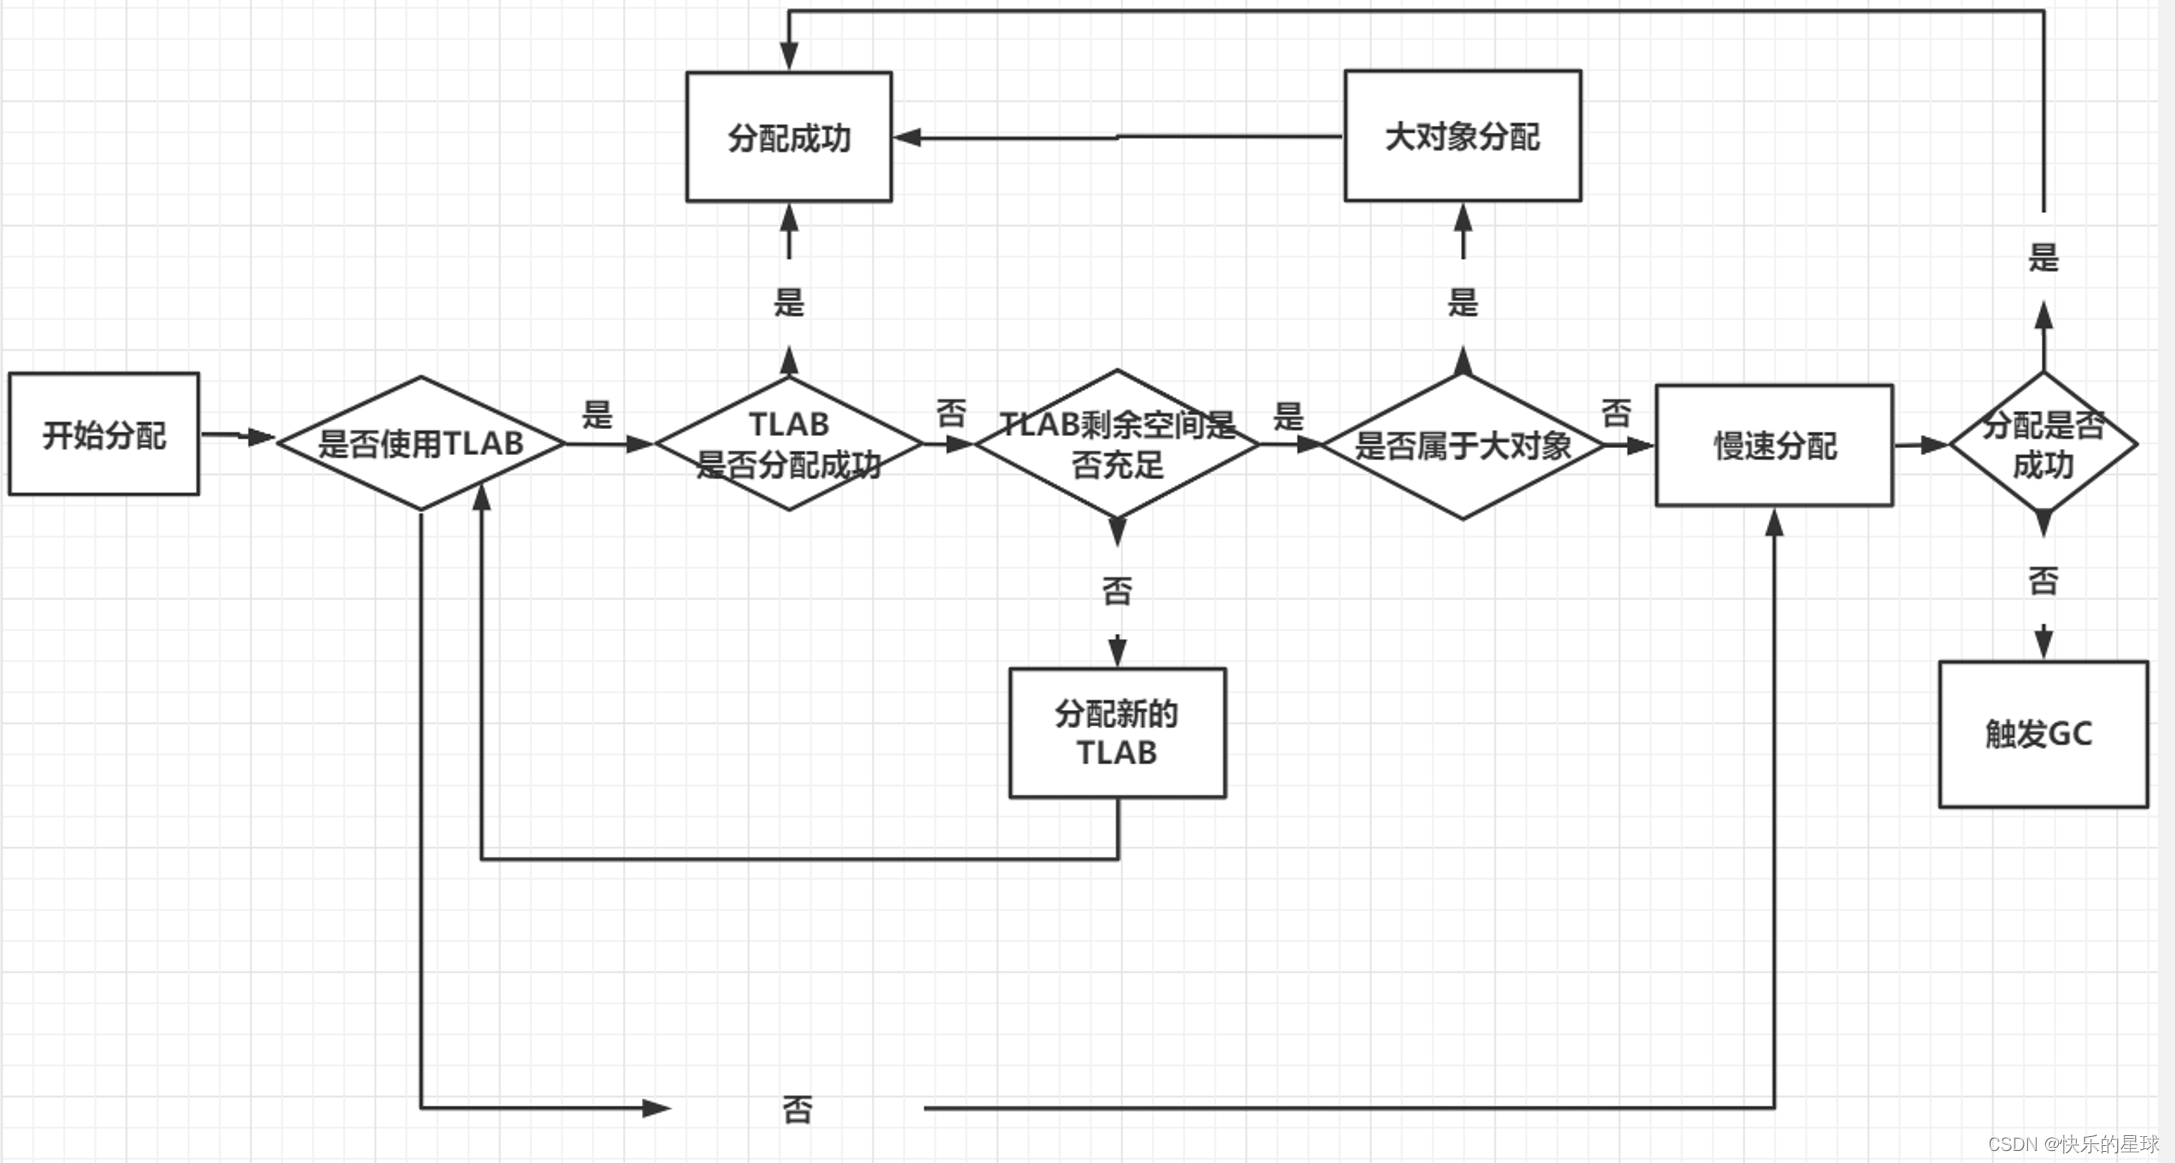
TLAB mechanism of JVM object memory allocation and TLAB process in G1

With the QQ group file storage function of super nice, you immediately have n cloud disks that are easy to download and never expire

首期Techo Day腾讯技术开放日,628等你!

使用Navicat对比多环境数据库数据差异和结构差异,以及自动DML和DDL脚本
![[design completion - opening report] zufeinfo 2018 software engineering major (including FAQ)](/img/b7/fb7ead787e00047f3663e8b5acfe33.jpg)
[design completion - opening report] zufeinfo 2018 software engineering major (including FAQ)
随机推荐
C # startup program loses double quotation marks for parameters passed. How to solve it?
Analysis on the bottom calling process of micro service calling component ribbon
自定义注解之编译时注解(RetentionPolicy.CLASS)
C language: count the number of words in a paragraph
【期末复习笔记】数字逻辑
Prediction of pumpkin price based on BP neural network
五、项目实战---识别人和马
【无标题】**数据库课设:三天完成学生信息管理系统**
股票在线开户安全吗?找谁可以办理?
[IOU] intersection over union
《乔布斯传》英文原著重点词汇笔记(二)【 chapter one】
2022 postgraduate entrance examination experience post -- Alibaba Business School of Hangzhou Normal University -- management science and Engineering (including the recommendation of books and course
socket编程——poll模型
《乔布斯传》英文原著重点词汇笔记(四)【 chapter two 】
通过客户经理的开户二维码开股票账户安全吗?
Socket programming -- poll model
35 websites ICER must know
【OpenCV】—输入输出XML和YAML文件
Is it safe for Huatai Securities to open an account on it? Is it reliable?
六级易混词整理