当前位置:网站首页>Onenet platform control w5500 development board LED light
Onenet platform control w5500 development board LED light
2022-07-25 11:42:00 【WIZnet】
Preface
Some noun explanations about the content of this article
1、 product
The product refers to the real device in the user's hand OneNET Virtual name corresponding to on , It's the user OneNET The top-level cloud resources .
2、 product ID
product ID Means by OneNET An independent one allocated by the background for a real product of yours ID Number , If there are two different series of one of your products ( Such as Iphone7/Iphone7 PLUS), Then it is suggested to create two products to obtain two products respectively ID.
3、APIKey
Used to deal with OneNET Carry out operation authentication and authority control , In the use of OneNET Restful API when ,HTTP The header field of the request message must carry this APIKey Field ,OneNET Will be based on APIKey Field to determine whether the user has the corresponding operation permission .
APIKey The permission model of is to set whether cloud resources can be added 、 see 、 modify 、 Delete, etc , The lowest permission level can be refined to the access permission to a certain data flow .APIKey Divided into two :
1. product APIKey: When you create a product ,OneNET A default APIKey, This APIKey yes Masterkey, With maximum privileges , Be able to access all resources under this product .
2. equipment APIKey: Created by the user for a certain device under a certain product Key Called equipment APIKey, equipment APIKey The function permission of is limited to the resources of this device , You cannot access other devices .
4、 equipment
In the clouds “ equipment ” Refers to the above mentioned “ product ” The entity under , It also means that a real device of the user is OneNET The corresponding unique virtual name on .
5、 equipment ID(Device ID,DID)
equipment ID Means by OneNET An independent and unique... Assigned by the background to one of your real devices ID Number , There can be multiple devices under one product , Each independent device has a unique device ID.
6、 Equipment serial number
The user is in OneNET When creating devices on , If the device access protocol is HTTP, You need to fill in “ Equipment serial number ”. The equipment number is the unique identification number of each real equipment , Unwanted OneNET Background allocation , Users can customize the device number , However, the independence and uniqueness of each device must be guaranteed , It is recommended that users use the serial number of the original product line when entering the equipment number .
7、 Data flow (Datastream)
A data flow can be understood as a kind of data , Such as the temperature of the sensor 、 Longitude and latitude of position , Humidity of the air . Users can customize the data flow name , Data flow ID; A device can add multiple data streams .
8、 The data points (Datapoint)
That is, a specific data value in a data flow . Data points adopt “Key-Value” How to store . among Key The composition of includes equipment ID、 Data flow ID、 Time and other information ,value Part can be any data object , Such as integers 、 String or JSON data type .
9、SDK
It is divided into public agreement products SDK And private agreement products SDK
Open agreement products SDK: The terminal side software development package for the device access protocol is a public protocol ,OneNET Available in multiple languages SDK, Provide device connection 、 Basic functions such as data upload .
Private agreement products SDK: When using private protocol to access the device ,OneNET It will be automatically generated according to the device data model defined by the developer SDK Source code , Developers will SDK Embedded in the device , Automatically realize the docking with the platform .OneNET Providing private agreement products SDK Full source code .
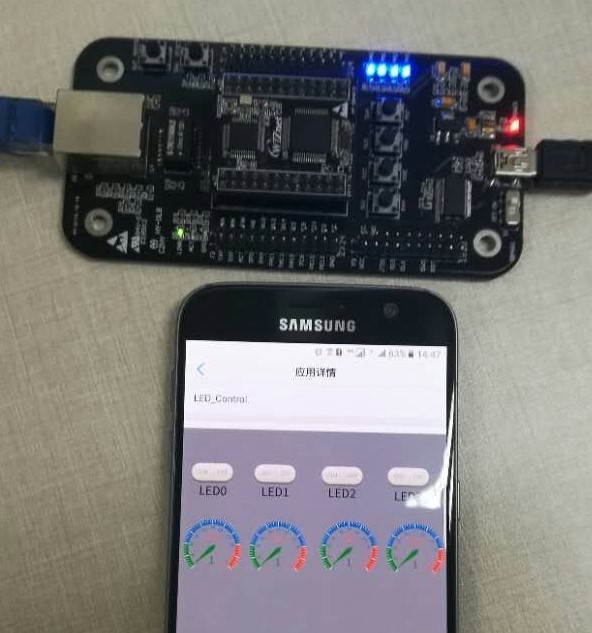
The experiment purpose : adopt oneNET official APP And login the official website account to operate the product application control W5500 Development board LED The light is on and off .
Experimental process :
1、 register oneNET Platform account ;
Sign in https://open.iot.10086.cn/, Choose individual registration or enterprise registration according to your personal situation , Sign up and log in .

2、 Create products
After logging in, click the developer center in the upper right corner and enter the corresponding product list interface ;
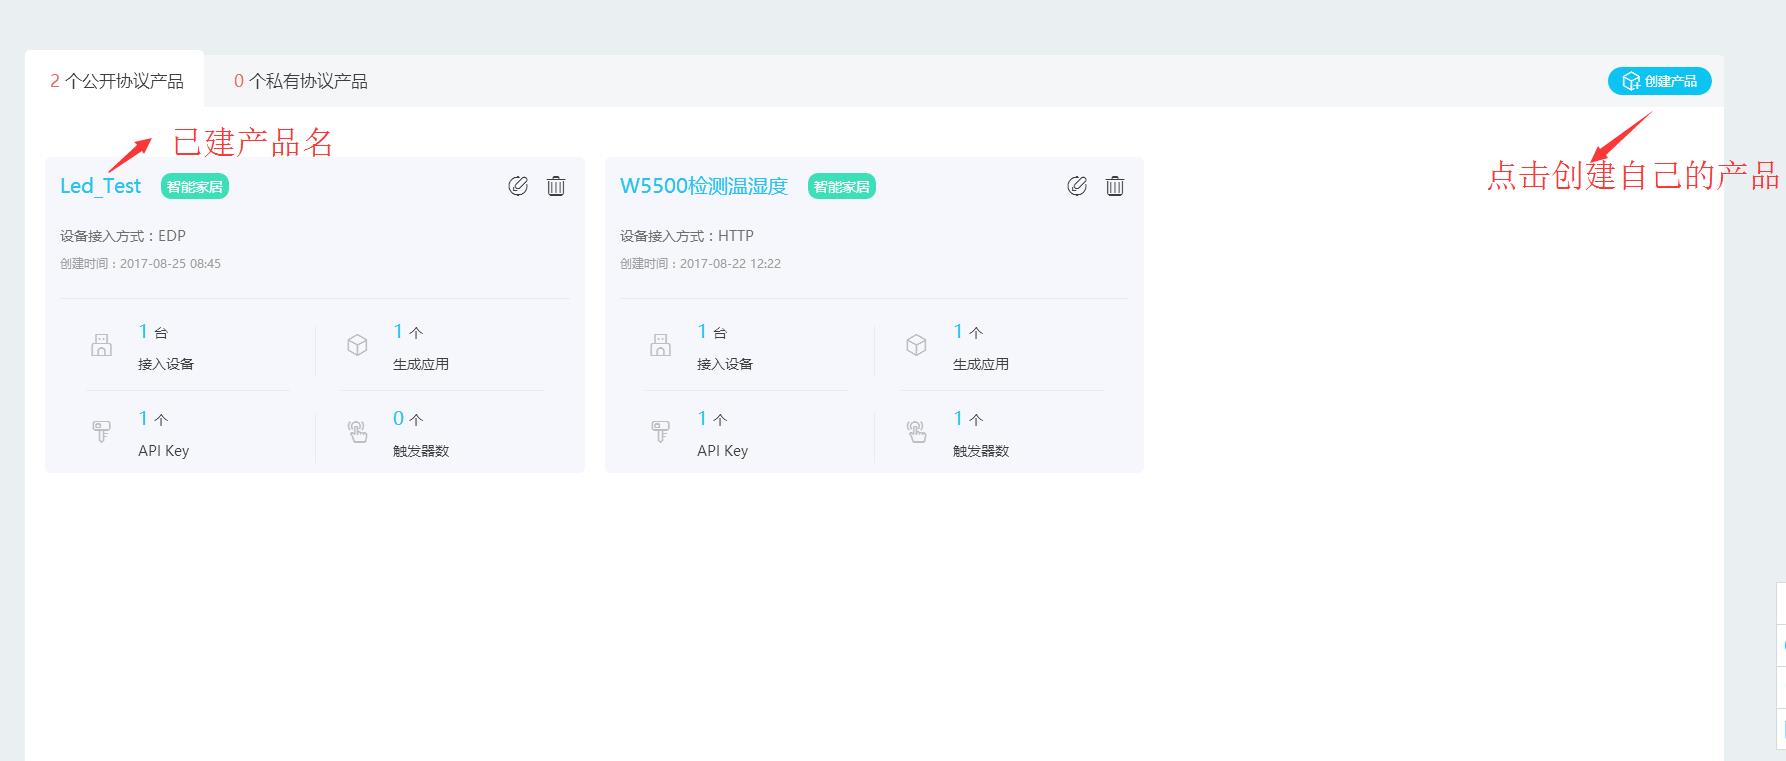
Click create product and fill in the basic information of the product in the pop-up page . industry 、 The category and progress can be filled in according to your actual situation ;
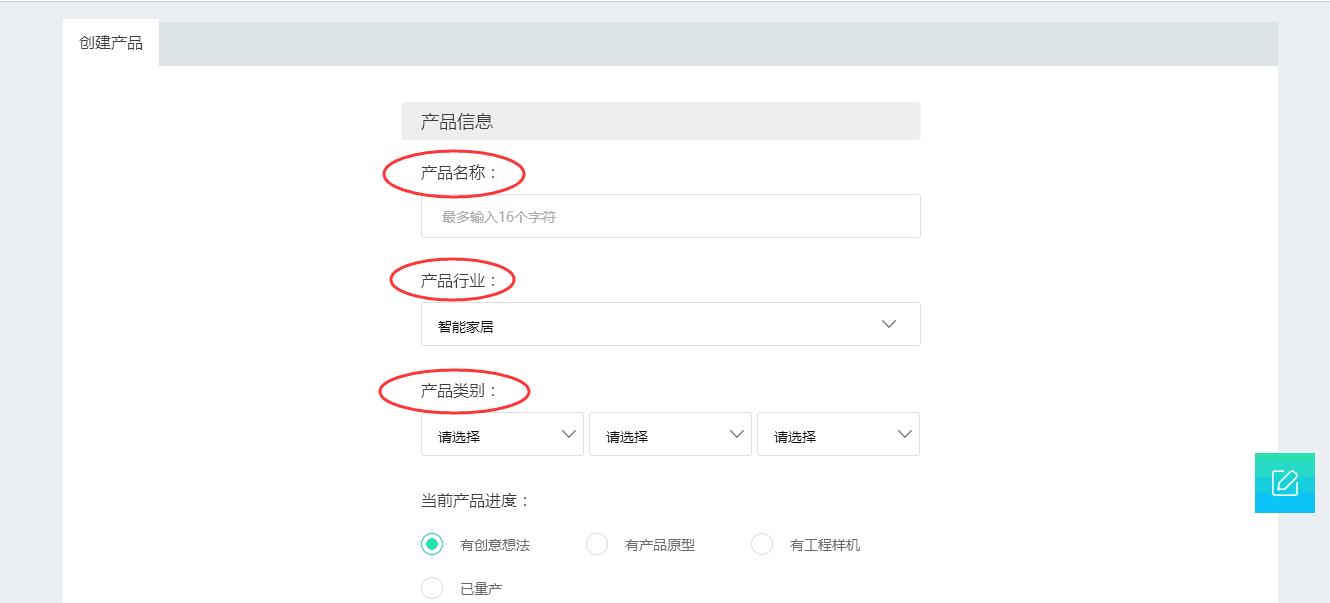
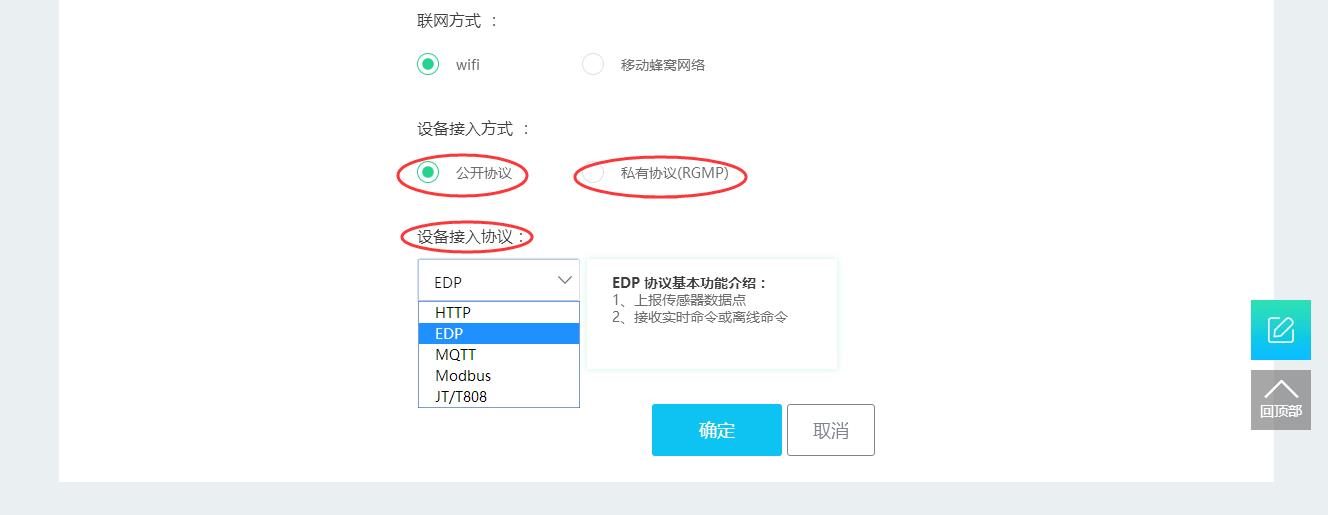
The operating system, operator and networking mode shall be filled in according to their actual situation , our W5500 The development board has no operating system , So choose none . Our development board is wired networking. Here I choose wifi The specific choice depends on your actual situation .

The choice of device access mode and access protocol should be judged according to your own project , There are public and private , Public agreements include EDP、HTTP、MQTT etc. , Private agreements include RGMP etc. . In this experiment we will use EDP agreement .
( notes : stay oneNET There is a development document on the left of the home page of , It's about oneNET Use a more detailed guide , Users can have a deeper understanding through this document OneNET How to use .)
3、 Add equipment
After registering, logging in and establishing your own products, enter the product page, select device management, click Add device to start adding devices to your products .
(1) Click on the product to enter the next page

(2) Click device management to enter the following interface

Select the information to add the device according to the prompt

4、 Add data flow under the device , Click the data flow template to enter the following interface

Start adding data flow

( Check to upload four LED The data flow from the state of the lamp to the equipment under the product , So we need to create four data streams to receive the uploaded data , This experiment is due to the data stream uploaded in the code ID yes LED_0_statu So we'd better change it to this , Or modify the code part to your own defined amount data ID.)
5、 Now about oneNET The registration and product creation of have been basically completed , Next, we will upload data through code, and then add device applications according to the uploaded data .
Let's start with a brief introduction EDP, Because our experiment uses EDP Protocol upload / Issue data and commands .
brief introduction
EDP (Enhanced Device Protocol Enhanced device protocol ) yes OneNET The platform is customized according to the characteristics of the Internet of things, and is completely open based on TCP The agreement , Can be widely used in home 、 traffic 、 logistics 、 In energy and other industries .
Functional characteristics
Long connection protocol
Data encrypted transmission
Terminal data point report , The supported data point types are :
Floating point numbers (float)
integer (int)
character string (string)
JSON object
binary data
Platform message is sent ( Offline message support )
End to end data forwarding
Access to the process

The process :
After adding the data flow of the device, first establish with the platform TCP Connect and then establish EDP Connect , After success, you can upload data and issue commands .
SDK:
oneNET Software development kit provided ; This experiment uses SDK In the document center — Open agreement Product Guide — Device access —EDP——SDK
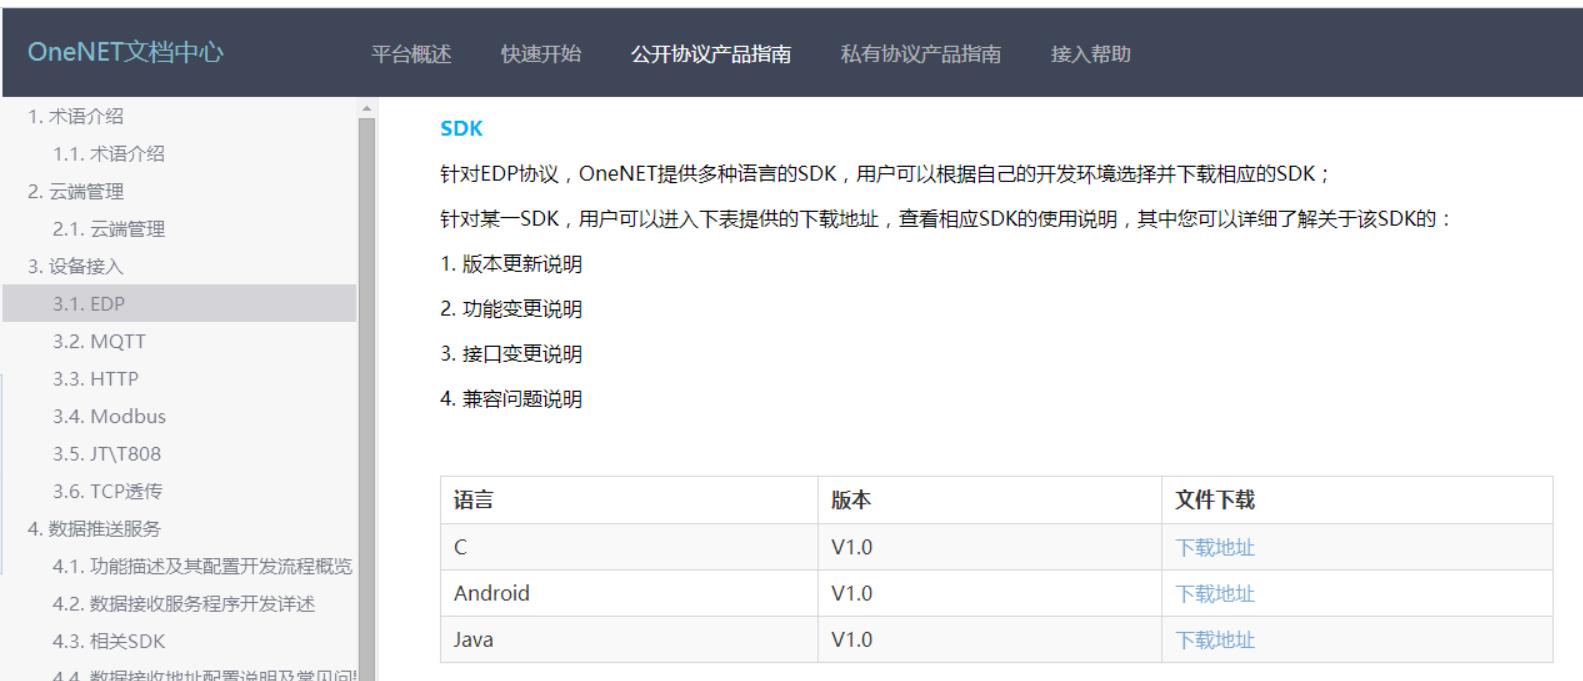
Users who are interested can download their own projects , This routine provides portable and available SDK.
6、 Code implementation
This routine is oneNET Reverse control W5500 Of LED The light goes on and off , So after getting the routine we provided, open the project and enter W5500_config.c Modify the of the device IP The address, gateway and other data information make it on the same LAN as your computer so that it can be connected with your computer oneNET Platform building TCP Connect . After modification, enter tcp_demo.c Modify the device ID And the equipment APIKEY Equipment for creating products for yourself ID And APIKEY. Specific path : equipment ID Under the built equipment in the equipment management .

APIKEY Under the product overview

( notes :APIKEY There are two kinds of , One is the main product in the screenshot above APIKEY, It has the maximum permission to access all resources under the product, and is generated by default when we create the product ; The other is equipment APIKEY, The user can add the APIKEY, Its role is only limited to the resource operation under the device , The specific path is shown in the screenshot above APIKEY Manage click Add APIKEY The add information box will pop up , Users can add devices for their own devices APIKEY.)
Find our own equipment ID as well as APIKEY Later, it will be modified in our project , as follows :

7、 After the code is modified, it can be compiled and written , Open the serial assistant to see the relevant process .

As shown in the above figure, after the code is burned, our W5500 Equipment and oneNET Platform building TCP Connect and then establish EDP The connection starts uploading us W5500 Of LED The state of the light goes to the platform , At this time, log in to the platform and find the device management to see that it has been established EDP Connect , As shown in the following figure, there are colored dots .

At this time, open the data flow management under the device to view the data flow uploaded to the platform, as shown in the following figure :

After receiving the data, you can create a device application .
8、 Create a device application
Enter the product of the platform and click application management — Create an

After creation, click Edit to enter the application editing interface

The editing page is shown in the following figure , You can edit the application on this page , Drag the application you want to add into the editing area , For example, the switch and instrument panel in this experiment .

The application of this experiment has four switches and four instrument panels , The switch is mainly responsible for passing the switch value we set EDP Send instructions to our W5500 Development board , The dashboard is responsible for displaying our development board uploaded to the platform LED The state of the light .
We drag the switch of the left taskbar and look forward to our editing area :

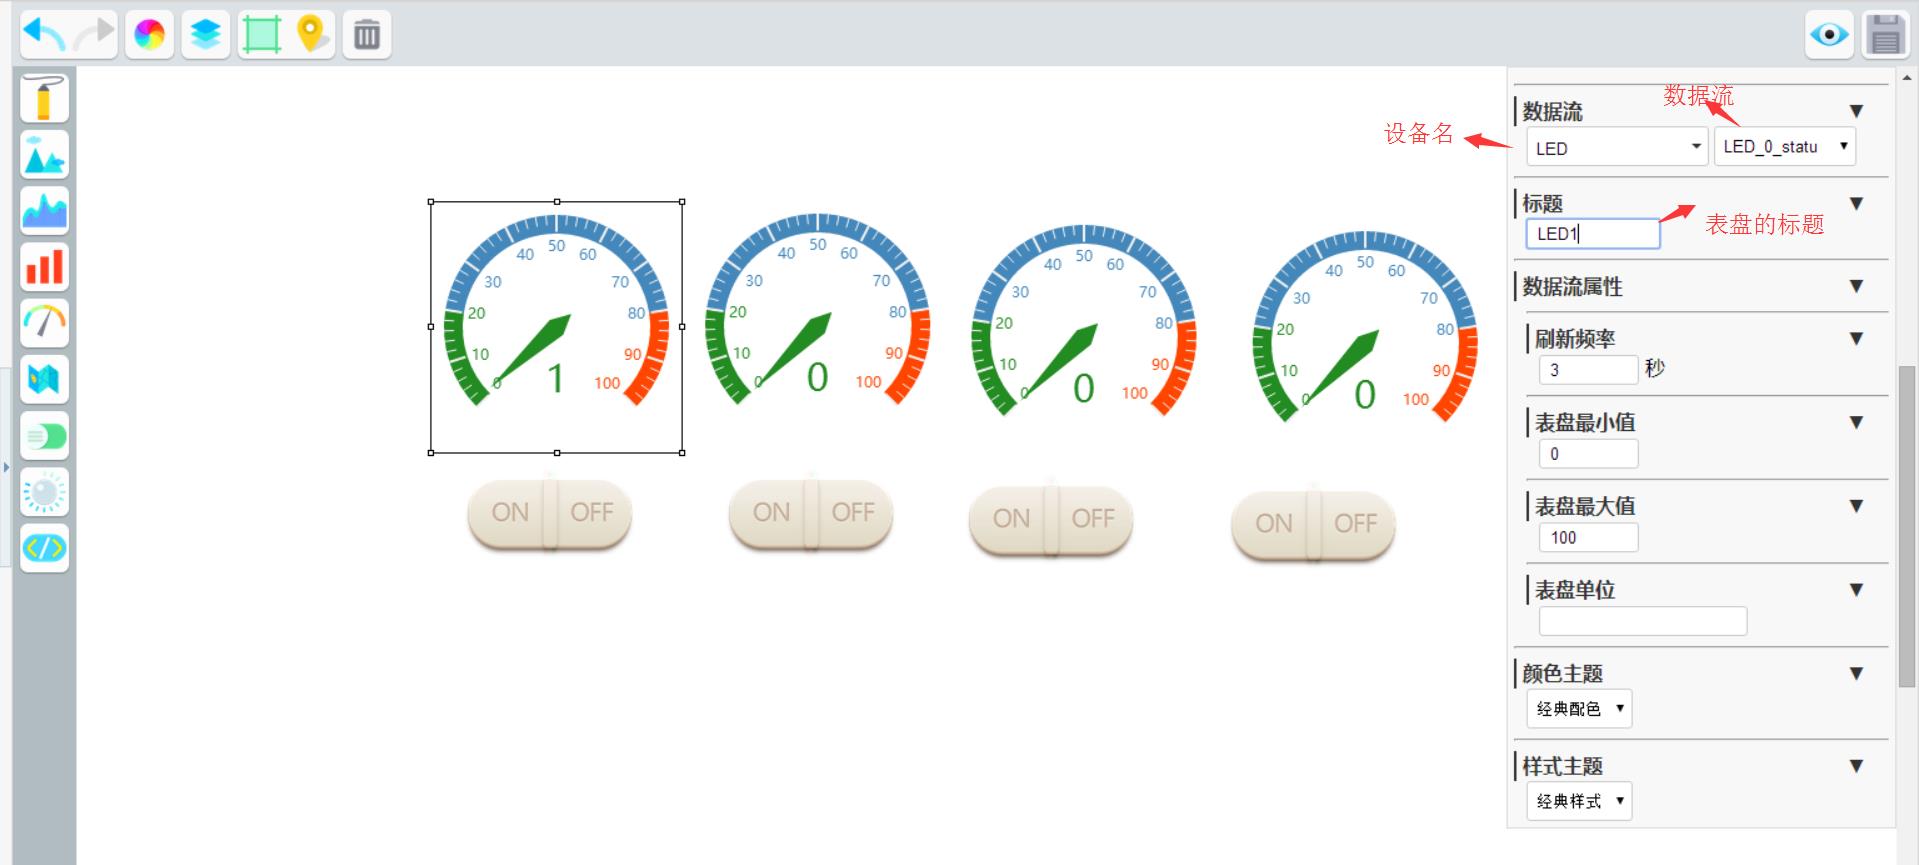
Click on the right side of the dashboard editing area we dragged, and the configuration information will pop up, as shown in the following figure :
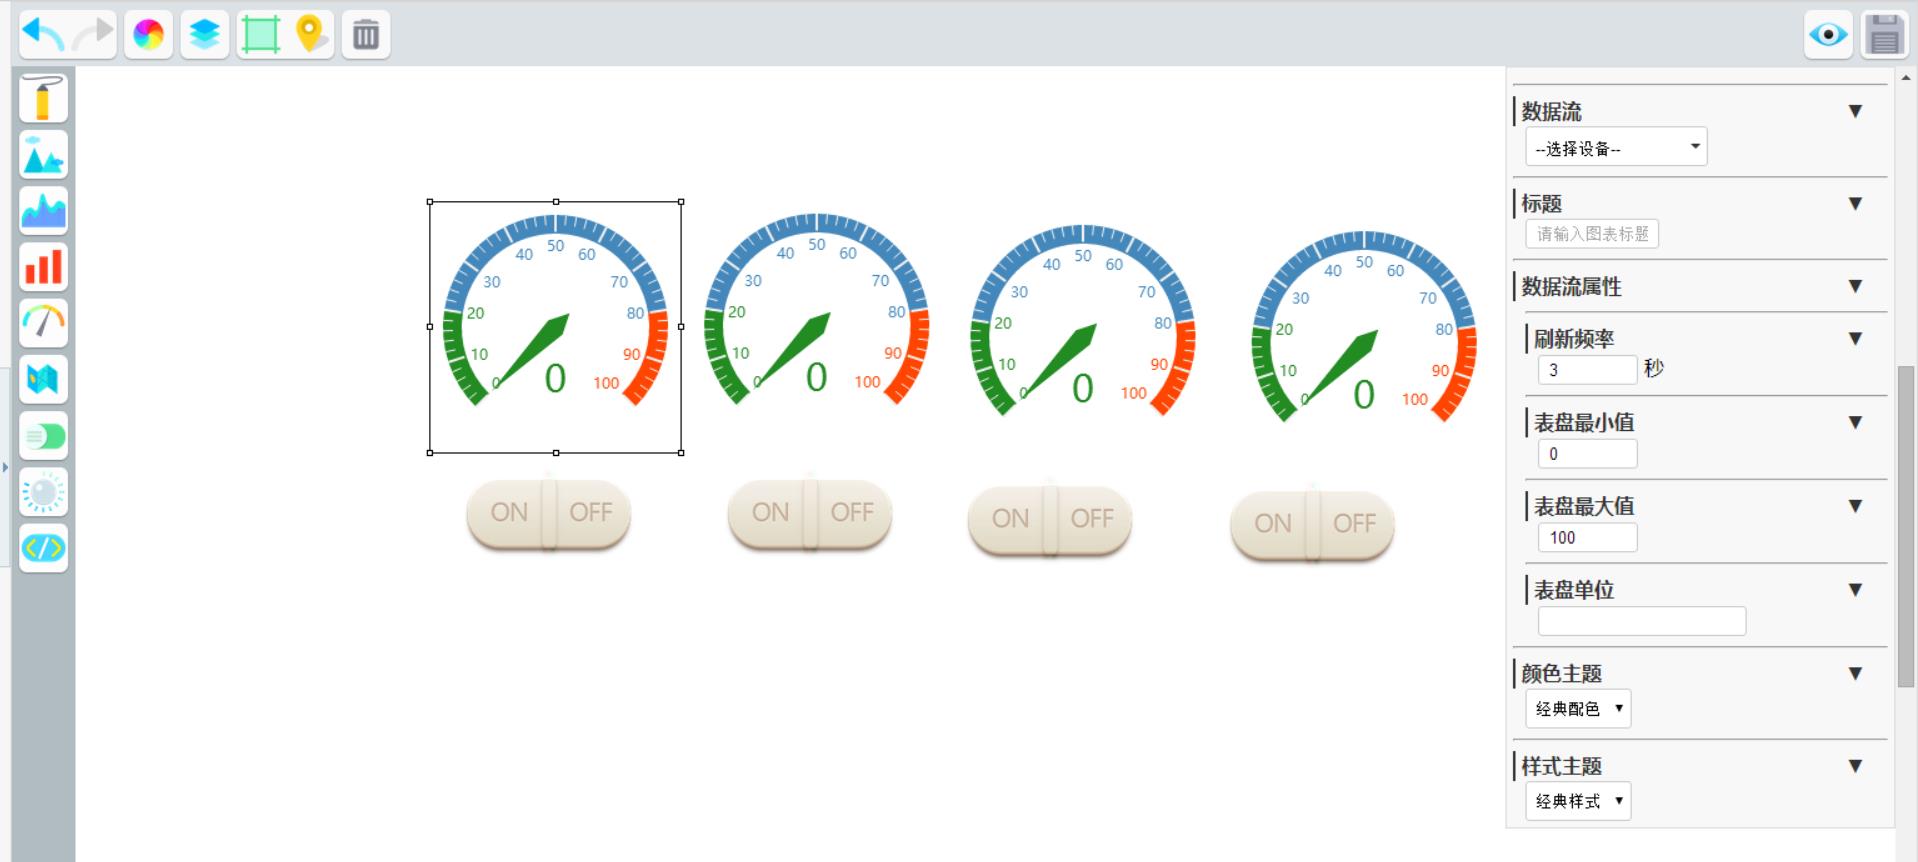
Choose to configure the data of the first dashboard according to the prompt , The main thing is the selection of data flow equipment and the corresponding data flow of equipment , After filling in, configure the remaining three dashboards and pay attention to the corresponding relationship of data flow . Our experiment is to receive data from the development board through four data streams under one device .
The configuration of the first dashboard is shown in the figure below :
Click the switch in the editing area to open the switch configuration window , The configuration is as follows :

explain :
The data flow part of the device name is the same as that of the dashboard , It should be noted that four different data flows under a device correspond to four dashboards and switches , The switch value part is the content of the command sent by the platform to the development board , For example, after you install it, the platform will 1O( Indicates that the first light is on ,1 It's Arabic numerals ,O yes Open The first letter ) Send to the development board , After receiving it, the development board parses the data and executes opening LED1 The operation of .
What needs to be noticed is about EDP Command content section ; If you choose the same as the one in the figure {V} Or just don't write anything , The effect is that the platform directly sets the value of the switch 1O Package and send to the development board , The development board is based on EDP The command sending rule finds the data and executes the command , If not, for example {LED1}1, Change the command to indicate the first LED Lamp assignment 1, namely LED1 bright . Then the platform is {LED1}1 Package and send it to the development board. At this time, the development board needs to find two key parts from the sent data, namely LED1 and 1, This process requires “{}” Find and discard from the data . Second, we only need to find the above situation 1 and O That's it . It's equivalent to saving a small step .
After the first switch is configured, configure the remaining three switches in turn , After all, the whole application is added , Click save 、 Preview can be used for practical operation experiments .
Users can log in directly oneNET Open your own application operation development board LED The lamp can also pass oneNET Official mobile phones APP Log in to your account and open the application .
The experimental inspection process is shown in the following figure :

Editor's note :
About the code part SDK as well as EDP The document of the agreement can be downloaded from the official website , Connect as follows :
C It's about language EDP Of SDK download
https://github.com/cm-heclouds/edp_c
EDP Download the agreement document
https://upfiles.heclouds.com/123/ueditor/2017/05/03/35c119697c30e06f1e857263fd7c5c3e.docx
Android version is officially available APP Download QR code :

边栏推荐
- Let sports happen naturally, and fire creates a new lifestyle
- Layout management ==pyqt5
- SQL注入 Less17(报错注入+子查询)
- SQL language (6)
- Small and micro enterprise smart business card management applet
- Esp8266 uses drv8833 drive board to drive N20 motor
- Greedy problem 01_ Activity arrangement code analysis
- varest蓝图设置json
- LVS负载均衡之LVS-DR搭建Web群集与LVS结合Keepalived搭建高可用Web群集
- SQL language (II)
猜你喜欢

Want to record your supernatural moments when playing games? Let's take a look at how to use unity screenshots

Emmet syntax quick query syntax basic syntax part
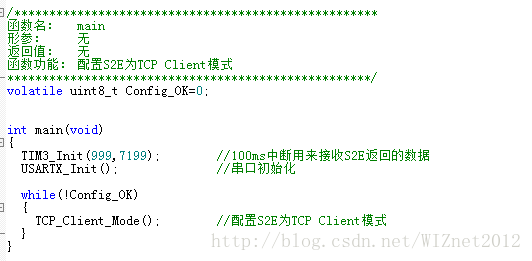
教你如何通过MCU配置S2E为TCP Client的工作模式

Make a reliable delay queue with redis

Let sports happen naturally, and fire creates a new lifestyle

Information management system for typical works of urban sculpture (picture sharing system SSM)

论文解读(MaskGAE)《MaskGAE: Masked Graph Modeling Meets Graph Autoencoders》
同事看了我的代码惊呼:居然是这么在Unity中用单例的

SQL language (II)
Nowcodertop7-11 - continuous updating
随机推荐
Activity registration | play with kubernetes container service improvement class officially opened!
SQL language (I)
谣言检测文献阅读十一—Preventing rumor spread with deep learning
Shell Chapter 7 exercise
用 Redis 做一个可靠的延迟队列
web移动端:touchmove实现局部滚动
Eigenvalues and eigenvectors of matrices
Breadth first traversal (problems related to sequence traversal of graphs and binary trees)
W5500在处于TCP_Server模式下,在交换机/路由器网络中无法ping通也无法通讯。
Menu bar + status bar + toolbar ==pyqt5
同事看了我的代码惊呼:居然是这么在Unity中用单例的
The principle analysis of filter to solve the request parameter garbled code
Use three.js to realize the cool cyberpunk style 3D digital earth large screen
教你如何通过MCU配置S2E为TCP Client的工作模式
varest蓝图设置json
RedisUtil
Linked list related (design linked list and ring linked list)
WIZnet W5500系列培训活动之“MQTT协议讲解和实践(接入OneNET)”
Oracle parsing XML with the same name
Only know that the preform is used to generate objects? See how I use unity to generate UI prefabs