当前位置:网站首页>[technical grass planting] use webhook to automatically deploy my blogs on multiple sites in Tencent cloud
[technical grass planting] use webhook to automatically deploy my blogs on multiple sites in Tencent cloud
2022-06-24 00:59:00 【Little brother Fu】
author : Little brother Fu
Blog :https://bugstack.cn
One 、 Preface
Little brother Fu , I got three servers in Tencent cloud , Maintain the school game club site , I'm numb !
Female powder Incoming letter : Fu Brother , I'm a sophomore , The kind of sophomore girl who can learn programming . Recently, I see a lot of people promoting server white fur coats every day , I was there 11.1 I bought it on Sunday , I also asked two students in the dormitory to buy it together , Bought it for three years . In this way, the three of us can build and maintain the site of our school game club , Daily maintenance of the school game competition 、 propaganda 、 notice , I can also use the programming technology I learned , Kill many birds with one stone . But with the three of us staying up late tossing about the server 、 Make a website 、 Filed domain name , There are so many problems , I used to feel like I could take off after learning the textbook , Now it's all hip pulling . You can only learn Vogel's ECS operation video once , One pass deployment verification , I really learned a lot ! Thank you again, brother fu ! So here's the problem , Is is , I have three servers , Configure according to the video Nginx After the load , Pass every time FTP Transfer the website files to three servers , Sometimes I forget one . What's going on , Brother Fu, find a way .
Fu Ge Reply : do There is a law , You can set up a private repository for your website code and send it to Github perhaps Gitee, Both code bases support webhook Simply put, when you put the code push When you get to the code base , The code base will call one or more of your pre configured callback hooks , In fact, it is provided by calling your three load balancing sites URL, To inform you that the code base now has the latest updated code , You can receive URL After the call notification , adopt git pull Command the latest uploaded website code , Pull to the server . So now the effect is , You maintain the code in GitHub in the future , After uploading the latest website content , Three sites can be deployed automatically , The brief process is as follows :
Program flow :
- In your own website , Provide webhooks URL Access address , Configuration to
Github/GiteeCode base Settings -> WebhooksThis will be described in detail below - For example, in the figure webhooks.php The content of development is when the call is received , After getting the input parameters, execute git pull operation
shell_exec("git pull origin main 2>&1"); - webhooks After configuration , When we pass again git push Push the local code to the warehouse (Github/Gitee) When , The warehouse will call all webhooks.php, Put the warehouse (Github/Gitee) Pull the code in to the site , This completes the update of the content of the whole site .
Fu Ge , I understand what you said , But I need your hands again , Under operation !
Two 、 Environmental statement
- 【 must 】 Tencent cloud server 1 Table above , Purchase address :https://cloud.tencent.com/act/double11?channel=yunjia&from=10680
- 【 must 】 Use Github、Gitee、Codechina Maintain website code , Because these code bases can support configuration webhooks
- 【 must 】Linux Cloud server ( Public network IP); install Git、 install Nginx、 install PHP、 install FTP
- 【 Optional 】 Use pagoda O & M panel , Deploy site blog , It will be more convenient to operate
3、 ... and 、 Site configuration
First , We use Linux Pagoda operation and maintenance panel , Add a blog site , Before adding, you need to install... In the pagoda Nginx、FTP、PHP modular , If you are unfamiliar with the operation here , You can see little brother Fu in B Stop the recorded ECS learning video , Address :https://space.bilibili.com/15637440/channel/seriesdetail?sid=479958PS: Of course, you can also not use the pagoda , Install by command Nginx perhaps Apache The software required by the server is also OK .
1. Configure and log in to the pagoda
- Address :http://80.71.255.xxx:8888/ -
Change it to your address - account number : The user name and password have been printed on the console , You can copy your own , After logging into the pagoda, you can change the default password
2. Install Apache and FTP
Next, we'll install an Apache server and FTP, So we can deploy and access our static blog , That's one html, as follows :
install Apache
- Some commands will be executed automatically during the installation process , You don't have to worry about this , Just watch in silence .
install FTP
- install FTP The main purpose is to transfer files to the server locally , For example, one of your static blogs is html, You can go through FTP To the server .
3. Website configuration
Installed Apache and FTP We can simply configure a site , With this site, we can visit our own blog !
Create site
- Create a site that's suitable if you haven't applied for a domain name yet , Or the domain name hasn't been filed yet , Then you can directly connect the public network IP Fill in .
Visit Site
- Address :http://80.71.255.***/ At the time of the visit , You get your own IP that will do
4. Environmental installation
install Git
- demand : Received... At site webhooks When the callback , Use git pull Pull website code , So you need to install git
- command :
yum -y install git - verification :
[[email protected] ~]# git version
git version 2.27.0
install Nginx、FTP
- demand : When deploying a blog site, you will need to go to Nginx The server 、FTP Upload
- operation : It can be used directly in the pagoda
Software storeInstallation
To configure PHP, allow exec Script instructions
- demand : Because we use PHP Developed webhook Callback operation , So we need to install PHP modular
- install : You can install it directly in the pagoda's software store
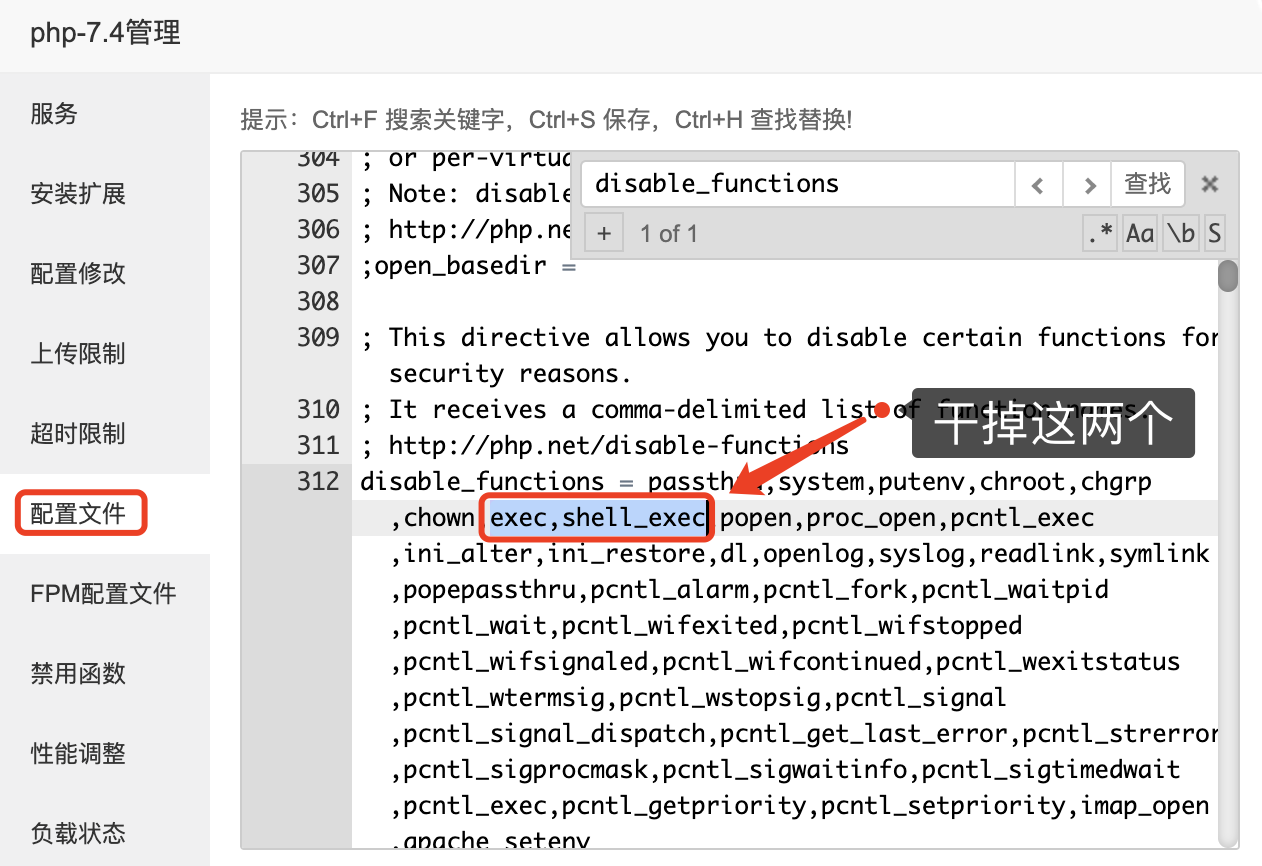
- To configure : installed PHP After the module , Also need to PHP Of
php.iniMake changes , Delete disable_functions Under the exec、shell_exec, In order to webhooks.php In file , Execute script command . Pictured :
5. Site configuration
- After the environment is installed , You can add a web site , Your website running code needs to be uploaded to this site , It provides FTP There is also one in the operation and maintenance panel of the pagoda
file, You can modify the site content online .
6. Visit Site
- Address :http://80.71.255.*** - You change to your own interview IP that will do
- describe : By default, the site is created , Will be in
/www/wwwroot/80.71.255.***There is a index.html At this point, you can modify it online
Four 、 Create public key
SSH yes Linux System login tool , Now it is widely used in server login and all kinds of encrypted communication .
1. View running users
commonly php The operation uses www user , We can go through ftp Upload a index.php Go to the root directory of the site , Then visit the site , View the project path and user directory .
index.php The code in is as follows
<?php
header('Content-type: text/html; charset=utf-8');
ini_set("error_reporting", "E_ALL & ~E_NOTICE");

echo "Hi,Webhooks!By  Little brother Fu <br/>";

echo '<br/> test : Output project path and user directory :<br/>';

exec("cd ~ && cd - && cd -", $output);

echo '<pre>';
echo print_r($output);
echo '</pre>';- If you're not right
php.iniMediumdisable_functions = {exec、shell_exec}Delete , Then execute this php The script instruction in the file will report an error .
Visit Site
- Project path :
[0] => /www/wwwroot/80.71.255.*** - User directory :
[1] => /home/www- www This is the user directory , That is, we need to create ssh The user of the public key
2. Generate and configure public keys
2.1 Turn on www user
- command :
vim /etc/passwd - To configure : hold
sbin/nologinbybin/bash

2.2 Generate public key
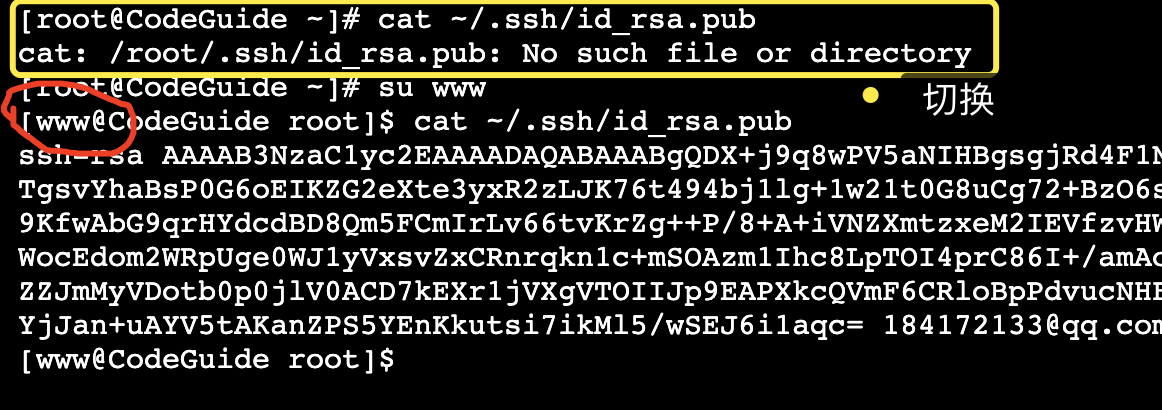
Because we've started www Login rights , So before generating the public key , Need to switch to www Under the account , command :su www
- Switching users :
su www - Generate public key :
ssh-keygen -t rsa -C "[email protected]"- By default, you can return - View public key :
cat ~/.ssh/id_rsa.pub- Not visible under other accounts , Only switch to www so
2.3 Configure the public key (Github)
- Address :https://github.com/settings/ssh/new
- To configure : Pass you through
cat ~/.ssh/id_rsa.pubView the public key , Configure here , as follows :
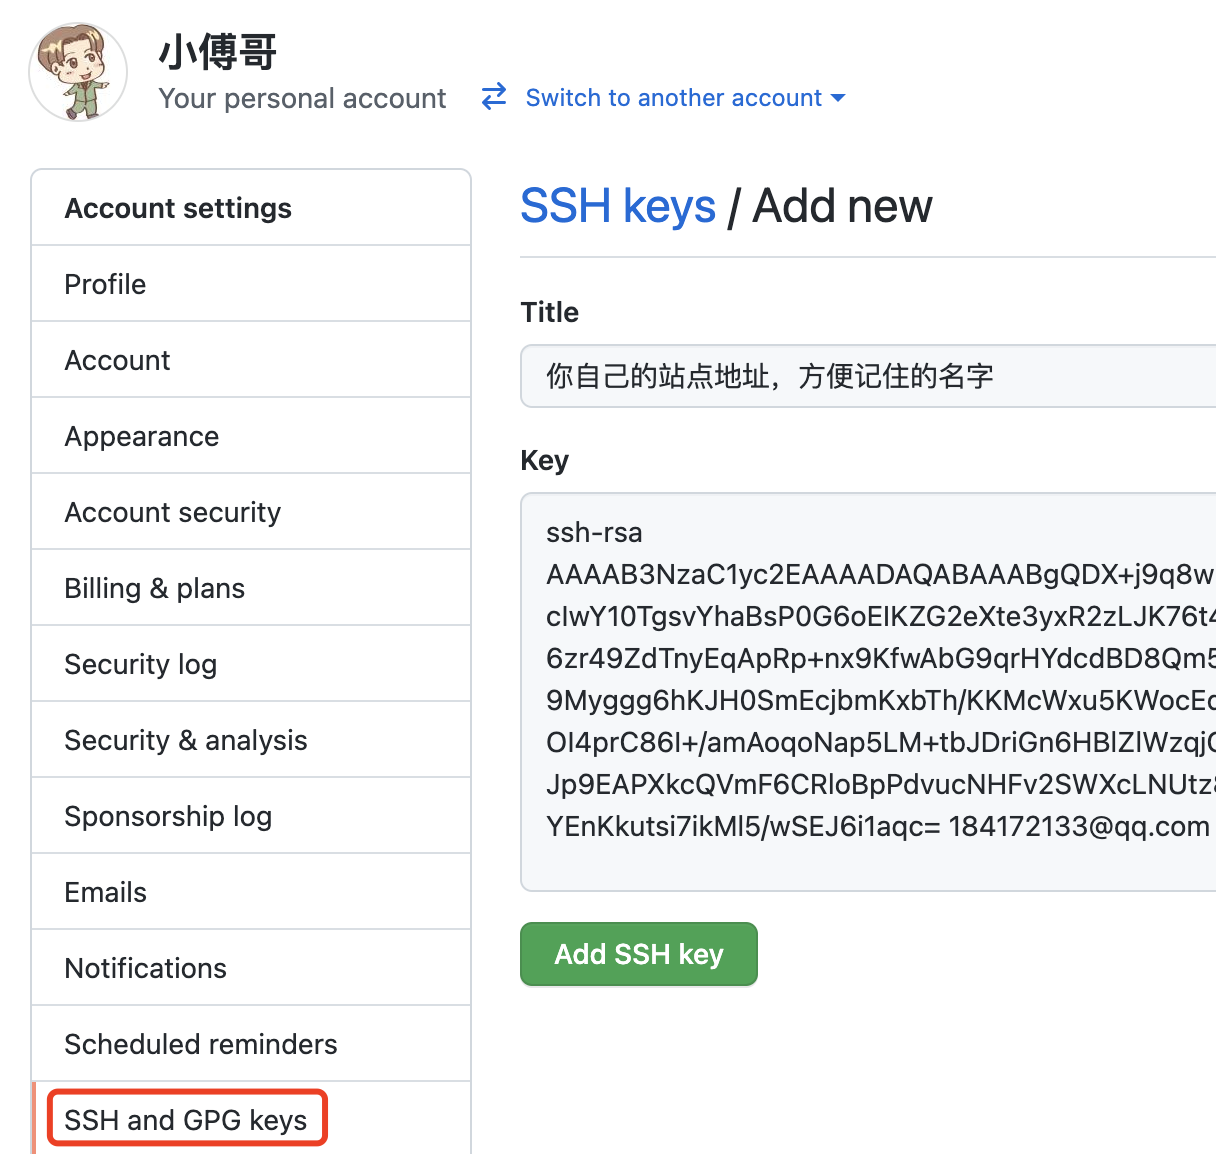
- With this public key configuration , We go through webhooks.php The script instructions in can automatically pull the code .
5、 ... and 、webhooks Update blog
1. Clone my code
- Source code : Official account :bugstack Wormhole stack - reply :
guide-webhooksYou can get - Use : You can put my source code first fork To your own Github, Then deploy to your site . After learning and understanding the principle , Then deal with your own site
2. Deploy to site
- Here we need to use... On the site first
git clone ” Your website code git Address “, hold Github Clone the code into your own blog , In fact, it starts the role of deployment . And this step , It's actually for daily use Git The way , Clone the code first , Constantly git pull to update . - command :
[[email protected] 80.71.255.***]$ git clone [email protected]:fuzhengwei/guide-webhooks.git- Be careful , You need to switch to your codebase address , otherwise webhooks It doesn't work
3. Change the web site running Directory
- Because we are already in the blog site , from Github Clone our blog running code , Then you need to switch the running directory of the website to this folder , In this way, we can normally access our blog code .
4. To configure webhooks
webhooks.php
Callback script
<?php
/**
 * Git webhooks  Automatic deployment script
 *  Address :https://github.com/fuzhengwei/guide-webhooks/settings/hooks
 */

//  receive post Parameters
$requestBody = file_get_contents("php://input");
if (empty($requestBody)) {
    exit('data null!');
}

// Content type = application/json
$content = json_decode($requestBody, true);

//  verification  Webhooks  Configured  Secret, You can also not verify
/*if (empty($content['password']) || $content['password'] != '123456') {
	exit('password error');
}*/

//  Project storage physical path , That is, the access address of the site
$path = "/www/wwwroot/80.71.255.***/guide-webhooks/";

//  Judge whether there is a commit on the branch to be pulled down , Our branch name here is  main
if ($content['ref'] == 'refs/heads/main') {

    //  Execute the script  git pull, Pull the latest branch code
    $res = shell_exec("cd {$path} && git pull origin main 2>&1"); //  At present, it is www user

    //  Log  ($content  Returns an entire object , You can get the contents on demand , Write to the log )
    $res_log = '------------------------->' . PHP_EOL;
    $res_log .= ' user  ' . $content['pusher']['name'] . '  On  ' . date('Y-m-d H:i:s') . '  To project 【' . $content['repository']['name'] . '】 Branch 【' . $content['ref'] . '】PUSH ' . $content['commits'][0]['message'] . PHP_EOL;
    $res_log .= $res . PHP_EOL;

    //  append mode , Write log file
    file_put_contents("git_webhook_log.txt", $res_log, FILE_APPEND);
}
echo 'done';- Before we go from Github In the cloned code file , There is one named
webhooks.phpThe file of , It is used to deal with Github Pull during callback Github The script file corresponding to the blog code base . - Now? http://80.71.255.***/webhooks.php It can be configured to Github Of webhooks I'm off , Pictured :
- To configure ,URL、Content type、Secret、trigger, Confirm after configuration , In addition, you can configure multiple server instances webhooks, This allows you to push code to Github The warehouse was deployed together .
6、 ... and 、 Deployment validation
at present , Visiting a blog is like this , as follows : Next, we start to modify the blog file and submit , Verify that the automatic deployment update site
1. index.php New code
- You can index.php Modify anything in the file , Or add something new .
2. push Code to Github
- Push the newly modified content , To the code base , wait for Github webhooks Callback script
3. Verify blog updates
- Address :http://80.71.255.***/
- effect :
- New talent offers :https://cloud.tencent.com/act/double11?channel=yunjia&from=10680
- By visiting the blog address , You can already see our new content , Updates have been automatically deployed to the site !
4. View the script execution log
In our webhooks.php in , perform git pull Script time , And a log record , It's easy to know who's right about the website and what !
git_webhook_log.txt
- git_webhook_log.txt Is in webhooks.php Log files recorded in , You can expand other content you need to output .
5. see webhooks Push logs
- every time webhooks Execution time , There will be corresponding records , To tell you whether the code push is successfully called back . And in the log , You can also see webhooks The content pushed to you JSON The contents of the document , You can get the information you need , For example, who pushed this 、 In which branch did you push 、 What files are pushed and so on .
- Here also intercepted a push JSON, You can view the rest of the information yourself in the push record .
7、 ... and 、 summary
- In this chapter, we take you through webhooks I went through the use of , It also allows small partners who need this technology to make their site deployment changes more convenient
Be smart. Of course, keeping their own records also helped some younger martial brothers and little sisters ! - Now, if you have a server eating ash, you don't know how to use it , Now you can toss , Because brother Fu has recorded an introductory video for you 、 Write the operation article , Then don't wait , Come on. ! Young people !
边栏推荐
- The first open-source MySQL HTAP database in China will be released soon, and the three highlights will be informed in advance that shiatomics technology will launch heavily
- 一次 MySQL 误操作导致的事故,「高可用」都顶不住了!
- 现在网上开股票账户安全吗?选择国有券商,最快8分钟开户成功
- Security | warm tips: security incidents on the cloud have intensified recently. Please do a good job in backup monitoring of cloud security protection!
- Cvpr2022 𞓜 thin domain adaptation
- C language: sorting with custom functions
- [OSG] OSG development (04) - create multiple scene views
- C语言:结构体数组实现找出最低分学生记录
- 毕业设计-论文写作笔记【毕设题目类型、论文写作细节、毕设资料】
- What do NLP engineers do? What is the work content?
猜你喜欢

Everything I see is the category of my precise positioning! Open source of a new method for saliency map visualization

Shardingsphere-proxy-5.0.0 implementation of capacity range partition (V)

Apple iphone14 is equipped with Beidou navigation system. What are the advantages of Beidou vs GPS?

【小程序】实现双列商品效果

Cvpr2022 𞓜 thin domain adaptation

What are the two types of digital factories

Common core resource objects of kubernetes

一次 MySQL 误操作导致的事故,「高可用」都顶不住了!

Shardingsphere-proxy-5.0.0 implementation of capacity range partition (V)

【Flutter】如何使用Flutter包和插件
随机推荐
Common core resource objects of kubernetes
【CVPR 2020】会议版本:A Physics-based Noise Formation Model for Extreme Low-light Raw Denoising
Activity 的 36 大难点,你会几个?,安卓面试2020
Arm learning (7) symbol table and debugging
[digital signal] spectrum refinement based on MATLAB analog window function [including Matlab source code 1906]
持续测试和质量保障的关系
Installation and use of winscp and putty
阿里巴巴面试题:多线程相关
Empty encoded password warning reason
Basic usage of setfacl command
【ICCV Workshop 2021】基于密度图的小目标检测:Coarse-grained Density Map Guided Object Detection in Aerial Images
用一个软件纪念自己故去的母亲,这或许才是程序员最大的浪漫吧
CVPR2022 | 可精简域适应
version `ZLIB_1.2.9‘ not found (required by /lib64/libpng16.so.16)
2022考研经验分享【初试、择校、复试、调剂、校招与社招】
通达信股票开户是安全的吗?
What are the two types of digital factories
Real time computing framework: Spark cluster setup and introduction case
这不会又是一个Go的BUG吧?
【机器学习】线性回归预测