当前位置:网站首页>First order model realizes photo moving (with tool code) | machine learning
First order model realizes photo moving (with tool code) | machine learning
2022-06-24 22:04:00 【Swordsman a Liang_ ALiang】
Catalog
Resource download and installation
Preface
See a very interesting project , In fact, I have seen similar implementation effects on Baidu feijiang and other platforms before .
You can put photos according to the expression of the video , move . Take a look at the effect of the project .

Project address :first-order-model Project address
Same old thing , Regardless of the effects given by the author , Test it yourself .
Resource download and installation
Let's take a look first README Basic information about the project , It can be seen that in addition to the expression driven photos , You can also move your posture .
The model file provides an online download address .

The file is large and difficult to download , I put it on my cloud disk , You can download from the cloud disk below .
link :https://pan.baidu.com/s/1ANQjl4SBEjBZuX87KPXmnA
Extraction code :tuan
The model file is placed in the root directory and created checkpoint Under the folder .


take requirements.txt Install the dependency in .

Installation supplement
In the test README At the time of the command in , If there is an error .
Traceback (most recent call last):
File "demo.py", line 17, in <module>
from animate import normalize_kp
File "D:\spyder\first-order-model\animate.py", line 7, in <module>
from frames_dataset import PairedDataset
File "D:\spyder\first-order-model\frames_dataset.py", line 10, in <module>
from augmentation import AllAugmentationTransform
File "D:\spyder\first-order-model\augmentation.py", line 13, in <module>
import torchvision
File "C:\Users\huyi\.conda\envs\fom\lib\site-packages\torchvision\__init__.py", line 2, in <module>
from torchvision import datasets
File "C:\Users\huyi\.conda\envs\fom\lib\site-packages\torchvision\datasets\__init__.py", line 9, in <module>
from .fakedata import FakeData
File "C:\Users\huyi\.conda\envs\fom\lib\site-packages\torchvision\datasets\fakedata.py", line 3, in <module>
from .. import transforms
File "C:\Users\huyi\.conda\envs\fom\lib\site-packages\torchvision\transforms\__init__.py", line 1, in <module>
from .transforms import *
File "C:\Users\huyi\.conda\envs\fom\lib\site-packages\torchvision\transforms\transforms.py", line 16, in <module>
from . import functional as F
File "C:\Users\huyi\.conda\envs\fom\lib\site-packages\torchvision\transforms\functional.py", line 5, in <module>
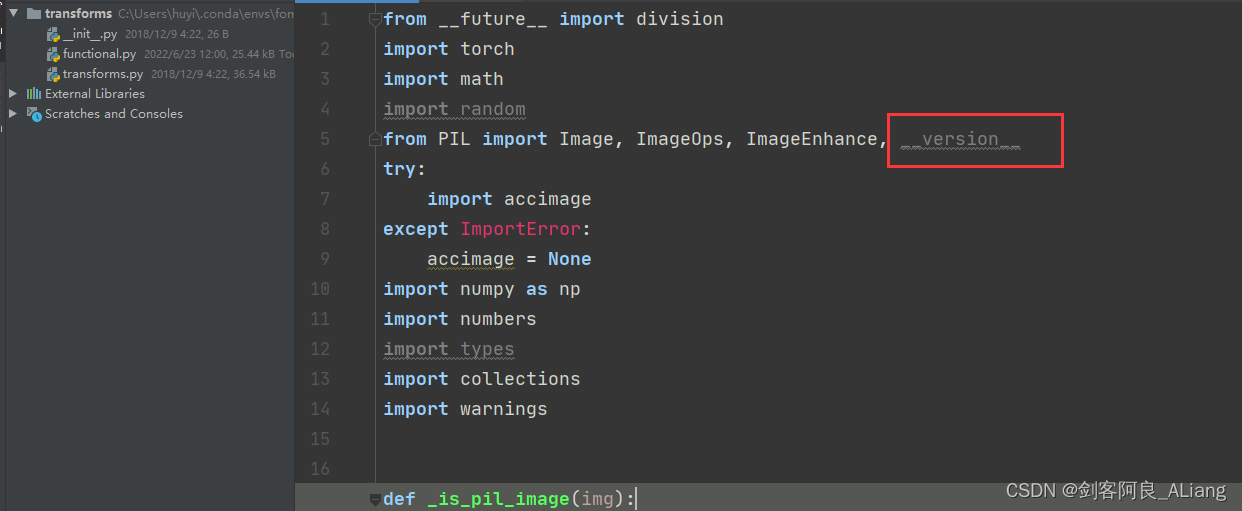
from PIL import Image, ImageOps, ImageEnhance, PILLOW_VERSION
ImportError: cannot import name 'PILLOW_VERSION' from 'PIL' (C:\Users\huyi\.conda\envs\fom\lib\site-packages\PIL\__init__.py)
This question is mainly used by me pillow The reason why the version is too high , If you don't want to find the corresponding lower version , It can be solved in my way .
1、 modify functional.py Code , take PILLOW_VERSION Adjusted for __version__.
2、 take imageio upgrade .
pip install --upgrade imageio -i https://pypi.douban.com/simple3、 install imageio_ffmpeg modular .
pip install imageio-ffmpeg -i https://pypi.douban.com/simpleTool code validation
I will not repeat the test for the official method of use , You can test it according to the following command .

Here I recommend a visual Library gradio, Below I will demo.py A bit of code transformation .
The new tool file code is as follows :
#!/user/bin/env python
# coding=utf-8
"""
@project : first-order-model
@author  :  Swordsman a Liang _ALiang
@file   : hy_gradio.py
@ide    : PyCharm
@time   : 2022-06-23 14:35:28
"""
import uuid
from typing import Optional

import gradio as gr
import matplotlib

matplotlib.use('Agg')
import os, sys
import yaml
from argparse import ArgumentParser
from tqdm import tqdm

import imageio
import numpy as np
from skimage.transform import resize
from skimage import img_as_ubyte
import torch
from sync_batchnorm import DataParallelWithCallback

from modules.generator import OcclusionAwareGenerator
from modules.keypoint_detector import KPDetector
from animate import normalize_kp
from scipy.spatial import ConvexHull

if sys.version_info[0] < 3:
    raise Exception("You must use Python 3 or higher. Recommended version is Python 3.7")


def load_checkpoints(config_path, checkpoint_path, cpu=False):
    with open(config_path) as f:
        config = yaml.load(f)

    generator = OcclusionAwareGenerator(**config['model_params']['generator_params'],
                                        **config['model_params']['common_params'])
    if not cpu:
        generator.cuda()

    kp_detector = KPDetector(**config['model_params']['kp_detector_params'],
                             **config['model_params']['common_params'])
    if not cpu:
        kp_detector.cuda()

    if cpu:
        checkpoint = torch.load(checkpoint_path, map_location=torch.device('cpu'))
    else:
        checkpoint = torch.load(checkpoint_path)

    generator.load_state_dict(checkpoint['generator'])
    kp_detector.load_state_dict(checkpoint['kp_detector'])

    if not cpu:
        generator = DataParallelWithCallback(generator)
        kp_detector = DataParallelWithCallback(kp_detector)

    generator.eval()
    kp_detector.eval()

    return generator, kp_detector


def make_animation(source_image, driving_video, generator, kp_detector, relative=True, adapt_movement_scale=True,
                   cpu=False):
    with torch.no_grad():
        predictions = []
        source = torch.tensor(source_image[np.newaxis].astype(np.float32)).permute(0, 3, 1, 2)
        if not cpu:
            source = source.cuda()
        driving = torch.tensor(np.array(driving_video)[np.newaxis].astype(np.float32)).permute(0, 4, 1, 2, 3)
        kp_source = kp_detector(source)
        kp_driving_initial = kp_detector(driving[:, :, 0])

        for frame_idx in tqdm(range(driving.shape[2])):
            driving_frame = driving[:, :, frame_idx]
            if not cpu:
                driving_frame = driving_frame.cuda()
            kp_driving = kp_detector(driving_frame)
            kp_norm = normalize_kp(kp_source=kp_source, kp_driving=kp_driving,
                                   kp_driving_initial=kp_driving_initial, use_relative_movement=relative,
                                   use_relative_jacobian=relative, adapt_movement_scale=adapt_movement_scale)
            out = generator(source, kp_source=kp_source, kp_driving=kp_norm)

            predictions.append(np.transpose(out['prediction'].data.cpu().numpy(), [0, 2, 3, 1])[0])
    return predictions


def find_best_frame(source, driving, cpu=False):
    import face_alignment

    def normalize_kp(kp):
        kp = kp - kp.mean(axis=0, keepdims=True)
        area = ConvexHull(kp[:, :2]).volume
        area = np.sqrt(area)
        kp[:, :2] = kp[:, :2] / area
        return kp

    fa = face_alignment.FaceAlignment(face_alignment.LandmarksType._2D, flip_input=True,
                                      device='cpu' if cpu else 'cuda')
    kp_source = fa.get_landmarks(255 * source)[0]
    kp_source = normalize_kp(kp_source)
    norm = float('inf')
    frame_num = 0
    for i, image in tqdm(enumerate(driving)):
        kp_driving = fa.get_landmarks(255 * image)[0]
        kp_driving = normalize_kp(kp_driving)
        new_norm = (np.abs(kp_source - kp_driving) ** 2).sum()
        if new_norm < norm:
            norm = new_norm
            frame_num = i
    return frame_num


def h_interface(input_image: str):
    parser = ArgumentParser()
    opt = parser.parse_args()
    opt.config = "./config/vox-256.yaml"
    opt.checkpoint = "./checkpoint/vox-cpk.pth.tar"
    opt.source_image = input_image
    opt.driving_video = "./data/input/ts.mp4"
    opt.result_video = "./data/result/{}.mp4".format(uuid.uuid1().hex)
    opt.relative = True
    opt.adapt_scale = True
    opt.cpu = True
    opt.find_best_frame = False
    opt.best_frame = False
    # source_image = imageio.imread(opt.source_image)
    source_image = opt.source_image
    reader = imageio.get_reader(opt.driving_video)
    fps = reader.get_meta_data()['fps']
    driving_video = []
    try:
        for im in reader:
            driving_video.append(im)
    except RuntimeError:
        pass
    reader.close()

    source_image = resize(source_image, (256, 256))[..., :3]
    driving_video = [resize(frame, (256, 256))[..., :3] for frame in driving_video]
    generator, kp_detector = load_checkpoints(config_path=opt.config, checkpoint_path=opt.checkpoint, cpu=opt.cpu)

    if opt.find_best_frame or opt.best_frame is not None:
        i = opt.best_frame if opt.best_frame is not None else find_best_frame(source_image, driving_video, cpu=opt.cpu)
        print("Best frame: " + str(i))
        driving_forward = driving_video[i:]
        driving_backward = driving_video[:(i + 1)][::-1]
        predictions_forward = make_animation(source_image, driving_forward, generator, kp_detector,
                                             relative=opt.relative, adapt_movement_scale=opt.adapt_scale, cpu=opt.cpu)
        predictions_backward = make_animation(source_image, driving_backward, generator, kp_detector,
                                              relative=opt.relative, adapt_movement_scale=opt.adapt_scale, cpu=opt.cpu)
        predictions = predictions_backward[::-1] + predictions_forward[1:]
    else:
        predictions = make_animation(source_image, driving_video, generator, kp_detector, relative=opt.relative,
                                     adapt_movement_scale=opt.adapt_scale, cpu=opt.cpu)
    imageio.mimsave(opt.result_video, [img_as_ubyte(frame) for frame in predictions], fps=fps)
    return opt.result_video


if __name__ == "__main__":
    demo = gr.Interface(h_interface, inputs=[gr.Image(shape=(500, 500))], outputs=[gr.Video()])

    demo.launch()
    # h_interface("C:\\Users\\huyi\\Desktop\\xx3.jpg")
Code instructions
1、 The original demo.py Medium main Function content , Re edit as h_interface Method , Input is the picture you want to drive .
2、 among driving_video The parameter uses an expression video recorded by myself ts.mp4, I suggest that you can record a replacement with your mobile phone .
3、 Use gradio To generate the page of the method , The following will show you .
4、 Use uuid Name the resulting video .
The results are as follows
Running on local URL: http://127.0.0.1:7860/
To create a public link, set `share=True` in `launch()`.
Open the local address :http://localhost:7860/
You can see that the interactive interface we implemented is as follows :

Let's upload the sample image I prepared , Submit for production .

Look at the execution log , Here's the picture .

Take a look at the production results .

Because I can't upload the video , I turned the video into gif.

It's kind of interesting , I won't do the specific parameter tuning , You may adjust the parameters in the method I provide as needed .
summary
It's still highly recommended gradio, If you are interested, you can still play .
Share :
People think you can only be one of the following : Or you're a shark , Or you have to lie there , Let the shark eat you alive —— This is the world . And I'm , I'm the kind of person who will go out , A man who fights a shark .
——《 Eleven kinds of loneliness 》

边栏推荐
猜你喜欢

Make tea and talk about heroes! Leaders of Fujian Provincial Development and Reform Commission and Fujian municipal business office visited Yurun Health Division for exchange and guidance

Redis+caffeine two-level cache enables smooth access speed

Flutter 库冲突问题解决

Cannot find reference 'imread' in 'appears in pycharm__ init__. py‘

二叉搜索树模板

Opengauss kernel: simple query execution

Filtered data analysis

Want to be a test leader, do you know these 6 skills?
![[notes of Wu Enda] convolutional neural network](/img/19/2cac17010c29cbd5ba245de105d6c1.png)
[notes of Wu Enda] convolutional neural network

“阿里健康”们的逻辑早就变了
随机推荐
Junior college background, 2 years in Suning, 5 years in Ali. How can I get promoted quickly?
CV2 package guide times could not find a version that satisfies the requirement CV2 (from versions: none)
架构实战营 第 6 期 毕业设计
建木持续集成平台v2.5.0发布
降低pip到指定版本(通过PyCharm升级pip,在降低到原来版本)
使用region折叠代码
[featured] how do you design unified login with multiple accounts?
Flutter-使用 typedef的注意事项
Balanced binary search tree
You are using pip version 21.1.2; however, version 22.1.2 is available
Opengauss kernel: simple query execution
【吴恩达笔记】机器学习基础
Cannot find reference 'imread' in 'appears in pycharm__ init__. py‘
Rotate the square array of two-dimensional array clockwise by 90 °
leetcode1720_ 2021-10-14
Installing Oracle without graphical interface in virtual machine centos7 (nanny level installation)
I really want to send a bunch of flowers
Guava中这些Map的骚操作,让我的代码量减少了50%
Reduce the pip to the specified version (upgrade the PIP through pycharm, and then reduce it to the original version)
Practice of hierarchical management based on kubesphere