当前位置:网站首页>JS to realize the rotation chart (riding light). Pictures can be switched left and right. Moving the mouse will stop the rotation
JS to realize the rotation chart (riding light). Pictures can be switched left and right. Moving the mouse will stop the rotation
2022-06-23 01:53:00 【Bejpse】
If you are little white , This set of information can help you become a big bull , If you have rich development experience , This set of information can help you break through the bottleneck
2022web Full set of video tutorial front-end architecture H5 vue node Applet video + Information + Code + Interview questions .
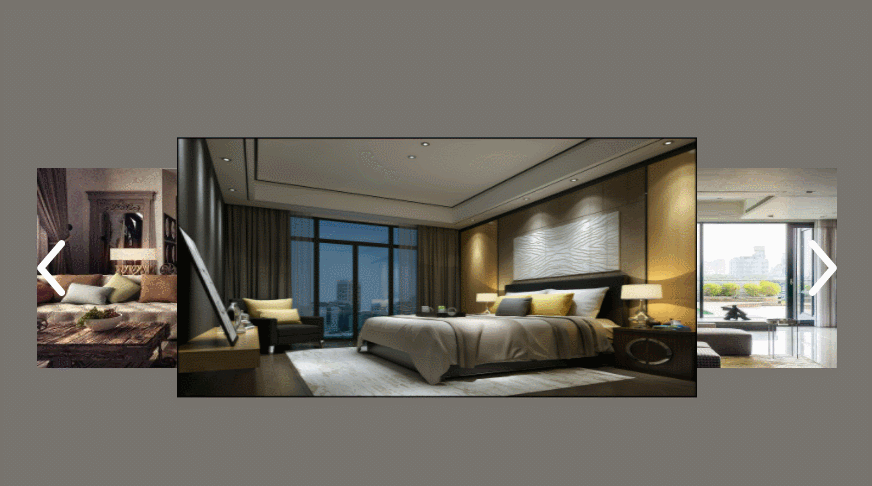
Effect 1 :

Will automatically rotate , When the mouse enters the rotation chart area, the rotation will be stopped , Click the left and right arrows to move forward 、 Switch pictures backwards
Effect two :

This effect is simpler than the first effect , Just delete some code and modify some styles .
Realization principle
The rotation chart is placed on the whole ul Inside ,li Store in img picture ( Pictures on the carousel )
<ul>
     <li>
        <img>
     </li>
</ul>
to li Element for absolute positioning , And give everyone li One z-index value ( Stack values , It can be understood as z Axis , The greater the numerical , This element will be superimposed on the element with small value , Such as the picture 1 Of z-index Larger than picture 2 Of , picture 1 Will show , picture 2 Will be in the picture 1 Not shown below , We can use this to rotate pictures ).
And then we put li Put the elements in one arr Array , And start giving each li Set up z-index, stay arr Array , Further back ( The larger the subscript ) Of li, its z-index The bigger it is , And then we're going to rotate , hold arr The last in the array li Switch to the front of the array , And then the other elements come forward , Come on , Every li Will have the opportunity to arr The tail of the array , namely z-index The biggest place , So the pictures will rotate .
Code section
1. Set the overall style first .
<style>
        body {
            background-color: rgb(119, 115, 110);
        }

        ul {
            height: 200px;
            width: 800px;
            padding: 0;
            position: absolute;
            /*  Horizontal center  */
            left: 50%;
            margin-left: -400px;
            /*  Vertical center  */
            top: 50%;
            margin-top: -100px;
            list-style: none;
        }

        /*  Move into the rotation chart area and change the mouse shape to ‘ hand ’ */
        ul:hover {
            cursor: pointer;
        }

        li {
            position: absolute;
            left: 0;
            /*  Transition properties , Make the rotation chart switching more natural  */
            transition: 0.4s;
        }
    </style>
2. And then only in body There is only one written in ul,li and img All directly in js Create a loop in
<body>
    <ul id="banner"></ul>
</body>
3.JS Code section , obtain ul Then loop to create li and img
//1. obtain ul
var cur_ul = document.getElementById('banner')
// 2. Create an array instance
var arr = new Array();

//  use js To create li、img Elements , As many pictures as you want to rotate, you can cycle them as many times
for (i = 1; i <= 5; i++) {
    //  establish li Elements
    var cur_li = document.createElement('li')
    //  establish img Elements
    var cur_img = document.createElement('img')
    //  to img Element settings src、width、height attribute
    //  here src Is the path of the rotation chart
    //  stay img The pictures under the folder are named 1.jpg、2.jpg、3.jpg.... It can be written like this
    cur_img.src = 'img/' + i + '.jpg';
    cur_img.style.width = '400px';
    cur_img.style.height = '200px';
    //  hold img Element is inserted into the created li Inside
    cur_li.appendChild(cur_img);
    //  Then I'm putting li Insert into ul Inside
    cur_ul.appendChild(cur_li);
    //  And then to ul Element setting event , Move the mouse to stop the rotation
    cur_ul.onmouseenter = function () {
        clearInterval(timer)
    }
    //  Mouse removal ul Continue to rotate pictures
    cur_ul.onmouseleave = function () {
        timer = setInterval(get_next, 3000)
    }
    //  When you finish creating a li(li There are already img Elements ) Just put li Add to arr In the array
    // arr What's in there li  Equivalent to an object , In other places arr Inside li out , Still point to the original one , It's not a new li
    //  Equivalent to a shallow copy of an object , The pointer points to the problem
    arr.push(cur_li)
}
arr What's in there li It is equivalent to storing an object , All we have is this li Reference address of , Put... In other places arr Inside li out , Still point to the original one li, The revision is also the original one li, It's not a new li.
4.JS Code section , Set the position of the picture in the rotation chart , Because the rotation shows three pictures , The first effect , If you want to achieve the second effect , This code may not be written , Then set it up ul The width of can achieve effect 2
//  Because the rotation picture is enlarged in the middle , The left and right pictures are normal , So do the following
//  If you only need that kind of picture by picture rotation , That is, there is no rotation map on the left and right sides , You can remove the following code
//  We need three pictures to show ,  Left   in   Right
var len = arr.length - 1;
//  This is to take the picture on the left and adjust the position
arr[len - 2].style.left = '0px';
//  This is to take the middle picture and adjust the position
arr[len - 1].style.left = '200px';
//  This is to take the picture on the right and adjust the position
arr[len].style.left = '400px';
//  Then the middle picture calls scale Make it bigger
arr[len - 1].style.transform = 'scale(1.3)'
//  The middle picture also gives it a large stack value , Make the middle picture above the left and right pictures
arr[len - 1].style.zIndex = 100;
5、JS Code section , Encapsulate the carousel graph function , We use an intermittent timer setInterval To rotate pictures ( The code in it will be executed every corresponding time )
//  Then start the rotation , The principle is to change arr Inside li Position of elements , More backward li Elements z-index The bigger it is
// z-index The bigger it is , It will be superimposed on others li Above the elements , So change arr Inside li The position can realize the rotation
function get_next() {
    var give_up = arr[arr.length - 1];// obtain arr The last of the numbers li Elements
    arr.pop();// Delete the last li Elements
    arr.unshift(give_up);// Finally, insert the last element into arr Front of array
    //  Then give it back to arr In the array li Element settings z-index and scale
    for (var i = 0; i < arr.length; i++) {
        arr[i].style.zIndex = i;
        arr[i].style.transform = 'scale(1)'
    }
    //  This step is to show arr The last three pictures of , As in the previous step
    arr[len - 2].style.left = '0px';
    arr[len - 1].style.left = '200px';
    arr[len].style.left = '400px';
    arr[len - 1].style.transform = 'scale(1.3)'
    arr[len - 1].style.zIndex = 100;
}
//  Declare a timer , Then put the rotation graph function into the interval function ,3 Once every second
var timer = setInterval(get_next, 3000)
6.JS Code section , The next step is to create the left and right arrows
//  use js Create left arrow
var pre_img = document.createElement('img')
pre_img.src = 'img/preImg.png';// Left arrow picture
pre_img.style.position = 'absolute';
pre_img.style.top = 0;
pre_img.style.bottom = 0;
pre_img.style.left = 0;
pre_img.style.margin = 'auto';
pre_img.style.zIndex = 100;
cur_ul.appendChild(pre_img);

//  use js Create right arrow
var next_img = document.createElement('img')
next_img.src = 'img/nexImg.png';// Picture of the right arrow
next_img.style.position = 'absolute';
next_img.style.top = 0;
next_img.style.bottom = 0;
next_img.style.right = 0;
next_img.style.margin = 'auto';
next_img.style.zIndex = 100;
cur_ul.appendChild(next_img);
7. Then bind the click event to the arrow
//  Click the bind event to the left arrow
pre_img.onclick = function () {
    get_pre();
}
//  The right arrow is used to rotate the picture forward , And what we wrote get_next() Method to achieve the same function , Direct reference
next_img.onclick = function () {
    get_next();
}

//  Binding event of the left arrow   and get_next() The same way of thinking , Just change it .
//  Take out first arr Array first li, I'm putting this li Just put it at the end
function get_pre() {
    var give_up = arr[0];
    arr.shift();// Take out the last picture
    arr.push(give_up);// Put the last picture on the first one
    for (var i = 0; i < arr.length; i++) {
        arr[i].style.zIndex = i;
        arr[i].style.transform = 'scale(1)'
    }
    arr[len - 2].style.left = '0px';
    arr[len - 1].style.left = '200px';
    arr[len].style.left = '400px';
    arr[len - 1].style.transform = 'scale(1.3)'
    arr[len - 1].style.zIndex = 100;
}
The overall code
If you want to copy directly , Note to change the path of the image , Otherwise, the name of your rotation chart would be 1.jpg、2.jpg、3.jpg… Just go
<!DOCTYPE html>
<html lang="en">

<head>
    <meta charset="UTF-8">
    <meta http-equiv="X-UA-Compatible" content="IE=edge">
    <meta name="viewport" content="width=device-width, initial-scale=1.0">
    <title>Document</title>
    <style>
        body {
            background-color: rgb(119, 115, 110);
        }

        ul {
            height: 200px;
            width: 800px;
            padding: 0;
            position: absolute;
            /*  Horizontal center  */
            left: 50%;
            margin-left: -400px;
            /*  Vertical center  */
            top: 50%;
            margin-top: -100px;
            list-style: none;
        }

        /*  Move into the rotation chart area and change the mouse shape to ‘ hand ’ */
        ul:hover {
            cursor: pointer;
        }

        li {
            position: absolute;
            left: 0;
            /*  Transition properties , Make the rotation chart switching more natural  */
            transition: 0.4s;
        }
    </style>
</head>

<body>
    <ul id="banner"></ul>
    <script>
        //1. obtain ul
        var cur_ul = document.getElementById('banner')
        // 2. Create an array instance
        var arr = new Array();

        //  use js To create li、img Elements , As many pictures as you want to rotate, you can cycle them as many times
        for (i = 1; i <= 5; i++) {
            //  establish li Elements
            var cur_li = document.createElement('li')
            //  establish img Elements
            var cur_img = document.createElement('img')
            //  to img Element settings src、width、height attribute
            //  here src Is the path of the rotation chart
            //  stay img The pictures under the folder are named 1.jpg、2.jpg、3.jpg.... It can be written like this
            cur_img.src = 'img/' + i + '.jpg';
            cur_img.style.width = '400px';
            cur_img.style.height = '200px';
            //  hold img Element is inserted into the created li Inside
            cur_li.appendChild(cur_img);
            //  Then I'm putting li Insert into ul Inside
            cur_ul.appendChild(cur_li);
            //  And then to ul Element setting event , Move the mouse to stop the rotation
            cur_ul.onmouseenter = function () {
                clearInterval(timer)
            }
            //  Mouse removal ul Continue to rotate pictures
            cur_ul.onmouseleave = function () {
                timer = setInterval(get_next, 3000)
            }
            //  When you finish creating a li(li There are already img Elements ) Just put li Add to arr In the array
            // arr What's in there li  Equivalent to an object , In other places arr Inside li out , Still point to the original one , It's not a new li
            //  Equivalent to a shallow copy of an object , The pointer points to the problem
            arr.push(cur_li)
        }

        //  Because the rotation picture is enlarged in the middle , The left and right pictures are normal , So do the following
        //  If you only need that kind of picture by picture rotation , That is, there is no rotation map on the left and right sides , You can remove the following code
        //  We need three pictures to show ,  Left   in   Right
        var len = arr.length - 1;
        //  This is to take the picture on the left and adjust the position
        arr[len - 2].style.left = '0px';
        //  This is to take the middle picture and adjust the position
        arr[len - 1].style.left = '200px';
        //  This is to take the picture on the right and adjust the position
        arr[len].style.left = '400px';
        //  Then the middle picture calls scale Make it bigger
        arr[len - 1].style.transform = 'scale(1.3)'
        //  The middle picture also gives it a large stack value , Make the middle picture above the left and right pictures
        arr[len - 1].style.zIndex = 100;

        //  Encapsulate the carousel graph function
        //  Then start the rotation , The principle is to change arr Inside li Position of elements , More backward li Elements z-index The bigger it is
        // z-index The bigger it is , It will be superimposed on others li Above the elements , So change arr Inside li The position can realize the rotation
        function get_next() {
            var give_up = arr[arr.length - 1];// obtain arr The last of the numbers li Elements
            arr.pop();// Delete the last li Elements
            arr.unshift(give_up);// Finally, insert the last element into arr Front of array
            //  Then give it back to arr In the array li Element settings z-index and scale
            for (var i = 0; i < arr.length; i++) {
                arr[i].style.zIndex = i;
                arr[i].style.transform = 'scale(1)'
            }
            //  This step is to show arr The last three pictures of , As in the previous step
            arr[len - 2].style.left = '0px';
            arr[len - 1].style.left = '200px';
            arr[len].style.left = '400px';
            arr[len - 1].style.transform = 'scale(1.3)'
            arr[len - 1].style.zIndex = 100;
        }
        //  Declare a timer , Then put the rotation graph function into the interval function ,3 Once every second
        var timer = setInterval(get_next, 3000)


        //  use js Create left arrow
        var pre_img = document.createElement('img')
        pre_img.src = 'img/preImg.png';// Left arrow picture
        pre_img.style.position = 'absolute';
        pre_img.style.top = 0;
        pre_img.style.bottom = 0;
        pre_img.style.left = 0;
        pre_img.style.margin = 'auto';
        pre_img.style.zIndex = 100;
        cur_ul.appendChild(pre_img);

        //  use js Create right arrow
        var next_img = document.createElement('img')
        next_img.src = 'img/nexImg.png';// Picture of the right arrow
        next_img.style.position = 'absolute';
        next_img.style.top = 0;
        next_img.style.bottom = 0;
        next_img.style.right = 0;
        next_img.style.margin = 'auto';
        next_img.style.zIndex = 100;
        cur_ul.appendChild(next_img);

        //  Click the bind event to the left arrow
        pre_img.onclick = function () {
            get_pre();
        }
        //  The right arrow is used to rotate the picture forward , And what we wrote get_next() Method to achieve the same function , Direct reference
        next_img.onclick = function () {
            get_next();
        }

        //  Binding event of the left arrow   and get_next() The same way of thinking , Just change it .
        //  Take out first arr Array first li, I'm putting this li Just put it at the end
        function get_pre() {
            var give_up = arr[0];
            arr.shift();// Take out the last picture
            arr.push(give_up);// Put the last picture on the first one
            for (var i = 0; i < arr.length; i++) {
                arr[i].style.zIndex = i;
                arr[i].style.transform = 'scale(1)'
            }
            arr[len - 2].style.left = '0px';
            arr[len - 1].style.left = '200px';
            arr[len].style.left = '400px';
            arr[len - 1].style.transform = 'scale(1.3)'
            arr[len - 1].style.zIndex = 100;
        }
    </script>
</body>

</html>
边栏推荐
- Bc116 xiaolele changed to digital
- //1.13 auto increment and auto decrement operators (+ +, --)
- Binary String
- Muduo simple usage
- Nuxt - auto generate dynamic route bug
- Download and compile ROS source code
- HDU - 7072 double ended queue + opposite top
- Browser independent way to detect when image has been loaded
- C language games: sanziqi (simple version) implementation explanation
- 1. introduction to MySQL database connection pool function technology points
猜你喜欢

Rebirth -- millimeter wave radar and some things I have to say

Do you know the memory components of MySQL InnoDB?

Day367: valid complete square

Use elk to save syslog, NetFlow logs and audit network interface traffic

How are pub and sub connected in ros1?

6. const usage, combination of first and second level pointers

Browser independent way to detect when image has been loaded

Express framework installation and start service

Foundation Consolidation - Flex width is content width

SQL programming task05 job -sql advanced processing
随机推荐
5. explain function overloading
C language foundation ----- write a function to find the larger value of two unequal integers
Browser independent way to detect when image has been loaded
Pat class A - 1012 the best rank (PIT)
Openvino CPU acceleration survey
C. Unstable String
[Luogu] P2887 Sunscreen G
Detailed explanation of makefile usage
Pat class a 1016 phone bills (time difference)
Unit of RMB in words
Constexpr keyword
Analysis of current mainstream video coding technology | community essay solicitation
JS to paste pictures into web pages
【CodeWars】 Pete, the baker
[CodeWars] Convert Decimal Degrees to Degrees, Minutes, Seconds
Autumn move script a
[ZOJ] P3228 Searching the String
SQL programming task06 assignment - Autumn recruit secret script ABC
1. Mx6u bare metal program (4) - GPIO module
Why can't I access object properties in a for in loop in an object array