当前位置:网站首页>PXE efficient batch network installation
PXE efficient batch network installation
2022-07-24 17:50:00 【Now a lemon】
List of articles
One 、PXE Principles and concepts
1.PXE Overview
PXE( Pre boot execution environment ) By Inter Network guidance technology developed by the company , Working in Client/Server Pattern , Allows clients to download boot images from remote servers over the network , And load the installation file or the operating system
pxe Strictly speaking, it is not an installation method , It's a way of guiding
Conduct PXE The necessary condition for installation is that the computer to be installed contains a PXE Supported network cards (NIC), That is, there must be PXE Client.PXE The protocol enables the computer to start over the network .
The agreement is divided into client and server End
PXE Client On the network card ROM in , When the computer boots ,BIOS hold PXE Client Call in memory to execute , from PXE Client Download the files placed at the remote end to run locally through the network .
function PXE The protocol needs to be set DHCP The server and TFTP The server
DHCP The server is used for PXE Client( The host on which the system will be installed ) Allocate one IP Address , Because it's for PXE Client Distribute IP Address , So configuration DHCP The server needs to increase the response PXE Set up . Besides , stay PXE Client Of ROM in , It already exists TFTP Client.PXE Client adopt TFTP The agreement reached TFTP Server Download the required files
2.PXE The advantages of
scale : Set up multiple servers at the same time
automation : Install the system 、 Configure various services
Remote implementation : No installation media such as CD is required
3. build PXE The premise of
1. The client's network card supports PXE agreement ( Integrate BOOTROM chip ), And the motherboard supports network boot
2. There's one on the Internet DHCP Server to automatically assign addresses to clients 、 Specify the boot file location
3. Server pass TFTP( Simple file transfer protocol ) Download the boot image file
among , The first condition is actually the hardware requirements , At present, most servers and most PC Can provide this support , Just in BIOS Setting allows you to set from Network or LAN Start it up
Two 、KickSrart summary
KickStart It's a kind of unattended installation
KickStart The working principle of is to record various parameters written by manual intervention in the typical installation process , And generate a file named ks.cfg The file of ; During the subsequent installation ( It's not just about generating KickStart The machine where the files are installed ) When a parameter is required to be filled , Installation will first find KickStart Generated files , When you find the right parameters , Just use the parameters found , When no suitable parameter is found , It requires manual intervention by the installer .
such , If KickStart The file covers all the parameters that need to be filled in during installation , The installer can simply tell the installer where to get ks.cfg file , Then go and do your own thing . After installation , The installation program will follow ks.cfg To restart the system , And end the installation .
3、 ... and 、PXE Service construction process
PXE The working process of server and client
1.PXE The client sends DHCP request , towards DHCP Server application IP Address .
2.DHCP Server response PXE Client requests , Automatically from IP Allocate an address in the address pool IP Address to PXE The client , And tell the client :TFTP Server's IP Address and PXE Bootloader file pxelinux.0, Default in TFTP share directory /var/lib/tftpboot/ Next
3.PXE The client is going to TFTP The server initiates the acquisition pxelinux.0 Request for bootstrap file
4.TFTP Server response PXE Client requests , Share it pxelinux.0 File transfer to PXE The client
5.PXE The client starts to the main interface of system installation through the network
6.PXE The client initiates the acquisition to the file sharing server centos or windows Request for system installation files
7.vsftp File sharing service response PXE Client requests , Transfer the shared system installation files to PXE The client
8.PXE The client enters the installation prompt wizard interface , Users need to manually complete the operation of system installation
Four 、 To configure PXE service
Installation package required
vsftpd   // Used to place the installation image , adopt ftp Access the image installation
dhcp.x86_64 12:4.2.5-7pd-3.0.2-27.el7.x86_64.r9.el7.centos  // Used to assign... To clients ip
syslinux-4.05-15.el7.x86_64.rpm  // To provide with pxe The boot program of
tftp-server.x86_64 0:5.2-22.el7.rpm   // Used to download boot image files
xinetd.x86_64 2:2.3.15-14.el7    // For hosting tftp
system-config-kickstart.noarch 0:2.9.7-1.el7.rpm   // For unattended installation
1. Add a new network card
1. Add a network card , Network card type selection VMnet1( Host only mode )
2. View the virtual network editor 
3. Copy configuration information to ifcfg-ens37
4. modify ifcfg-ens37 Configuration of 

2. To configure DHCP service
1. install DHCP service 
2. Copy template 
3. edit DHCP The configuration file 

4. Turn on DHCP service 
3. To configure TFTP service
TFTP( Simple file transfer protocol ), It's based on UDP Protocol a protocol implemented for simple file transfer between client and server , Suitable for small file transfer applications .
TFTP The service is default by xinetd Service Management , Use UDP port 69
xinetd Is a new generation of network daemons Services , It's also called super server , It's often used to manage a variety of lightweight Internet service .
TFTP and FTP The difference is that he is not interactive , And no authentication
1. install tftp-server and xinetd service 
2. Changing configuration files ,disable Set to no( Turn on TFTP service )
3. Mount the image , Copy the initialization image file and kernel file to TFTP The root directory 
4. start-up TFTP Service and xinetd
4. Get ready PXE Boot image file pxelinux.0
pxelinux.0 It's a binary , The main function is equivalent to the guidance of a system installation step , Guide the client how to install the system
1. lookup pxelinux.0 Which package is the file installed by 
2. install syslinux service 
3. lookup pxelinux.0 Path to file 
4. Copy pxelinux.0 File to tftp The root directory 
5. Configure the Startup menu file
The Startup menu is used to guide the boot process of the client , Including how to call the kernel , How to load drivers . The default Startup menu file is default, Should be placed in tftp Root directory pxelinux.cfg subdirectory , The typical Startup menu configuration can be established automatically or manually by referring to the following operations .
As for why /var/lib/tftpboot/pxelinux.cfg/default file , Because it was pxelinux.0 This document determines the good
1.pxelinux.cfg There is no , Manual creation required , It is a directory, not a file , Although it is because of .cfg ending
mkdir /var/lib/tftpboot/pxelinux.cfg
2. Manual configuration defaule Menu file 
6. install FTP service , Get ready centos7 Install source
1. install vsftpd service 
2. establish centos7 Catalog , Copy the image file to centos7 Directory 
3. start-up vsftpd service 
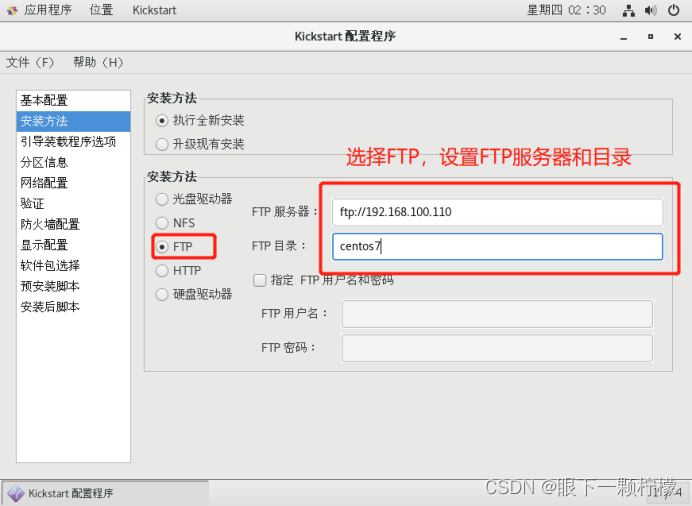
7. Realization Kickstart Unattended installation
1. install system-config-kickstart Tools 
2. Virtual machine opens the system tools in the application , Click on kickstart


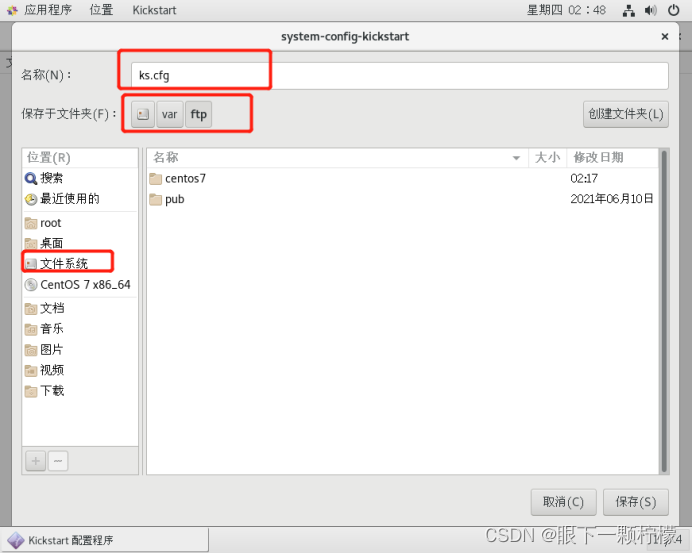
3. After saving , Can be in /var/ftp Find below ks.cfg file , Then look at the contents of the file 
4. take anaconda-ks.cfg Copy a paragraph from the file to ks.cfg Last 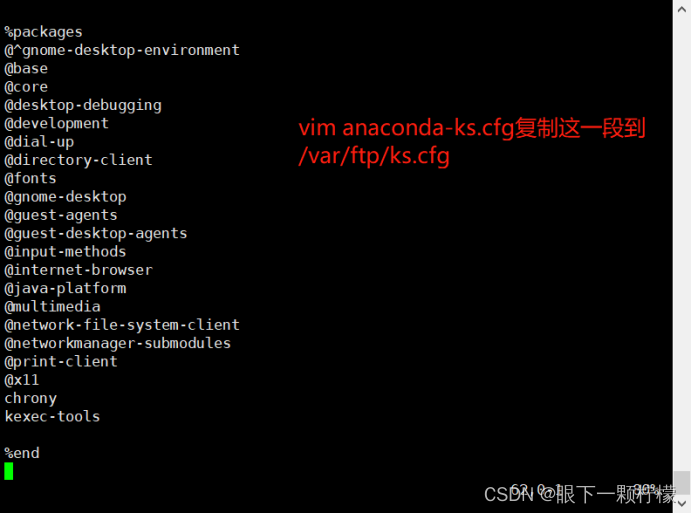
5. add to ks Boot parameters to boot menu file default
8. verification
1. Create a virtual machine
Be careful : Memory to be given 2G above , Network card type selection VMnet1, Don't give the image file
2. Then restart the virtual machine
Virtual opportunity automatically completes the installation 
边栏推荐
- 使用matplotlib模拟线性回归
- JS & TS learning summary
- [leetcode] 30. Concatenate substrings of all words
- Are the top ten securities companies safe and risky to open accounts?
- 生信常用分析图形绘制02 -- 解锁火山图真谛!
- 0630~职业素养课
- C # print reports using fastreport.net
- [wechat official account H5] authorization
- 单细胞代码解析-妇科癌症单细胞转录组及染色质可及性分析1
- Huawei machine test - topic core test point
猜你喜欢

Tensorflow introductory tutorial (40) -- acunet

0630~职业素养课

Today, I met a 38K from Tencent, which let me see the ceiling of the foundation

Scept: consistent and strategy based trajectory prediction for planned scenarios
去不图床容量兑换

ROC and AUC details of the recommended system

C # print reports using fastreport.net

Getaverse,走向Web3的远方桥梁

Opencv picture rotation

生信常用分析图形绘制02 -- 解锁火山图真谛!
随机推荐
0616项目二结束~~总总结
0611~ self study class
还在用命令行看日志?快用Kibana吧,可视化日志分析YYDS!
分家后印象笔记过日子依然不好过,骚操作却不少
C language custom type explanation - structure
Preliminary understanding of redis
Make good use of these seven tips in code review, and it is easy to establish your opposition alliance
0613~自习
After separation, the impression notes are still difficult to live, but there are many coquettish operations
Quickly complete the unit test junit4 setting of intelij idea
awk从入门到入土(19)awk扩展插件,让awk如虎添翼
《STL源码剖析》应该怎样读?
C language custom type explanation - Consortium
2.3.1 view drawing process
Gan Development Series II (pggan, Singan)
Introduction and use of Pinia
0614~放假自习
Link editing tips of solo blog posts illegal links
Getaverse,走向Web3的远方桥梁
DHCP relay of HCNP Routing & Switching