当前位置:网站首页>Extracting public fragments from thymeleaf
Extracting public fragments from thymeleaf
2022-06-26 09:55:00 【Ma cute's Ma cute】
1、 First, there is the following project directory

2、 Establish extraction public common.html pagefile
take dashbord.html and emps Under the list.html Duplicate navigation bar and sidebar codes are extracted to common Under the common.html In file
Use th:fragment="topnav" Name the public fragment ( The navigation bar )
th:fragment=“side”( Sidebar )
3、 from common.html Find the required fragment in
th:include and th:replace The difference between
th:include: Introduction of sub modules children, The of the parent module remains tag.  Load the contents of the template :  Read the contents of the load node ( No node name ), Replace div Content
th:replace: Introduce all of the sub modules , Do not keep the parent module tag.  Replace the current label with the label in the template , The loaded node will replace the whole loaded node div
stay dashbord.html Use in <div th:include="~{commonPage/common::topnav}"></div> Introduce the head navigation bar ;
Use <div th:include="~{commonPage/common::side}"></div> Introduce sidebar 
Also in emps Under the list.html Do the same in ! The best and dashbord.html The same method is used to introduce the head navigation bar and the side bar <div th:include="~{commonPage/common::topnav}"></div><div th:include="~{commonPage/common::side}"></div>
Code reuse can be achieved , Be similar to vue Components in !
But they all use <div th:include="~{commonPage/common::topnav}"></div> and <div th:include="~{commonPage/common::side}"></div> After introducing the head navigation bar and side bar , Both the home page and the employee management page will be deformed 
But if all are dashbord.html and list.html The following code is used in
<div th:replace="~{commonPage/common::topnav}"></div>
<div th:replace="~{commonPage/common::side}"></div>
It will not deform the home page of login access and the employee management page 
Then you can do it on the extracted public page dashbord.html and list.html The same operation in !
In fact, it is also possible to repeat in multiple pages style、js Extract the code into the public page
take list.html and dashboard.html The public in css Code extraction to public pages common.html in , And for the public css Name it th:fragment="head"
<head th:fragment="head">
    <meta http-equiv="Content-Type" content="text/html; charset=UTF-8">
    <meta name="viewport" content="width=device-width, initial-scale=1, shrink-to-fit=no">
    <meta name="description" content="">
    <meta name="author" content="">

    <title>Dashboard Template for Bootstrap</title>
    <!-- Bootstrap core CSS -->
    <link th:href="@{/css/bootstrap.min.css}" rel="stylesheet">

    <!-- Custom styles for this template -->
    <link th:href="@{/css/dashboard.css}" rel="stylesheet">
    <style type="text/css"> /* Chart.js */ @-webkit-keyframes chartjs-render-animation {
       from {
       opacity: 0.99 } to {
       opacity: 1 } } @keyframes chartjs-render-animation {
       from {
       opacity: 0.99 } to {
       opacity: 1 } } .chartjs-render-monitor {
       -webkit-animation: chartjs-render-animation 0.001s; animation: chartjs-render-animation 0.001s; } </style>
</head>
And then they were in dashboard.html and list.html Introduction in css fragment 
Start project , Login access is normal !
take list.html and dashboard.html The public in js Code extraction to public pages common.html in , And for the public css Name it th:fragment="stpt"
<div th:fragment="srpt">
    <script type="text/javascript" th:src="@{/js/jquery-3.2.1.slim.min.js}" ></script>
    <script type="text/javascript" th:src="@{/js/popper.min.js}" ></script>
    <script type="text/javascript" th:src="@{/js/bootstrap.min.js}" ></script>

    <!-- Icons -->
    <script type="text/javascript" th:src="@{/js/feather.min.js}" ></script>
    <script> feather.replace() </script>

    <!-- Graphs -->
    <script type="text/javascript" th:src="@{/js/Chart.min.js}" ></script>
    <script> var ctx = document.getElementById("myChart"); var myChart = new Chart(ctx, {
       type: 'line', data: {
       labels: ["Sunday", "Monday", "Tuesday", "Wednesday", "Thursday", "Friday", "Saturday"], datasets: [{
       data: [15339, 21345, 18483, 24003, 23489, 24092, 12034], lineTension: 0, backgroundColor: 'transparent', borderColor: '#007bff', borderWidth: 4, pointBackgroundColor: '#007bff' }] }, options: {
       scales: {
       yAxes: [{
       ticks: {
       beginAtZero: false } }] }, legend: {
       display: false, } } }); </script>
</div>
And then they were in dashboard.html and list.html Introduction in js fragment 
Start project , Login access is normal !
This concludes all operations on extracting public pages ! The extracted public pages are as follows 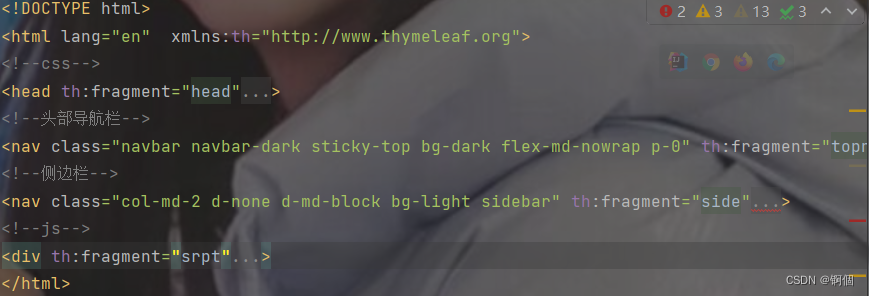
Here is a record of my own experience
When a large number of pages are involved in the project, jump , We can use addViewControllers Method to realize no business logic jump , So as to reduce the writing of controller code .
addViewControllers Method to map a request directly to a view , There is no need to write a controller to implement , Thus, the page Jump is simplified
@Configuration
public class WebConfig implements WebMvcConfigurer {

    @Override
    public void addViewControllers(ViewControllerRegistry registry) {

        registry.addViewController("/").setViewName("login");
        registry.addViewController("/login.html").setViewName("login");
        registry.addViewController("/main.html").setViewName("dashboard");
        registry.addViewController("/listEmp").setViewName("emps/list");
    }
    @Bean   // Register in container
    public LocaleResolver localeResolver(){

        return  new MyLocalResolver();
    }

    @Override
    public void addInterceptors(InterceptorRegistry registry) {

        registry.addInterceptor(new LoginHandlerInterceptor())
                .addPathPatterns("/**")
                .excludePathPatterns("/","/login.html","/index","/css/**","/js/**","/img/**");
    }

}
registry.addViewController("/").setViewName("login"); Used to automatically jump to the login page when logging in the background .setViewName(“login”) The parameter in is the name of the view to be returned , Equivalent to... In the controller return View name for ; and addViewController(“/”) Is the request path !registry.addViewController("/login.html").setViewName("login"); This is used to implement no business logic jump when customizing internationalization operations ,th:href="@{/login.html(l='en_US')}" Medium login.html yes registry.addViewController("/login.html") Medium login.html, The pages you need to visit are setViewName("login"); in templates In the catalog login The front code of the page is as follows
<a class="btn btn-sm" th:href="@{/login.html(l='zh_CN')}"> chinese </a>  <!--thymeleaf No need to ? This method takes the path variable @{/login.html?l='zh_CN'}-->
<a class="btn btn-sm" th:href="@{/login.html(l='en_US')}">English</a>
Jump can be realized without writing to the background controller !registry.addViewController("/main.html").setViewName("dashboard"); It's landing login The home page you need to visit after landing ./main.html It's the request path ,dashboard yes templates In the catalog html file !
@Controller
public class Admin {

    @PostMapping("/index")
    public String index(@RequestParam("username") String username, @RequestParam("password") String password, Model model, HttpSession session){

        if(!StringUtils.isEmpty(username)&& "mmmm".equals(username) &&!StringUtils.isEmpty(password)&& "123".equals(password)){

            session.setAttribute("loginUser",username);
            return "redirect:/main.html";  // Use redirect:/main.html To redirect to a virtual view , If you jump to template Under the dashboard The account and password will be displayed in the search box
        }
        else{

            model.addAttribute("msg"," Wrong account or password ! Please login again !");
            return "login";
        }
    }
}
Note that you want to use addViewControllers Method to realize no business logic jump , Redirection must be used , Such as
return "redirect:/main.html";
But not directly return “main.html”; As in the controller above return "login", It is the return of templates The name under the directory is login Of html file ! If it is used directly addViewControllers Methods return "login.html" perhaps return "/" It's all wrong , When you visit a page, you won't be able to access , Unable to resolve !
Of course, it can be in html Use directly in the page addViewControllers Method to realize no business logic jump , For example, write the following code in the extracted public page
<a class="nav-link active" th:href="@{/main.html}">
In this way, it can be directly implemented in dashbord.html and list.html Click the link in , Jump to addViewControllers Access to dashbord.html home page !
because thymeleaf The default view parser , Mapping to template Under the table of contents , If you want to access the customized directory of the page , It needs to be in application.yaml Configuration of the
Suppose you want to access mm In the catalog hello.html spring.thymeleaf.prefix=classpath:/mm/ spring.thymeleaf.suffix=.html
There are also the following configurations
server:
port: 8888
servlet:
context-path: /ml # Configure virtual access path
spring:
thymeleaf:
cache: false # Turn off the cache of the template engine
messages:
basename: i18n.login # The real path to the internationalization profile
4、 Click on the sidebar to generate the corresponding highlight
stay dashboard.html introduce common.html Pass the parameter in the clip of the middle sidebar to judge whether the highlight is generated , as follows
<!-- Pass parameters to the component , amount to ? The ginseng , and thymeleaf Medium used () Pass reference instead of ?-->
<div th:replace="~{commonPage/common::side(active='d')}"></div>
And then in common.html Write the following code in the public sidebar
<li class="nav-item">
    <a th:class="${active=='d'?'nav-link active':'nav-link'}" th:href="@{/main.html}">
    <svg xmlns="http://www.w3.org/2000/svg" width="24" height="24" viewBox="0 0 24 24" fill="none" stroke="currentColor" stroke-width="2" stroke-linecap="round" stroke-linejoin="round" class="feather feather-home">
    <path d="M3 9l9-7 9 7v11a2 2 0 0 1-2 2H5a2 2 0 0 1-2-2z"></path>
    <polyline points="9 22 9 12 15 12 15 22"></polyline>
    </svg>
     home page <span class="sr-only">(current)</span>
    </a>
</li>
among <a th:class=“${active==‘d’?‘nav-link active’:‘nav-link’}” Used to judge when clicking the home page in other pages dashboard.html When , The public page will determine whether the parameter is transferred to d, if d In the sidebar “ home page ” Two words light up , And jump to the home page dashboard.html! If not, it will also jump to the home page dashboard.html, But it will not highlight the corresponding clicked position !
In the same way list.html introduce common.html Pass the parameter in the clip of the middle sidebar to judge whether the highlight is generated
<div th:replace="~{commonPage/common::side(active='list')}"></div>
 <li class="nav-item">
                <a th:class="${active=='list'?'nav-link active':'nav-link'}" th:href="@{/all}">
                    <svg xmlns="http://www.w3.org/2000/svg" width="24" height="24" viewBox="0 0 24 24" fill="none" stroke="currentColor" stroke-width="2" stroke-linecap="round" stroke-linejoin="round" class="feather feather-users">
                        <path d="M17 21v-2a4 4 0 0 0-4-4H5a4 4 0 0 0-4 4v2"></path>
                        <circle cx="9" cy="7" r="4"></circle>
                        <path d="M23 21v-2a4 4 0 0 0-3-3.87"></path>
                        <path d="M16 3.13a4 4 0 0 1 0 7.75"></path>
                    </svg>
                     Employee management
                </a>
 </li>
5、 Display the data
(1) The back-end code is as follows
@Controller
public class EmpController {

    @Autowired
    EmployeeDao employeeDao;
    @RequestMapping("/all")
    public String empList(Model model){

        Collection<Employee> employeeList = employeeDao.getAllEmployee();
        model.addAttribute("emps",employeeList);
        return "emps/list";
    }
}
(2)themleaf The front-end code in is as follows
<h2> Employee management </h2>
					<h6 style="margin-top: 15px"><a class="btn btn-sm btn-success" th:href="@{/emp}"> Add employees </a></h6>
					<div class="table-responsive" style="margin-top: 20px">
						<table class="table table-bordered">
							<thead>
								<tr>
									<th>id</th>
									<th>lastName</th>
									<th>email</th>
									<th>gender</th>
									<th>department</th>
									<th>birth</th>
									<th> operation </th>
								</tr>
							</thead>
							<tbody>
								<tr th:each="emp:${emps}">
									<td th:text="${emp.getId()}"></td>
									<td th:text="${emp.getLastName()}"></td>
									<td th:text="${emp.getEmail()}"></td>
									<td th:text="${emp.getGender()==0?' male ':' Woman '}"></td>
									<td th:text="${emp.getDepartment().getDepartmentName()}"></td>
									<td>[[${#dates.format(emp.getDate(), 'yyyy-MM-dd')}]]</td>
									<td>
										<button class="btn btn-sm btn-primary"> edit </button>
										<button class="btn btn-sm btn-danger"> Delete </button>
									</td>
								</tr>
							</tbody>
						</table>
					</div>
(3) Running result display 
The display data here should be in application.yaml The format of date display is configured in advance in , Otherwise, the specific year, month, day, hour, minute and second will be displayed , as follows 
6、 Add data
(1) Above list.html Add... On the employee management page “ Add employees ” Button , Links are as follows
<h6 style="margin-top: 15px"><a class="btn btn-sm btn-success" th:href="@{/emp}"> Add employees </a></h6>
(2)(1) Request the backend to return the page of adding employees , You need to return the Department information in the page , You can select which department the employee belongs to when adding employee information
@GetMapping("/emp")   //restful style , Same request path , But use different request methods , Here is the use of get The way
    public String addPage(Model model) {

        // Find out all the Department Information
        Collection<Department> departments = departmentDao.getAllDepartments();
        model.addAttribute("dps",departments);
        return "emps/add";
    }
(3) Add employee data to the front end add.html On the page form Forms
<form method="post" th:action="@{/emp}">
						<div class="form-group">
							<label for="lN">lastName</label>
							<input type="text" class="form-control" name="lastName" id="lN" placeholder="ml">
						</div>
						<div class="form-group">
							<label for="em">email</label>
							<input type="email" class="form-control" name="email" id="em" placeholder="[email protected]">
						</div>
						<div class="form-group">
							<label>gender</label><br/>
							<div class="form-check form-check-inline">
								<input class="form-check-input" type="radio" name="gender" value="1" checked>
								<label class="form-check-label"> male </label>
							</div>
							<div class="form-check form-check-inline">
								<input class="form-check-input" type="radio" name="gender" value="0">
								<label class="form-check-label"> Woman </label>
							</div>
						</div>
						<div class="form-group">
							<label>department</label>
							<select class="form-control" name="department.id">
								<option th:each="dept:${dps}" th:text="${dept.getDepartmentName()}" th:value="${dept.getId()}"></option>
							</select>
						</div>
						<div class="form-group">
							<label>birth</label>
							<input class="form-control" type="text" name="date" placeholder="1998-12-12">
						</div>
						<button type="submit" class="btn btn-primary"> add to </button>
					</form>
When adding employee details, you also need to add the employee's Department , however name="department.id" It refers to the Department to which the employee belongs... Submitted to the database id, And from the traversal of the Department data to find the Department id You need to use th:value="${dept.getId()}", The display options are th:text="${dept.getDepartmentName()}.
It can be understood here ,th:text="${dept.getDepartmentName()} For people to choose , Each department corresponds to a unique id, So use th:value="${dept.getId()}" The employee belongs to id Find out and use name="department.id" Upload to database !
<div class="form-group">
							<label>department</label>
							<select class="form-control" name="department.id">
								<option th:each="dept:${dps}" th:text="${dept.getDepartmentName()}" th:value="${dept.getId()}"></option>
							</select>
						</div>
(4) Click the Add button to submit data directly , Redirect to on the back end list.html page
@PostMapping("/emp") // Use restful style , Use post How to submit data
    public String addEmp(Employee employee) {

        // Add operation
        employeeDao.insertEmployee(employee);
        return "redirect:/all";
    }
     @RequestMapping("/all")
    public String empList(Model model) {

        Collection<Employee> employeeList = employeeDao.getAllEmployee();
        model.addAttribute("emps", employeeList);
        return "emps/list";
    }
But there is a problem that needs attention , The date format does not match when submitting data , because springboot The default format in is as follows
 * Date format to use, for example 'dd/MM/yyyy'.
		 */
		private String date;

		/** * Time format to use, for example 'HH:mm:ss'. */
So if you want to change to the format we want, you must first application.yaml In the definition of mvc: format: date: dd-MM-yyyy
If it is submitted by passing entities above , And then just Employee Under entity class date Property @DateTimeFormat(pattern = "yyyy-MM-dd") annotation , Problem solvable !
If HttpServletRequest request Mode submission , You need to convert the date in string format uploaded by the front end into a date format acceptable to the back end in the controller , Otherwise, there will be an error that the date format does not match !application.yaml No definition required in mvc: format: date: dd-MM-yyyy
@RequestMapping(value = "/insert", method = RequestMethod.POST)
    public Object insertSinger(HttpServletRequest request) {

        JSONObject jsonObject = new JSONObject();
        String name = request.getParameter("name").trim();
        String sex = request.getParameter("sex").trim();
        String bornDate = request.getParameter("born").trim();
        String picture = request.getParameter("picture").trim();
        String location = request.getParameter("location").trim();
        String introduction = request.getParameter("introduction").trim();
        SimpleDateFormat simpleDateFormat = new SimpleDateFormat("yyyy-MM-dd");
        Date born = new Date();
        try {

            born = simpleDateFormat.parse(bornDate);
        } catch (ParseException e) {

            e.printStackTrace();
        }
        Singer singer = new Singer();
        singer.setName(name);
        singer.setSex(Integer.parseInt(sex));
        singer.setBorn(born);
        singer.setPicture(picture);
        singer.setLocation(location);
        singer.setIntroduction(introduction);
        Boolean flag = singerService.insertSinger(singer);
        if (flag) {

            jsonObject.put(Consts.CODE, 1);
            jsonObject.put(Consts.MSG, " Successfully added singer !");
            return jsonObject;
        }
        jsonObject.put(Consts.CODE, 0);
        jsonObject.put(Consts.MSG, " Failed to add singer ");
        return jsonObject;
    }
(5)、 Running result display 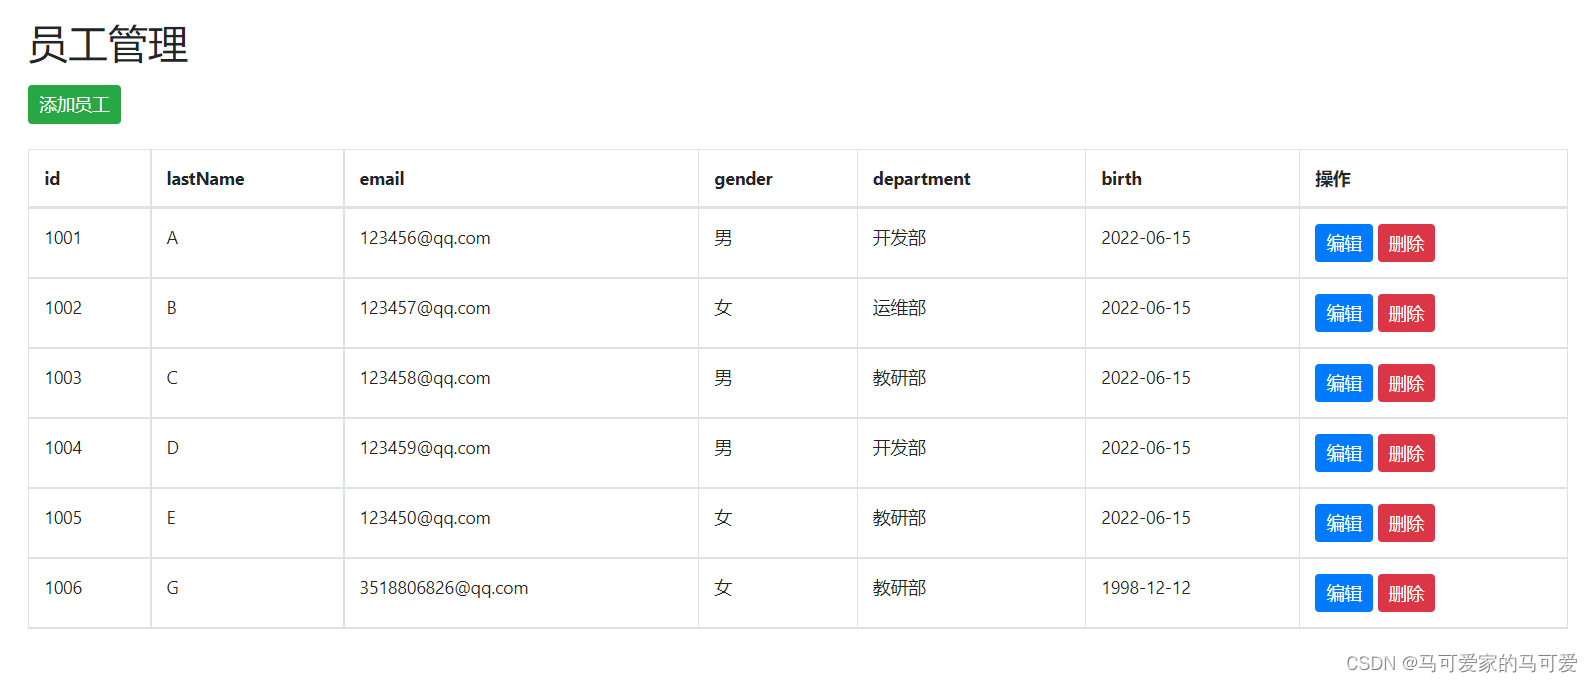
7、 Modify employees
(1) Above list.html Add... On the employee management page “ modify ” or “ edit ” Button , Links are as follows
<a class="btn btn-sm btn-primary" th:href="@{/emp/}+${emp.getId()}"> modify </a>
(2)(1) Request the backend to return to the page of modifying employees , The page needs to echo the client employee information 、 Department information , For the client to modify employees 、 And the employee's department information
@GetMapping("/emp/{empId}")    //restful style , same get The way , But this request ; There are parameters in the path ,restful Use in style {} Instead of the traditional use ?
    public String changePage(@PathVariable("empId") Integer empId,Model model){

        // according to id Query the corresponding employee , And query all departments for easy modification
        Collection<Department> departments = departmentDao.getAllDepartments();
        model.addAttribute("dps", departments);
        Employee employee = employeeDao.getEmployeeById(empId);
        model.addAttribute("employee",employee);
        return "emps/change";
    }
(3) The front end modifies employee data change.html On the page form Forms
<form method="post" th:action="@{/emp}">
						<input type="hidden" name="id" th:value="${employee.getId()}">
						<div class="form-group">
							<label for="lN">lastName</label>
							<input th:value="${employee.getLastName()}" type="text" class="form-control" name="lastName" id="lN" placeholder="ml">
						</div>
						<div class="form-group">
							<label for="em">email</label>
							<input th:value="${employee.getEmail()}" type="email" class="form-control" name="email" id="em" placeholder="[email protected]">
						</div>
						<div class="form-group">
							<label>gender</label><br/>
							<div class="form-check form-check-inline">
								<input th:checked="${employee.getGender()==1}" class="form-check-input" type="radio" name="gender" value="1" checked>
								<label class="form-check-label"> male </label>
							</div>
							<div class="form-check form-check-inline">
								<input th:checked="${employee.getGender()==0}" class="form-check-input" type="radio" name="gender" value="0">
								<label class="form-check-label"> Woman </label>
							</div>
						</div>
						<div class="form-group">
							<label>department</label>
							<select class="form-control" name="department.id">
								<option th:each="dept:${dps}" th:text="${dept.getDepartmentName()}" th:value="${dept.getId()}" th:selected="${employee.getDepartment().getId()==dept.getId()}" ></option>
							</select>
						</div>
						<div class="form-group">
							<label>birth</label>
							<input th:value="${#dates.format(employee.getDate(),'yyyy-MM-dd')}" class="form-control" type="text" name="date" placeholder="1998-12-12">
						</div>
						<button type="submit" class="btn btn-primary"> modify </button>
					</form>
(4) Click the Add button to submit data directly , Redirect to on the back end list.html page
@PutMapping("/emp")  // Use restful Style to update data
    public String changeEmp(Employee employee){

        // Add an updated operation
        employeeDao.insertEmployee(employee);
        return "redirect:/all";
    }
(5) Running result display 
Change the employee name in the fifth row of data in the figure to H, Modification successful !
7、 Delete employee
(1) stay list.html Add... To the page “ Delete employee ” Operation buttons for
<a class="btn btn-sm btn-danger" th:href="@{/deEmp/}+${emp.getId()}"> Delete </a>
(2) The background deletion operation is as follows
 @GetMapping("/deEmp/{empId}")  // Use restful Style to delete data
    public String deleteEmp(@PathVariable("empId") Integer empId){

        // Delete
        employeeDao.deleteById(empId);
        return "redirect:/all";
    }
(3) Results show 
Delete No 1005 The employees' 
Delete successful !
But I have a problem , Is the use of restful When it comes to style , If you use @DeleteMapping ("/deEmp/{empId}") Why can't I delete it , The request method is not supported ! So I used @GetMapping("/deEmp/{empId}") // Use restful Style to delete data Data deleted successfully !
8、404、500 Wrong solution
stay templates Next build a error Folder , It defines various error files , If it happens 404 perhaps 500 Or something like that , Will automatically find error The corresponding items in the folder html file 
9、 Log off

stay common.html Head navigation bar in “ Exit login ” Write the above route in the link of ! And then in Admin Of controller Write logout login logic in , And redirect to the landing page
/** *  Background login  */
// stay templates All the pages under can only pass controller To achieve jump access , But the premise is that templyef Dependence , Otherwise, I still can't visit
@Controller
public class Admin {

    @PostMapping("/index")
    public String index(@RequestParam("username") String username, @RequestParam("password") String password, Model model, HttpSession session){

        if(!StringUtils.isEmpty(username)&& "ml".equals(username) &&!StringUtils.isEmpty(password)&& "123".equals(password)){

            session.setAttribute("loginUser",username);
            return "redirect:/main.html";  // Use redirect:/main.html To redirect to a virtual view , If you jump to template Under the dashboard The account and password will be displayed in the search box
        }
        else{

            model.addAttribute("msg"," Wrong account or password ! Please login again !");
            return "login";
        }
    }
    @PostMapping("/out")
    public String outLogin(HttpSession session){

        session.invalidate(); // Make the login session invalid
        return "redirect:index";
    }
}
success !!!!!!!!!!!!!!!!!!!!!!!!
10、 summary
(1) First of all, for a problem of adding, deleting, checking and modifying, it starts with a search page , The above case is from list.html At the beginning of the employee management page ! Because the employee management page list.html There are various employee information in the page ! These can be used as a starting point to add 、 Delete 、 Change 、 check !
(2) To sum up bootstarp as well as themleaf Some uses of
<tr th:each="emp:${emps}">
	<td th:text="${emp.getId()}"></td>
th:each Used to traverse objects ,th:text Used to display the properties of the traversed object to the client ( Find all the data from the background and display it on the client )! therefore th:text Used to find display data . As the first 5 One is display data operation In the 6 Adding data , To interact with the background, you need to use name="lastName etc. ( Input data from the foreground and save it to the background ), and placeholder="[email protected]" Is used to prompt in the input text , But the prompt data is only the prompt displayed to the client , If you want to submit data to the background, you need to enter it manually "
th:value It is used to find the background data and echo it to the client , However, you can modify it after echo ! and th:text Just show it to the client , However, it cannot modify the displayed data . therefore th:value It is used in 6 Add the selection of the employee's department in the data , In the 7 The data will be echoed to the client and modified in the modification operations ! In the 7 Data modification operations in progress , The modification is based on the selected employee id To modify the submitted data , So use hidden layers to submit modified data
<input type="hidden" name="id" th:value="${employee.getId()}">
The back end is directly the same as adding data , Just use restful Style is just , This is the first time I have seen this operation
@PutMapping("/emp")  // Use restful Style to update data
    public String changeEmp(Employee employee){

        // Add an updated operation
        employeeDao.insertEmployee(employee);
        return "redirect:/all";
    }
But generally, the data modification we see is the front-end transfer of the data that needs to be modified id To the back end , And the back end is based on id Modify data directly ! But the one above is magical , Probably bootstarp The bottom layer is for transitive id It was packaged , We can directly use the same method as adding data on the back end ! (1)th:checked="${employee.getGender()==0}" adopt th:checked Echo the data in the back end to the client , And use if sentence employee.getGender()==0 Displays the employee original that needs to be modified = Is the record in the database male or female !th:checked Use... In radio buttons (2)selected="${employee.getDepartment().getId()==dept.getId()}" Use... In the drop-down list if sentence employee.getDepartment().getId()==dept.getId() Echo the current employee's department to the client for operation !
(3) about restful Style api Be sure to use @PathVariable("empId") Integer empId To receive the parameters in the path variable , If not used @PathVariable("empId") And directly Integer empId Will go wrong !
11、 Reprinted others' information about themleaf Records of various knowledge points in
The end !!!!!!!!!!!!!!!!!!!!!!!!!!!!!!!!!
边栏推荐
- Deep learning (tentsorflow2. version) three good student performance problems (1)
- The first problem troubleshooting process of re disk
- 自动化测试——pytest框架介绍及示例
- SQL高级教程
- online trajectory generation
- 教你用shell脚本检测服务器程序是否在运行
- LeetCode 958. 二叉树的完全性校验
- Test instructions - common interface protocol analysis
- 2021-11-29 轨迹规划五次多项式
- Getting started with Flink - word statistics
猜你喜欢

The 100000 line transaction lock has opened your eyes.

Redis novice introduction

My creation anniversary

The basis of C language grammar -- pointer (multidimensional array, function, summary) learning

Single sign on logic

Mysql database field query case sensitive setting

定制拦截器

Redis notes (14) - persistence and data recovery (data persistence RDB and AOF, data recovery, mixed persistence)

Redis notes (13) - scan and keys search for specific prefix key fields (command format, usage examples, locating large keys)

logback
随机推荐
Automated testing -- Introduction and use of pytest itself and third-party modules
Js--- get the data with the same key value in the object array to get a new array
c语言语法基础之——函数定义学习
Speed test of adding, deleting, modifying and querying 5million pieces of data in a single MySQL table
Daily-used English phrases
Origin of QPM
SQL modification of table structure
定制拦截器
c语言语法基础之——函数嵌套、递归 小程序斐波那契之和、阶乘
mysql 数据库字段查询区分大小写设置
Meaning of go runtime
TensorFlow动态分配显存
2021-11-22 运动规划杂记
Redis notes (16) - info instructions and command line tools (view memory, status, number of client connections, monitoring server, scan large keys, sampling server, execute batch commands, etc.)
Industrial and enterprise patent matching data (hundreds of thousands of data) 1998-2014
LeetCode 498. 对角线遍历
OpenCV depthframe -> pointcloud 导致 segmentation fault!
2021 national vocational college skills competition (secondary vocational group) network security competition questions (1) detailed analysis tutorial
install opencv-contrib-dev to use aruco code
QPM suspended window setting information