当前位置:网站首页>实战监听Eureka client的缓存更新
实战监听Eureka client的缓存更新
2022-06-23 07:43:00 【InfoQ】
欢迎访问我的GitHub
从Eureka server获取服务列表
- Spring cloud环境中的应用,如果注册到Eureka server,就会从Eureka server获取所有应用的注册信息(也叫服务列表),然后保存到本地,这个操作是周期性的,默认每三十秒一次;
- 以下是来自官方的架构图,可以看到Application Service向Eureka Server有Get Registry的请求:

参考文章
- 如果您有兴趣,想深入了解spring广播机制或者Eureka client更新服务列表,推荐您参考以下两篇文章:
- 《spring4.1.8扩展实战之三:广播与监听 》
- 《Spring Cloud源码分析之Eureka篇第五章:更新服务列表 》
实战内容
- 本文是一篇实战的文章,实战内容如下:
- 启动Eureka server;
- 开发一个应用springcloudcustomizelistener,启动后会注册到Eureka server;
- 此时该应用身份为Eureka client,会周期性的从Eureka server获取服务列表(已有逻辑);
- 每次成功获取的服务列表成功都会存入本地缓存(已有逻辑);
- 存入缓存后,会在spring容器内发送广播(已有逻辑);
- 本次实战的重点就是自定义一个监听器来接收上述广播,收到广播后把详情用日志打印出来;
- 再启动另一个应用springclouddeepprovider,也会注册到Eureka server;
- 再去观察springcloudcustomizelistener的广播监听日志,会发现springclouddeepprovider的注册信息;
Eureka client缓存服务列表的源码简介
- 实战前,先对Eureka client缓存服务列表的实现源码做个简介,这样才能做出匹配的监听器;
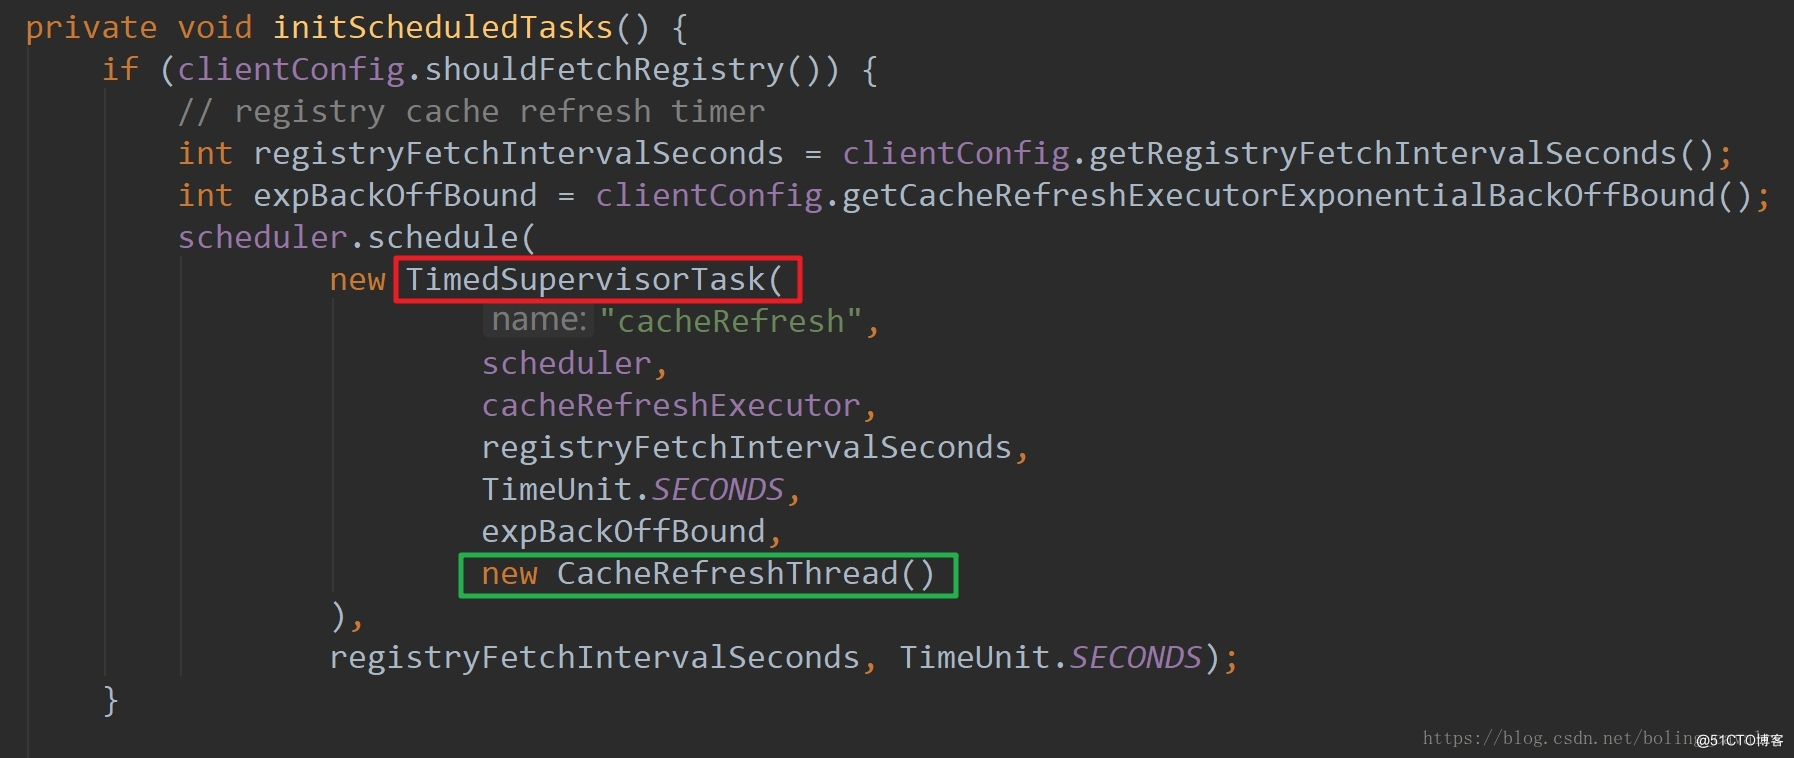
- 应用作为Eureka Client的启动时,在com.netflix.discovery.DiscoveryClient类的initScheduledTasks方法中,会启动周期性任务,每隔30秒从Eureka server获取服务列表信息,如下图,红框中的TimedSupervisorTask负责周期性执行,绿框中的CacheRefreshThread负责具体的更新逻辑:
- 在CacheRefreshThread类中经过层层调用,获取服务列表并更新本地缓存的逻辑在fetchRegistry方法中实现,如下图,红框中的getAndStoreFullRegistry方法负责全量更新,绿框中的getAndUpdateDelta方法负责增量更新,黄框中的onCacheRefreshed方法就是今天的重点:发送广播,广播类型是服务列表的本地缓存已更新

- onCacheRefreshed方法在子类CloudEurekaClient中被重写,可见这里发送了一个普通的spring容器内广播,类型是HeartbeatEvent,我们可以自定义监听类来接收广播,并通过泛型规定只接受HeartbeatEvent类型:
 @Override
 protected void onCacheRefreshed() {
 if (this.cacheRefreshedCount != null) { //might be called during construction and will be null
 long newCount = this.cacheRefreshedCount.incrementAndGet();
 log.trace("onCacheRefreshed called with count: " + newCount);
 //spring容器内广播,HeartbeatEvent实例在创建时收到两个参数:CloudEurekaClient实例和缓存刷新次数
 this.publisher.publishEvent(new HeartbeatEvent(this, newCount));
 }
 }
实战应用设定
- 本次实战要搭建一个小的Spring Cloud环境,包括以下应用:

源码下载
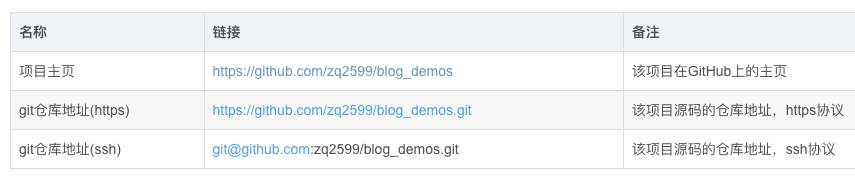
- springclouddeepeureka和springclouddeepprovider这两个应用,在文章《Spring Cloud源码分析之Eureka篇第一章:准备工作》中已有详细介绍,本文中就不多说了,您可以参考文章,也可以在github下载这两个应用的源码,地址和链接信息如下表所示:

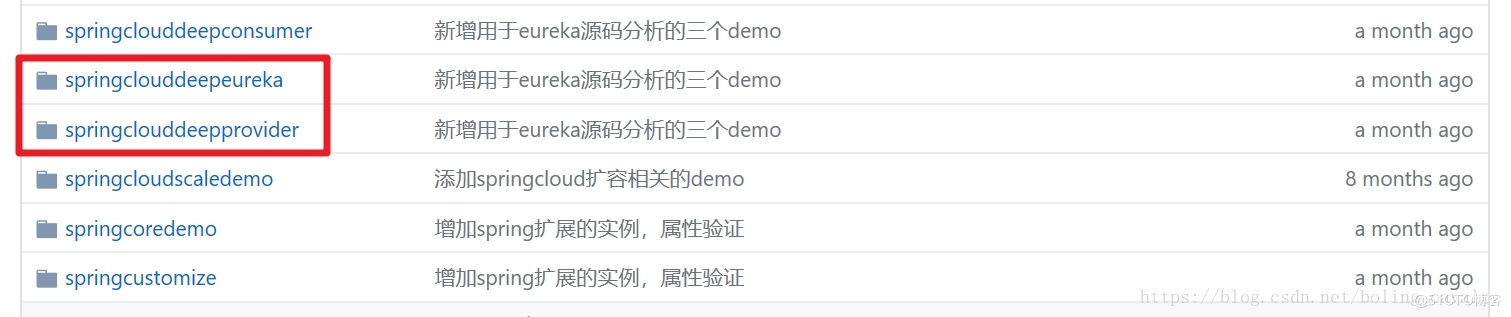
- 这个git项目中有多个文件夹,本章源码分别在springclouddeepeureka、springclouddeepprovider这两个文件夹下,如下图红框所示:
启动springclouddeepeureka
- 应用springclouddeepeureka开发完成后就立即启动,在浏览器访问地址:http://localhost:8081,可见Eureka server已经启动,不过还没有任何应用注册上来,如下图:

开发springcloudcustomizelistener
- 接下来一起开发应用springcloudcustomizelistener,在此应用中添加自定义的spring广播监听器,如果您不想敲代码,也可以从github上直接下载源码,地址和链接信息如下表所示:
- 这个git项目中有多个文件夹,本章源码在springcloudcustomizelistener文件夹下,如下图红框所示:

- 一起来开发吧:
- 创建一个springboot的web应用,pom.xml内容如下,注意为了在日志中展示更详细的内容,依赖了fastjson库:
<?xml version="1.0" encoding="UTF-8"?>
<project xmlns="http://maven.apache.org/POM/4.0.0" xmlns:xsi="http://www.w3.org/2001/XMLSchema-instance"
xsi:schemaLocation="http://maven.apache.org/POM/4.0.0 http://maven.apache.org/xsd/maven-4.0.0.xsd">
<modelVersion>4.0.0</modelVersion>
<groupId>com.bolingcavalry</groupId>
<artifactId>springcloudcustomizelistener</artifactId>
<version>0.0.1-SNAPSHOT</version>
<packaging>jar</packaging>
<name>springcloudcustomizelistener</name>
<description>Demo project for Spring Boot</description>
<parent>
<groupId>org.springframework.boot</groupId>
<artifactId>spring-boot-starter-parent</artifactId>
<version>1.5.9.RELEASE</version>
</parent>
<properties>
<project.build.sourceEncoding>UTF-8</project.build.sourceEncoding>
<project.reporting.outputEncoding>UTF-8</project.reporting.outputEncoding>
<java.version>1.8</java.version>
</properties>
<dependencies>
<dependency>
<groupId>org.springframework.boot</groupId>
<artifactId>spring-boot-starter-web</artifactId>
</dependency>
<dependency>
<groupId>org.springframework.cloud</groupId>
<artifactId>spring-cloud-starter-netflix-eureka-client</artifactId>
</dependency>
<dependency>
<groupId>com.alibaba</groupId>
<artifactId>fastjson</artifactId>
<version>1.2.28</version>
</dependency>
<dependency>
<groupId>org.springframework.boot</groupId>
<artifactId>spring-boot-starter-test</artifactId>
<scope>test</scope>
</dependency>
</dependencies>
<dependencyManagement>
<dependencies>
<dependency>
<groupId>org.springframework.cloud</groupId>
<artifactId>spring-cloud-dependencies</artifactId>
<version>Edgware.RELEASE</version>
<type>pom</type>
<scope>import</scope>
</dependency>
</dependencies>
</dependencyManagement>
<build>
<plugins>
<plugin>
<groupId>org.springframework.boot</groupId>
<artifactId>spring-boot-maven-plugin</artifactId>
</plugin>
</plugins>
</build>
</project>
- 应用配置文件application.yml的内容如下:
server:
 port: 8085
spring:
 application:
 name: springcloud-customize-listener
eureka:
 client:
 serviceUrl:
 defaultZone: http://localhost:8081/eureka/
 instance:
 prefer-ip-address: true
- 创建监听器EurekaCacheRefreshListener.java,前面已经分析过HeartbeatEvent实例的两个成员变量,值为缓存刷新次数和CloudEurekaClient实例,在收到广播时,将这两个成员变量都在日志中打印出来:
@Component
public class EurekaCacheRefreshListener implements ApplicationListener<HeartbeatEvent> {
private static final Logger logger = LoggerFactory.getLogger(EurekaCacheRefreshListener.class);
@Override
public void onApplicationEvent(HeartbeatEvent event) {
Object count = event.getValue();
Object source = event.getSource();
logger.info("start onApplicationEvent, count [{}], source :\n{}", count, JSON.toJSON(source));
}
}
- 启动应用,等待大约30秒左右,EurekaCacheRefreshListener中的日志就会在控制台输出,内容十分丰富,建议您复制这些内容去在线格式化JSON的网站做一下格式化再来看,下面列出部分关键信息,其他的内容已经略去:
{
 "instanceRemoteStatus": "UP",
 "lastSuccessfulHeartbeatTimePeriod": 316,
 "allKnownRegions": [
 "us-east-1"
 ],
 ...
 此处省略部分内容
 ...
 "applications": {
 "appsHashCode": "UP_1_",
 "registeredApplications": [
 {
 "instances": [
 {
 "hostName": "192.168.31.104",
 "overriddenStatus": "UNKNOWN",
 "metadata": {
 "jmx.port": "64656",
 "management.port": "8085"
 },
 "statusPageUrl": "http://192.168.31.104:8085/info",
 "secureVipAddress": "springcloud-customize-listener",
 "leaseInfo": {
 "renewalIntervalInSecs": 30,
 "registrationTimestamp": 1537827838033,
 "evictionTimestamp": 0,
 "renewalTimestamp": 1537827987419,
 "durationInSecs": 90,
 "serviceUpTimestamp": 1537827837461
 },
 "homePageUrl": "http://192.168.31.104:8085/",
 "countryId": 1,
 "sID": "na",
 "securePort": 443,
 "dataCenterInfo": {
 "name": "MyOwn"
 },
 "instanceId": "DESKTOP-82CCEBN:springcloud-customize-listener:8085",
 "coordinatingDiscoveryServer": false,
 "id": "DESKTOP-82CCEBN:springcloud-customize-listener:8085",
 "vIPAddress": "springcloud-customize-listener",
 "dirty": false,
 "lastUpdatedTimestamp": 1537827838033,
 "healthCheckUrl": "http://192.168.31.104:8085/health",
 "appName": "SPRINGCLOUD-CUSTOMIZE-LISTENER",
 "lastDirtyTimestamp": 1537827837401,
 "iPAddr": "192.168.31.104",
 "version": "unknown",
 "actionType": "ADDED",
 "port": 8085,
 "healthCheckUrls": [
 "http://192.168.31.104:8085/health"
 ],
 "status": "UP"
 }
 ]
- 如上所示,当前应用的实例信息在本地已经缓存了;
启动springclouddeepprovider
- 应用springclouddeepprovider是最后一个启动的应用,启动该应用后,再去观察springcloudcustomizelistener的日志,发现应用springclouddeepprovider的注册信息已经获取到了:
{
 "instances": [
 {
 "hostName": "192.168.119.1",
 "overriddenStatus": "UNKNOWN",
 "metadata": {
 "jmx.port": "58420",
 "management.port": "8082"
 },
 "statusPageUrl": "http://192.168.119.1:8082/info",
 "secureVipAddress": "springcloud-deep-provider",
 "leaseInfo": {
 "renewalIntervalInSecs": 30,
 "registrationTimestamp": 1537840715486,
 "evictionTimestamp": 0,
 "renewalTimestamp": 1537840715486,
 "durationInSecs": 90,
 "serviceUpTimestamp": 1537840715486
 },
 "homePageUrl": "http://192.168.119.1:8082/",
 "countryId": 1,
 "sID": "na",
 "securePort": 443,
 "dataCenterInfo": {
 "name": "MyOwn"
 },
 "instanceId": "localhost:springcloud-deep-provider:8082",
 "coordinatingDiscoveryServer": false,
 "id": "localhost:springcloud-deep-provider:8082",
 "vIPAddress": "springcloud-deep-provider",
 "dirty": false,
 "lastUpdatedTimestamp": 1537840715486,
 "healthCheckUrl": "http://192.168.119.1:8082/health",
 "appName": "SPRINGCLOUD-DEEP-PROVIDER",
 "lastDirtyTimestamp": 1537840715451,
 "iPAddr": "192.168.119.1",
 "version": "unknown",
 "actionType": "ADDED",
 "port": 8082,
 "healthCheckUrls": [
 "http://192.168.119.1:8082/health"
 ],
 "status": "UP"
 }
 ],
 "name": "SPRINGCLOUD-DEEP-PROVIDER",
 "instancesAsIsFromEureka": [
 {
 "hostName": "192.168.119.1",
 "overriddenStatus": "UNKNOWN",
 "metadata": {
 "jmx.port": "58420",
 "management.port": "8082"
 },
 "statusPageUrl": "http://192.168.119.1:8082/info",
 "secureVipAddress": "springcloud-deep-provider",
 "leaseInfo": {
 "renewalIntervalInSecs": 30,
 "registrationTimestamp": 1537840715486,
 "evictionTimestamp": 0,
 "renewalTimestamp": 1537840715486,
 "durationInSecs": 90,
 "serviceUpTimestamp": 1537840715486
 },
 "homePageUrl": "http://192.168.119.1:8082/",
 "countryId": 1,
 "sID": "na",
 "securePort": 443,
 "dataCenterInfo": {
 "name": "MyOwn"
 },
 "instanceId": "localhost:springcloud-deep-provider:8082",
 "coordinatingDiscoveryServer": false,
 "id": "localhost:springcloud-deep-provider:8082",
 "vIPAddress": "springcloud-deep-provider",
 "dirty": false,
 "lastUpdatedTimestamp": 1537840715486,
 "healthCheckUrl": "http://192.168.119.1:8082/health",
 "appName": "SPRINGCLOUD-DEEP-PROVIDER",
 "lastDirtyTimestamp": 1537840715451,
 "iPAddr": "192.168.119.1",
 "version": "unknown",
 "actionType": "ADDED",
 "port": 8082,
 "healthCheckUrls": [
 "http://192.168.119.1:8082/health"
 ],
 "status": "UP"
 }
 ]
 }
- 至此,本次实战就完成了,通过开发自定义的广播监听器,我们对Eureka的注册发现机制有了进一步了解,在您的Spring Cloud学习过程中,希望本文能祝您一臂之力;
欢迎关注InfoQ:程序员欣宸
边栏推荐
猜你喜欢

On ThreadLocal and inheritablethreadlocal, source code analysis

QT project error: -1: error: cannot run compiler 'clang++' Output:mingw32-make. exe

忽略超长参数违规

11 string function

Interview questions of a company in a certain month of a certain year (1)

Does huangrong really exist?
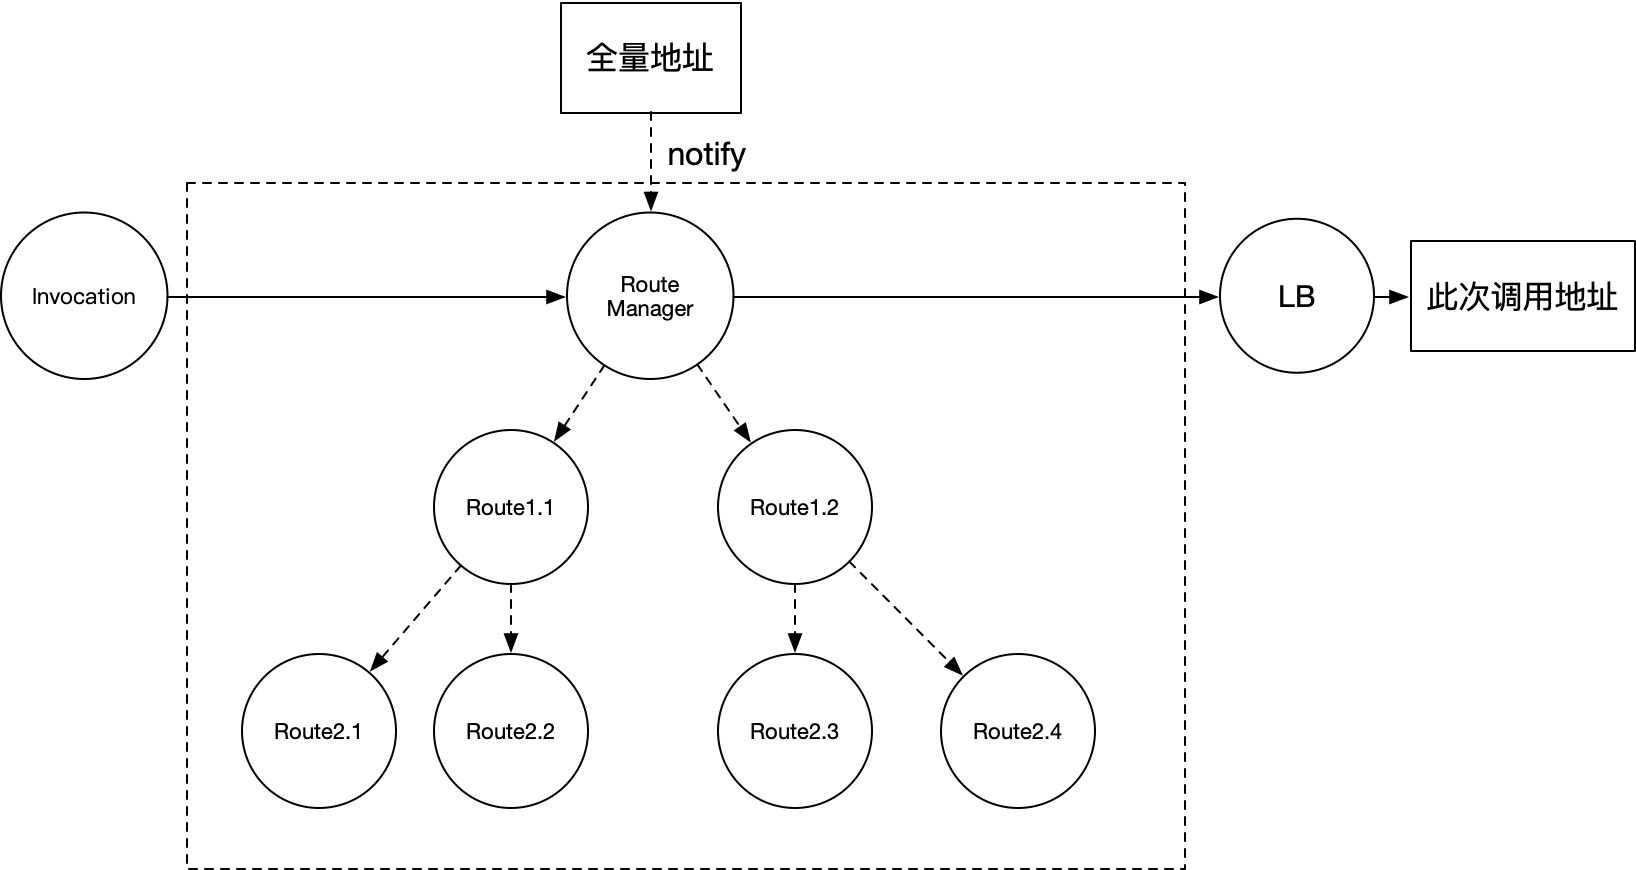
聊聊服务治理中的路由设计
Talk about routing design in service governance

MIT CMS. 300 session 12 – identity construction Part 2

Playwirght getting started
随机推荐
Start appium
AVL树的实现
ThreadPoolExecutor线程池实现原理与源码解析
帆软堆积图显示占比
aquatone工具 中的2個bug修複
openvino系列 18. 通过OpenVINO和OpenCV实现实时的物体识别(RTSP,USB视频读取以及视频文件读取)
MFC radio button grouping
Socket programming (multi process)
图像分割-改进网络结构
Unity audio visualization scheme
Regular expression use cases
Vulnhub | DC: 4 |【实战】
建立一有序的顺序表,并实现下列操作: 1.把元素x插入表中并保持有序; 2.查找值为x的元素,若找到将其删除; 3.输出表中各元素的值。
On ThreadLocal and inheritablethreadlocal, source code analysis
Matlab random volatility SV, GARCH using MCMC Markov chain Monte Carlo method to analyze exchange rate time series
Gif verification code analysis
QT project error: -1: error: cannot run compiler 'clang++' Output:mingw32-make. exe
Introduction to Excel VBA and practical examples
js中的同步和异步
Socket socket programming