当前位置:网站首页>Use of pytorch tensorboard
Use of pytorch tensorboard
2022-06-25 05:27:00 【HheeFish】
be based on pytorch Use Tensorboard Use
Content sources :
Detailed explanation PyTorch Project use TensorboardX Conduct training visualization
TORCH.UTILS.TENSORBOARD
Display the remote server's... Locally TensorboardX result
1. install
Use pip install
pip install tensorboardX
Install from source
git clone https://github.com/lanpa/tensorboardX && cd tensorboardX && python setup.py install
2.Tensboard Use
2.1. initialization SummaryWriter
- Save the log using the specified path :
summarywriter1 = SummaryWriter(%target_dir)
- No parameter , By default, the path... Will be used
runs/ Date timeTo save the log
summarywriter2 = SummaryWriter()
- Provide commen Parameters , Use path
runs/ Date time -commentSave the log file
summarywriter3 = SummaryWriter(comment='experiment')
In general , We create a new path for each experiment SummaryWriter, Also called a run, Such as runs/exp1、runs/exp2.
Next , We can call SummaryWriter Various examples add_something Method writes different types of data to the log .
2.2. Record number (scalar) data
add_scalar(tag, scalar_value, global_step=None, walltime=None)
Parameters
- tag (string): Data name , Data with different names are shown in different curves
- scalar_value (float): Numeric constant value
- global_step (int, optional): Trained step
- walltime (float, optional): Record when it happened , The default is time.time()
PyTorch scalar tensor, Need to call.item()Method to get its value . We usually useadd_scalarMethods to record the training process loss、accuracy、learning rate The change of equal value , Intuitively monitor the training process .
from torch.utils.tensorboard import SummaryWriter
import numpy as np

writer = SummaryWriter('runs/scalar_example')

for n_iter in range(100):
    writer.add_scalar('Loss/train', np.random.random(), n_iter)
    writer.add_scalar('Loss/test', np.random.random(), n_iter)
    writer.add_scalar('Accuracy/train', np.random.random(), n_iter)
    writer.add_scalar('Accuracy/test', np.random.random(), n_iter)

In a path of runs/scalar_example Of run The quadratic function data is written in quadratic And exponential function data exponential,
The other path is runs/another_scalar_example Of run Write data of quadratic function and exponential function with the same name but different parameters in
writer = SummaryWriter('runs/scalar_example')
for i in range(10):
    writer.add_scalar('quadratic', i**2, global_step=i)
    writer.add_scalar('exponential', 2**i, global_step=i)


writer = SummaryWriter('runs/another_scalar_example')
for i in range(10):
    writer.add_scalar('quadratic', i**3, global_step=i)
    writer.add_scalar('exponential', 3**i, global_step=i)

Quantities with the same name are shown in the same chart , Convenient for comparative observation . meanwhile , We can also use the... On the left side of the screen runs Column to select which run The data of .
Adding multiple digital data at once can be used add_scalars
from torch.utils.tensorboard import SummaryWriter
writer = SummaryWriter()
r = 5
for i in range(100):
    writer.add_scalars('run_14h', {
    'xsinx':i*np.sin(i/r),
                                    'xcosx':i*np.cos(i/r),
                                    'tanx': np.tan(i/r)}, i)
writer.close()
# This call adds three values to the same scalar plot with the tag
# 'run_14h' in TensorBoard's scalar section.

2.3. Record pictures (image) data
Be careful , This method requires pillow Library support .
add_image(tag, img_tensor, global_step=None, walltime=None, dataformats='CHW')
Parameters
- tag ( string ): Data identifier
- img_tensor ( torch.Tensor , numpy.array , or string/blobname ) : Image data
- global_step ( int ) : Global step value to be recorded
- walltime ( float ) : Optional override default walltime (time.time()) The number of seconds after the event era
shape
The default is (3,H,W), have access to torchvision.utils.make_grid() Convert a batch of tensors into 3xHxW Format or call add_images And let's finish this work . (1, H, W),(H,W), (H,W,3) The tensor of also applies , as long as dataformats Pass the corresponding parameters , for example CHW, HWC, HW.
from tensorboardX import SummaryWriter
import cv2 as cv

writer = SummaryWriter('runs/image_example')
for i in range(1, 6):
    writer.add_image('countdown',
                     cv.cvtColor(cv.imread('{}.jpg'.format(i)), cv.COLOR_BGR2RGB),
                     global_step=i,
                     dataformats='HWC')
Use opencv Read in the picture ,opencv The read in picture channel arrangement is BGR, Therefore, it needs to be converted to RGB To ensure the correct color , also dataformats Set to ‘HWC’, Not the default ‘CHW’. When calling this method, make sure that the data format is correct , image PyTorch Tensor Is the default format ‘CHW’. The effect is as follows , You can drag the slider to see different global_step Picture below :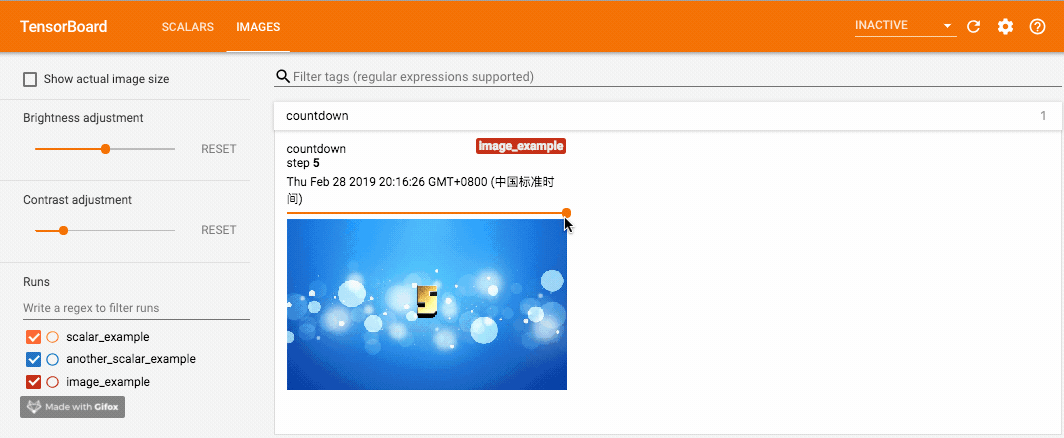
add_image Method can only insert one image at a time . If you want to insert more than one picture at a time , There are two ways :
- Use torchvision Medium
make_gridMethods after combining multiple pictures into one picture , Call again add_image Method . - Use SummaryWriter Of ```add_images```` Method
add_images(tag, img_tensor, global_step=None, walltime=None, dataformats='NCHW')
Parameters
- tag ( string ): Data identifier
- img_tensor ( torch.Tensor , numpy.array , or string/blobname ) : Image data
- global_step ( int ) : Global step value to be recorded
- walltime ( float ) : Optional override default walltime (time.time()) The number of seconds after the event era
- dataformats ( string ):NCHW、NHWC、CHW、HWC、HW、WH And other forms of image data format specification .
from torch.utils.tensorboard import SummaryWriter
import numpy as np

img_batch = np.zeros((16, 3, 100, 100))
for i in range(16):
    img_batch[i, 0] = np.arange(0, 10000).reshape(100, 100) / 10000 / 16 * i
    img_batch[i, 1] = (1 - np.arange(0, 10000).reshape(100, 100) / 10000) / 16 * i

writer = SummaryWriter()
writer.add_images('my_image_batch', img_batch, 0)
writer.close()

2.4. Add histogram (histogram) data
add_histogram(tag, values, global_step=None, bins='tensorflow', walltime=None, max_bins=None)
Parameters
- tag (string): Data name
- values (torch.Tensor, numpy.array, or string/blobname): The data used to build the histogram
- global_step (int, optional): Trained step
- bins (string, optional): Values are ‘tensorflow’、‘auto’、‘fd’ etc. , This parameter determines how to divide the bucket , See here for details. .
- walltime (float, optional): Record when it happened , The default is time.time()
- max_bins (int, optional): The maximum number of barrels
We can observe the data 、 Training parameters 、 Histogram of features , Know their general distribution , Assist the training process of neural network .
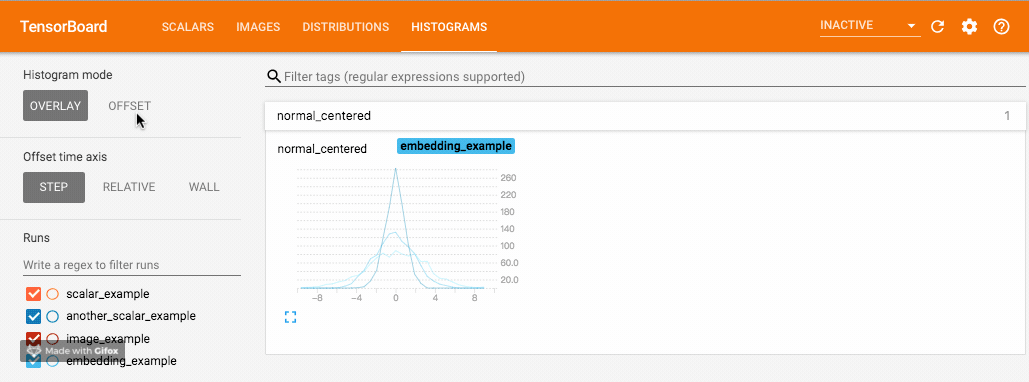
from tensorboardX import SummaryWriter
import numpy as np

writer = SummaryWriter('runs/embedding_example')
writer.add_histogram('normal_centered', np.random.normal(0, 1, 1000), global_step=1)
writer.add_histogram('normal_centered', np.random.normal(0, 2, 1000), global_step=50)
writer.add_histogram('normal_centered', np.random.normal(0, 3, 1000), global_step=100)
We use numpy Sampling from the normal distribution of different variances . After opening the browser visualization interface , We'll find more "DISTRIBUTIONS" and "HISTOGRAMS" Two columns , They are all used to observe the distribution of data . Among them in "HISTOGRAMS" in , The same data is different step The histogram can be staggered up and down (OFFSET) It can also be overlapped (OVERLAY). The upper and lower figures are "DISTRIBUTIONS" Interface and "HISTOGRAMS" Interface .
2.5. Add neural structure diagram (graph) data
add_graph(model, input_to_model=None, verbose=False, **kwargs)
Parameters
- model (torch.nn.Module): The network model to be visualized
- input_to_model (torch.Tensor or list of torch.Tensor, optional): The variable or set of variables to be input into the neural network
This method can visualize the neural network model 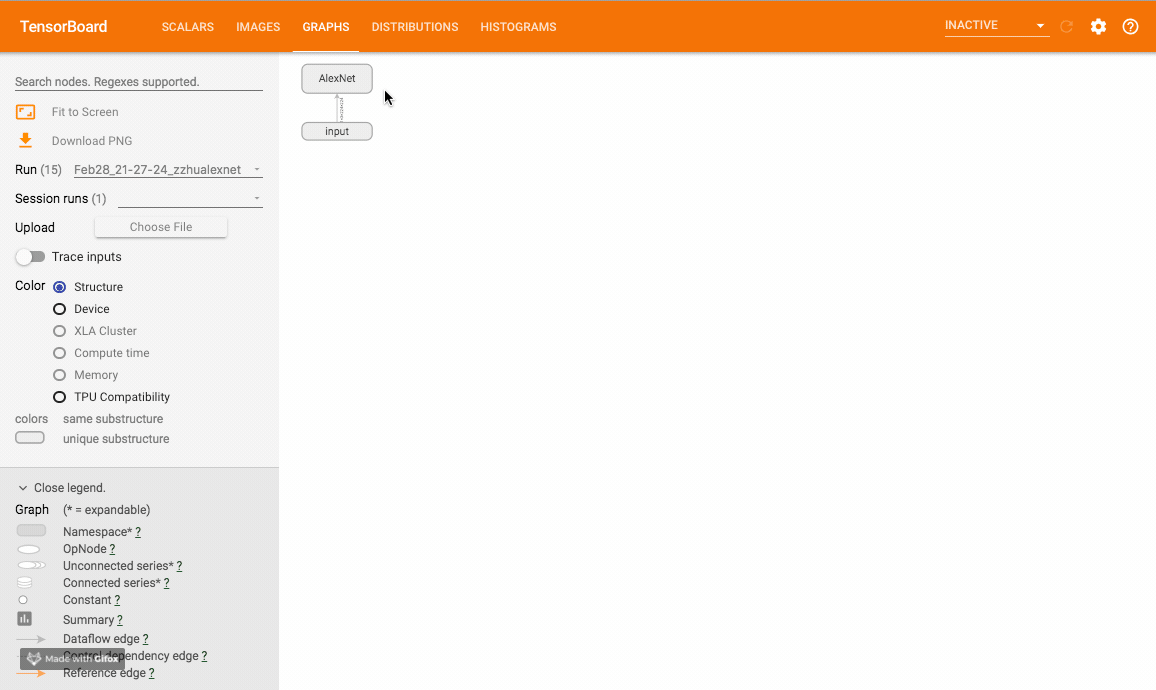
2.6. Add embedded vectors (embedding) data
add_embedding(mat, metadata=None, label_img=None, global_step=None, tag='default', metadata_header=None)
Parameters
- mat (torch.Tensor or numpy.array): A matrix , Each row represents a data point in the feature space
- metadata (list or torch.Tensor or numpy.array, optional): A one-dimensional list ,mat Of each row of data in the label, The size should be the same as mat The same number of lines
- label_img (torch.Tensor, optional): One looks like NxCxHxW Tensor , Corresponding mat The image displayed by each line of data ,N Should and mat The same number of lines
- global_step (int, optional): Trained step
- tag (string, optional): Data name , Data with different names will be displayed separately
add_embeddingIs a very practical method , Not only can high-dimensional features be used PCA、t-SNE And other methods to reduce the dimension to two-dimensional plane or three-dimensional space display , The feature space of each data point before dimensionality reduction can also be observed K Neighborhood situation . In the following example, we take MNIST The training is focused on 100 Data , Expand the image into a one-dimensional vector directly as embedding, Use TensorboardX Visualize it
from tensorboardX import SummaryWriter
import torchvision

writer = SummaryWriter('runs/embedding_example')
mnist = torchvision.datasets.MNIST('mnist', download=True)
writer.add_embedding(
    mnist.train_data.reshape((-1, 28 * 28))[:100,:],
    metadata=mnist.train_labels[:100],
    label_img = mnist.train_data[:100,:,:].reshape((-1, 1, 28, 28)).float() / 255,
    global_step=0
)
use PCA The visualization effect in 3D space after dimension reduction is as follows :
You can find , Although we haven't done any feature extraction yet , but MNIST The data has shown the effect of clustering , The same numbers are closer ( Did you think of KNN classifier ). We can also click on the bottom left T-SNE, use t-SNE The method is visualized add_embedding Several points needing attention in the method :
- mat It's two dimensions MxN,metadata It's one dimension N,label_img It's four-dimensional NxCxHxW!
- label_img Remember to normalize to 0-1 Between float value
3.Tensboard Display of
3.1. Operate directly on the normal host
- stay Google Chrome Open the log file under
- open Anaconda Prompt, Enter the environment , Then go to the disk where the log file is saved , Input tensorboard --logdir= The name of the folder you saved , It will generate a web address
- Copy URL to Google Chrome You can open
3.2. Display the server's... Locally tensorboardX Steps for results (XShell)
- Use XShell Establishing a connection ,! The source host is filled with 127.0.0.1( Indicating the machine ), Listening port can set an unoccupied port number at will , such as 6007; The target host represents the local server , The target port is 6007, namely tensorboard Set the listening port .

- Connect . Enter the command on the server , If -port Set to another port , The target port of the above target host should also be modified accordingly .
tensorboard --logdir=log_dir
- Server side display :

- Copy the link to the local browser to successfully access tensorboard.
http://localhost:6007
Browser side display :
边栏推荐
猜你喜欢

UVA816 Abbott’s Revenge

How to download and use Xiaobai one click reload on the official website

XSS (cross site script attack) summary (II)

Uva1103 ancient pictograph recognition

Activereportsjs V3.0 comes on stage

Mirror image of binary tree

Use serialize in egg to read and write split tables

Visual studio 2022 interface beautification tutorial

3.2.3 use tcpdump to observe TCP header information (supplement common knowledge of TCP protocol)

2022.1.25
随机推荐
Deeply understand the characteristics of standard flow and off standard elements
Penetration test - right raising topic
XSS (cross site script attack) summary (II)
Abuse unlimited authorization -- is your address safe?
滲透測試-提權專題
Baidu ueeditor set toolbar initial value
[day40 literature extensive reading] space and time in the child's mind: metallic or atomic
February 20ctf record
Create an environment for new projects
CTFHUB SSRF
The k-th node of the binary search tree [sword finger offer]
Large number operation (capable of square root, power, permutation and combination, logarithm and trigonometric value)
Go Concurrency
hr竟主动给这位测试小姐姐涨工资,她是怎么做到的?
Critical dependency: require function is used in a way in which dependencies
Eyeshot Ultimate 2022 Crack By Xacker
C style string
2021-10-24
Array introduction plus example 01
Vue uses keep alive to cache page optimization projects