当前位置:网站首页>Embedded system transplantation [2] - Construction of cross development environment
Embedded system transplantation [2] - Construction of cross development environment
2022-07-24 05:13:00 【imysy_ 22_】
【 Experiment 1 】ubuntu Network environment configuration
【 The experiment purpose 】
master ubuntu The basic method of network configuration , It can be connected through wired network ubuntu And development board
【 Experimental environment 】
1、ubuntu 14.04 Distribution version
2、FS4412 The experiment platform
【 matters needing attention 】
1、 In the experimental steps “$” The first command means ubuntu Execution in environment , With “#” Command table at the beginning
Show the execution under the development board
【 The experimental steps 】
One 、 Network connection mode settings
1、 As shown in the figure , single click “ edit ” And then choose “ Virtual Network Editor (N)...” Set up virtual machine network

2、 As shown in the figure , Choose to use... In the pop-up dialog box “ Bridging mode ”, And then click “ determine ”

notes : If you can't choose “ Bridging mode ”, The first will ubuntu To turn it off , Then close it VMware, Then use the administrator
Identity running VMware, Then open the above interface , Click... In the lower left corner “ Restore default settings (R)”, Waiting for completion
After restore, you can select “ Bridging mode ”, Then open it again ubuntu that will do

3、 As shown in the figure , single click “ virtual machine ”, And then choose “ Set up (S)...”

4、 As shown in the figure , In the pop-up dialog box, click “ Hardware ” And then click “ network adapter ”, Then refer to the following figure to
The network connection is set to “ Bridging mode ”, Then click ok

Two 、Ubuntu The network configuration
Ubuntu The network configuration methods are flexible and diverse , We can use a graphical interface to configure , You can also use commands
Row to configure , Dynamic configuration is available , You can also use static configuration , Here we demonstrate the use of graphical interfaces
Make static configuration as a reference
1、 Because we use graphical interface configuration , So first delete the configuration information in the configuration file ( Or comments )
$ sudo vi /etc/network/interfacesOnly the following information is retained in the configuration file , Save and exit after modification

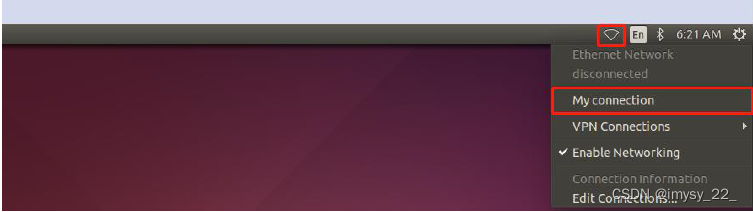
2、 As shown in the figure , Click the network settings Icon in the upper right corner of the desktop ( If there is no such icon, it is because the configuration in the previous step has not been generated
effect , Restart it ubuntu that will do ), And then choose “Edit Connections...”

3、 In the pop-up dialog box, click “Add” Add a new connection

4、 The default... Is used here “Ethernet”, And then click “Create...”

5、 As shown in the figure , In the pop-up dialog box, first fill in the name of the new connection ( at will ), And then click “IPv4 settings”
Set up IP Information , take “Method” Column selected as “Manual”, And then click “Add” Fill in IP Information

Because we use the bridge mode , therefore IP Information needs reference windows Under the settings , The current window will not
To shut down , Switch to windows Check out IP Information
6、 stay windows Next open a command line terminal , Then input “ipconfig” see windows Network used under
And IP Information ( According to personal computer , find windows Information about the network connection being used )

7、 go back to ubuntu Next , As shown in the figure below , according to windows Under the IP Fill in the information ubuntu Of IP Information
Address Set to and windows Under the “IPV4 Address ” Different addresses under the same network segment
such as windows Under the IP by “192.168.1.102”
Will ubuntu Under the IP Set to “192.168.1.100”
Netmask Set to and windows Under the “ Subnet mask ” Agreement
Gateway Set to and windows Under the “ The default gateway ” Agreement
DNS servers Set to and windows Under the “ The default gateway ” Agreement
When the settings are complete, click “Save” preservation , Close the dialog box
8、 The network connection just added may not be effective , Here, first disconnect the original connection

Then select the new connection just established
3、 ... and 、 Network card selection
In the above steps, we have set the network connection mode of the virtual machine to the bridge mode , Also set up ubuntu in
IP Relevant information , But in practice , Sometimes our computers surf the Internet wirelessly , Sometimes
It's wired , Sometimes you need to connect to the development board through a wired way , At this time, we need to switch virtual
The network card used by the computer .
1、 As shown in the figure , single click “ edit ” And then choose “ Virtual Network Editor (N)...”

2、 As shown in the figure , stay “ Bridge received ” Select the bridged network card , When the settings are complete, click “ determine ” that will do
Generally, computers have wired network cards and wireless network cards , Different computer network card names are different , Generally, the name of the wired network card has
Yes “PCIe”, The name of the wireless network card has “Wireless”, Distinguish according to the actual situation of your computer
The principle of choosing network card here is , If you want to let ubuntu On the Internet , that windows The next network card to use is the bridge
Which network card is connected ; If you want to let ubuntu Connect to the development board , Directly bridge to the wired network card

Four 、 Connect the development board
1、 Enter the following command at the terminal , see ubuntu The host IP Address
$ ifconfig
Display the following information

2、 As shown in the figure , stay uboot In interactive mode , Set up uboot in IP Related environment variables

serverip The server IP, Set to and ubuntu The host is the same IP
ipaddr That is, oneself IP, Set to and ubuntu Different addresses of the host under the same network segment
such as ubuntu The host IP by “192.168.1.100”
Will ipaddr Set to “192.168.1.200”
3、 Use the network cable to connect the development board with the computer , And then in uboot Use in interactive mode ping Command connection ubuntu, if
Show “host xxx.xxx.xxx.xxx is alive” It means that the network is connected

4、 If the development board and ubuntu Not connected yet , Try closing windows Under the firewall

If not connected , Please check the correctness of all the above steps
【 Experiment two 】tftp Server environment construction
【 The experiment purpose 】
master tftp Basic methods of environment construction , In the uboot Use in tftp Download the file
【 Experimental environment 】
1、ubuntu 14.04 Distribution version
2、FS4412 The experiment platform
【 matters needing attention 】
1、 In the experimental steps “$” The first command means ubuntu Execution in environment , With “#” Command table at the beginning
Show the execution under the development board
【 The experimental steps 】
One 、tftp Server environment construction
1、 Open a command line terminal , Execute the following command to see if..., is installed tftp The server
$ dpkg -s tftpd-hpaIf the following information is displayed, it means that it is not installed

2、 If not installed , Execute the following command to install ( Make sure ubuntu Internet access ), If installed, proceed directly to step 3
$ sudo apt-get install tftpd-hpa tftp-hpa3、 modify tftp The configuration file for the server
$ sudo vi /etc/default/tftpd-hpatake

Change to the following ,

Then save the exit note :TFTP_DIRECTORY yes tftp Working directory of the server , That is, the files to be downloaded by the client need to be placed in this directory .
4、 Create the server working directory and set it to the highest permission
$ sudo mkdir /tftpboot
$ sudo chmod 777 /tftpboot
5、 restart tftp service , Make configuration effective
$ sudo service tftpd-hpa restartThe following information is displayed to indicate that the restart is successful

notes : Every time I reopen ubuntu If you want to use tftp Both need to be rebooted
6、 Whether the local test is successfully installed
Enter the server working directory
$ cd /tftpboot/
Create a file
$ sudo touch test.txt
Home catalog
$ cd
Use tftp Command login to this machine
$ tftp localhost
get files
$ get test.txt
sign out
$ q
Execute the following command to check whether
$ ls
Obtained under the current directory test.txt The file indicates that the installation was successful 
【 Experiment three 】nfs Server environment construction
【 The experiment purpose 】
master nfs Basic methods of environment construction , Can be used on the development board nfs Mount the root file system
【 Experimental environment 】
1、ubuntu 14.04 Distribution version
2、FS4412 The experiment platform
【 matters needing attention 】
1、 In the experimental steps “$” The first command means ubuntu Execution in environment , With “#” Command table at the beginning
Show the execution under the development board
【 The experimental steps 】
One 、nfs Server environment construction
1、 Open a command line terminal , Execute the following command to check whether it is installed nfs The server
$ dpkg -s nfs-kernel-server If the following information is displayed, it means that it is not installed 
2、 If not installed , Execute the following command to install ( Make sure ubuntu Internet access ), If installed, proceed directly to step 3
$ sudo apt-get install nfs-kernel-server3、 modify nfs The configuration file for the server
$ sudo vi /etc/exports Add the following configuration at the end of the file , Then save to exit 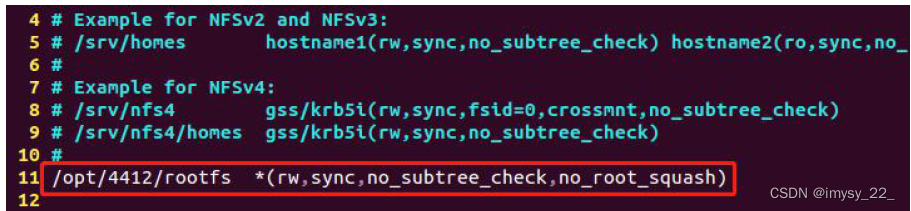
notes :/opt/4412/rootfs yes nfs Working directory of the server , That is, the files to be accessed by the client need to be placed in this directory
4、 Create the server working directory and set it to the highest permission
$ sudo mkdir -p /opt/4412/rootfs
$ sudo chmod -R 777 /opt
5、 restart nfs service , Make configuration effective
$ sudo service nfs-kernel-server restart The following information is displayed to indicate that the restart is successful 
notes : Every time I reopen ubuntu If you want to use nfs Both need to be rebooted
6、 Whether the local test is successfully installed
Enter the server working directory
$ cd /opt/4412/rootfs/Create a file
$ sudo touch test.txtHome catalog
$ cdUse nfs Mount the working directory to /mnt
$ sudo mount -t nfs localhost:/opt/4412/rootfs /mntCheck if the mount is successful
$ ls /mnt/ If there is test.txt The file indicates that the installation was successful 
Cancel the mount
$ sudo umount /mnt notes :ubuntu 17.10 Later versions nfs Only protocols are supported by default 3 and 4, But later we use uboot Default
Use agreement 2, So you need to be in /etc/default/nfs-kernel-server Add the following sentence at the end of the document :
RPCNFSDOPTS="--nfs-version 2,3,4 --debug --syslog"
And then restart nfs The service can be .
TFTP、NFS The difference between
“nfs It's the network file system , Not for passing things , Is to pass the embedded root file system through nfs Put it on a medium on the network ,nfs It's through... In Ethernet udp Transmitting command .tftp It's through TCP/IP Protocol is a protocol used for simple file transfer between client and server .”
边栏推荐
- Chiitoitsu (expected DP)
- mapreduce概念
- [Basic 6] - encapsulation and inheritance of classes, objects and classes
- Teach you how to weld CAD design board bottom (for beginners) graphic tutorial
- In his early 30s, he became a doctoral director of Fudan University. Chen Siming: I want to write both codes and poems
- Markov random field: definition, properties, maximum a posteriori probability problem, energy minimization problem
- NumPy 统计相关函数示例教程
- Illustration and text demonstrate the movable range of the applet movable view
- Infineon launched the world's first TPM security chip with post quantum encryption technology for firmware update
- Binary SCA fingerprint extraction black Technology: go language Reverse Technology
猜你喜欢
![Codeforce:d2. remove the substring (hard version) [greedy string + subsequence]](/img/c1/320e0349e2edda0eb420ed018aa831.png)
Codeforce:d2. remove the substring (hard version) [greedy string + subsequence]

酒店IPTV数字电视系统解决方案

Chiitoitsu (expected DP)

Jiang Xingqun, senior vice president of BOE: aiot technology enables enterprise IOT transformation

明星逆市入局的NFT,如何能走出独立行情?

Redis enhancements
想知道一个C程序是如何进行编译的吗?——带你认识程序的编译

Teach you how to weld CAD design board bottom (for beginners) graphic tutorial

This article takes you to understand C string functions and memory functions in simple terms

Do you want to have a robot that can make cartoon avatars in three steps?
随机推荐
postgresql:在Docker中运行PostgreSQL + pgAdmin 4
Chiitoitsu(期望dp)
In his early 30s, he became a doctoral director of Fudan University. Chen Siming: I want to write both codes and poems
High performance architecture design of wechat circle of friends
Chapter 7 other neural network types
C. Recover an RBS (parenthesis sequence, thinking)
Blue Bridge Cup 31 day sprint 21 day (C language)
京东方高级副总裁姜幸群:AIoT技术赋能企业物联网转型
PostgreSQL: run PostgreSQL + pgadmin 4 in docker
Hcip day 3 - mGRE experiment
Ben, reducing online importance is the same. Abnormal instance CP operation found
MS simulated written test
[postgraduate entrance examination vocabulary training camp] day 10 - capital, expand, force, adapt, depand
Zhaoyi innovation gd25wdxxk6 SPI nor flash product series comes out
Chapter V communication training
Web3 product manager's Guide: how to face the encryption world
Chapter 9 using image data
Event extraction and documentation (2019)
How to solve the engine prompt alias herodb and game engine startup exceptions?
Crazy God redis notes 09