当前位置:网站首页>[esp32 learning path 6 - Flash encryption]
[esp32 learning path 6 - Flash encryption]
2022-06-25 04:34:00 【Snail xiansen I】
stay esp-idf Copy it out of (/esp/esp-idf/examples/security/flash_encryption)demo file , For detailed encryption description, please refer to Lexin document Flash encryption
One 、 Development mode
In the development process , You can use ESP32 Internal generated key or external host generated key flash encryption .
In development mode, modification and reading of encrypted flash Content .
1、 Use ESP32 Generated key
1.1 Check ESP32 flash Encryption status
Before doing the encryption experiment , And ensure that the module does not do any encryption , To check your ESP32 Whether... Is enabled on the device flash encryption , Do one of the following :
(1) The example... Will be applied security/flash_encryption Burn to the device . This application will print FLASH_CRYPT_CNT eFuse value , And whether it is enabled flash encryption .
(2) Query the serial port name to which the device is connected , In the following command PORT Replace with the serial port name and run :espefuse.py -p PORT summary
1.2 In the project configuration menu , Do the following to flash encryption
(1) Enable at startup flash encryption , Choose encryption mode ( Development mode )
Get into idf.py menuconfig
(2) choice UART ROM Download mode ( The default is to enable )
(3) Select the boot loader log with the appropriate level of detail
Then save the configuration and exit .
1.3 Run the following command to build and burn the complete image
The command will flash Write an unencrypted image : Firmware boot loader 、 Partition tables and Applications .
idf.py -b 921600 flash monitor -p /dev/ttyUSB0
After burning ,ESP32 Will reset .“Development” Enable in mode flash After encryption , The first output display is enabled flash Encryption process ( At this startup , The firmware boot loader encrypts : Firmware boot loader 、 Application partitions and tags are “ encryption ” The partition , Then reset . In place encryption may take time , Need to wait for a while ):
You can see that the partition table information is printed ,CRYPT_CONFIG Set to 0xF, And three encrypted partitions and offsets , Finally, the encryption is completed and the device is restarted .
after , The application decrypts and executes commands at run time . Enable flash After encryption , At the next startup, the output will show enabled flash encryption , The sample output is as follows :
Check device encryption status ,FLASH_CRYPT_CNT The value is 1, Indicates successful encryption .
start-up flash After encryption, it is encrypted by default nvs Partition , Can be found in menuconfig Set whether to enable nvs encryption . I have a little problem here , After the second startup flash Show encryption , then nvs Initialization failed ,( return 0x1117 Tips NVS The key partition is corrupted , This partition may have burned other keys before ), Equipment to restart .
The solution is to erase all partitions idf.py erase_flash Burn again .( Be careful : In the development mode, if the application program is modified to be re burned, the following command should be used to encrypt and write the new plaintext Application :idf.py -p PORT encrypted-flash monitor), Otherwise, burning in clear text will cause the device to restart all the time .
2、 close flash encryption
To enable the same module to verify, use the key generated by the host , Turn off... For this module flash encryption
First use idf.py erase_flash -p /dev/ttyUSB0 Erase all partitions
For the development mode flash encryption , You can burn FLASH_CRYPT_CNT efuse To turn off encryption . Each chip has only 3 Second chance , Please perform the following steps :
1、 stay Project configuration menu in , Ban Enable at startup flash encryption Options , Then save and exit .
2、 Open the project configuration menu again , Check again if you have disabled this option , If this option is still enabled , The boot loader will re enable the encryption function immediately upon startup .
3、 Disabled at flash After encryption , By running idf.py flash To build and burn new boot loaders and Applications .
At this time, you do not need to power on to open the serial port to run the program , Because it is still encrypted , The device has been restarted , And then the next step
4、 Use espefuse.py ( stay components/esptool_py/esptool in ) To close FLASH_CRYPT_CNT, function :
espefuse.py burn_efuse FLASH_CRYPT_CNT
The output information is as follows :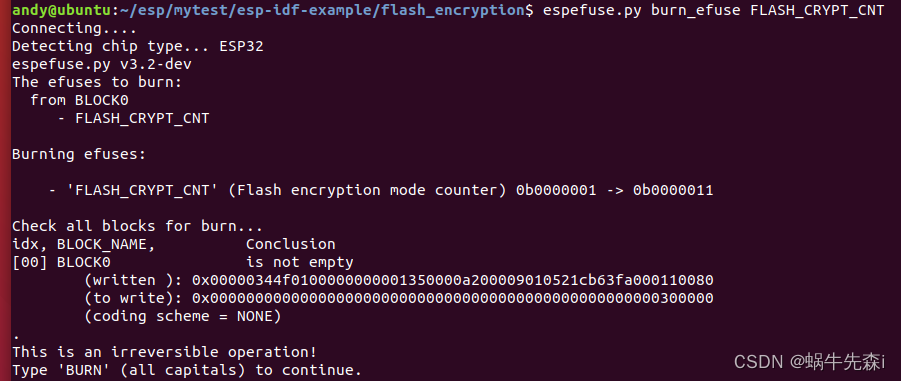
Then the input BURN, Tips FLASH_CRYPT_CNT Closed successfully 
Reset at this time ESP32, Open the serial port ,flash Encryption should be turned off , The boot loader will start normally . The device is running in an unencrypted state .
3、 Use host generated keys
Steps and use ESP32 The generated keys are basically the same , Just two more steps before the project configuration
1、 Generate a random key by running the following command :
espsecure.py generate_flash_encryption_key my_flash_encryption_key.bin

2、 Before the first encryption starts , Use the following command to burn the key to the device , This operation can only be performed once .
espefuse.py --port PORT burn_key flash_encryption my_flash_encryption_key.bin

The following steps are the same as above 1.2 Configuration items , Output the same result , It's just FLASH_CRYPT_CNT The value of will change , from 1 Turn into 3 And then it becomes 7 了 .
Two 、 Release pattern
In release mode ,UART Boot loader failed to execute flash Encryption operation , Can only Use OTA Download the new plaintext image , The scheme will be written in flash Pre encrypted plaintext image .
Re operate the above flash Decryption operation , Then encrypt according to the steps under the development mode , The difference is that the publish mode is selected in the project configuration menu 
Re burn (idf.py flash monitor) The post release mode operation interface is as follows :
see FLASH_CRYPT_CNT The value of is 127
It is not disabled in publishing mode UART ROM In download mode, you can't burn the program in an encrypted way , You can burn in clear text , Because it has been encrypted , Of clear text data flash Can make ESP32 Unable to start properly , The device has been restarted since it was burned .
Once enabled in publish mode flash encryption , The boot loader will write protect FLASH_CRYPT_CNT eFuse. Due to the use of ESP32 Generated key , There is no copy on the host , This device cannot be turned off flash encryption ,UART Boot loader failed to execute flash Encryption operation , This device can't run the burning program again , Unable to update encryption through serial port flash, That is to say, it is invalid , You can only use OTA programme Subsequent updates to the plaintext in the field .
In the manufacturing and production process , For safety reasons , Firmware download mode should not have access flash Content . Therefore, it is set to release mode during production , And disable UART ROM Download mode to prevent physical reading of encrypted flash Content .
The same as the publishing mode operation , Just choose Disable UART ROM Download mode , Note that this option is only available in CONFIG_ESP32_REV_MIN Level set to 3 when (ESP32 V3) You can use . The default option is to keep enabled UART ROM Download mode , However, it is recommended to disable this mode permanently , To reduce the options available to attackers .

If the production equipment does not need UART ROM Download mode , Then this mode should be disabled to increase device security . This can be done by calling esp_efuse_disable_rom_download_mode() To achieve .
Be careful : Only revision Version set to rev3 To disable UART ROM download mode.
Replace a new module and burn it into the device after setting , Wait for publishing mode encryption to complete , take IO0 Pull down and power on again to find that the terminal display download mode is disabled , thus , The device cannot be downloaded through the serial port . It can only be viewed through the terminal log Information .
边栏推荐
- php封装curl发送get、post请求方法,并使用
- 95% of programmers fish here
- L'épée leetcode fait référence au chemin leetcode de l'offre II 091 pour peindre la maison [planification dynamique] heroding
- UCLA | 用于黑盒优化的生成式预训练
- GBASE 8s的并行操作问题场景描述
- GBASE 8s中DELIMIDENT环境变量的使用
- GBASE 8s活锁、死锁问题的解决
- PHP encapsulates curl to send get and post request methods, and uses
- Nodejs 通过Heidisql连接mysql出现ER_BAD_DB_ERROR: Unknown database 'my_db_books'
- CTF_ Web: Advanced questions of attack and defense world expert zone WP (1-4)
猜你喜欢

CTF_ Web:8-bit controllable character getshell

单元测试覆盖率

i. Max development board learning record

论文阅读《LSD-SLAM: Large-Scale Direct Monocular SLAM》

Intel 13th generation core showed its true colors for the first time: 68mb cache improved significantly

LabVIEW开发气体调节器

Can Navicat directly operate the Android database SQLite

NFT insider 63: the sandbox reached a cooperation with Time magazine, and YGG established Spain's subdao

小白学习MySQL - 统计的'投机取巧'

UCLA | 用于黑盒优化的生成式预训练
随机推荐
GBase 8s 锁的分类
GbASE 8s中的Blob 页(Blobspace page)
navicat可不可以直接操作安卓数据库SQLite
Finereport displays and hides column data according to conditions
Laravel document sorting 10. Request life cycle
The yii2 debug toolbar is missing
kenlm
Laravel document sorting 6. Response
2020.3.3 notes async/await and promise and Then processes and threads
Gbase 8s stored procedure syntax structure
English Grammar - pronunciation rules
【无标题】
2021.4.15 note the difference between let, const and VaR in ES6
如何筛选出和产品相关的词,精准排除掉无效词
LeetCode 劍指Offer II 091 粉刷房子[動態規劃] HERODING的LeetCode之路
GBASE 8s存储过程语法结构
关于TCP连接四次握手(或者叫四次挥手)的详细总结
CTF_ Web: deserialization learning notes (I) classes and objects in PHP
Musk released humanoid robot. Why is AI significant to musk?
js中的concat()