当前位置:网站首页>Day_ 10 smart health project - permission control, graphic report
Day_ 10 smart health project - permission control, graphic report
2022-06-23 06:22:00 【fat ۣۖ tiger ۣۖ】
The first 10 Chapter Access control 、 Graphical reports
1. Apply... In the project Spring Security
We have learned before Spring Security How to use the framework , In this chapter, we need to put Spring Security The framework is applied to the background system for permission control , Its essence is authentication and authorization .
To authenticate and authorize, you need the permission model mentioned in the previous course 7 Sheet support , Because user information 、 Permission information 、 Menu information 、 The role of information 、 Related information is saved here 7 Zhang biaozhong , That is, the data in these tables are the basis for our authentication and authorization . Therefore, these data need to be managed before authentication and authorization , That is, we need to develop the following functions :
1、 Authority data management ( Additions and deletions )
2、 Menu data management ( Additions and deletions )
3、 Role data management ( Additions and deletions 、 Role Association permission 、 Role context menu )
4、 User data management ( Additions and deletions 、 User association role )
In view of the time relationship , We no longer implement code development for data management . We can directly import the data into the database .
1.1 Import Spring Security Environmental Science
First step : stay health_parent Parent project pom.xml Import Spring Security Of maven coordinate
<dependency>
  <groupId>org.springframework.security</groupId>
  <artifactId>spring-security-web</artifactId>
  <version>${spring.security.version}</version>
</dependency>
<dependency>
  <groupId>org.springframework.security</groupId>
  <artifactId>spring-security-config</artifactId>
  <version>${spring.security.version}</version>
</dependency>
The second step : stay health_backend engineering web.xml The configuration in the file is used for consolidation Spring Security Frame filter DelegatingFilterProxy
<!-- Delegate filters , Used to integrate other frameworks -->
<filter>
  <!-- Integrate spring security when , The name of this filter is fixed springSecurityFilterChain-->
  <filter-name>springSecurityFilterChain</filter-name>
  <filter-class>org.springframework.web.filter.DelegatingFilterProxy</filter-class>
</filter>
<filter-mapping>
  <filter-name>springSecurityFilterChain</filter-name>
  <url-pattern>/*</url-pattern>
</filter-mapping>
1.2 Achieve authentication and authorization
First step : stay health_backend In the project, according to Spring Security The framework requires SpringSecurityUserService, And realize UserDetailsService Interface
package com.itheima.security;

import com.alibaba.dubbo.config.annotation.Reference;
import com.itheima.pojo.CheckItem;
import com.itheima.pojo.Permission;
import com.itheima.pojo.Role;
import com.itheima.service.CheckItemService;
import com.itheima.service.UserService;
import org.springframework.security.core.GrantedAuthority;
import org.springframework.security.core.authority.SimpleGrantedAuthority;
import org.springframework.security.core.userdetails.User;
import org.springframework.security.core.userdetails.UserDetails;
import org.springframework.security.core.userdetails.UserDetailsService;
import org.springframework.security.core.userdetails.UsernameNotFoundException;
import org.springframework.stereotype.Component;
import java.util.ArrayList;
import java.util.List;
import java.util.Set;

@Component
public class SpringSecurityUserService implements UserDetailsService{

    @Reference // Be careful : Here to pass dubbo Invoke the user service remotely
    private UserService userService;

    // Query user information according to user name
    public UserDetails loadUserByUsername(String username) throws UsernameNotFoundException {

      	// Invoke the user service remotely , Query user information according to user name
        com.itheima.pojo.User user = userService.findByUsername(username);
        if(user == null){

              // The username does not exist
              return null;
        }
        List<GrantedAuthority> list = new ArrayList<>();
        Set<Role> roles = user.getRoles();
        for(Role role : roles){

            // Give character
            list.add(new SimpleGrantedAuthority(role.getKeyword()));
            Set<Permission> permissions = role.getPermissions();
            for(Permission permission : permissions){

              	// to grant authorization
                list.add(new SimpleGrantedAuthority(permission.getKeyword()));
            }
        }

        UserDetails userDetails = new User(username,user.getPassword(),list);
        return userDetails;
    }
}
The second step : establish UserService Service interface 、 Service implementation class 、Dao Interface 、Mapper Mapping files, etc
package com.itheima.service;

import com.itheima.pojo.User;
/** *  User service interface  */
public interface UserService {

    public User findByUsername(String username);
}
package com.itheima.service;

import com.alibaba.dubbo.config.annotation.Service;
import com.itheima.dao.PermissionDao;
import com.itheima.dao.RoleDao;
import com.itheima.dao.UserDao;
import com.itheima.pojo.Permission;
import com.itheima.pojo.Role;
import com.itheima.pojo.User;
import org.springframework.beans.factory.annotation.Autowired;
import org.springframework.transaction.annotation.Transactional;
import java.util.Set;

@Service(interfaceClass = UserService.class)
@Transactional
public class UserServiceImpl implements UserService {

    @Autowired
    private UserDao userDao;
    @Autowired
    private RoleDao roleDao;
    @Autowired
    private PermissionDao permissionDao;

    public User findByUsername(String username) {

        User user = userDao.findByUsername(username);
        if(user == null){

            return null;
        }
        Integer userId = user.getId();
        Set<Role> roles = roleDao.findByUserId(userId);
        if(roles != null && roles.size() > 0){

            for(Role role : roles){

                Integer roleId = role.getId();
                Set<Permission> permissions = permissionDao.findByRoleId(roleId);
                if(permissions != null && permissions.size() > 0){

                    role.setPermissions(permissions);
                }
            }
            user.setRoles(roles);
        }
        return user;
    }
}
package com.itheima.dao;

import com.itheima.pojo.User;

public interface UserDao {

    public User findByUsername(String username);
}
package com.itheima.dao;

import com.itheima.pojo.Role;
import java.util.Set;

public interface RoleDao {

    public Set<Role> findByUserId(int id);
}
package com.itheima.dao;

import com.itheima.pojo.Permission;
import java.util.Set;

public interface PermissionDao {

    public Set<Permission> findByRoleId(int roleId);
}
<?xml version="1.0" encoding="UTF-8" ?>
<!DOCTYPE mapper PUBLIC "-//mybatis.org//DTD Mapper 3.0//EN" "http://mybatis.org/dtd/mybatis-3-mapper.dtd" >
<mapper namespace="com.itheima.dao.UserDao" >
    <select id="findByUsername" parameterType="string" resultType="com.itheima.pojo.User">
        select * from t_user where username = #{username}
    </select>
</mapper>
<?xml version="1.0" encoding="UTF-8" ?>
<!DOCTYPE mapper PUBLIC "-//mybatis.org//DTD Mapper 3.0//EN" "http://mybatis.org/dtd/mybatis-3-mapper.dtd" >
<mapper namespace="com.itheima.dao.RoleDao" >
    <select id="findByUserId" parameterType="int" resultType="com.itheima.pojo.Role">
        select  r.*
      		from t_role r ,t_user_role ur
      		where r.id = ur.role_id and ur.user_id = #{userId}
    </select>
</mapper>
<?xml version="1.0" encoding="UTF-8" ?>
<!DOCTYPE mapper PUBLIC "-//mybatis.org//DTD Mapper 3.0//EN" "http://mybatis.org/dtd/mybatis-3-mapper.dtd" >
<mapper namespace="com.itheima.dao.PermissionDao" >
    <select id="findByRoleId" parameterType="int" resultType="com.itheima.pojo.Permission">
        select  p.*
      		from t_permission p ,t_role_permission rp
      		where p.id = rp.permission_id and rp.role_id = #{roleId}
    </select>
</mapper>
The third step : modify health_backend In the project springmvc.xml file , modify dubbo Package path for batch scanning
<!-- Batch scan -->
<dubbo:annotation package="com.itheima" />
** Be careful :** The original scanned package here is com.itheima.controller, Now change to com.itheima The purpose of the package is to change the SpringSecurityUserService Also scanned , Because in SpringSecurityUserService Of loadUserByUsername The method needs to pass dubbo The remote call name is UserService Service for .
Step four : stay health_backend Provide... In the project spring-security.xml The configuration file
<?xml version="1.0" encoding="UTF-8"?>
<beans xmlns="http://www.springframework.org/schema/beans" xmlns:xsi="http://www.w3.org/2001/XMLSchema-instance" xmlns:context="http://www.springframework.org/schema/context" xmlns:dubbo="http://code.alibabatech.com/schema/dubbo" xmlns:mvc="http://www.springframework.org/schema/mvc" xmlns:security="http://www.springframework.org/schema/security" xsi:schemaLocation="http://www.springframework.org/schema/beans http://www.springframework.org/schema/beans/spring-beans.xsd http://www.springframework.org/schema/mvc http://www.springframework.org/schema/mvc/spring-mvc.xsd http://code.alibabatech.com/schema/dubbo http://code.alibabatech.com/schema/dubbo/dubbo.xsd http://www.springframework.org/schema/context http://www.springframework.org/schema/context/spring-context.xsd http://www.springframework.org/schema/security http://www.springframework.org/schema/security/spring-security.xsd">

    <!-- http: Used to define related permission controls   Specify which resources do not need permission verification , You can use wildcards  -->
    <security:http security="none" pattern="/js/**" />
    <security:http security="none" pattern="/css/**" />
    <security:http security="none" pattern="/img/**" />
    <security:http security="none" pattern="/plugins/**" />

    <!-- http: Used to define related permission controls  auto-config: Whether to automatically configure   Set to true The framework will provide some default configurations , For example, provide a default login page 、 Logout processing, etc   Set to false The login form configuration needs to be displayed , Otherwise, an error will be reported  use-expressions: Is used to specify the intercept-url Medium access Whether the property uses an expression  -->
    <security:http auto-config="true" use-expressions="true">
        <security:headers>
            <!-- Settings on the page can be through iframe Access protected pages , The default is not allowed to access -->
            <security:frame-options policy="SAMEORIGIN"></security:frame-options>
        </security:headers>
        <!-- intercept-url: Define an interception rule  pattern: To which url Authority control  access: In the request corresponding URL What kind of permissions do you need when you're doing this , By default, it should be a comma separated list of roles ,  The requested user only needs to have one of the roles to successfully access the corresponding URL isAuthenticated(): Has been certified ( Not anonymous users ) -->
        <security:intercept-url pattern="/pages/**" access="isAuthenticated()" />
        <!--form-login: Define form login information -->
        <security:form-login login-page="/login.html" username-parameter="username" password-parameter="password" login-processing-url="/login.do" default-target-url="/pages/main.html" always-use-default-target="true" authentication-failure-url="/login.html" />

        <!-- csrf: Corresponding CsrfFilter filter  disabled: Is it enabled? CsrfFilter filter , If you use a custom login page, you need to turn this off ,  Otherwise, the login operation will be disabled (403) -->
        <security:csrf disabled="true"></security:csrf>
    </security:http>

    <!-- Configure password encryption object -->
    <bean id="passwordEncoder" class="org.springframework.security.crypto.bcrypt.BCryptPasswordEncoder" />

    <!-- Authentication manager , Used to handle authentication operations -->
    <security:authentication-manager>
        <!-- Certification provider , Execute specific authentication logic -->
        <security:authentication-provider user-service-ref="springSecurityUserService">
            <!-- Specify password encryption policy -->
            <security:password-encoder ref="passwordEncoder" />
        </security:authentication-provider>
    </security:authentication-manager>

    <!-- Enable annotation mode permission control -->
    <security:global-method-security pre-post-annotations="enabled" />
</beans>
Step five : stay springmvc.xml Introduce in the file spring-security.xml file
<import resource="spring-security.xml"></import>
Step six : stay Controller Add permission control annotation to the method , Here to CheckItemController For example
package com.itheima.controller;

import com.alibaba.dubbo.config.annotation.Reference;
import com.itheima.constant.MessageConstant;
import com.itheima.constant.PermissionConstant;
import com.itheima.entity.PageResult;
import com.itheima.entity.QueryPageBean;
import com.itheima.entity.Result;
import com.itheima.exception.CustomException;
import com.itheima.pojo.CheckItem;
import com.itheima.pojo.Member;
import com.itheima.service.CheckItemService;
import org.springframework.security.access.annotation.Secured;
import org.springframework.security.access.prepost.PreAuthorize;
import org.springframework.web.bind.annotation.RequestBody;
import org.springframework.web.bind.annotation.RequestMapping;
import org.springframework.web.bind.annotation.RequestParam;
import org.springframework.web.bind.annotation.RestController;
import org.springframework.web.multipart.commons.CommonsMultipartFile;
import java.util.List;

/** *  Management of physical examination items  */
@RestController
@RequestMapping("/checkitem")
public class CheckItemController {

    @Reference
    private CheckItemService checkItemService;

    // Paging query
    @PreAuthorize("hasAuthority('CHECKITEM_QUERY')")// Permission to check
    @RequestMapping("/findPage")
    public PageResult findPage(@RequestBody QueryPageBean queryPageBean){

        PageResult pageResult = checkItemService.pageQuery(
                                    queryPageBean.getCurrentPage(),
                                    queryPageBean.getPageSize(),
                                    queryPageBean.getQueryString());
        return pageResult;
    }

    // Delete
    @PreAuthorize("hasAuthority('CHECKITEM_DELETE')")// Permission to check
    @RequestMapping("/delete")
    public Result delete(Integer id){

        try {

            checkItemService.delete(id);
        }catch (RuntimeException e){

            return new Result(false,e.getMessage());
        }catch (Exception e){

            return new Result(false, MessageConstant.DELETE_CHECKITEM_FAIL);
        }
        return new Result(true,MessageConstant.DELETE_CHECKITEM_SUCCESS);
    }

    // newly added
    @PreAuthorize("hasAuthority('CHECKITEM_ADD')")// Permission to check
    @RequestMapping("/add")
    public Result add(@RequestBody CheckItem checkItem){

        try {

            checkItemService.add(checkItem);
        }catch (Exception e){

            return new Result(false,MessageConstant.ADD_CHECKITEM_FAIL);
        }
        return new Result(true,MessageConstant.ADD_CHECKITEM_SUCCESS);
    }

    // edit
    @PreAuthorize("hasAuthority('CHECKITEM_EDIT')")// Permission to check
    @RequestMapping("/edit")
    public Result edit(@RequestBody CheckItem checkItem){

        try {

            checkItemService.edit(checkItem);
        }catch (Exception e){

            return new Result(false,MessageConstant.EDIT_CHECKITEM_FAIL);
        }
        return new Result(true,MessageConstant.EDIT_CHECKITEM_SUCCESS);
    }
}
Step seven : Modify page , Prompt for setting when you do not have permission , Here to checkitem.html Medium handleDelete Methods as an example
// Insufficient permission prompt
showMessage(r){

  if(r == 'Error: Request failed with status code 403'){

    // Insufficient authority
    this.$message.error(' No access ');
    return;
  }else{

    this.$message.error(' Unknown error ');
    return;
  }
}
//  Delete
handleDelete(row) {

  this.$confirm(' This operation will persist the current data , Whether or not to continue ?', ' Tips ', {

    type: 'warning'
  }).then(()=>{

    // Click the OK button to execute this code
    axios.get("/checkitem/delete.do?id=" + row.id).then((res)=> {

      if(!res.data.flag){

        // Delete failed
        this.$message.error(res.data.message);
      }else{

        // Delete successful
        this.$message({

          message: res.data.message,
          type: 'success'
        });
        this.findPage();
      }
    }).catch((r)=>{

      this.showMessage(r);
    });
  }).catch(()=> {

    // Click the Cancel button to execute this code
    this.$message(' Operation cancelled ');
  });
}
1.3 Display the user name
We have completed the authentication and authorization operation , If the user authentication is successful, the user name of the current user needs to be displayed on the page .Spring Security After successful authentication, the user information will be saved to the context object provided by the framework , So here we can call Spring Security Framework provided API Gets the current user's username And show it on the page .
Implementation steps :
First step : stay main.html Modify in page , Definition username The model data is based on VUE The data binding of shows the user name , send out ajax The request for username
<script>
    new Vue({

        el: '#app',
        data:{

            username:null,// user name
    	    menuList:[]
        },
        created(){

            // Send a request to get the user name of the currently logged in user
            axios.get('/user/getUsername.do').then((response)=>{

                this.username = response.data.data;
            });
        }
    });
</script>
<div class="avatar-wrapper">
  <img src="../img/user2-160x160.jpg" class="user-avatar">
  <!-- Show user name -->
  {
   {username}}
</div>
The second step : establish UserController And provide getUsername Method
package com.itheima.controller;

import com.itheima.constant.MessageConstant;
import com.itheima.entity.Result;
import org.springframework.security.core.context.SecurityContextHolder;
import org.springframework.security.core.context.SecurityContextImpl;
import org.springframework.web.bind.annotation.RequestMapping;
import org.springframework.web.bind.annotation.RestController;

@RestController
@RequestMapping("/user")
public class UserController {

    // Get the user name of the currently logged in user
    @RequestMapping("/getUsername")
    public Result getUsername()throws Exception{

        try{

            org.springframework.security.core.userdetails.User user =
                    (org.springframework.security.core.userdetails.User)
                    SecurityContextHolder.getContext().getAuthentication().getPrincipal();
            return new Result(true, MessageConstant.GET_USERNAME_SUCCESS,user.getUsername());
        }catch (Exception e){

            return new Result(false, MessageConstant.GET_USERNAME_FAIL);
        }
    }
}
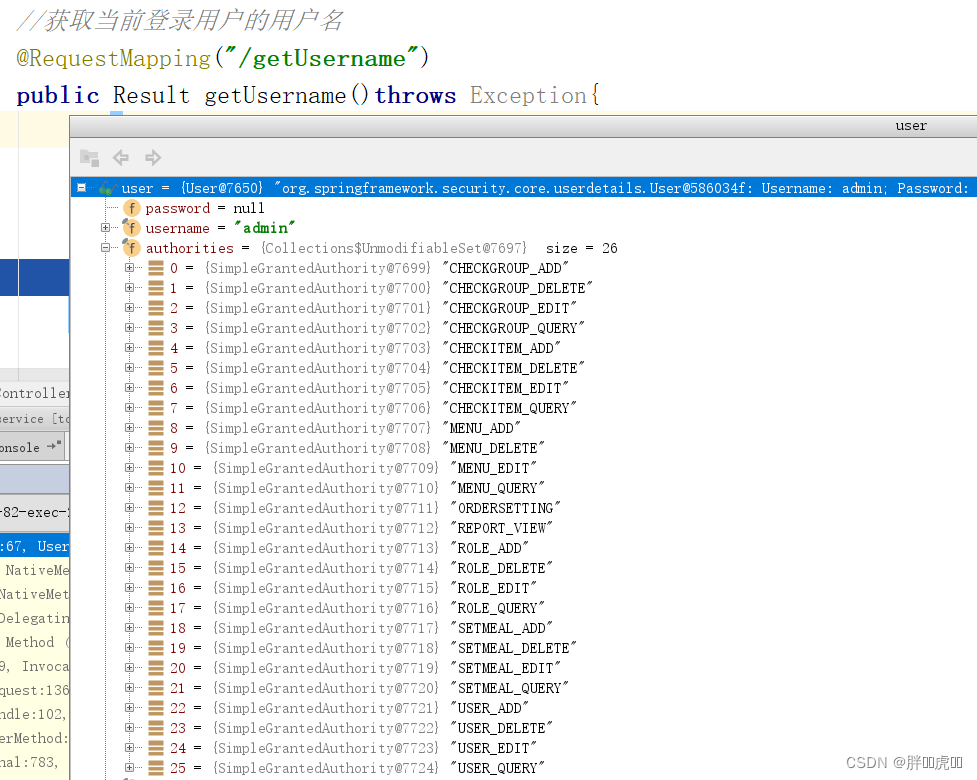
adopt debug Debugging can be seen Spring Security The user related information that the framework holds in its context :
1.4 User exits
First step : stay main.html Add a hyperlink to the Exit menu provided in
<el-dropdown-item divided>
  <span style="display:block;"><a href="/logout.do"> sign out </a></span>
</el-dropdown-item>
The second step : stay spring-security.xml Configuration in file
<!-- logout: Log out  logout-url: Exit the request path corresponding to the login operation  logout-success-url: Exit the jump page after login  -->
<security:logout logout-url="/logout.do" logout-success-url="/login.html" invalidate-session="true"/>
2. Graphical reports ECharts
2.1 ECharts brief introduction
ECharts The abbreviation comes from Enterprise Charts, Business class data charts , It is an open source use of Baidu JavaScript Realized data visualization tool , It can run smoothly in PC And mobile devices , Compatible with most current browsers (IE8/9/10/11,Chrome,Firefox,Safari etc. ), The bottom layer relies on lightweight vector graphics library ZRender, Provide intuitive 、 Rich interaction 、 Highly customizable data visualization chart .
Official website :https://echarts.baidu.com/
Download address :https://echarts.baidu.com/download.html
After downloading, you can get the following files :

We just need to put dist In the catalog echarts.js When the file is imported into the page, it can be used

2.2 5 Minutes to go ECharts
We can refer to the official 5 Minutes to go ECharts Feel the document ECharts How to use , The address is as follows :
https://www.echartsjs.com/tutorial.html#5%20%E5%88%86%E9%92%9F%E4%B8%8A%E6%89%8B%20ECharts
First step : establish html Page and introduce echarts.js file
<!DOCTYPE html>
<html>
<head>
    <meta charset="utf-8">
    <!--  introduce  ECharts  file  -->
    <script src="echarts.js"></script>
</head>
</html>
The second step : Prepare a with width and height in the page DOM Containers .
<body>
    <!--  by  ECharts  Prepare one with size ( Wide and high ) Of  DOM -->
    <div id="main" style="width: 600px;height:400px;"></div>
</body>
The third step : adopt echarts.init Method initializes one echarts Instance and pass setOption Method to generate a simple histogram
<script type="text/javascript">
  //  Based on the prepared dom, initialization echarts example
  var myChart = echarts.init(document.getElementById('main'));

  //  Specify configuration items and data for the chart
  var option = {

    title: {

      text: 'ECharts  Introductory example '
    },
    tooltip: {
    },
    legend: {

      data:[' sales ']
    },
    xAxis: {

      data: [" shirt "," Woolen sweater "," Snow spins unlined upper garment "," The trousers "," High heels "," socks "]
    },
    yAxis: {
    },
    series: [{

      name: ' sales ',
      type: 'bar',
      data: [5, 20, 36, 10, 10, 20]
    }]
};

//  Use the configuration item and data display chart just specified .
myChart.setOption(option);
</script>
The effect is as follows :
2.3 see ECharts Official example
ECharts Provides many official examples , We can use these official examples to see the display effect and usage .
Official instance address :https://www.echartsjs.com/examples/
[ Failed to transfer the external chain picture , The origin station may have anti-theft chain mechanism , It is suggested to save the pictures and upload them directly (img-cjANkgiC-1655525040744)(3.
)]
You can click on a specific graphic to jump to the editing page , The source code is displayed on the left side of the editing page (js Part of the source code ), The chart effect is shown on the right , as follows :
To view the complete code, click the... In the lower right corner Download Button to download the full page to the local .
Through official cases, we can find , Use ECharts Show the chart effect , The key point is to determine the data format required for this chart , Then provide data in this data format , We don't have to pay attention to how the effect is rendered .
in application , The data we want to show is often stored in the database , So we can send ajax Request to obtain the data in the database and convert it into the data required by the chart .
3. Number of members line chart
3.1 Demand analysis
Member information is the core data of physical examination institutions , The number of its members and the number of growth can reflect part of the operation of the institution . The line chart can directly reflect the growth trend of the number of members . In this chapter, we need to show the total member data volume of each month in the past year . The display effect is as follows :

3.2 Perfect the page
The page corresponding to the line chart of the number of members is /pages/report_member.html.
3.2.1 Import ECharts library
First step : take echarts.js File copy to health_backend engineering plugins Under the table of contents
The second step : stay report_member.html The page introduce echarts.js file
<script src="../plugins/echarts/echarts.js"></script>
3.2.2 Import the line chart by referring to the official instance
<div class="box">
  <!--  by  ECharts  Prepare one with size ( Wide and high ) Of  DOM -->
  <div id="chart1" style="height:600px;"></div>
</div>
<script type="text/javascript">
  //  Based on the prepared dom, initialization echarts example
  var myChart1 = echarts.init(document.getElementById('chart1'));
  // send out ajax Request dynamic data
  axios.get("/report/getMemberReport.do").then((res)=>{

    myChart1.setOption(
      {

        title: {

          text: ' Number of members '
        },
        tooltip: {
    },
        legend: {

          data:[' Number of members ']
        },
        xAxis: {

          data: res.data.data.months
        },
        yAxis: {

          type:'value'
        },
        series: [{

          name: ' Number of members ',
          type: 'line',
          data: res.data.data.memberCount
        }]
      });
  });
</script>
According to the requirements of line chart for data format , We send ajax request , The server needs to return data in the following format :
{

	"data":{

			"months":["2019.01","2019.02","2019.03","2019.04"],
			"memberCount":[3,4,8,10]
		   },
	"flag":true,
	"message":" Get member statistics successfully "
}
3.3 Background code
3.3.1 Controller
stay health_backend Create in project ReportController And provide getMemberReport Method
package com.itheima.controller;

import com.alibaba.dubbo.config.annotation.Reference;
import com.itheima.constant.MessageConstant;
import com.itheima.entity.Result;
import com.itheima.pojo.Setmeal;
import com.itheima.service.MemberService;
import com.itheima.service.ReportService;
import com.itheima.service.SetmealService;
import com.itheima.utils.DateUtils;
import org.apache.poi.xssf.usermodel.XSSFRow;
import org.apache.poi.xssf.usermodel.XSSFSheet;
import org.apache.poi.xssf.usermodel.XSSFWorkbook;
import org.springframework.beans.factory.annotation.Autowired;
import org.springframework.web.bind.annotation.RequestMapping;
import org.springframework.web.bind.annotation.RestController;
import javax.servlet.ServletOutputStream;
import javax.servlet.http.HttpServletRequest;
import javax.servlet.http.HttpServletResponse;
import java.io.File;
import java.io.FileInputStream;
import java.io.FileOutputStream;
import java.math.BigDecimal;
import java.text.SimpleDateFormat;
import java.util.*;

/** *  Statistical report  */
@RestController
@RequestMapping("/report")
public class ReportController {

    @Reference
    private MemberService memberService;
    /** *  Membership statistics  * @return */
    @RequestMapping("/getMemberReport")
    public Result getMemberReport(){

        Calendar calendar = Calendar.getInstance();
        calendar.add(Calendar.MONTH,-12);// Get before the current date 12 The date of the month

        List<String> list = new ArrayList<>();
        for(int i=0;i<12;i++){

            calendar.add(Calendar.MONTH,1);
            list.add(new SimpleDateFormat("yyyy.MM").format(calendar.getTime()));
        }

        Map<String,Object> map = new HashMap<>();
        map.put("months",list);

        List<Integer> memberCount = memberService.findMemberCountByMonth(list);
        map.put("memberCount",memberCount);

        return new Result(true, MessageConstant.GET_MEMBER_NUMBER_REPORT_SUCCESS,map);
    }
}
3.3.2 Service interface
stay MemberService Extension method in service interface findMemberCountByMonth
public List<Integer> findMemberCountByMonth(List<String> month);
3.2.3 Service implementation class
stay MemberServiceImpl Implementation in service implementation class findMemberCountByMonth Method
// Count the number of members according to the month
public List<Integer> findMemberCountByMonth(List<String> month) {

  List<Integer> list = new ArrayList<>();
  for(String m : month){

    m = m + ".31";// Format :2019.04.31
    Integer count = memberDao.findMemberCountBeforeDate(m);
    list.add(count);
  }
  return list;
}
3.3.4 Dao Interface
stay MemberDao Extension method in interface findMemberCountBeforeDate
public Integer findMemberCountBeforeDate(String date);
3.3.5 Mapper The mapping file
stay MemberDao.xml Provided in the mapping file SQL sentence
<!-- Count the number of members according to the date , Count the number of members before the specified date -->
<select id="findMemberCountBeforeDate" parameterType="string" resultType="int">
select count(id) from t_member where regTime <= #{value}
</select>

边栏推荐
- Jour 04 projet de santé mentale - gestion des rendez - vous - gestion des forfaits
- Pat class B 1019 C language
- ant使用总结(二):相关命令说明
- mongodb 4. X binding multiple IP startup errors
- mysql以逗号分隔的字段作为查询条件怎么查——find_in_set()函数
- Machine learning 3-ridge regression, Lasso, variable selection technique
- Pat class B 1020 Moon Cake
- 【Leetcode】431. Encode N-ary Tree to Binary Tree(困难)
- Day_06 传智健康项目-移动端开发-体检预约
- 金融科技之高效办公(一):自动生成信托计划说明书
猜你喜欢

Day_11 传智健康项目-图形报表、POI报表

Day_ 04 smart health project - appointment management - package management

Day_02 传智健康项目-预约管理-检查项管理

Radar canvas
Day_04 传智健康项目-预约管理-套餐管理

Gplearn appears assignment destination is read only

In the half year summary, it people just want to lie flat

Progress of layer 2 technical scheme

mongodb 4.x绑定多个ip启动报错

【开源项目】excel导出lua配置表工具
随机推荐
Difference between MySQL read committed and repeatability
Jour 04 projet de santé mentale - gestion des rendez - vous - gestion des forfaits
如何为 Arduino IDE 安装添加库
Day_12 传智健康项目-JasperReports
jvm-06. Garbage collector
Leetcode topic resolution single number
Remove duplicates from sorted list II of leetcode topic resolution
mysql读已提交和可重复度区别
Pyqt5 setting window top left Icon
SQL表名与函数名相同导致SQL语句错误。
CVE-2021-20038
ant使用总结(二):相关命令说明
去除防火墙和虚拟机对live555启动IP地址的影响
Pat class B 1018 C language
[vivado] xilinxcedstore introduction
How to specify the output path of pig register Project Log
Leetcode topic resolution valid Sudoku
学习太极创客 — ESP8226 (十一)用 WiFiManager 库配网
Memory analysis and memory leak detection
Day_13 傳智健康項目-第13章