当前位置:网站首页>Easily learn pytoch transfer learning to realize surface defect inspection
Easily learn pytoch transfer learning to realize surface defect inspection
2022-07-24 18:41:00 【Xiaobai learns vision】
Click on the above “ Xiaobai studies vision ”, Optional plus " Star standard " or “ Roof placement ”
Heavy dry goods , First time delivery Reprinted from :OpenCV School
introduction ·
Hello everyone , Today's update is how to base on torchvision The built-in model completes the transfer learning of image classification tasks , Previously, we have completed the migration learning of object detection tasks , Here we add the transfer learning for image classification tasks , Official documents are verbose , After reading it, the operability is actually very low , Especially for beginners , It's estimated that after reading it, I'm confused . I rewrite a wave , Code is simple and easy to understand , Then export the training results ONNX, Use OpenCV DNN Invoke deployment , Very practical !
Data sets
The data set of hot rolled strip surface defects of Northeastern University , This data set was collected by several teachers including song kechen of Northeastern University , There are three types of data . Use here (NEU surface defect database), The data set collects data 、 Scratches 、 Press in oxide skin 、 Crackle 、 Total pitting and plaque 6 Seed defect , Every defect 300 Zhang , The image size is 200×200. Some examples are as follows :

Based on this data set , Realization pytorch Data class , The code to complete the loading and preprocessing of data sets is as follows :
class SurfaceDefectDataset(Dataset):
    def __init__(self, root_dir):
        self.transform = transforms.Compose([transforms.ToTensor()])
        img_files = os.listdir(root_dir)
        self.defect_types = []
        self.images = []
        index = 0
        for file_name in img_files:
            defect_attrs = file_name.split("_")
            d_index = defect_labels.index(defect_attrs[0])
            self.images.append(os.path.join(root_dir, file_name))
            self.defect_types.append(d_index)
            index += 1

    def __len__(self):
        return len(self.images)

    def num_of_samples(self):
        return len(self.images)

    def __getitem__(self, idx):
        if torch.is_tensor(idx):
            idx = idx.tolist()
            image_path = self.images[idx]
        else:
            image_path = self.images[idx]
        img = cv.imread(image_path)  # BGR order
        h, w, c = img.shape
        # rescale
        img = cv.resize(img, (200, 200))
        img = (np.float32(img) /255.0 - 0.5) / 0.5
        # H, W C to C, H, W
        img = img.transpose((2, 0, 1))
        sample = {'image': torch.from_numpy(img), 'defect': self.defect_types[idx]}
        return sample
How to download this dataset , The background to reply "NEU" Keyword to get the download address
Model USES
Pytorchvison Support a variety of image classification models , Here we choose the residual network model as the basic model of transfer learning , For the output layer ( The last layer ) Change to six categories , For other feature layer selection, fine tune the parameters during training . common ResNet The network model is as follows :

be based on ResNet18 Complete the network model modification , The final model implementation code is as follows :
class SurfaceDefectResNet(torch.nn.Module):

    def __init__(self):
        super(SurfaceDefectResNet, self).__init__()
        self.cnn_layers = torchvision.models.resnet18(pretrained=True)
        num_ftrs = self.cnn_layers.fc.in_features
        self.cnn_layers.fc = torch.nn.Linear(num_ftrs, 6)

    def forward(self, x):
        # stack convolution layers
        out = self.cnn_layers(x)
        return out
Model training and testing
Model training is not different from some image classification model training methods mentioned above , Based on cross entropy loss , Finish training , Each batch 4 Images or 8 Pictures , Training 15 individual epoch after , Save the model . Then use the model test 35 Test images , Two predictions were found to be wrong , The rest are correct . The code of the training model is as follows :
#  The number of training models
num_epochs = 15
# optimizer = torch.optim.SGD(model.parameters(), lr=0.001)
optimizer = torch.optim.Adam(model.parameters(), lr=1e-2)
model.train()

#  Loss function
cross_loss = torch.nn.CrossEntropyLoss()
index = 0
for epoch in  range(num_epochs):
    train_loss = 0.0
    for i_batch, sample_batched in enumerate(dataloader):
        images_batch, label_batch = \
            sample_batched['image'], sample_batched['defect']
        if train_on_gpu:
            images_batch, label_batch= images_batch.cuda(), label_batch.cuda()
        optimizer.zero_grad()

        # forward pass: compute predicted outputs by passing inputs to the model
        m_label_out_ = model(images_batch)
        label_batch = label_batch.long()

        # calculate the batch loss
        loss = cross_loss(m_label_out_, label_batch)

        # backward pass: compute gradient of the loss with respect to model parameters
        loss.backward()

        # perform a single optimization step (parameter update)
        optimizer.step()

        # update training loss
        train_loss += loss.item()
        if index % 100 == 0:
            print('step: {} \tTraining Loss: {:.6f} '.format(index, loss.item()))
        index += 1

        #  Calculate the average loss
    train_loss = train_loss / num_train_samples

    #  Show the loss function of training set and verification set
    print('Epoch: {} \tTraining Loss: {:.6f} '.format(epoch, train_loss))

# save model
model.eval()
torch.save(model, 'surface_defect_model.pt')
Convert to ONNX Pattern ,OpenCV DNN Deployment call , The code is as follows :
defect_net = cv.dnn.readNetFromONNX("surface_defect_resnet18.onnx")
root_dir = "D:/pytorch/enu_surface_defect/test"
fileNames = os.listdir(root_dir)
for f in fileNames:
    image = cv.imread(os.path.join(root_dir, f))
    blob = cv.dnn.blobFromImage(image, 0.00392, (200, 200), (127, 127, 127)) / 0.5
    defect_net.setInput(blob)
    res = defect_net.forward()
    idx = np.argmax(np.reshape(res, (6)))
    defect_txt = defect_labels[idx]
    cv.putText(image, defect_txt, (10, 25), cv.FONT_HERSHEY_SIMPLEX, 1, (255, 0, 0), 2)
    cv.imshow("input", image)
    print(f, defect_txt)
    cv.waitKey(0)
cv.destroyAllWindows()
The predicted operation results are as follows :

Running results and pytorch The running results of the call model are consistent . Because this is a column , Many codes have been given in previous articles , There is no duplicate code here !
The good news !
Xiaobai learns visual knowledge about the planet
Open to the outside world

 download 1:OpenCV-Contrib Chinese version of extension module

 stay 「 Xiaobai studies vision 」 Official account back office reply : Extension module Chinese course , You can download the first copy of the whole network OpenCV Extension module tutorial Chinese version , Cover expansion module installation 、SFM Algorithm 、 Stereo vision 、 Target tracking 、 Biological vision 、 Super resolution processing and other more than 20 chapters .


 download 2:Python Visual combat project 52 speak
 stay 「 Xiaobai studies vision 」 Official account back office reply :Python Visual combat project , You can download, including image segmentation 、 Mask detection 、 Lane line detection 、 Vehicle count 、 Add Eyeliner 、 License plate recognition 、 Character recognition 、 Emotional tests 、 Text content extraction 、 Face recognition, etc 31 A visual combat project , Help fast school computer vision .


 download 3:OpenCV Actual project 20 speak
 stay 「 Xiaobai studies vision 」 Official account back office reply :OpenCV Actual project 20 speak , You can download the 20 Based on OpenCV Realization 20 A real project , Realization OpenCV Learn advanced .


 Communication group

Welcome to join the official account reader group to communicate with your colleagues , There are SLAM、 3 d visual 、 sensor 、 Autopilot 、 Computational photography 、 testing 、 Division 、 distinguish 、 Medical imaging 、GAN、 Wechat groups such as algorithm competition ( It will be subdivided gradually in the future ), Please scan the following micro signal clustering , remarks :” nickname + School / company + Research direction “, for example :” Zhang San + Shanghai Jiaotong University + Vision SLAM“. Please note... According to the format , Otherwise, it will not pass . After successful addition, they will be invited to relevant wechat groups according to the research direction . Please do not send ads in the group , Or you'll be invited out , Thanks for your understanding ~边栏推荐
猜你喜欢

Principle and application of database

04 distributed resource management system yarn
![BUUCTF-pwn[1]](/img/93/6b9fe53b31e0c846b8c2ec7ab793ce.png)
BUUCTF-pwn[1]

5. Reference type and value type as function parameters?

Valentine's Day gift ----- use her photos and our chat records to generate word clouds~

缺失值处理

【历史上的今天】7 月 24 日:Caldera 诉微软案;AMD 宣布收购 ATI;谷歌推出 Chromecast

全国职业院校技能大赛网络安全竞赛之数据分析数字取证-A

Go小白实现一个简易的go mock server
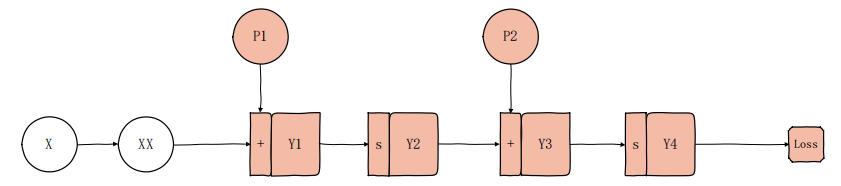
理解动态计算图,requires_grad、zero_grad
随机推荐
Type-C PD protocol chip while charging and listening
字符串的遍历及拼接
Vsftpd2.3.4-端口渗透 6200 irc_3281_backdoor
L4l7 load balancing
全国职业院校技能大赛网络安全竞赛——Apache安全配置详解
Ionic4 learning notes 9 -- an east project 01
【Tkinter】常用组件(二)
Rookie colleagues cost me 2K. Did you recite the secret of salary increase? (collect it quickly!)
ETL development tool kettle download installation environment construction and use tutorial
Web
Principle and application of database
5. Reference type and value type as function parameters?
16. What is the difference between target and currenttarget?
怎么解决idea中yaml无法识别或者飘红?
Mid year inventory | in 2022, PAAS will be upgraded again
CF. Bits And Pieces(子集状压dp + 剪枝)
Highcharts chart and report display, export data
Template syntax [easy to understand]
MySQL -- implicit conversion of data type
Ionic4 learning notes 8 -- UI component 2 list (no practice, direct excerpt)