
author :HelloGitHub-Anthony
Here is HelloGitHub Introduction of open source hardware development platform Arduino Series of tutorials for .
- Chapter one :Arduino Introduction and development environment construction
- Second articles : Make temperature and humidity display
Last article , We explained how to install Arduino support library 、DHT 11 Temperature and humidity sensors and OLED Use of screen , And use Arduino A small temperature and humidity display is made .
In this particular, we pay attention to All things connected Era , Let's Arduino Temperature and humidity “ On the cloud ” play , There is a scientific name called the Internet of things .
The Internet of things (IoT) Is a network of physical objects , These physical objects are embedded with sensors 、 Software and other technologies , So that it can establish connections with other devices and systems and exchange data through the Internet .
Do you feel a little taller in an instant , But don't worry about the knowledge in this issue , Because the profound I will not !
Today we're going to talk about : How to put the temperature and humidity equipment made in the last phase into the cloud , Through the Internet of things platform Real time data upload and Remote control equipment . The implementation will Arduino The temperature and humidity data measured by the equipment are uploaded to the Internet of things platform , Then the receiving platform sends instructions to the control equipment LED Light switch .
Have you started to sharpen your fists ? Now let's start “ On the cloud ”!
One 、 Realize networking function
1.1 Module introduction
First , If you want to Arduino Servers connected to the Internet of things platform , It is necessary to enable the device to connect to the network first ( Like at home WiFi), Here we need to use ESP-01(s) modular , To achieve this function .
Its usage is similar to that of the components described above , Just use VCC(3.3v)、GND、TX、RX Four lines , And Arduino communicate . What I use here is ESP-01+ Adapter plate , The adapter board realizes 5v->3.3v And Rx and Tx Leading out of the interface , Convenient for subsequent use .

majority ESP-01(s) The module leaves the factory , It's all built in AT Command firmware , When in use, you only need to send to the module AT Command to connect to the network 、 Data transmission and other operations .
About what is AT Instructions , Simply speaking, it is a kind of equipment room Communication message specification , More specific definitions and application scenarios can be understood by readers themselves .
1.2 Module USES
ESP-01 The module wiring mode is as follows :
- GND -> GND
- VCC -> 3.3v( Separate modules ) 5.5v( With adapter plate )
- Tx -> Rx
- Rx -> TX
Use of AT The instructions are as follows :
- AT+RST: Reset module
- AT+CWMODE=1: Switch mode
- AT+CWQAP: To break off WiFi Connect
- AT+CWJAP="WiFi name "," password ": Connect WiFi
- AT+CIPSTART="TCP","IP", port : Connect to server
- AT+CIPMODE=1: Switch to TCP Passthrough mode
- AT+CIPSEND: Start sending data
1.3 Code
Arduino Connect WiFi Code for :
#include <Arduino.h>

boolean at_exec(char *data, char *keyword, unsigned long time_out)
{
  Serial.println(data);
  Serial.flush();
  delay(100); //  Waiting response
  unsigned long start = millis();

  while (Serial.available() < strlen(keyword))
  {
    if (millis() - start > time_out)
      return false;
  }
  if (Serial.find(keyword))
    return true;
  else
    return false;

  while (Serial.available())
    Serial.read(); // Clear the serial buffer
}

void setup()
{
  Serial.begin(115200);
  while (!at_exec("AT+RST", "OK", 1000));
  while (!at_exec("AT+CWMODE=1", "OK", 1000));
  while (!at_exec("AT+CWQAP", "OK", 1000));
  while (!at_exec("AT+CWJAP=\"HelloGithub\",\"PassWord\"", "WIFI CONNECTED", 2000));
  while (!at_exec("AT+CIPSTART=\"TCP\",\"183.230.40.40\",1811", "CONNECT", 1000));
  while (!at_exec("AT+CIPMODE=1", "OK", 500));
  while (!at_exec("AT+CIPSEND", "OK", 500));
  //Serial.println("* product ID# Authentication information # Script name *"); //  How to obtain this information is discussed below
}
Be careful :
- Disconnect before downloading Arduino and ESP-01 The connection of , Otherwise, the download may fail
- perform
AT+CIPSENDafter , The module will no longer respond AT Instructions , If you need to modify the configuration, you must power off and restart the module - Remember to change
AT+CWJAPParameters of , Corresponding WiFi User name and password
After burning , The connection module restarts Arduino. In the router management interface “ Connected device ” page , See our WiFi equipment , That means success !

Two 、 Internet of things platform
Here we are using OneNet Internet of things platform , It is the Internet of things created by China Mobile PaaS Open platform , Through this platform, you can easily ( free ) Implement the device ” On the cloud “.

below , It will cover the process from registration to cloud on device , All cloud configuration steps required .
2.1 register
open OneNet Official website , Click on the “ register ” Registered account .

2.2 New product
After completing the login account registration , Click on the “ Console ” Go to the control page .
Click after entering “ All products and services ”->“ Multi protocol access ”:

stay “ Multi protocol access interface ” choice TCP transparent transmission -> Add product :

Fill in the relevant information in the pop-up sidebar ,“ Product industry ” and “ Category ” Just fill it in , Finally, click “ determine ” Complete new product .

2.3 Add equipment
Find the product I just created. Mine is “HelloGitHub”, Then click... In the left column “ The equipment list ”, Click on the new page “ Add equipment ”, After filling in the relevant information, click “ add to ”, Complete the operation of adding equipment .

2.4 Write data parsing script
Next , We configure the cloud data parsing script , Don't write it yourself and download it directly Official script You can use it if you change it locally .

In the extracted and downloaded folder , find sample.lua In the file device_timer_init function ( The first 303 That's ok ), Change to the following :
function device_timer_init(dev)
    --  Send the light switch command regularly  --
	dev:timeout(0)
	dev:add(10,"open","open")
	dev:add(12,"close","close")
end
find device_data_analyze function ( At the end of the file ), Change to the following :
function device_data_analyze(dev)
	local t={}
	local a=0
	local s = dev:size()
    --  We define   One time transmission   ten   byte , Respectively   temperature   humidity  --
	add_val(t,"Temperature",a,dev:bytes(1,5))
	add_val(t,"Humidity",a,dev:bytes(6,5))
	dev:response()
	dev:send("received")
	return s,to_json(t)
end
If you are interested in using scripts , You can view code comments and access documents on the official website , There will be no more explanation here .
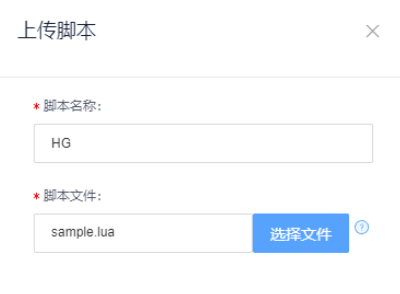
2.5 Upload script
After saving the file , Go back to the just opened “ The equipment list ” Click on “ Upload parsing script ”.

thus , Cloud configuration is complete .
2.6 Connect to the Internet of things platform
modify 1.3 Code for , take “ How to obtain this information is discussed below ” Change this line of code to :
Serial.println("* product ID#ILoveHelloGitHub#HG*");
After configuring the cloud , To obtain the product ID、 Authentication information 、 Script name Equal parameter , Replace to the corresponding position .(* product ID# Authentication information # Script name *)
Last , Re - burn the code and restart ESP-01 modular . Wait a moment , Refresh in the cloud “ The equipment list ” page , See our equipment , Prove that the device is successfully connected to the Internet of things platform .

3、 ... and 、Arduino On the cloud
Go through the front matting , We “ On the cloud ” The most exciting part of our journey is coming . Upload the temperature and humidity data of the environment where the device is located to the cloud !
3.1 Code
Since it is uploading temperature and humidity data , You need us Last issue Speak of the DHT11 modular ( Temperature and humidity sensor ), Then combine the code of connecting the network in this issue , It can be finished in minutes .
But to make the project more interesting , I added an additional parsing IOT platform to send commands , Remote control switch LED Function of .
The code snippet is as follows :
void setup()
{
  //  Change to your own cloud parameters
  Serial.println("* product ID#ILoveHelloGitHub#HG*");
}

//  According to the received from the serial port   character string   Execute the corresponding instruction
bool command_parse(String command){
  ...
  if (command == "open")
  {
    digitalWrite(LED_BUILTIN, HIGH);
  } else if (command == "close")
  {
    digitalWrite(LED_BUILTIN, LOW);
  }
}
Complete code :https://github.com/HelloGitHub-Team/Article/blob/master/contents/Other/Arduino/3/code.cpp
Last , Modify... In the complete code WiFi Name and password , as well as product ID after , Re - burn the code .
3.2 Upload temperature and humidity data
Just a moment later , View the Internet of things platform “ Equipment information ”, If you see Arduino Uploaded indoor temperature and humidity information , It proves that our code runs successfully .

3.3 Remote control
The following is a demonstration of how to use the Internet of things platform , Switch of remote control lamp .
Open the Internet of things platform , Click on “ Device interface ” Of “ Give orders ”, Select... On the pop-up form “ character string ” Options , Input “open” or “close” Instructions .

Come here , The remote control is completed Arduino built-in LED Light on / Closing effect !

success ! And the flower
Four 、 summary
This article , combination Arduino、 sensor 、WiFi as well as OneNet Internet of things platform , By doing and talking , It describes the whole process of a device from networking to cloud . Although it is an entry-level tutorial , But this knowledge can already help you accomplish , Such as smart switches 、 Practical and interesting projects such as automatic feeders .
Do not underestimate every small progress , Every step is worth a thousand miles .
If the wave of mobile Internet has passed , Will there be any in the next wave The Internet of things And the shadow of ? Anyway, I don't think it's too much for me , What do you think of that ? Welcome to comment on it .
thus , Whole Arduino Series of tutorials , It's over here . The end ! Sprinkle the flowers again
hope ,HelloGitHub Of Arduino Series of tutorials , It can arouse your interest in the Internet of things , After all, interest is the best teacher .
These are the contents of this issue , Here is HelloGitHub Share GitHub The interesting 、 Entry-level open source projects .
Thank you for reading , If you think the content is good , Do remember to like 、 Leaving a message. 、 Share , See you next time !


