当前位置:网站首页>HCIA实验(07)综合实验
HCIA实验(07)综合实验
2022-07-25 09:47:00 【雨天_】

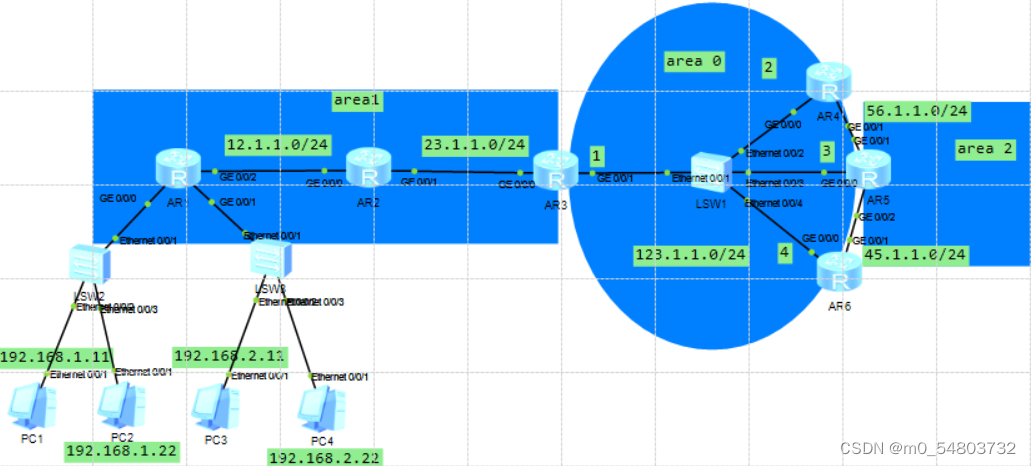
【1】第一阶段 :基础配置
1.进行拓扑设计和地址规划
192.168.1.0/24 (划分成三个子网,一个骨干,R1和R2需要两个子网)
192.168.1.0/26 (骨干)
192.168.1.0/30
192.168.1.4/30 192.168.1.8/30 ...... 192.168.1.60/30
192.168.1.64/26 R1 192.168.1.64/27 192.168.1.96/27
192.168.1.128/26 R2 192.168.1.128/27 192.168.1.160/27
192.168.1.192/26
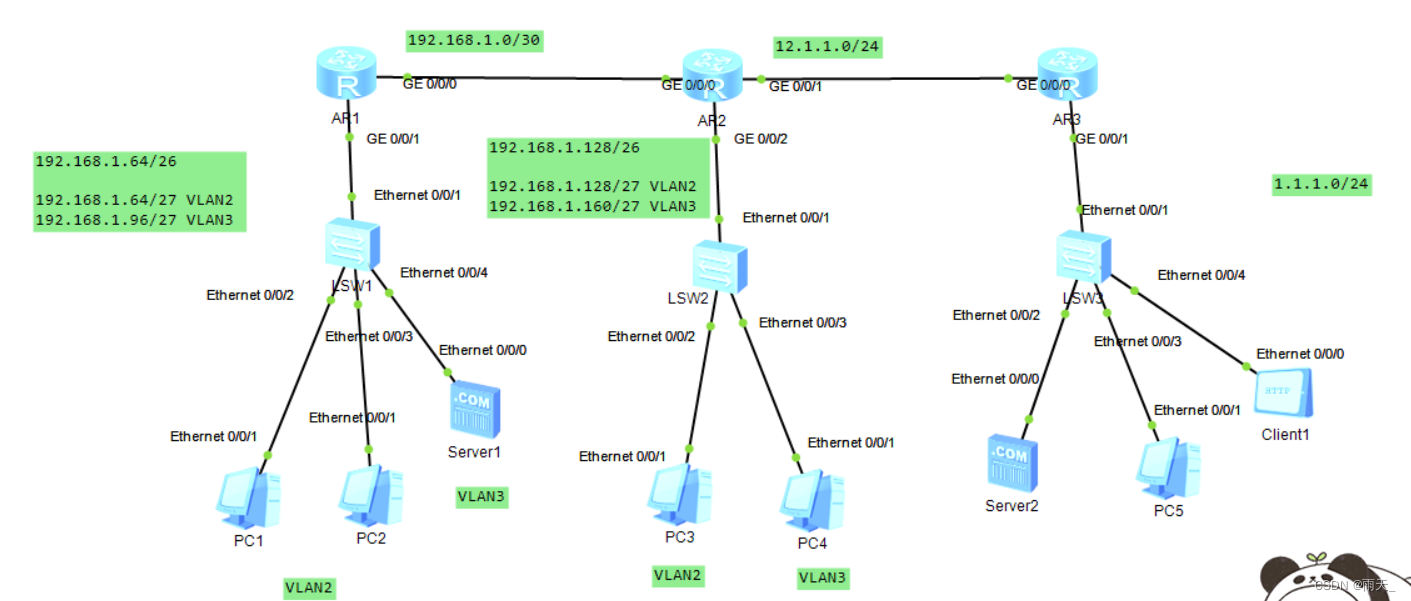
2.配置路由器接口的IP地址和子接口
[r1]int g0/0/0
[r1-GigabitEthernet0/0/0]ip add 192.168.1.1 30
[r1]int g0/0/1.1
[r1-GigabitEthernet0/0/1.1]dot1q termination vid 2
[r1-GigabitEthernet0/0/1.1]arp broadcast enable
[r1-GigabitEthernet0/0/1.1]ip add 192.168.1.65 27
[r1]int g0/0/1.2
[r1-GigabitEthernet0/0/1.2]dot1q termination vid 3
[r1-GigabitEthernet0/0/1.2]arp broadcast enable
[r1-GigabitEthernet0/0/1.2]ip add 192.168.1.97 27
[r2]int g0/0/0
[r2-GigabitEthernet0/0/0]ip add 192.168.1.2 30
[r2]int g0/0/1
[r2-GigabitEthernet0/0/1]ip add 12.1.1.1 24
[r2]int g0/0/2.1
[r2-GigabitEthernet0/0/2.1]dot1q termination vid 2
[r2-GigabitEthernet0/0/2.1]arp broadcast enable
[r2-GigabitEthernet0/0/2.1]ip add 192.168.1.129 27
[r2]int g0/0/2.2
[r2-GigabitEthernet0/0/2.2]dot1q termination vid 3
[r2-GigabitEthernet0/0/2.2]arp broadcast enable
[r2-GigabitEthernet0/0/2.2]ip add 192.168.1.161 27
[r3]int g0/0/0
[r3-GigabitEthernet0/0/0]ip add 12.1.1.2 24
[r3]int g0/0/1
[r3-GigabitEthernet0/0/1]ip add 1.1.1.1 24
3.配置DHCP服务,创建池塘
[r1]ip pool v2
[r1-ip-pool-v2]network 192.168.1.64 mask 255.255.255.224
[r1-ip-pool-v2]gateway-list 192.168.1.65
[r1-ip-pool-v2]dns-list 114.114.114.114 8.8.8.8
[r1]ip pool v3
[r1-ip-pool-v3]network 192.168.1.96 mask 255.255.255.224
[r1-ip-pool-v3]gateway-list 192.168.1.97
[r1-ip-pool-v3]dns-list 114.114.114.114 8.8.8.8
[r1]int g0/0/1.1
[r1-GigabitEthernet0/0/1.1]dhcp select global
[r1]int g0/0/1.2
[r1-GigabitEthernet0/0/1.2]dhcp select global
[r2]ip pool v2
[r2-ip-pool-v2]network 192.168.1.128 mask 255.255.255.224
[r2-ip-pool-v2]gateway-list 192.168.1.129
[r2-ip-pool-v2]dns-list 114.114.114.114 8.8.8.8
[r2]ip pool v3
[r2-ip-pool-v3]network 192.168.1.160 mask 255.255.255.224
[r2-ip-pool-v3]gateway-list 192.168.1.161
[r2-ip-pool-v3]dns-list 114.114.114.114
[r2]int g0/0/2.1
[r2-GigabitEthernet0/0/2.1]dhcp select global
[r2]int g0/0/2.2
[r2-GigabitEthernet0/0/2.2]dhcp select global
4.将交换机上的各个接口划分到对应的VLAN中
[sw1]vlan batch 2 to 3
[sw1]port-group group-member e0/0/2 to e0/0/3
[sw1-port-group]port link-type access
[sw1-port-group]port default vlan 2
[sw1]int e0/0/4
[sw1-Ethernet0/0/4]port link-type access
[sw1-Ethernet0/0/4]port default vlan 3
[sw2]vlan batch 2 to 3
[sw2]int e0/0/2
[sw2-Ethernet0/0/2]port link-type access
[sw2-Ethernet0/0/2]port default vlan 2
[sw2]int e0/0/3
[sw2-Ethernet0/0/3]port link-type access
[sw2-Ethernet0/0/3]port default vlan 3
5.配置trunk干道
[sw1]int e0/0/1
[sw1-Ethernet0/0/1]port link-type trunk
[sw1-Ethernet0/0/1]port trunk allow-pass vlan all
[sw2]int e0/0/1
[sw2-Ethernet0/0/1]port link-type trunk
[sw2-Ethernet0/0/1]port trunk allow-pass vlan all
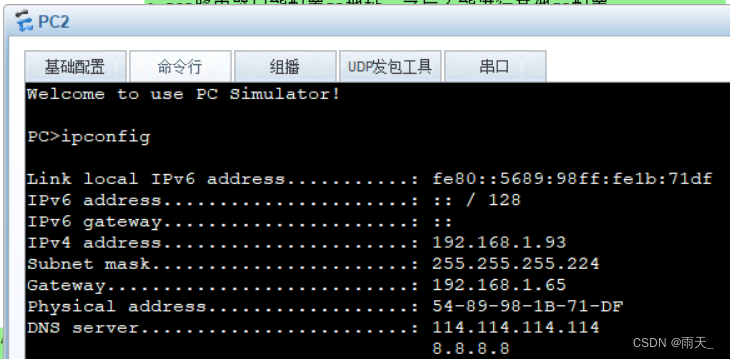
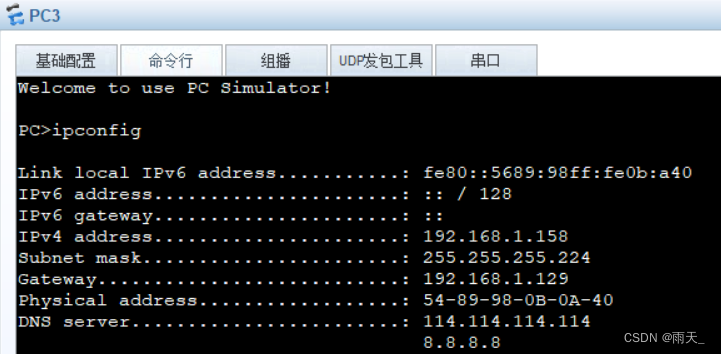
6.为服务器手写IP地址

7.测试


【2】第二阶段:划分区域
1.宣告
[r1]ospf 1 router-id 1.1.1.1
[r1-ospf-1]area 0
[r1-ospf-1-area-0.0.0.0]network 192.168.1.1 0.0.0.0
[r1-ospf-1]area 1
[r1-ospf-1-area-0.0.0.1]network 192.168.1.65 0.0.0.0
[r1-ospf-1-area-0.0.0.1]network 192.168.1.97 0.0.0.0
[r2]ospf 1 router-id 2.2.2.2
[r2-ospf-1]area 0
[r2-ospf-1-area-0.0.0.0]network 192.168.1.2 0.0.0.0
[r2-ospf-1]area 2
[r2-ospf-1-area-0.0.0.2]network 192.168.1.129 0.0.0.0
[r2-ospf-1-area-0.0.0.2]network 192.168.1.161 0.0.0.0
2.查看


(R1和R2之间建立了邻接关系)
3.优化
[r1]ospf 1
[r1-ospf-1]area 1
[r1-ospf-1-area-0.0.0.1]abr-summary 192.168.1.64 255.255.255.192
[r2]ospf 1
[r2-ospf-1]area 2
[r2-ospf-1-area-0.0.0.2]abr-summary 192.168.1.128 255.255.255.192


(区域间汇总,将两个环回汇总成一个环回)
4.进一步优化(阻挡其发Hello包)
设置沉默接口
[r1]ospf 1
[r1-ospf-1]silent-interface g0/0/1.1
[r1-ospf-1]silent-interface g0/0/1.2
[r2]ospf 1
[r2-ospf-1]silent-interface g0/0/2.1
[r2-ospf-1]silent-interface g0/0/2.2
5.进行加密认证
[r1]int g0/0/0
[r1-GigabitEthernet0/0/0]ospf authentication-mode md5 1 cipher 123456
[r2]int g0/0/0
[r2-GigabitEthernet0/0/0]ospf authentication-mode md5 1 cipher 123456
6.开启 telnet 功能
[r1]aaa
[r1-aaa]local-user wang password cipher 123456
[r1-aaa]local-user wang service-type telnet
[r1-aaa]local-user wang privilege level 15
[r1-aaa]q
[r1]user-interface vty 0 4
[r1-ui-vty0-4]authentication-mode aaa
通过DHCP获取IP,自动有个缺省路由

验证:
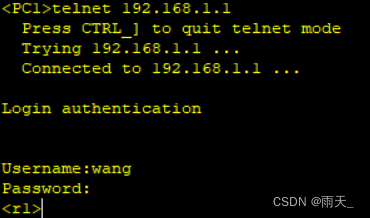
7.拒绝PC1对三个IP的 telnet 行为
![]()
[r1] acl 3000
[r1-acl-adv-3000]
[r1-acl-adv-3000]rule deny tcp source 192.168.1.92 0 destination 192.168.1.1 0 destination-port eq 23
[r1-acl-adv-3000]rule deny tcp source 192.168.1.92 0 destination 192.168.1.65 0 destination-port eq 23
[r1-acl-adv-3000]rule deny tcp source 192.168.1.92 0 destination 192.168.1.97 0 destination-port eq 23
[r1]int g0/0/1.1
[r1-GigabitEthernet0/0/1.1]traffic-filter inbound acl 3000
验证:

【3】第三阶段:局域网访问广域网
![]()
1.构建缺省路由
[r2]ospf 1
[r2-ospf-1]default-route-advertise always 
(为R1发缺省路由)
[r2]ip route-static 0.0.0.0 0 12.1.1.2(为边界路由器R2手写缺省路由)
2.构建EASY NAT
[r2]acl 2000
[r2-acl-basic-2000]rule permit source 192.168.1.0 0.0.0.255
[r2-acl-basic-2000]q
[r2]int g0/0/1
[r2-GigabitEthernet0/0/1]nat outbound 2000
验证:

【4】第四阶段:通过域名访问HTTP
![]()
1.搭建服务器和client


2.端口映射
[r2]interface g0/0/1
[r2-GigabitEthernet0/0/1]nat server protocol tcp global current-interface 80 inside 192.168.1.100 80
Warning:The port 80 is well-known port. If you continue it may cause function failure.
Are you sure to continue?[Y/N]:y
3.验证

4.建立端口映射
![]()
[r2]int g0/0/1
[r2-GigabitEthernet0/0/1]nat server protocol tcp global current-interface 23 inside 192.168.1.1 23
Warning:The port 23 is well-known port. If you continue it may cause function failure.
Are you sure to continue?[Y/N]:y
成功登录:

5.防环
[r1]ip route-static 192.168.1.0 26 NULL 0
[r2]ip route-static 192.168.1.128 26 null 0
边栏推荐
- VLAN configuration and application (take Huawei ENSP as an example)
- MySQL solves the problem of not supporting Chinese
- 10.expect免交互
- 2021 jd.com written examination summary
- UE4 collision
- Angr (II) -- angr_ ctf
- 11.iptables 防火墙
- After switching the shell command line terminal (bash/zsh), CONDA cannot be used: command not found
- Qt | 鼠标事件和滚轮事件 QMouseEvent、QWheelEvent
- HCIP实验(03)
猜你喜欢
Configuration of OSPF protocol (take Huawei ENSP as an example)
1.Shell编程规范与变量

HCIP实验(03)

Voxceleb1 dataset Download

Number theory -- negative Radix conversion

6.PXE结合Kickstart原理和配置实现无人值守自动装机

UE4 quickly find the reason for packaging failure

The most comprehensive UE4 file operation in history, including opening, reading, writing, adding, deleting, modifying and checking

HCIP实验(02)

DHCP configuration (take Huawei ENSP as an example)
随机推荐
Angr (II) -- angr_ ctf
Number theory -- negative Radix conversion
Install MySQL database version 5.7.29 under ubuntu20.04 system
微信小程序WxPrase中包含文件无法点击解决
Angr (V) - angr_ ctf
Storage, computing, distributed Virtualization (collection and sorting is suitable for Xiaobai)
MySQL offline deployment
C# 类库的生成,使用类库对象对DataGridView 进行数据绑定
2.shell脚本之条件语句
Redis usage scenario
FRP reverse proxy deployment
DHCP configuration (take Huawei ENSP as an example)
UE4 loadingscreen dynamic loading startup animation
shortest-unsorted-continuous-subarray
Modify MySQL group error expression 1 of select list is not in group
微波技术基础实验一 滤波器的设计
Fastdfs离线部署(图文)
3. Like you, DNS domain name resolution service!!!
2021 jd.com written examination summary
Angr (VIII) -- angr_ ctf