当前位置:网站首页>JMeter stress testing and agent recording
JMeter stress testing and agent recording
2022-06-25 05:29:00 【qq_ forty-one million five hundred and fifty-four thousand six 】
Stress or performance testing
1. open jmeter, New thread
Step two Use Jmeter Test not logged in page
After running the software , Of course we need to find a link to test it , Here we take Baidu as an example , Let's right-click “ test plan ”——“ add to ”——“Threads(Users)—— Thread group ”, This creates a thread group , What is this , Of course, it is used for running threads . With thread groups , Let's right-click the thread group ,“ add to ”——“ The configuration element ”——“http Request defaults ”, What is the default value for ? You can set some common default settings ( This is bullshit ~), stay http Request default values panel , We can enter the name of the server to be tested IP Or domain name , Here we put in “www.baidu.com”, Agreement is “https”, If the URL you want to test is http At the beginning, fill in “http”, Other defaults are ignored , Click save in the upper left corner to open a save box , This is to allow you to save the test configuration you are doing now , If you need to test again in the future, you can directly open the saved jmx Just a file . After saving , Let's right click again “ Thread group ”——“ add to ”——“Sampler”——“http request ”, Ah , I just added it ? That was not , That was just the default , It is only used to set some default configurations , What really initiated the request was “http request ”, stay http Request inside we are “ route ” Enter a slash inside “/” Just do it , Indicates the default path ,IP There is no need to enter in that column , Why? ? Because in http The request default value has already been entered , You can create multiple... In the future http request , Just change the path , In this way, you can visit different pages of the same website , This is it. “http Request defaults ” The significance of , Just write down some common settings . next , Let's right click again “ Thread group ”——“ add to ”——“ Monitor ”——“ Look at the results ”, Here you can see http Requests and results . Click save every time you create a new component and modify the configuration information , Okay , The page configuration diagram is as follows :


Now let's click the Green Run button on the toolbar , You can go to “ Look at the fruit tree ” See the result in

Our new building “http request ” Return results 200, Indicates that the request was successful , You can also see from the green tick , The display format can be selected from the drop-down list box in the above figure , We choose HTML, Switch to “ The response data ” You can see the return page , That is Baidu home page .
Of course, if it is a single test page , Similar to interface testing , You can also not add a default request , Add only one http request , The input value can also .
Step three Set thread concurrency
We just completed a simple test , You should also feel that you have done nothing , You can test , It's not , We click “ Thread group ” You can see the thread group settings page , default setting 1 Threads ,1 Seconds to start , loop 1 Time . The number of threads indicates how many threads are started ,Ramp-Up Period Indicates how long it takes to start all threads , The number of cycles represents the number of executions per thread , for example , I set the number of threads 10,Ramp-Up Period by 10, cycles 2, Indicates that the software will 10 Seconds to start 10 Threads , That is to say 1 Seconds to start 1 Threads , Each thread executes the request twice .

Besides , We can also check “ Scheduler ”, For example, I fill in the duration 100, Start delay 0, Check the number of cycles “ forever ”, Indicates that the thread starts immediately , perform 100 Seconds after stop , Be careful , If the duration and start delay are set , Then the following start time and end time will not work , It doesn't matter , Click Run .
Step four Set up other listeners
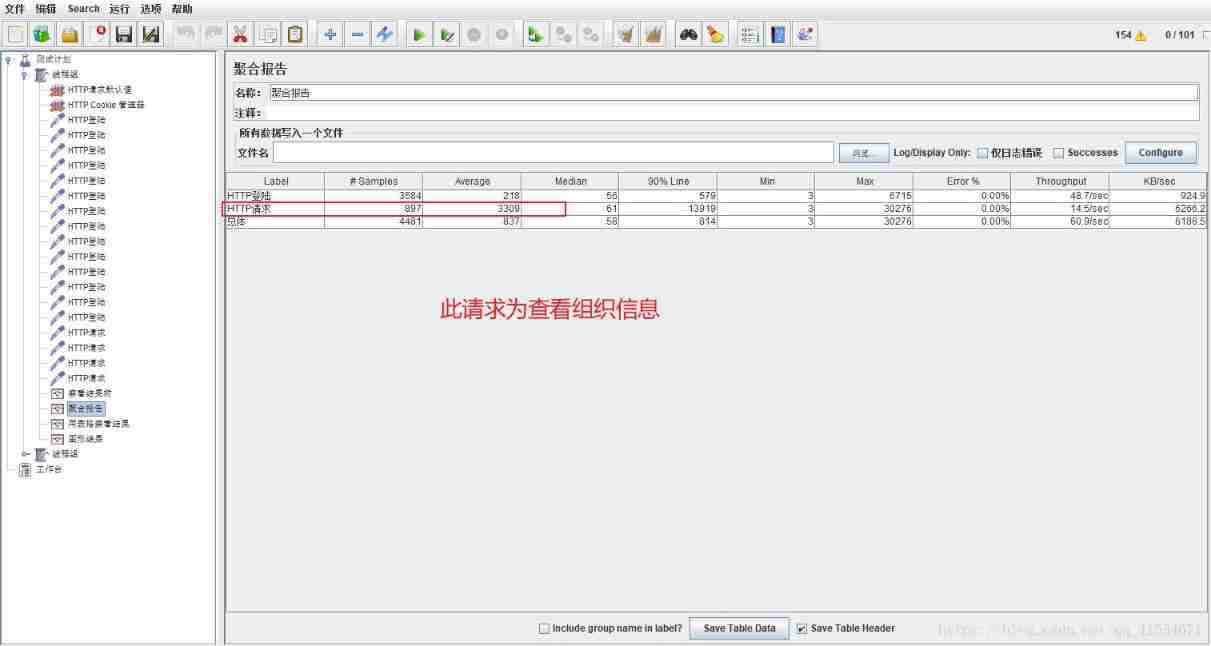
We just set up “ Look at the fruit tree ” This monitor , Let's right-click “ Thread group ”——“ add to ”——“ Monitor ”, There are many listeners to choose from , Such as graphical results , Look at the results in a table , Aggregate reports, etc , These are the index data reflecting the test process . The graphical results show the throughput in graphical form 、 The offset 、 Average and other information , The table results show the time of each request , return , Number of bytes sent , Connection time, etc , The aggregate report shows the overall request throughput , Error rate and so on . The following figure shows the style of table results .

It can be seen that , The picture shows 20 individual Http request , By 10 Thread execution , Each thread executes twice , Just in line with our thread group settings . The meaning of each column in the figure represents the request sequence number , Starting time , Thread number , Request name , The time taken to request , Request status , Request bytes , Number of bytes sent , The waiting time , Connection time .
The aggregation report is shown in the following figure , The meaning of each column indicates the request name , Total requests , Average response time for requests ( millisecond ),50% Response time of the request ,90% Response time of the request ,95% Response time of the request ,99% Response time of the request , Minimum response time , Maximum response time , Wrong request rate ( Number of bad requests / Total number of requests ), throughput ( Number of requests processed per second ), Rate of bytes received , Rate of bytes sent .

Step five Log on to the test
The page we tested earlier does not require login , Now let's test the login operation , Because the login operation involves specific internal URL and parameters , I'll use the general URL and parameters instead , But the way is the same , for example , Our intranet IP yes 1.1.1.1, The landing page is 1.1.1.1/login.do, We will 1.1.1.1 fill “http Request defaults ”, take /login.do fill “http request ” In the path of , I would like to specify the parameters required for login , Generally speaking, it is the user name and password , But other parameters are often required , We can use the bag grabbing tool Fiddler Carry out the bag , We have a normal login in the website , Can be in Fiddler To see what is required for login post Parameters , And the path , for example Fiddler Login operation is displayed in post Parameters have username,password,type, So you need to “http request ” Fill in , Shown below .

Click on “ add to ” Button to add parameters , After preservation , Let's click Run , You can see the page after successful login in the view result tree , The specific operation is the same as before .
If the login page crawls to multiple , It is best to add multiple requests or use file readers , Load various web pages . This is more ready to test the complete login process , If it's just the first step, enter the user name and password , Closer to interface testing , It is a stress test of the server , If all the pages are added , Similar recorded will be loaded, including css、js The test after such content mainly includes the front-end test , The use process is to load the front end , So it's usually added , Select and add to the same thing , At this point, and loadrunner It makes sense to record the added things . 了 . It does not reflect the login time correctly , Such as :


Step six Conversation retention
After we enter the login page , I would also like to visit, for example “ My account ”,“ My message ” Wait for the module , These pages can only be accessed after successful login , Here we need to keep the conversation , Let's right-click “ Thread group ”——“ add to ”——“ The configuration element ”——“httpcookie Manager ”, To add content, we can view the results of the tree “ request ” Tab , You can see what you need to log in cookie, for example JSESSIONID, We will JSESSIONID fill cookie Manager parameters , as follows

see jsessionid Can be in fiddle Wait for the packet capture tool to view ,

here , We are http Enter the login page URL in the request , for example “ My message ” wait , You can request success .
Step seven File read URL
We are “http request ” The path of is filled with the web page we want to visit , Only one at a time , If I want to visit several web pages , For example, home page , Notice page , Company introduction page, etc , In addition to new http Out of request , We can also store the addresses of these pages in TXT In the document , for example , I want to visit 1.1.1.1/index.do,1.1.1.1/information.do,1.1.1.1/company.do, We can do this

Fill in the web address , We are Jmeter Inside “ Options ”——“ Function Assistant dialog ”——“StringFromFile”, take TXT Paste the full path of to the position in the figure , Click generation , Can be generated in the box TXT The read path of the file .

We will $ The first string of paths is posted to “http request ” In the path of , You can access TXT All the pages inside , As shown in the figure .

Step eight Real time monitoring of server status
Above we have introduced several Jmeter The built-in monitor , I wonder if you feel a little weak , Because the indicators shown in it don't seem to be what you need , At least for me , I am more concerned about the change of server state during the execution of my request , for example CPU, Memory , disk , The Internet ,TPS, Response time graph, etc , Because that's what stress testing is all about , The curve of server status as requests increase is what we need to see more . Want to see a graph of server changes , We need to download JMeterPlugins-Extras.jar and JMeterPlugins-Standard.jar, Put these two jar Put in bags Jmeter Under the installation path of lib/ext/ below , restart Jmeter after , Right click “ Thread group ”——“ add to ”——“ Monitor ”, We can see many more listeners , Most of them use “[email protected]” The beginning of the listener , We choose “PerfMon Metrics Collector”, The status information of the server will be displayed , Now we can't see , Why? , Because the server to be tested needs to install a package , It's called ServerAgent.zip, For example, my server is linux, We will ServerAgent Unzip in the server , Run the inside startAgent.sh That's all right. , After starting up, you can see the following ( take ServerAgent.zip Open in the monitored machine , If monitoring the local machine , Just open it locally .)

The default port is 4444, Here I would like to interject , I was running through Telnet Throughout ping Less than 4444 The port causes the display to fail , It was later changed to 4445 Just start the port , The specific server command is ServerAgent-2.2.3/startAgent.sh--udp-port 4445 --tcp-port 4445, This means that serverAgent stay 4445 Port boot , You can take 4445 Change to another port , If the default 4444 If the port doesn't work, you can try other ports . Okay , We go back to Jmeter Software , Fill in the server address and port number according to the following figure , And the hardware that needs to be monitored , Such as CPU, Memory , disk , Network, etc. .

Okay , Let's click Run , Can be in chart See the state change curve of the server under

If the monitor doesn't show , You can select the number of cycles in the thread to be forever , Then it can be displayed normally
jmeter Plug in download address https://jmeter-plugins.org/downloads/all/
jmeter Plug in download address
Agent recording :
To record the contents of the page ,badboy It's not very useful , You can use its own proxy recording function here .
1. Add... Under the workbench http proxy server

2. Set proxy parameters : The port in the picture is marked incorrectly , The port number here should be consistent with the port number in the proxy browser .
To exclude or include from url The regular expression is .*\.css.*

3. here jmeter Some settings are completed , Proxy for browser needs to be set , Mainly Firefox :

4. After setting up , preservation , stay jmeter Start agent in , The browser can operate normally , see jmeter There will be recorded content in .
边栏推荐
猜你喜欢

3.2.3 use tcpdump to observe TCP header information (supplement common knowledge of TCP protocol)
File upload vulnerability (III)

Route parameters to jump to the page and transfer parameters -- > hidden parameter list

Unsupervised domain adaptation in semantic segmentation:a review unsupervised domain adaptation in semantic segmentation: a review
Double recursion in deep analysis merge sort

Detailed summary of position positioning

hr竟主动给这位测试小姐姐涨工资,她是怎么做到的?

February 20ctf record

How to install the blue lake plug-in to support Photoshop CC 2017
Essais de pénétration - sujets d'autorisation
随机推荐
The k-th node of the binary search tree [sword finger offer]
How to choose the years of investment in financial products?
Try block and exception handling
Handwritten promise all
投资理财产品的年限要如何选?
Visual studio 2022 interface beautification tutorial
Basic bit operation symbols of C language
Personalized Federated Learning with Moreau Envelopes
IronOCR 2022.1 Crack
PHP uses JWT
cuda编译报错
2021-04-02
Mysql interactive_ Timeout and wait_ Timeout differences
Go Context - Cancelation and Propagation
Using JS to realize the sidebar of life information network
Electric store stores data
Create dynamic array
Baidu ueeditor set toolbar initial value
How to install the blue lake plug-in to support Photoshop CC 2017
Specific operations for uploading pictures in PHP