当前位置:网站首页>Mongodb分片环境搭建和验证(redis期末大作业)
Mongodb分片环境搭建和验证(redis期末大作业)
2022-06-26 08:34:00 【我的思路很明确】
总体实验步骤:环境准备——》部署Mongodb——》部署Config Server——》部署Shard——》部署mongos——》启动分片功能——》分片基本操作和功能验证
目录
实验操作代码:
#1 bigdata111 bigdata112 bigdata113虚拟机环境准备/etc/hosts并修改/etc/hostname文件内容的主机名
bigdata111 192.168.1.111
bigdata112 192.168.1.112
bigdata113 192.168.1.113
你可以选择重新建立三个主机,在初始的信息配置里改成上面格式
如果你虚拟机上已经有了三个主机,可以通过命令操作来修改:
su root
hostname 查看主机名
vim /etc/hostname 修改主机名
ip addr或者ifconfig 查看主机IP
cd /etc/sysconfig/network-scripts
vi ifcfg-ens33 修改网络配置文件
{
将BOOTPROTO=dhcp改为static
ONBOOT=NO改为yes
首先设置IPADDR=192.168..(要根据自己电脑情况)最后一个要除了2,可以填1-255之间的数
NETMASK=255.255.255.0(与虚拟机的子网掩码保持一致)
GATEWAY=192.168..(与虚拟机的网关保持一致)
到编辑里面打开虚拟网络编辑器然后找到NAT模式点击NAT设置就可以看到网关
DNS1=8.8.8.8(属于默认的服务器端口)
#下面四行就是我在bigdata112上的网络配置文件中加入的配置信息:(每个人的网关是不一样的,其他都要和我这个相同)
IPADDR=192.168.1.112
NETMASK=255.255.255.0
GATEWAY=192.168.80.2
DNS1=8.8.8.8
}
#2 bigdata111 将mongodb压缩包放置在/home/bigdata目录下 解压
su root
mkdir -p /home/bigdata
cd /home/bigdata/
tar -zxvf mongodb-linux-x86_64-rhel70-4.4.13.tgz
mv mongodb-linux-x86_64-rhel70-4.4.13 mongodb
#3 bigdata111 目录与数据准备
cd /home/bigdata/mongodb
mkdir -p /home/bigdata/mongodb/shardcluster/configServer/configFile
mkdir -p /home/bigdata/mongodb/shardcluster/configServer/data
mkdir -p /home/bigdata/mongodb/shardcluster/configServer/logs
mkdir -p /home/bigdata/mongodb/shardcluster/shard/configFile
mkdir -p /home/bigdata/mongodb/shardcluster/shard/shard1_data
mkdir -p /home/bigdata/mongodb/shardcluster/shard/shard2_data
mkdir -p /home/bigdata/mongodb/shardcluster/shard/shard3_data
mkdir -p /home/bigdata/mongodb/shardcluster/shard/logs
mkdir -p /home/bigdata/mongodb/shardcluster/mongos/configFile
mkdir -p /home/bigdata/mongodb/shardcluster/mongos/logs
touch /home/bigdata/mongodb/shardcluster/configServer/logs/config_server.log
touch /home/bigdata/mongodb/shardcluster/shard/logs/shard1.log
touch /home/bigdata/mongodb/shardcluster/shard/logs/shard2.log
touch /home/bigdata/mongodb/shardcluster/shard/logs/shard3.log
touch /home/bigdata/mongodb/shardcluster/mongos/logs/mongos.log
#4 bigdata111 放置config server配置文件
shardcluster/configServer/configFile mongodb_config.conf
#5 将bigdata111上的mongodb目录及其内容上传至bigdata112和bigdata113
先在bigdata112 bigdata113上mkdir -p /home/bigdata
scp -r /home/bigdata/mongodb/ [email protected]:/home/bigdata/
scp -r /home/bigdata/mongodb/ [email protected]:/home/bigdata/
scp -r /home/bigdata/mongodb/shardcluster/configServer/configFile/mongodb_config.conf [email protected]:/home/bigdata/mongodb/shardcluster/configServer/configFile/
#6 bigdata111 112 113 在/etc/profile文件中添加如下内容
export PATH=/home/bigdata/mongodb/bin:$PATH
#7 启动config server集
##bigdata111 bigdata112 bigdata113
systemctl stop firewalld.service
source /etc/profile
mongod -f /home/bigdata/mongodb/shardcluster/configServer/configFile/mongodb_config.conf
#8 配置config server集
##bigdata111
mongo --host bigdata111 --port 27022
config_conf={
_id: "configs",
members: [
{_id: 0,host: "192.168.1.111:27022"},
{_id: 1,host: "192.168.1.112:27022"},
{_id: 2,host: "192.168.1.113:27022"}
]
}
rs.initiate(config_conf)
#9 放置shard配置文件
##bigdata111 112 113
shardcluster/shard/configFile
#10 启动三个shard集群
##bigdata111 112 113
mongod -f /home/bigdata/mongodb/shardcluster/shard/configFile/mongodb_shard1.conf
mongod -f /home/bigdata/mongodb/shardcluster/shard/configFile/mongodb_shard2.conf
mongod -f /home/bigdata/mongodb/shardcluster/shard/configFile/mongodb_shard3.conf
#11 配置三个shard集群
##bigdata111
mongo --host bigdata111 --port 27018
shard_conf={
_id: "shard1",
members: [
{_id: 0,host: "192.168.1.111:27018"},
{_id: 1,host: "192.168.1.112:27019"},
{_id: 2,host: "192.168.1.113:27020",arbiterOnly: true}
]
}
rs.initiate(shard_conf)
##bigdata112
mongo --host bigdata112 --port 27018
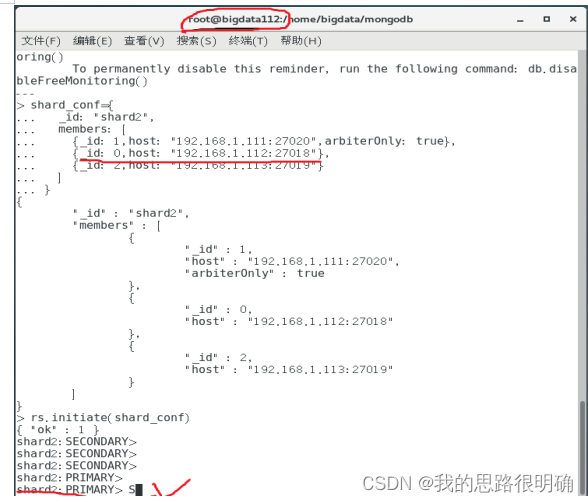
shard_conf={
_id: "shard2",
members: [
{_id: 1,host: "192.168.1.111:27020",arbiterOnly: true},
{_id: 0,host: "192.168.1.112:27018"},
{_id: 2,host: "192.168.1.113:27019"}
]
}
rs.initiate(shard_conf)
##bigdata113
mongo --host bigdata113 --port 27018
shard_conf={
_id: "shard3",
members: [
{_id: 2,host: "192.168.1.111:27019"},
{_id: 1,host: "192.168.1.112:27020",arbiterOnly: true},
{_id: 0,host: "192.168.1.113:27018"}
]
}
rs.initiate(shard_conf)
#12 放置mongos配置文件
shardcluster/mongos/configFile
#13 启动mongos服务
##bigdata111 112
mongos -f /home/bigdata/mongodb/shardcluster/mongos/configFile/mongodb_mongos.conf
#14 启动分片功能
##bigdata111
mongo --host bigdata111 --port 27021
use gateway
sh.addShard("shard1/192.168.1.111:27018,192.168.1.112:27019,192.168.1.113:27020")
sh.addShard("shard2/192.168.1.111:27020,192.168.1.112:27018,192.168.1.113:27019")
sh.addShard("shard3/192.168.1.111:27019,192.168.1.112:27020,192.168.1.113:27018")
#15 验证分片功能
use config
db.settings.save({"_id":"chunksize","value":1}) #设置块大小1MB
use school
for(i=1;i<=5;i++){db.user.insert({"id":i,"name":"jack"+i})} #添加5个文档数据
use gateway
sh.enableSharding("school") #开启集合school的分片功能
use school
db.user.createIndex({"id":1}) #以ID创建为主键索引
use gateway
sh.shardCollection("school.user",{"id":1}) #启动
sh.status() #查看分片信息
配置文件和安装包和安装流程PDF: 资源下载处
资源说明:分片的conf配置文件共14个,3个主机每个主机3个shard配置文件,每个主机一个配置文件,只有前两个主机有mongos路由配置文件 ,你可以下载后通过xftp文件传输到虚拟机上,也可以复制内容,在linux终端通过vim写入命令复制进去。后面为了简化操作,可以只实现一台机子上的文件,然后传输到另外的文件上,但需要做一些小修改,毕竟每台主机的配置文件内容不同。
环境准备
1.利用命令vim etc/hostname修改主机名和命令vi /etc/sysconfig/network-scripts
/ifcfg-ens33修改主机的的ip地址,ip地址和主机名如下:
bigdata111192.168.1.111;bigdata112192.168.1.112;bigdata113192.168.1.113


从上图中可以看到主机名和ip地址与设计的是一致的
2.接下来在bigdata111上创建MongoDB分片集群相关服务器的数据文件、配置文件以及日志文件。
最后的蓝色目录表示成功准备好了相关目录和数据文件
部署Mongodb
- 刚刚在bigdata111上准备好了Mongodb所需的环境文件,在三台主机都安装好mongodb的情况下,利用scp命令把bigdata111上的文件和目录传输到bigdata112和bigdata113上,因为本人曾配置过两个主机,现只进行从111到113的传输过程。

部署Config Server
1.在bigdata111上创建和编写config.conf文件并传到112和113上
2.在bigdata111和112和113上启动config.conf文件


启动完成后,3个主机都出现了successfully说明启动成功
3.最后返回bigdata111,启动mongo --host bigdata111 --port 27022然后进行config server的配置和初始化。

初始化结果出现了ok字段,并且configs从secondary变成了primary说明配置成功。
部署Shard
1.在每台主机上创建并编写3个shard.conf配置文件并利用mongod命令启动,可看见每台主机上都会出现三个successfully。


2.在每台主机上都进行Shard集群配置操作,可以看见三个初始化的OK字段,在bigdata111上shard1从secondary变成primary,bigdata112上shard2从secondary变成了primary,bigdata113上shard3从other变成了primary,该结果表明了Shard集群配置成功。


部署mongos
1.在bigdta111和112上创建并编写mongos.conf文件,利用mongos启动,可看见出现了两个successfully即启动成功。

启动分片功能
1.在bigdata111上通过mongo --host bigdata111 --port 27021启动mongodb,使用gateway数据库,在分片集群中添加三个Shard,出现了三个OK字段,说明三个Shard都添加成功。

分片基本操作和功能验证
1.还是在bigdata111上进行操作,先切换到数据库config,设置块大小为1M,然后切换到数据库school,向集合user中添加5条文档,最后切换到数据库gateway,利用enableSharding实现数据库school分片功能,出现了OK字段,说明我们成功开启数据库分片功能,即成功对数据库进行分片操作。

2.切换到数据库school创建“id”的索引,再切换到数据库gateway以id为分片键对集合user进行分片操作。

3.在数据库gateway下查看数据库school中集合user的分片信息,从返回的结果中可知chunks中各Shard的分布信息为“shard1 767,shard2 128,shard3 129”,说明每个shard对应存在相应数字的量的chunk,在school.user的信息中,它的分片键是shard key:{ “id”:1},shards中的分片信息也与前面添加的操作与之对应,综上可知分片的验证是成功的。

边栏推荐
- Transformers loading Roberta to implement sequence annotation task
- Batch execute SQL file
- Text to SQL model ----irnet
- Whale conference one-stop intelligent conference system helps organizers realize digital conference management
- Recovering the system with Clonezilla USB disk
- pgsql_ UDF01_ jx
- 多台三菱PLC如何实现无线以太网高速通讯?
- (4) Independent key
- Stream analysis of hevc learning
- How to realize wireless Ethernet high-speed communication for multiple Mitsubishi PLCs?
猜你喜欢

WBC learning notes (I): manually push WBC formula

Fourier transform of image

STM32 project design: an e-reader making tutorial based on stm32f4

滑块验证 - 亲测 (京东)

Embedded Software Engineer (6-15k) written examination interview experience sharing (fresh graduates)

QT_ AI

深度学习论文阅读目标检测篇(七)中文版:YOLOv4《Optimal Speed and Accuracy of Object Detection》

opencv学习笔记三

51 MCU project design: Based on 51 MCU clock perpetual calendar

XSS 跨站脚本攻击
随机推荐
opencv学习笔记二
[已解决]setOnNavigationItemSelectedListener()被弃用
Selenium 搭建 Cookies池 绕过验证反爬登录
1.Intro_ Math (white board derivation and reprint of station B)
Polka lines code recurrence
Yolov5进阶之三训练环境
Two ways to realize time format printing
Performance comparison of unaryexpr's function on matrix elements in eigen Library
First character that appears only once
【云原生 | Kubernetes篇】深入万物基础-容器(五)
Convex optimization of quadruped
isinstance()函数用法
鲸会务为活动现场提供数字化升级方案
Google Chrome collection
51 MCU project design: Based on 51 MCU clock perpetual calendar
Use of PCL
在同花顺开户证券安全吗,
深度学习论文阅读目标检测篇(七)中文版:YOLOv4《Optimal Speed and Accuracy of Object Detection》
Using transformers of hugging face to realize text classification
torch. fft