当前位置:网站首页>Quickly master asp Net authentication framework identity - login and logout
Quickly master asp Net authentication framework identity - login and logout
2022-06-22 17:04:00 【Dotnet cross platform】
Recommended attention 「 Code Xia Jianghu 」 Add Star standard , Never forget the Jianghu Affairs
This is a ASP.NET Core Identity The third article in the series , The last article explained how to ASP.NET Core Identity User registration in .
that , This article talks about how to ASP.NET Core Identity To achieve user login and logout .
Click on the blue word above or behind , read ASP.NET Core Identity Collection of series .
The sample project for this article :https://github.com/zilor-net/IdentitySample/tree/main/Sample03

Identity Authentication
Speaking of user login , It's easy to think of identity authentication , This is the process of confirming the user's identity .
This process goes through a series of operations , According to the voucher retained by the user in the database , To verify the credentials submitted by the user , The vouchers here are generally the account number and password .
To enable users to provide credentials , The application needs a login page , By providing a login form , Interact with users .
In order to realize the login operation , The first thing we have to do , Is to prohibit unauthenticated users , visit Home In the controller Employees Operation method .
So , We must for this operation , add to [Authorize] characteristic :
[Authorize]
public async Task<IActionResult> Employees()
then , Register the identity authentication and authorization Middleware in the startup class :
//  authentication
app.UseAuthentication();
//  to grant authorization
app.UseAuthorization();
It should be noted that , Because the pipeline middleware has an execution sequence , So identity authentication middleware , You must register before authorizing the middleware .
If you run the application at this time , And click Employees link , We will see a 404 Not Found Response .

Why does this happen , Because by default ,ASP.NET Core Identity Will try to send unauthenticated users , Redirect to /Account/Login To guide the user to log in , However, the corresponding operation of this route is not provided .
in addition , We can also see one in the address bar ReturnUrl The query parameters of , It provides the operation path before the user redirects to the login page .
in other words , When the user logs in successfully , It will redirect back to the page before login .
Sign in
Now? , Let's create something related to login .
The first is the user login model , It is used to accept the login credentials submitted by users in the login form .
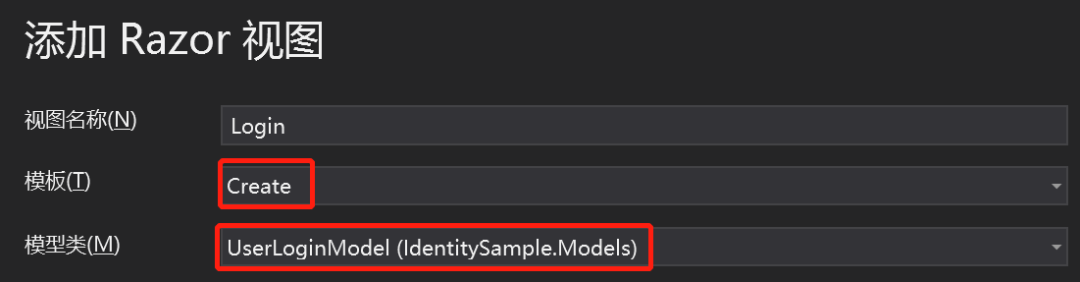
stay 「Models」 In the folder , Create a 「UserLoginModel」 class :
public class UserLoginModel
{
   [Display(Name = " email ")]
   [Required(ErrorMessage = " Email cannot be empty ")]
   [EmailAddress(ErrorMessage = " Incorrect email format ")]
   public string Email { get; set; }

   [Display(Name = " password ")]
   [Required(ErrorMessage = " The password cannot be empty ")]
   [DataType(DataType.Password)]
   public string Password { get; set; }

   [Display(Name = " Remember the account number ")]
   public bool RememberMe { get; set; }
}
Next , stay 「AccountController」 The controller , establish 「Login」 Operation method :
[HttpGet]
public IActionResult Login()
{
    return View();
}

[HttpPost]
[ValidateAntiForgeryToken]
public async Task<IActionResult> Login(UserLoginModel userModel)
{
    return View();
}
And include a login form 「Login」 View :
Now this login view , Only by accessing protected operations , To be able to be visited .
But this does not conform to common sense , We must provide a separate login link , Let's revise _LoginPartial Division of the view :
<ul class="navbar-nav">

    <li class="nav-item">
        <a class="nav-link text-dark" asp-controller="Account"
           asp-action="Login"> Sign in </a>
    </li>
    <li class="nav-item">
        <a class="nav-link text-dark" asp-controller="Account"
           asp-action="Register"> register </a>
    </li>

</ul>
Start the application , You can repeat the last operation , Verify that the login page will be opened :

When we click the login button , The form data will be submitted to POST Requested 「Login」 operation , But there is no login logic yet .
Next , Let's revise Login Method , Implement login logic :
using System.Security.Claims;
using Microsoft.AspNetCore.Authentication;

[HttpPost]
[ValidateAntiForgeryToken]
public async Task<IActionResult> Login(UserLoginModel userModel)
{
    if(!ModelState.IsValid)
    {
        return View(userModel);
    }

    var user = await _userManager.FindByEmailAsync(userModel.Email);
    if(user != null &&
       await _userManager.CheckPasswordAsync(user, userModel.Password))
    {
        var identity = new ClaimsIdentity(IdentityConstants.ApplicationScheme);
        identity.AddClaim(new Claim(ClaimTypes.NameIdentifier, user.Id));
        identity.AddClaim(new Claim(ClaimTypes.Name, user.UserName));
        //  You can add more customized user information
        identity.AddClaim(new Claim("firstname", user.FirstName));
        identity.AddClaim(new Claim("lastname", user.LastName));
        var roles = await _userManager.GetRolesAsync(user);
        foreach (var role in roles)
        {
            identity.AddClaim(new Claim(ClaimTypes.Role, role));
        }

        await HttpContext.SignInAsync(IdentityConstants.ApplicationScheme,
                                      new ClaimsPrincipal(identity));

        return RedirectToAction(nameof(HomeController.Index), "Home");
    }
    else
    {
        ModelState.AddModelError("", " Invalid user name or password ");
        return View();
    }
}
Explain this code , Verify that the model is not valid , If an invalid , Just go back to the view .
after , Use 「UserManager」 Medium 「FindByEmailAsync」 Method , Query users by email .
Use 「CheckPasswordAsync」 Method , Check whether the user password matches the hash password in the database .
If the user exists , And the password is verified , Just create one 「ClaimsIdentity」 object .
ClaimsIdentity Represent identity object , It contains two declarations :ID And the user name .
Of course , You can also add more customized user information , Such as name 、 Roles, etc .
ApplicationScheme Indicates the name of the identity scheme , This is a predefined static variable , Finally, the name is 「Identity.Application」 Of Cookie.
after , adopt 「SignInAsync」 Method to log in , The first parameter is the scheme name , The second parameter is an identity holding object , That is, the object that really represents the user , We need to give it an identity .
This method will be displayed in our browser , Create a 「Identity.Application」 Of Cookie data , Its value is the information in the identity object .
Upon successful landing , Will redirect the user to the previous 「Index」 page .
If the user does not exist in the database , Or passwords do not match , Then return to a view with an error message .
next , Revise it 「Employees」 View , Let us see the identity information after logging in :
<h2>Claim details</h2>
<ul>
    @foreach (var claim in User.Claims)
    {
        <li><strong>@claim.Type</strong>: @claim.Value</li>
    }
</ul>
Now start the application , Click on 「Employees」 Connect , As we are now certified , So it will jump to the login page .
Log in with the user you just registered , Then click... Again 「Employees」 Connect , You can see 「Employees」 Data table of , And the identity information below .

We can also view in the browser Cookies , You can see there are two Cookie:

「.AspNetCore.Identity.Application」 ID information is saved in ;
「.AspNetCore.Antiforgery.xxxxx」 The token to validate the form is saved in .
Jump to source address
But now there is a small problem , I said before , If the user has unauthorized access to the protected operation , Will be redirected to Login page .
here ,URL There will be a 「ReturnUrl」 Query parameters , This parameter displays the source page from which the user comes .
But in our example , We navigated the user directly to 「/Home/Index」, Instead of jumping to ReturnUrl Source page in .
To achieve this function , We need to change Get Requested 「Login」 operation :
[HttpGet]
public IActionResult Login(string returnUrl = null)
{
    ViewData["ReturnUrl"] = returnUrl;
    return View();
}
then , modify 「Login.cshtml」 view file :
<form asp-action="Login" asp-route-returnUrl="@ViewData["ReturnUrl"]">adopt ViewData take 「returnUrl」 Value , Routing parameters in the form to the view .
When the form is submitted ,「ReturnUrl」 It will pass the routing parameters , Submit to POST Requested 「Login」 operation .
therefore , We still need to revise it POST Requested 「Login」 operation :
public async Task<IActionResult> Login(UserLoginModel userModel, string returnUrl = null)First add a returnUrl Parameters , Then create a normal method for redirection :
private IActionResult RedirectToLocal(string returnUrl)
{
    if (Url.IsLocalUrl(returnUrl))
        return Redirect(returnUrl);
    else
        return RedirectToAction(nameof(HomeController.Index), "Home");

}
This method will first check 「returnUrl」 Is it local URL, If it is , Redirect the user to this address , otherwise , Redirect the user to the home page .
Last , modify 「Login」 The return value of the operation , Call the method just added :
return RedirectToLocal(returnUrl);Start the application , You can see , Now you can jump to the source address correctly .
It should be noted that , Our login operation is located at 「/Account/Login」 Routing address , This is a ASP.NET Core Identity Default login routing address .
If you don't want to use the default address , It can be configured in the service configuration method , such as :
builder.Services.ConfigureApplicationCookie(o => o.LoginPath = "/Authentication/Login");Simplify login
The authentication we demonstrated earlier is a full version . however , If you don't need complete control over the logic of Authentication , So there is a simpler way :
[HttpPost]
[ValidateAntiForgeryToken]
public async Task<IActionResult> Login([FromServices]SignInManager<User> signInManager, UserLoginModel userModel, string returnUrl = null)
{
    if(!ModelState.IsValid)
    {
        return View(userModel);
    }

    var result = await signInManager.PasswordSignInAsync(
        userModel.Email, userModel.Password,
        userModel.RememberMe, false);

    if (result.Succeeded)
    {
        return RedirectToLocal(returnUrl);
    }

    ModelState.AddModelError("", " Invalid user name or password ");
    return View();
}
Inject... In the login operation 「SignInManager」 service , Use 「PasswordSignInAsync」 Method , Replace the previous verification logic .
This method accepts four parameters : user name 、 password 、 Persistent flag and login lock flag .
We will discuss the login locking function in detail later , Let's set it to false.
This method , Completed all the login logic we demonstrated earlier .
Besides , It also returns a result with four attribute values , among 「Succeeded」 The attribute represents whether it was successful .
Log out
Use ASP.NET Core Identity It is so simple to log in , It's easier to log out .
First , modify 「_LoginPartial」 Log in to the partial view :
@using Microsoft.AspNetCore.Identity
@using IdentitySample.Entites
@inject SignInManager<User> _signInManager

@{
    var lastname = User.Claims.SingleOrDefault(claim => claim.Type == "lastname")?.Value;
}

<ul class="navbar-nav">
    @if (_signInManager.IsSignedIn(User))
    {
        <li class="nav-item">
            <a class="nav-link text-dark" asp-controller="Home" asp-action="Index"
               title="Welcome"> welcome  @lastname!
            </a>
        </li>
        <li class="nav-item">
            <a class="nav-link text-dark" asp-controller="Account"
               asp-action="Logout"> Log out </a>
        </li>
    }
    else
    {
        <li class="nav-item">
            <a class="nav-link text-dark" asp-controller="Account"
               asp-action="Login"> Sign in </a>
        </li>
        <li class="nav-item">
            <a class="nav-link text-dark" asp-controller="Account"
               asp-action="Register"> register </a>
        </li>
    }
</ul>
Inject... Into the view 「SignInManager」 service , Use it to determine whether a user is logged in , Then render different clips .
Welcome message and logout button will be displayed when you have logged in , Not logged in as before .
Next , Realization 「Logout」 Logout operation :
public async Task<IActionResult> Logout([FromServices]SignInManager<User> signInManager)
{
    await signInManager.SignOutAsync();

    return RedirectToAction(nameof(HomeController.Index), "Home");
}
「SignOutAsync」 Method will be deleted Cookies, To realize the user's login .
Summary
Now? , We have realized the login and logout of users , See the example project for the specific code , The next article will explain how users forget their passwords , How to reset password through mail service .
More highlights , Please pay attention to me. ▼▼

If you like my article , that
Watching and forwarding is my greatest support !
( Stamp the blue words below to read )ASP.NET 6 The most easy to understand dependency injection series
Check and fill gaps, and learn from the system EF Core 6 series

Recommends WeChat official account : Code Xia Jianghu
 I think it's good , Point and watch before you go
边栏推荐
- 代码扫描工具扫出的 Arrays.asList 使用BUG
- Unable to connect after win10 WiFi is disconnected
- mysql指令执行sql文件
- JSP学习之开发模式
- Problems and recovery of spark streaming checkpoint
- 你管这破玩意儿叫高可用?
- 同花顺容易开户么?网上开户安全么?
- 华为云招募工业智能领域合作伙伴,强力扶持+商业变现
- Redis implements the correct posture of the delay queue
- Source code analysis of spark cache
猜你喜欢


随机推荐
MYSQL_ERRNO : 1205 MESSAGE :Lock wait timeout exceeded; try restarting transacti
Apache ShardingSphere 一文读懂
使用IDM让百度云加速的方法
Test for API
Unable to connect after win10 WiFi is disconnected
UI自动化定位利器-xpath实战
LETV group payment system architecture sharing for processing 100000 high concurrent orders per second
Spark's NaiveBayes Chinese text classification
spark Executor执行结果的处理源码
图计算Hama-BSP模型的运行流程
web技术分享| 【高德地图】实现自定义的轨迹回放
MYSQL 存储过程异常处理 报错 错误代码: 1337
MYSQL_ ERRNO : 1292 Truncated incorrect date value At add_ num :1
Blazor University (30)表单 —— 从 InputBase 派生
jsp學習之(二)---------jsp脚本元素和指令
jsp学习之(二)---------jsp脚本元素和指令
快速掌握 ASP.NET 身份认证框架 Identity - 用户注册
Web technology sharing | [Gaode map] to realize customized track playback
ABP Framework 5.3.0 版本新增功能和变更说明
C#-Linq源码解析之DefaultIfEmpty