当前位置:网站首页>Five practical tips for power Bi (complimentary books at the end of the article)
Five practical tips for power Bi (complimentary books at the end of the article)
2022-06-22 18:06:00 【The way of Python data】
Book presented at the end of the article
Power BI It integrates many practical functions , Some functions even have more than one entry .
The ultimate goal of Microsoft is to let us focus on the idea of data processing and analysis , Instead of looking for low value-added things like function menus .
A good workman does his work well , You must sharpen your tools first .Power BI There are many functions , We need to practice constantly 、 Only by groping can we master .
This article starts from Power BI The improvement of operation efficiency and the standardization and ease of use of the model , Share five practical tips .
Power BI There are many default function settings in , Such as data type detection 、 Relationship detection and automatic date / Time and so on . These functions really bring us great convenience , But when the model becomes complex 、 After the amount of data becomes more , The efficiency of the model will slow down . So we can change the default settings , To achieve the purpose of improving operation efficiency .

Cancel data type identification
stay Power BI in , Click... On the far right of the ribbon “ file ” Button , Select from the pop-up menu “ Options and settings ” command , Click again “ Options ” Button , stay “ Options ” Window to modify the default settings , Check “ Never detect column types and headers for unstructured sources ”, Pictured 1 Shown .

chart 1 Cancel automatic detection of data type

Cancel relationship detection
Canceling relationship detection is also in “ Options ” Setting in the window , choice “ Data loading ” Options , Uncheck the “ Automatically detect new relationships after loading data ” Just check the box , Pictured 2 Shown .

chart 2 Cancel auto detect relationship

Select the columns to load
The columns we load into the model , Not every column is useful , For unnecessary Columns , We should delete it at load time .
stay Power BI Deleting columns in is simple , After selecting a column, right-click it or use the function menu to find the related functions of deleting columns , Here is a very convenient column selection function , Pictured 3 Shown , Check the required column to delete the extra column .
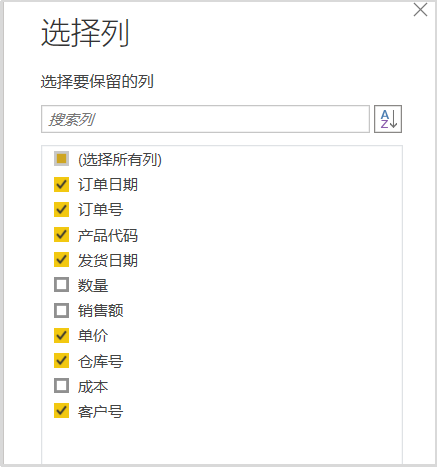
chart 3 Select column function
The following two tips can make the model more standardized ,Power BI It provides us with the Power Query Query and grouping of model metrics , They keep the model simple 、 standard .

Query groups
In the 3 Chapter explanation Power Query when , We applied most of the data cleansing operations to the raw data , Each operation produces a separate query , Queries can be classified according to the type of operation , And set up corresponding query groups , Pictured 4 Shown .
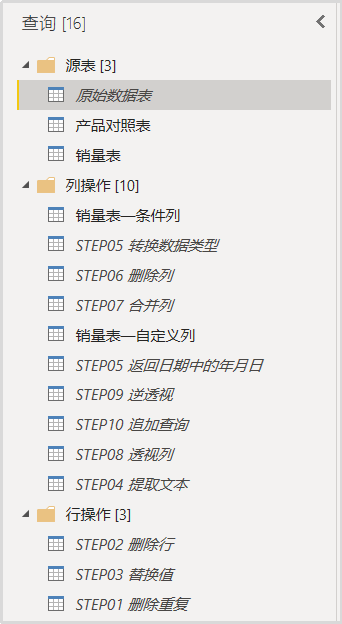
chart 4 Query group management
The query grouping method is very simple , stay “ Inquire about ” Right click below the pane , Choose... From the shortcut menu that pops up “ New group ” command , Name query groups according to requirements , Add notes if necessary , Pictured 5 Shown . After the group is established , You can directly drag and drop related queries into the group .

chart 5 Create a new query group

Measure table
The management of measures is similar to query grouping , You can also group and manage metrics according to their characteristics . Through the measure table , Measures can be classified and managed according to the table or dashboard page , It is convenient for us to find and maintain later , Pictured 6 Shown .

chart 6 Measure table
The method of establishing the measure table is very simple , single click “ Home page ” Tab “ input data ” Button , stay “ Create table ” Fill in the table name in the dialog box , The columns of the table remain the default settings , single click “ load ” button , Pictured 7 Shown .

chart 7 Create measure table
We can move the established measures to the new measure table , You can also directly create measures in an empty table .
Metrics are only relevant to the model , It has nothing to do with tables , So you can put measurements in any table , Have no effect on the calculation . When there are already measures in the measure table , We can use the default generated in the measure table “ Column 1” Hide or delete .
After the measures are gathered in a table , Then you can group the measurements . Switch to model view , stay “ Field ” In the pane , First select the measures that need to be grouped ( Hold down Shift Key to select consecutive measures , Hold down Ctrl Key to select non continuous measures ), And then in “ attribute ” Paned “ Show folders ” Enter the name of the group in the text box , Press Enter Press the key , Pictured 8 Shown .
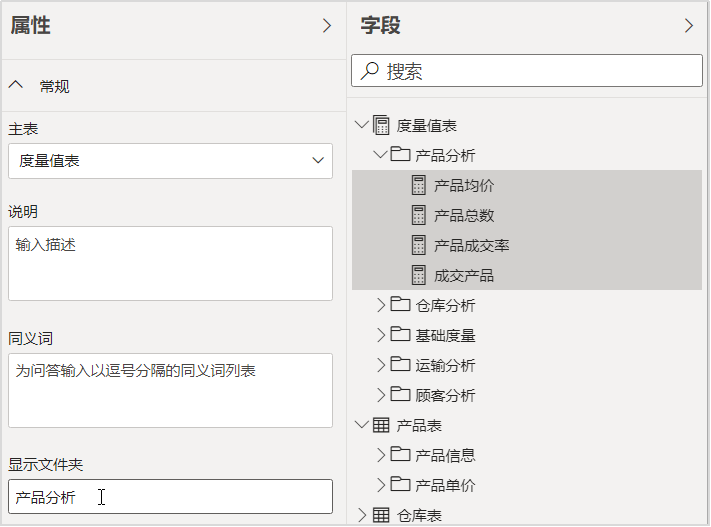
chart 8 Create measure folder
We can also set up a secondary folder for the measurements , stay “ Show folders ” Use... In the text box “ \ ” A symbol separates the hierarchy of folders , Pictured 9 Shown . Use “ \ ” Symbols can also create a third layer 、 The fourth level folder . The author suggests that the folder should not exceed three layers , Otherwise, it will be difficult to find .


chart 9 Create a secondary measure folder
Using the above method, you can also manage the fields of the table by category , image Windows The Explorer manages the columns and measures in the model as well , Pictured 10 Shown .

chart 10 Field group folder
This article is excerpted from 《Power BI Data visualization from entry to practice 》, Welcome to this book to learn more !
Scan code for details of this book


 Book delivery benefits
 Book delivery mode : Follow the video number below , Then on wechat official account 「Python The way of data 」 Leave a message at the end of this article , Choose the one you want to leave a message with  3  classmate , Give 《Power BI Data visualization 》, Books by 「 Press. 」 sponsorship .
 Message content : Study Power BI What I learned , And data visualization content
 By the time :2022 year 06 month 23 Japan 20:00, After the results were released 24 If you don't contact me within hours, it will be regarded as giving up .
 Book delivery rules :
1.  Pay attention to the video number above before the deadline + Leave a message at the end of the official account ;
2.  Readers participating in this activity are advised to add Yangge's wechat before the deadline ( The company's backstage replies “w” add to ) Good friends , In case you can't find anyone !
3.  I will announce the complimentary Book results in the message area of this article on or after the deadline , Please pay attention .
4.  Meaningless messages will not be selected ( For example, I want books , Ask for some praise, etc )
▼ Click to read the original text , Learn more about this book ~
边栏推荐
- Xftp 7(FTP/SFTP客户端) V7.0.0107 官方中文免费正式版(附文件+安装教程)
- Hello playwright: (7) simulate keyboard and mouse
- [face recognition] matlab simulation of face recognition based on googlenet deep learning network
- Defaultifempty for C # -linq source code analysis
- Xshell 7 (SSH Remote Terminal tool) v7.0.0109 official Chinese Version (with file + installation tutorial)
- 关于#数据库#的问题,如何解决?
- Simple integration of client go gin -update
- When online and offline integration accelerates and information docking channels are diversified, the traditional center will not be necessary
- Nuxt - Universal(SSR / SSG)/ Single Page App(渲染模式)
- Database industry analysis: from the global IT industry trend to the development of domestic databases
猜你喜欢

推荐7款超级好用的终端工具 —— SSH+FTP

docker: Error response from daemon: Conflict. The container name “/mysql“ is already in use by conta

How to solve the problem of database?
Ad20/altium Designer - oil for manhole cover

clickhouse 21. X cluster four piece one copy deployment

Interview shock 58: Six differences among truncate, delete and drop!

WPF effect chapter 190: playing listbox again

0 basic how to get started software testing, can you succeed in changing careers?

Xftp 7 (ftp/sftp client) v7.0.0107 official Chinese free official version (with file + installation tutorial)

The principle of locality in big talk
随机推荐
Nuxt - Universal (SSR / SSG) / single page app (rendering mode)
docker: Error response from daemon: Conflict. The container name “/mysql“ is already in use by conta
. Net release and support plan introduction
国产手机干翻苹果?原来是靠百元机和猛降价实现的
STM32系列(HAL库)——F103C8T6硬件SPI点亮带字库OLED屏
[fpga+pwm] design and implementation of phase shift trigger circuit for three-phase PWM rectifier based on FPGA
Recommend 7 super easy-to-use terminal tools - ssh+ftp
MYSQL_ ERRNO : 1205 MESSAGE :Lock wait timeout exceeded; try restarting transacti
[mysql] data synchronization prompt: specified key was too long; max key length is 767 bytes
请问一下,CDC2.0在读取mysql的时候,应该是没有表锁了吧,刚刚报了一个错误,access d
Which platform is safer to buy stocks on?
关于#数据库#的问题,如何解决?
Typescript (7) generic
Some difficulties in making web pages
mysql服务器启动后自动停止
一文带你掌握Tcpdump命令的使用
How can the new generation of HTAP databases be reshaped in the cloud? Tidb V6 online conference will be announced soon!
Short video with goods source code, save pictures to photo album / Gallery
Xshell 7 (SSH Remote Terminal tool) v7.0.0109 official Chinese Version (with file + installation tutorial)
Configuration of development environment for JSP learning