当前位置:网站首页>cartographer_fast_correlative_scan_matcher_2d分支定界粗匹配
cartographer_fast_correlative_scan_matcher_2d分支定界粗匹配
2022-06-26 05:09:00 【古路】
cartographer_fast_correlative_scan_matcher_2d分支定界粗匹配
0.引言
fast_correlative_scan_matcher_2d是对real_time_correlative_scan_matcher_2d算法的加速优化。
涉及到的文件有:
mapping/internal/constraint/constraint_builder_2d.cc :
  /** * @brief 进行局部搜索窗口的约束计算(对局部子图进行回环检测) * * @param[in] submap_id submap的id * @param[in] submap 单个submap * @param[in] node_id 节点的id * @param[in] constant_data 节点的数据 * @param[in] initial_relative_pose 约束的初值 */
  void ConstraintBuilder2D::MaybeAddConstraint(
      const SubmapId& submap_id, const Submap2D* const submap,
      const NodeId& node_id, const TrajectoryNode::Data* const constant_data,
      const transform::Rigid2d& initial_relative_pose) {

    //...

    // 为子图新建一个匹配器
    const auto* scan_matcher =
        DispatchScanMatcherConstruction(submap_id, submap->grid());

    // 生成个计算约束的任务
    auto constraint_task = absl::make_unique<common::Task>();
    constraint_task->SetWorkItem([=]() LOCKS_EXCLUDED(mutex_) {

      ComputeConstraint(submap_id, submap, node_id, false, /* match_full_submap */
                        constant_data, initial_relative_pose, *scan_matcher,
                        constraint);
    });
    // ...
  }
/** * @brief 计算节点和子图之间的一个约束(回环检测) * 用基于分支定界算法的匹配器进行粗匹配,然后用ceres进行精匹配 * * @param[in] submap_id submap的id * @param[in] submap 地图数据 * @param[in] node_id 节点id * @param[in] match_full_submap 是局部匹配还是全子图匹配 * @param[in] constant_data 节点数据 * @param[in] initial_relative_pose 约束的初值 * @param[in] submap_scan_matcher 匹配器 * @param[out] constraint 计算出的约束 */ void ConstraintBuilder2D::ComputeConstraint( const SubmapId& submap_id, const Submap2D* const submap, const NodeId& node_id, bool match_full_submap, const TrajectoryNode::Data* const constant_data, const transform::Rigid2d& initial_relative_pose, const SubmapScanMatcher& submap_scan_matcher, std::unique_ptr<ConstraintBuilder2D::Constraint>* constraint) { // ... // Step:2 使用基于分支定界算法的匹配器进行粗匹配 if (submap_scan_matcher.fast_correlative_scan_matcher->Match( initial_pose, constant_data->filtered_gravity_aligned_point_cloud, options_.min_score(), &score, &pose_estimate)) { // We've reported a successful local match. CHECK_GT(score, options_.min_score()); kConstraintsFoundMetric->Increment(); kConstraintScoresMetric->Observe(score); } else { return; } // Step:3 使用ceres进行精匹配, 就是前端扫描匹配使用的函数 ceres::Solver::Summary unused_summary; ceres_scan_matcher_.Match(pose_estimate.translation(), pose_estimate, constant_data->filtered_gravity_aligned_point_cloud, *submap_scan_matcher.grid, &pose_estimate, &unused_summary); //....mapping/internal/2d/scan_matching/fast_correlative_scan_matcher_2d.cc :
mapping/internal/2d/scan_matching/real_time_correlative_scan_matcher_2d.cc :
一下的每一步都是在为一对node<-->submap子图间约束做准备。
1.多分辨率地图构建
  // 为子图新建一个匹配器
  const auto* scan_matcher =
      DispatchScanMatcherConstruction(submap_id, submap->grid());
// 为每个子图新建一个匹配器
const ConstraintBuilder2D::SubmapScanMatcher*
ConstraintBuilder2D::DispatchScanMatcherConstruction(const SubmapId& submap_id,
                                                     const Grid2D* const grid) {

  CHECK(grid);
  // ...
  auto& scan_matcher_options = options_.fast_correlative_scan_matcher_options();
  auto scan_matcher_task = absl::make_unique<common::Task>();
  // 生成一个将初始化匹配器的任务, 初始化时会计算多分辨率地图, 比较耗时
  scan_matcher_task->SetWorkItem(
      [&submap_scan_matcher, &scan_matcher_options]() {

        // 进行匹配器的初始化, 与多分辨率地图的创建
        submap_scan_matcher.fast_correlative_scan_matcher =
            absl::make_unique<scan_matching::FastCorrelativeScanMatcher2D>(
                *submap_scan_matcher.grid, scan_matcher_options);
      });
  //...
}
在FastCorrelativeScanMatcher2D构造函数中同时构建多分辨率地图。
- PrecomputationGrid2D:不同分辨率的地图
- PrecomputationGridStack2D:不同分辨率的地图存储
  // 分辨率逐渐变大, i=0时就是默认分辨率0.05, i=6时, width=64,也就是64个格子合成一个值
  for (int i = 0; i != options.branch_and_bound_depth(); ++i) {

    const int width = 1 << i;  // 2^i
    // 构造不同分辨率的地图 PrecomputationGrid2D
    precomputation_grids_.emplace_back(grid, limits, width,
                                       &reusable_intermediate_grid);
  }
offset什么的计算就不细看了,没啥难点,仔细理一下就行,可以参考前端地图增长时的图:

滑动窗口建立多分辨率地图示意图:

实际上格子还在,只是值变为了最大值,一些小细节可以看代码:

因此,可以得出存储的数据类似图像金字塔但又有区别(总体图的大小没变,多分辨率地图的cell数量没有变化,只是每个cell的概率值等于大分辨率内所有概率的最大值,没有合并成大格子),最底层(front)的分辨率最高为原分辨率(0.05m):
for (int i = 0; i != options.branch_and_bound_depth(); ++i) {

  const int width = 1 << i;  // 2^i
  // 构造不同分辨率的地图 PrecomputationGrid2D
  precomputation_grids_.emplace_back(grid, limits, width,
                                     &reusable_intermediate_grid);
}
最后的结果如论文所示:

2.生成候选帧
前面大部分与前端的暴力匹配步骤是一样的,在 θ \theta θ 按步长生成候选集合后,对搜索窗口( x , y x,y x,y)进行了进一步的按实际情况进行缩小:
  // 缩小搜索窗口的大小, 计算每一帧点云在保证最后一个点能在地图范围内时的最大移动范围
  search_parameters.ShrinkToFit(discrete_scans, limits_.cell_limits());
获取最低分辨率层(栅格最粗)上的所有候选解并计算每个候选解的得分, 按照匹配得分从大到小排序, 返回排列好的candidates ,这一步和前端的没啥区别。
const std::vector<Candidate2D> lowest_resolution_candidates =
      ComputeLowestResolutionCandidates(discrete_scans, search_parameters);
3.基于分支定界筛选最佳候选帧
/** * @brief 基于多分辨率地图的分支定界搜索算法 * * @param[in] discrete_scans 多个点云的每个点在地图上的栅格坐标 * @param[in] search_parameters 搜索配置参数 * @param[in] candidates 候选解 * @param[in] candidate_depth 搜索树高度 * @param[in] min_score 候选点最小得分 * @return Candidate2D 最优解 */
Candidate2D FastCorrelativeScanMatcher2D::BranchAndBound(
    const std::vector<DiscreteScan2D>& discrete_scans,
    const SearchParameters& search_parameters,
    const std::vector<Candidate2D>& candidates, const int candidate_depth,
    float min_score) const {
这篇文章对理解分支定界讲解很易懂,搬运一点:
分枝的过程就是不断给树增加子节点的过程
定界(剪枝过程)就是在分枝的过程中检查子问题的上下界(如果问题是找最大值就定上届,最小值就定下界),如果子问题不能产生比当前最优解还要优的解,那么砍掉整个的这一支。直到所有子问题都不能产生一个更优的解时,算法结束

- A为根节点,表示整个解空间ω
- JKLMNOPQ为叶子节点,表示某一个具体的解
- BCDEFGHI为中间节点,表示解空间ω的某一部分子空间
具体流程:
A分枝BCDE,按照优先级排序;
B分枝FGHI,按照优先级排序;
F分枝JKLM,按照优先级排序;
在叶子节点上,计算JKLM的目标函数最大值,记为best_score(初始值为负无穷);
返回上一层G,计算G的目标函数值,与best_score比较:
若best_score依旧最大,则对G进行剪枝,继续计算H的目标函数值;
若G的目标函数值大于best_score,则对G进行分枝NOPQ,计算NOPQ的目标函数最大值,与best_score比较,更新best_score;
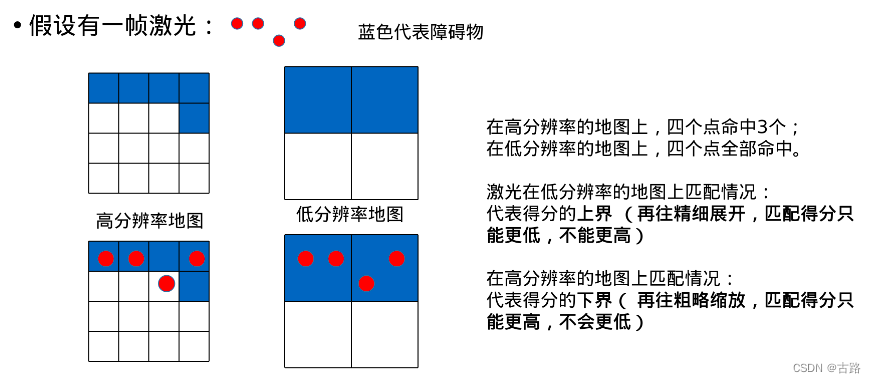
这篇文章对多分辨率地图概率值的设定缘由解释的很好。其实分支定界本质就是深度优先搜索加一个剪枝操作:
1、从根节点开始搜索,搜索至最底层的叶子节点,得到score的最大值,记作best_score。
2、返回上一层节点,先看一下它的评分是否大于best_score,如果是,继续分支(若分到底层依然有大于best_score的得分则更新best_score并记录),如果否,就可以直接剪枝了,抛弃这个节点及所有子节点。因为节点的评分代表了其子节点评分的上界,如果上界都小于best_score,就不可能再有子节点的评分大于它了。
这篇文章举例十分易懂:

思路理清楚了,看一下代码DFS:

实际上解是排序好的,因此会更快,只会在左部分找到解!
/** * @brief 基于多分辨率地图的分支定界搜索算法 * * @param[in] discrete_scans 多个点云的每个点在地图上的栅格坐标 * @param[in] search_parameters 搜索配置参数 * @param[in] candidates 候选解 * @param[in] candidate_depth 搜索树高度 * @param[in] min_score 候选点最小得分 * @return Candidate2D 最优解 */
Candidate2D FastCorrelativeScanMatcher2D::BranchAndBound(
    const std::vector<DiscreteScan2D>& discrete_scans,
    const SearchParameters& search_parameters,
    const std::vector<Candidate2D>& candidates, const int candidate_depth,
    float min_score) const {


  // 这个函数是以递归调用的方式求解的
  // 首先给出了递归终止的条件, 就是如果到了第0层(到底了), 意味着我们搜索到了一个叶子节点.
  // 同时由于每次迭代过程我们都是对新扩展的候选点进行降序排列
  // 所以队首的这个叶子节点就是最优解, 直接返回即可
  if (candidate_depth == 0) {

    // Return the best candidate.
    return *candidates.begin();
  }

  // 然后创建一个临时的候选解, 并将得分设置为min_score
  Candidate2D best_high_resolution_candidate(0, 0, 0, search_parameters);
  best_high_resolution_candidate.score = min_score;

  // 遍历所有的候选点
  for (const Candidate2D& candidate : candidates) {

    // Step: 剪枝 低于设置的阈值 或者 低于上一层的可行解的最高分 的可行解不进行继续分枝
    // 如果遇到一个候选点的分低于阈值, 那么后边的候选解的得分也会低于阈值,就可以直接跳出循环了
    if (candidate.score <= min_score) {

      break;
    }

    // 如果for循环能够继续运行, 说明当前候选点是一个更优的选择, 需要对其进行分枝
    std::vector<Candidate2D> higher_resolution_candidates;
    // 搜索步长减为上层的一半
    const int half_width = 1 << (candidate_depth - 1);

    // Step: 分枝 对x、y偏移进行遍历, 求出candidate的四个子节点候选解
    for (int x_offset : {
    0, half_width}) {
     // 只能取0和half_width
      // 如果超过了界限, 就跳过
      if (candidate.x_index_offset + x_offset >
          search_parameters.linear_bounds[candidate.scan_index].max_x) {

        break;
      }
      for (int y_offset : {
    0, half_width}) {

        if (candidate.y_index_offset + y_offset >
            search_parameters.linear_bounds[candidate.scan_index].max_y) {

          break;
        }

        // 候选者依次推进来, 一共4个,可以看出, 分枝定界方法的分枝是向右下角的四个子节点进行分枝
        higher_resolution_candidates.emplace_back(
            candidate.scan_index, candidate.x_index_offset + x_offset,
            candidate.y_index_offset + y_offset, search_parameters);
      }
    }

    // 对新生成的4个候选解进行打分与排序, 同一个点云, 不同地图 --> 到对应的多分辨率地图
    // depth: 7-->0 分辨率:低(粗格子)--> 高(细格子)
    ScoreCandidates(precomputation_grid_stack_->Get(candidate_depth - 1),
                    discrete_scans, search_parameters,
                    &higher_resolution_candidates);

    // 递归调用BranchAndBound对新生成的higher_resolution_candidates进行搜索
    // 先对其分数最高的节点继续进行分支, 直到最底层, 然后再返回倒数第二层再进行迭代
    // 如果倒数第二层的最高分没有上一个的最底层(叶子层)的分数高, 则跳过,
    // 否则继续向下进行分支与评分

    // Step: 定界 best_high_resolution_candidate.score
    // 以后通过递归调用发现了更优的解都将通过std::max函数来更新已知的最优解.
    best_high_resolution_candidate = std::max(
        best_high_resolution_candidate,
        BranchAndBound(discrete_scans, search_parameters,
                       higher_resolution_candidates, candidate_depth - 1,
                       best_high_resolution_candidate.score));
  }
  return best_high_resolution_candidate;
}
学习思想吧,细节久了也会忘得一干二净。
4.ceres_scan_matcher_2d精匹配
回到 mapping/internal/constraint/constraint_builder_2d.cc
/** * @brief 计算节点和子图之间的一个约束(回环检测) * 用基于分支定界算法的匹配器进行粗匹配,然后用ceres进行精匹配 * * @param[in] submap_id submap的id * @param[in] submap 地图数据 * @param[in] node_id 节点id * @param[in] match_full_submap 是局部匹配还是全子图匹配 * @param[in] constant_data 节点数据 * @param[in] initial_relative_pose 约束的初值 * @param[in] submap_scan_matcher 匹配器 * @param[out] constraint 计算出的约束 */
void ConstraintBuilder2D::ComputeConstraint(
    const SubmapId& submap_id, const Submap2D* const submap,
    const NodeId& node_id, bool match_full_submap,
    const TrajectoryNode::Data* const constant_data,
    const transform::Rigid2d& initial_relative_pose,
    const SubmapScanMatcher& submap_scan_matcher,
    std::unique_ptr<ConstraintBuilder2D::Constraint>* constraint)
在使用分支定界粗匹配之后,继续使用ceres进行精匹配:
  // Step:3 使用ceres进行精匹配, 就是前端扫描匹配使用的函数
  ceres::Solver::Summary unused_summary;
  ceres_scan_matcher_.Match(pose_estimate.translation(), pose_estimate,
                            constant_data->filtered_gravity_aligned_point_cloud,
                            *submap_scan_matcher.grid, &pose_estimate,
                            &unused_summary);
这部分参考文章.
边栏推荐
- YOLOV5训练结果的解释
- Tp5.0框架 PDO连接mysql 报错:Too many connections 解决方法
- Image translation /gan:unsupervised image-to-image translation with self attention networks
- Sentimentin tensorflow_ analysis_ cell
- 6.1 - 6.2 introduction to public key cryptography
- 微服务之间的Token传递之一@Feign的token传递
- 线程优先级
- Sklearn Library -- linear regression model
- [greedy college] recommended system engineer training plan
- Transport layer TCP protocol and UDP protocol
猜你喜欢

Using requests library and re library to crawl web pages

5. < tag stack and general problems > supplement: lt.946 Verify the stack sequence (the same as the push in and pop-up sequence of offer 31. stack)

天才制造者:獨行俠、科技巨頭和AI|深度學習崛起十年

钟珊珊:被爆锤后的工程师会起飞|OneFlow U

Machine learning final exercises

Ai+ remote sensing: releasing the value of each pixel

Anaconda creates tensorflow environment
Technical problems to be faced in mobile terminal im development

The best Chinese open source class of vision transformer, ten hours of on-site coding to play with the popular model of Vit!
Why does the mobile IM based on TCP still need to keep the heartbeat alive?
随机推荐
86. (cesium chapter) cesium overlay surface receiving shadow effect (gltf model)
【Unity3D】碰撞体组件Collider
Selection of programming language
图像翻译/GAN:Unsupervised Image-to-Image Translation with Self-Attention Networks基于自我注意网络的无监督图像到图像的翻译
【Unity3D】刚体组件Rigidbody
PHP之一句话木马
A ZABBIX self discovery script (shell Basics)
A company crawling out of its grave
Vie procédurale
Astype conversion data type
Schematic diagram of UWB ultra high precision positioning system
A beginner's entry is enough: develop mobile IM from zero
6.1 - 6.2 Introduction à la cryptographie à clé publique
6.1 - 6.2 公钥密码学简介
Keras actual combat cifar10 in tensorflow
LeetCode 19. Delete the penultimate node of the linked list
Multipass Chinese document - setup driver
6.1 - 6.2 introduction to public key cryptography
Technical past: tcp/ip protocol that has changed the world (precious pictures, caution for mobile phones)
Mise en œuvre du routage dynamique par zuul
