当前位置:网站首页>[200 opencv routines] 210 Are there so many holes in drawing a straight line?
[200 opencv routines] 210 Are there so many holes in drawing a straight line?
2022-06-25 10:19:00 【Xiaobai youcans】
OpenCV routine 200 piece General catalogue
【youcans Of OpenCV routine 200 piece 】210. There are so many holes in drawing a straight line ?
I'm not a headline party .
Drawing straight lines is of course the simplest drawing , What kind of pit can there be ? Students who don't believe in it can directly jump to the precautions . Even if you are OpenCV A great god , If this 10 You can master all the questions , Then I really took it .
7.1 Basic parameters of drawing function
OpenCV It provides drawing function , You can draw a line on the image 、 rectangular 、 round 、 Ellipse and other geometric figures .
function cv.line()、cv.rectangle()、cv.circle()、cv.polylines() And so on are used to draw straight lines in the image 、 rectangular 、 circular 、 Polygon and other geometric shapes , There are some setting parameters in these drawing functions , Introduce the following :
- img: Input / output image , Format is unlimited
- color: The color of the drawing line ,(b,g,r) Tuple of format , Or a scalar representing the gray value
- thickness: Draw the thickness of the line , The default value is 1px,-1 Indicates internal padding
- lineType: Draw the linear of the line segment , The default is LINE_8
- cv.FILLED: Inside filling ( Solid graphics )
- cv.LINE_4:4 Adjacency Linetype
- cv.LINE_8:8 Adjacency Linetype
- cv.LINE_AA: Anti aliasing , Smoother image
- shift: The number of decimal places of point coordinates , The default is 0
7.2 Draw a straight line
The function prototype
function cv.line() Used to draw lines in an image , function cv.arrowedLine() Used to draw straight lines with arrows in the image .
cv.line(img, pt1, pt2, color[, thickness=1, lineType=LINE_8, shift=0]) → img
cv.arrowedLine(img, pt1, pt2, color[, thickness=1, line_type=8, shift=0, tipLength=0.1]) → img
function cv.line() Draw the midpoint of the image pt1 With the point pt2 The line between , function cv.arrowedLine() Draw the midpoint of the image pt1 With the point pt2 Line segment with arrow between .
Parameter description :
- img: Input / output image , Allows single channel grayscale images or multi-channel color images
- pt1: Coordinates of the first point of the line segment ,(x1, y1)
- pt2: Coordinates of the second point of the line segment ,(x2, y2)
- tipLength: The ratio of the length of the arrow part to the length of the line segment , The default is 0.1
matters needing attention :
- The drawing operation will be performed directly on the incoming image img Make changes , Whether to accept the return value of the function or not . If you want to keep the input image unchanged, use img.copy() replicate .
- Use the starting point of the line segment pt1、 End pt2 Draw a straight line , Note that the format of the start and end coordinates is (x,y) instead of (y,x).
- The arrow starts from the starting point pt1 Point to the end pt2, By swapping the starting point pt1 And the end pt2 Redraw , Can generate the line segment of the double arrow .
- If the end coordinates exceed the image boundary , The drawn line segment is clipped by the image boundary . That is, the shape of the straight line is determined by pt1、pt2 decision , But the end of the line segment is a straight line pt1-pt2 Intersection with image boundary . If the end coordinates exceed the image boundary , The arrow may not be fully displayed or displayed .
- Draw on a color image , line color color You can tuple (b,g,r) Express , Such as (0,0,255) It means red ; It can also be scalar b, But it doesn't mean grayscale lines , It means color (b,0,0).
- Only gray lines can be drawn on a single channel gray image , Cannot draw colored lines . however , line color color It can be scalar b, It can also be tuples (b,g,r), Will be interpreted as grayscale values b. The parameters of the last two channels in the tuple are invalid .
- If set thickness, key word “lineType” It can be omitted ; If not set thickness, Then the key words “lineType” Don't omit , Otherwise, the input linetype parameters will be incorrectly interpreted as lineweight .
- You cannot select a fill linetype when drawing a line “cv.FILLED”, Otherwise, an error will be reported .
- When the image size is small ,LINE_4 The linetype has obvious sawtooth ,LINE_AA The linetype is smoother . But if the image size is large , Then the influence of linetype is not great , Default values are recommended LINE_8.
- The angle between the arrow and the line is ± 4 5 o \pm 45^o ±45o,tipLength Represents the ratio of the length of the arrow part to the length of the line segment .
These precautions , Please review it again against the routine and the result diagram .
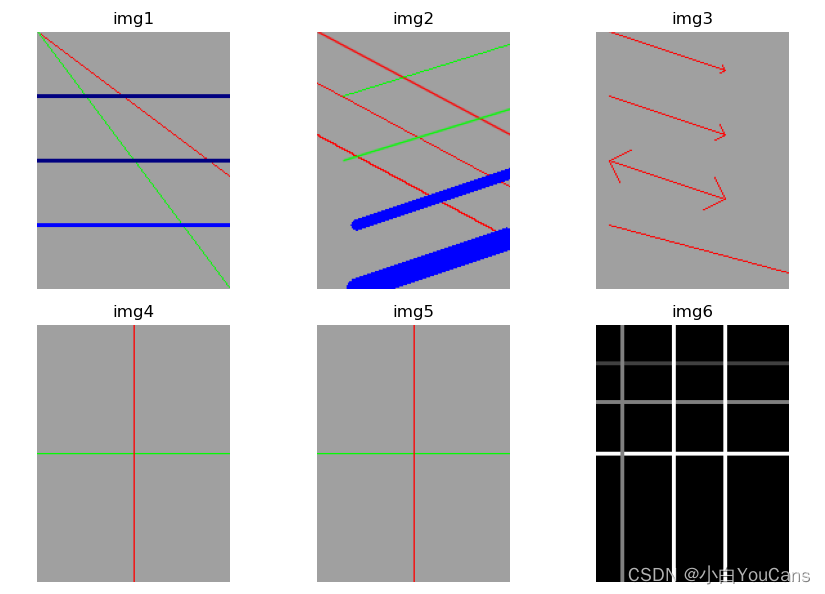
routine A4.1: Draw a line on the image
    # A4.1  Draw a line on the image
    height, width, channels = 200, 120, 3
    img = np.ones((height, width, channels), np.uint8)*160  #  Create a black image  RGB=0

    #  Be careful  pt1, pt2  The format of coordinates is  (x,y)  instead of  (y,x)
    img1 = img.copy()
    cv.line(img1, (0,0), (200,150), (0,0,255), 1)  #  Red  R=255
    cv.line(img1, (0,0), (150,200), (0,255,0), 1)  #  green  G=255
    cv.line(img1, (0,50), (200,50), (128,0,0), 2)  #  Navy Blue  B = 128
    cv.line(img1, (0,100), (200,100), 128, 2)  # color=128  Equivalent to  (128,0,0)
    cv.line(img1, (0,150), (200,150), 255, 2)  # color=255  Equivalent to  (255,0,0)

    img2 = img.copy()
    # img2 = cv.line(img2, (0,120), (100,180), (0,0,255), lineType=cv.FILLED) # cv.FILLED  illegal
    img2 = cv.line(img2, (0,80), (150,160), (0,0,255), lineType=cv.LINE_4)  #  Red ,cv.LINE_4
    img2 = cv.line(img2, (0,40), (150,120), (0,0,255), lineType=cv.LINE_8)  #  Red ,cv.LINE_8
    img2 = cv.line(img2, (0,0), (150,80), (0,0,255), lineType=cv.LINE_AA)  #  Red ,cv.LINE_AA
    #  If set  thickness, key word  "lineType"  It can be omitted
    img2 = cv.line(img2, (150,10), (20,50), (0,255,0), 1, cv.LINE_8)  #  green
    img2 = cv.line(img2, (150,60), (20,100), (0,255,0), 1, cv.LINE_AA)  #  green
    #  If not set  thickness, Then the key words  "lineType"  Don't omit
    img2 = cv.line(img2, (150,110), (30,150), (255,0,0), cv.LINE_8)  #  Blue , cv.LINE  Recognized as line width
    img2 = cv.line(img2, (150,160), (30,200), (255,0,0), cv.LINE_AA)  #  Blue , cv.LINE  Recognized as line width

    # img3 = img.copy()
    # tipLength  It refers to the ratio of the length of the arrow part to the length of the entire line segment
    img3 = cv.arrowedLine(img.copy(), (10,0), (100,30), (0,0,255), tipLength=0.05)  #  from  pt1  Point to  pt2
    img3 = cv.arrowedLine(img3, (10,50), (100,80), (0,0,255), tipLength=0.1)
    img3 = cv.arrowedLine(img3, (10,100), (100,130), (0,0,255), tipLength=0.2)  #  Double arrow
    img3 = cv.arrowedLine(img3, (100,130), (10,100), (0,0,255), tipLength=0.2)  #  Double arrow
    img3 = cv.arrowedLine(img3, (10,150), (200,200), (0,0,255), tipLength=0.1)  #  End point out of bounds , The arrow does not show

    #  Not used  img.copy(),  Will directly change  img, And interact with each other
    img4 = cv.line(img, (0,100), (150,100), (0,255,0), 1)  #  Level , y=100
    img5 = cv.line(img, (75,0), (75,200), (0,0,255), 1)  #  Vertical line , x= 60

    #  Drawing lines can be used for grayscale images , Parameters  color  Only the first channel value is valid , And is set to the gray value
    gray = np.zeros((height, width), np.uint8)  #  Create a grayscale image
    img6 = cv.line(gray, (0,10), (200,10), (0,255,255), 2)
    img6 = cv.line(gray, (0,30), (200,30), (64,128,255), 2)
    img6 = cv.line(gray, (0,60), (200,60), (128,64,255), 2)
    img6 = cv.line(gray, (0,100), (200,100), (255,0,255), 2)
    img6 = cv.line(gray, (20,0), (20,200), 128, 2)
    img6 = cv.line(gray, (60,0), (60,200), (255,0,0), 2)
    img6 = cv.line(gray, (100,0), (100,200), (255,255,255), 2)
    print(gray.shape, img6.shape)

    plt.figure(figsize=(9, 6))
    plt.subplot(231), plt.title("img1"), plt.axis('off')
    plt.imshow(cv.cvtColor(img1, cv.COLOR_BGR2RGB))
    plt.subplot(232), plt.title("img2"), plt.axis('off')
    plt.imshow(cv.cvtColor(img2, cv.COLOR_BGR2RGB))
    plt.subplot(233),plt.title("img3"), plt.axis('off')
    plt.imshow(cv.cvtColor(img3, cv.COLOR_BGR2RGB))
    plt.subplot(234), plt.title("img4"), plt.axis('off')
    plt.imshow(cv.cvtColor(img4, cv.COLOR_BGR2RGB))
    plt.subplot(235), plt.title("img5"), plt.axis('off')
    plt.imshow(cv.cvtColor(img5, cv.COLOR_BGR2RGB))
    plt.subplot(236),plt.title("img6"), plt.axis('off')
    plt.imshow(img6, cmap="gray")
    plt.tight_layout()
    plt.show()
Routine description :
The running result of this routine is shown in the figure below . The precautions in the previous article , You can read it by referring to the comments in the routine and the run result graph .
【 At the end of this section 】
Copyright notice :
reference : Use the Photoshop Levels adjustment (adobe.com)
[email protected] Original works , Reprint must be marked with the original link :(https://blog.csdn.net/youcans/article/details/125432101)
Copyright 2022 youcans, XUPT
Crated:2022-6-20
Welcome to your attention 『youcans Of OpenCV routine 200 piece 』 series , Ongoing update
Welcome to your attention 『youcans Of OpenCV Learning lessons 』 series , Ongoing update
边栏推荐
- This is enough for request & response
- Wearable devices may reveal personal privacy
- WPF 绑定表达式和绑定数据源(一)
- I'm afraid of the goose factory!
- JS【中高级】部分的知识点我帮你们总结好了
- Fluent: target support file /pods runner / pods runner frameworks Sh: permission denied - stack overflow
- MySQL source code reading (II) login connection debugging
- Cocopod error failed: undefined method `map 'for nil:nilclass
- Learning notes of rxjs takeuntil operator
- Shardingsphere proxy 4.1 sub database and sub table
猜你喜欢

Minio基本使用与原理

Principle of distribution: understanding the gossip protocol

String implementation strstr()

ShardingSphere-Proxy 5.0 分库分表(一)

The left sliding menu +menu item icon is grayed out

Kotlin advanced generic

【论文阅读|深读】DRNE:Deep Recursive Network Embedding with Regular Equivalence

Houdini图文笔记:Your driver settings have been set to force 4x Antialiasing in OpenGL applications问题的解决

How to develop wechat applet? How to open a wechat store

How much does a small program cost? How much does a small program cost? It's clear at a glance
随机推荐
I'm afraid of the goose factory!
Tiktok brand goes to sea: both exposure and transformation are required. What are the skills of information flow advertising?
How much does a small program cost? How much does a small program cost? It's clear at a glance
The gradle configuration supports the upgrade of 64 bit architecture of Xiaomi, oppo, vivo and other app stores
How to do the wechat selling applet? How to apply for applets
原生小程序开发注意事项总结
Linked list delete nodes in the linked list
Deep understanding of JVM - JVM memory model
Solutions using protobuf in TS projects
‘Flutter/Flutter. h‘ file not found
Difference between malloc and calloc
CyCa 2022 children's physical etiquette primary teacher class Shenzhen headquarters station successfully concluded
【论文阅读|深度】Role-based network embedding via structural features reconstruction with degree-regularized
Free platform for wechat applet making, steps for wechat applet making
Mengyou Technology: tiktok live broadcast with goods elements hot topics retention skills shaping image highlight selling points
宏的运用接续符\
How to "transform" small and micro businesses (I)?
Identityserver4 definition concept
虚幻引擎图文笔记:使用VAT(Vertex Aniamtion Texture)制作破碎特效(Houdini,UE4/UE5)上 Houdini端
单片机开发---基于ESP32-CAM的人脸识别应用