当前位置:网站首页>OPENGL学习(四)GLUT三维图像绘制
OPENGL学习(四)GLUT三维图像绘制
2022-07-24 18:42:00 【季马宝宝】
对于三维目标来说,最主要的就是有坐标变换问题,也就是说有视角问题
1.绘制一个旋转的立方体(普通视角变换)
下面这个程序只是我们看的方向一直在转,不是物体真的在转
#include <gl/glut.h>
#include <iostream>
#include <vector>

//绕每个轴旋转的角度
GLfloat angle_x = 30;
GLfloat angle_y = 30;
GLfloat angle_z = 30;

//点结构体
struct Point {

	GLfloat x, y, z;//位置
	GLfloat r, g, b;//颜色
	Point() = default;
};

//定义一个Point数组为面,每个面包括四个点
using face=std::vector<Point>;
//faces数组中存了所有面
std::vector<face> Faces;

//立方体顶点
GLfloat vertexes[8][3] = {
     {
     1.0, 1.0, 1.0},
						   {
     1.0,-1.0, 1.0},
						   {
    -1.0,-1.0, 1.0},
						   {
    -1.0, 1.0, 1.0},
						   {
     1.0, 1.0,-1.0},
						   {
     1.0,-1.0,-1.0},
						   {
    -1.0,-1.0,-1.0},
						   {
    -1.0, 1.0,-1.0} };
//立方体六个面
int facesId[6][4] = {
     {
     0, 1, 2, 3},
					{
     4, 5, 6, 7},
					{
     0, 4, 7, 3},
					{
     1, 5, 6, 2},
					{
     0, 4, 5, 1},
					{
     3, 7, 6, 2} };
//六个面分别的颜色
GLfloat facesColor[6][3] = {
     {
     1.0, 1.0, 0.0},
						   {
     1.0, 0.0, 1.0},
						   {
     0.0, 1.0, 1.0},
						   {
     1.0, 0.0, 0.0},
						   {
     0.0, 1.0, 0.0},
						   {
     0.0, 0.0, 1.0}};


//画一个面
void drawFace(face& points)
{

	glBegin(GL_POLYGON);
		for(auto &pt:points)
		{

			glColor3f(pt.r, pt.g, pt.b);
			glVertex3f(pt.x, pt.y, pt.z);
		}
	glEnd();
}

//当窗口发生变化(如改变大小)时自动调用
void mydisplay()
{

	//清除颜色缓存
	glClear(GL_COLOR_BUFFER_BIT | GL_DEPTH_BUFFER_BIT);
	for (auto &tmp_face : Faces)
	{

		drawFace(tmp_face);
	}
	//修改视角
	glMatrixMode(GL_MODELVIEW);
	glLoadIdentity();
	glRotatef(angle_x, 1, 0, 0);
	glRotatef(angle_y, 0, 1, 0);
	glRotatef(angle_z, 0, 0, 1);
	//使用DOUBLE_BUFFER后,使用以下代码来交换前后台内存
	glutSwapBuffers();
}

//初始化函数,一般包括视角等
void init()
{

	//全屏颜色变成黑色
	glClearColor(0.0, 0.0, 0.0, 1.0);
	//开启深度,阻挡后面的元素
	glEnable(GL_DEPTH_TEST);
	//改变投影视图,
	glMatrixMode(GL_PROJECTION);
	//opengl是一个状态机,要先清空之前的变换矩阵数据,所以每次视角操作时都要先变为单位矩阵
	glLoadIdentity();
	glOrtho(-2.0, 2.0, -2.0, 2.0, -2.0, 2.0);
	//修改视角
	glMatrixMode(GL_MODELVIEW);
	glLoadIdentity();
	glRotatef(angle_x, 1, 0, 0);
	glRotatef(angle_y, 0, 1, 0);
	glRotatef(angle_z, 0, 0, 1);
}

//初始化六个面数组
void initVertexes()
{

	for (int i = 0; i < 6; i++)
	{

		face tmp_face;
		for (int j = 0; j < 4; j++)
		{

			Point pt;
			pt.x = vertexes[facesId[i][j]][0];
			pt.y = vertexes[facesId[i][j]][1];
			pt.z = vertexes[facesId[i][j]][2];
			pt.r = facesColor[i][0];
			pt.g = facesColor[i][1];
			pt.b = facesColor[i][2];
			tmp_face.emplace_back(pt);
		}
		Faces.push_back(tmp_face);
	}
}

//旋转函数
void rotate(int x)
{

	angle_x += 1;
	if (angle_x >= 360)angle_x = 0;
	//立刻绘制
	glutPostRedisplay();
	//设置新定时器
	glutTimerFunc(10, rotate, 0);
}


int main(int argc, char** argv)
{

	glutInit(&argc, argv);
	//displayMode,增加GLUT_DEPTH使得深度
	glutInitDisplayMode( GLUT_DOUBLE|GLUT_RGB|GLUT_DEPTH);
	//设置窗口名
	glutCreateWindow("Cubic");

	//初始化六个面
	initVertexes();

	//设置定时函数
	glutTimerFunc(10, rotate, 0);
	//绑定display函数
	glutDisplayFunc(mydisplay);
	//设定opengl初始状态
	init();

	//开启窗口循环
	glutMainLoop();
	return 0;
}

2.绘制一个旋转的立方体(透视视角变化)
透视函数参数图下所示
#include <gl/glut.h>
#include <iostream>
#include <vector>

//绕每个轴旋转的角度
GLfloat angle_x = 30;
GLfloat angle_y = 30;
GLfloat angle_z = 30;

//点结构体
struct Point {

	GLfloat x, y, z;//位置
	GLfloat r, g, b;//颜色
	Point() = default;
};

//定义一个Point数组为面,每个面包括四个点
using face=std::vector<Point>;
//faces数组中存了所有面
std::vector<face> Faces;

//立方体顶点
GLfloat vertexes[8][3] = {
     {
     1.0, 1.0, 1.0},
						   {
     1.0,-1.0, 1.0},
						   {
    -1.0,-1.0, 1.0},
						   {
    -1.0, 1.0, 1.0},
						   {
     1.0, 1.0,-1.0},
						   {
     1.0,-1.0,-1.0},
						   {
    -1.0,-1.0,-1.0},
						   {
    -1.0, 1.0,-1.0} };
//立方体六个面
int facesId[6][4] = {
     {
     0, 1, 2, 3},
					{
     4, 5, 6, 7},
					{
     0, 4, 7, 3},
					{
     1, 5, 6, 2},
					{
     0, 4, 5, 1},
					{
     3, 7, 6, 2} };
//六个面分别的颜色
GLfloat facesColor[6][3] = {
     {
     1.0, 1.0, 0.0},
						   {
     1.0, 0.0, 1.0},
						   {
     0.0, 1.0, 1.0},
						   {
     1.0, 0.0, 0.0},
						   {
     0.0, 1.0, 0.0},
						   {
     0.0, 0.0, 1.0}};


//画一个面
void drawFace(face& points)
{

	glBegin(GL_POLYGON);
		for(auto &pt:points)
		{

			glColor3f(pt.r, pt.g, pt.b);
			glVertex3f(pt.x, pt.y, pt.z);
		}
	glEnd();
	//修改视角
	glMatrixMode(GL_MODELVIEW);
	glLoadIdentity();
	gluLookAt(0, 0, 4, 0.0, 0.0, 0.0, 0.0, 1.0, 0.0);
	glRotatef(angle_x, 1, 0, 0);
	glRotatef(angle_y, 0, 1, 0);
	glRotatef(angle_z, 0, 0, 1);
}

//当窗口发生变化(如改变大小)时自动调用
void mydisplay()
{

	//清除颜色缓存
	glClear(GL_COLOR_BUFFER_BIT | GL_DEPTH_BUFFER_BIT);
	for (auto &tmp_face : Faces)
	{

		drawFace(tmp_face);
	}
	//使用DOUBLE_BUFFER后,使用以下代码来交换前后台内存
	glutSwapBuffers();
}


//初始化函数,一般包括视角等
void init()
{

	//全屏颜色变成黑色
	glClearColor(0.0, 0.0, 0.0, 1.0);
	//开启深度,阻挡后面的元素
	glEnable(GL_DEPTH_TEST);
	//改变投影视图,
	glMatrixMode(GL_PROJECTION);
	//opengl是一个状态机,要先清空之前的变换矩阵数据,所以每次视角操作时都要先变为单位矩阵
	glLoadIdentity();
	//使用透视变换,也可以使用gluPerspective函数,参数有所不同
	glFrustum(-2.0, 2.0, -2.0, 2.0, 2.0, 20.0);
	//修改视角
	glMatrixMode(GL_MODELVIEW);
	glLoadIdentity();
	gluLookAt(0, 0, 4, 0.0, 0.0, 0.0, 0.0, 1.0, 0.0);
	glRotatef(angle_x, 1, 0, 0);
	glRotatef(angle_y, 0, 1, 0);
	glRotatef(angle_z, 0, 0, 1);
}

//初始化六个面数组
void initVertexes()
{

	for (int i = 0; i < 6; i++)
	{

		face tmp_face;
		for (int j = 0; j < 4; j++)
		{

			Point pt;
			pt.x = vertexes[facesId[i][j]][0];
			pt.y = vertexes[facesId[i][j]][1];
			pt.z = vertexes[facesId[i][j]][2];
			pt.r = facesColor[i][0];
			pt.g = facesColor[i][1];
			pt.b = facesColor[i][2];
			tmp_face.emplace_back(pt);
		}
		Faces.push_back(tmp_face);
	}
}

//旋转函数
void rotate(int x)
{

	angle_x += 1;
	if (angle_x >= 360)angle_x = 0;
	//立刻绘制
	glutPostRedisplay();
	//设置新定时器
	glutTimerFunc(10, rotate, 0);
}


int main(int argc, char** argv)
{

	glutInit(&argc, argv);
	//displayMode,增加GLUT_DEPTH使得深度
	glutInitDisplayMode( GLUT_DOUBLE|GLUT_RGB|GLUT_DEPTH);
	//设置窗口名
	glutCreateWindow("Cubic");

	//初始化六个面
	initVertexes();

	//设置定时函数
	glutTimerFunc(10, rotate, 0);
	//绑定display函数
	glutDisplayFunc(mydisplay);
	//设定opengl初始状态
	init();

	//开启窗口循环
	glutMainLoop();
	return 0;
}

3.画两个旋转方向不同的立方体
核心在于理解这段代码:
下面这段代码使我们看到 ( − 1.1 , − 1.1 , 0 ) (-1.1,-1.1,0) (−1.1,−1.1,0)处一个立方体在绕自己的轴旋转。
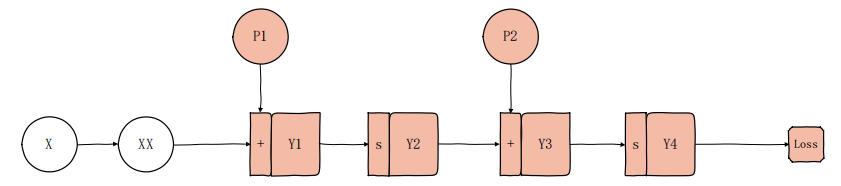
M1,M2,M3,M4分别代表四个变换矩阵的话, p ′ = M 1 M 2 M 3 M 4 p p'=M_1M_2M_3M_4p p′=M1M2M3M4p,越后面的代码越先作用于p,是一个从物体坐标系转移到视角坐标系的过程。M4、M3、M2都可以理解为以物体坐标系为基准的操作(即直接操作物体)M4将其移动到原点,M3将其绕y轴旋转,M2将其移动回去,连起来就是原地旋转。最后M1将它投射到我们的视角坐标系中。
	glLoadIdentity();
	gluLookAt(0, 0, 6, 0, 0, 0.0, 0.0, 1.0, 0.0); //M1
	glTranslatef(-1.1,-1.1,0.0); //M2
	glRotatef(angle_x, 0, 1, 0); //M3
	glTranslatef(1.1, 1.1, 0.0); //M4
完整代码:
#include <gl/glut.h>
#include <iostream>
#include <vector>

//绕每个轴旋转的角度
GLfloat angle_x = 30;
GLfloat angle_y = 30;
GLfloat angle_z = 30;

//点结构体
struct Point {

	GLfloat x, y, z;//位置
	GLfloat r, g, b;//颜色
	Point() = default;
};

//定义一个Point数组为面,每个面包括四个点
using face=std::vector<Point>;
//faces数组中存了所有面
std::vector<face> Cube1;
std::vector<face> Cube2;

//立方体顶点
GLfloat vertexes[8][3] = {
     {
     1.0, 1.0, 1.0},
						   {
     1.0,-1.0, 1.0},
						   {
    -1.0,-1.0, 1.0},
						   {
    -1.0, 1.0, 1.0},
						   {
     1.0, 1.0,-1.0},
						   {
     1.0,-1.0,-1.0},
						   {
    -1.0,-1.0,-1.0},
						   {
    -1.0, 1.0,-1.0} };
//立方体六个面
int facesId[6][4] = {
     {
     0, 1, 2, 3},
					{
     4, 5, 6, 7},
					{
     0, 4, 7, 3},
					{
     1, 5, 6, 2},
					{
     0, 4, 5, 1},
					{
     3, 7, 6, 2} };
//六个面分别的颜色
GLfloat facesColor[6][3] = {
     {
     1.0, 1.0, 0.0},
						   {
     1.0, 0.0, 1.0},
						   {
     0.0, 1.0, 1.0},
						   {
     1.0, 0.0, 0.0},
						   {
     0.0, 1.0, 0.0},
						   {
     0.0, 0.0, 1.0}};


//画一个面
void drawFace(face& points)
{

	glBegin(GL_POLYGON);
		for(auto &pt:points)
		{

			glColor3f(pt.r, pt.g, pt.b);
			glVertex3f(pt.x, pt.y, pt.z);
		}
	glEnd();
}

//当窗口发生变化(如改变大小)时自动调用
void mydisplay()
{

	//清除颜色缓存
	glClear(GL_COLOR_BUFFER_BIT | GL_DEPTH_BUFFER_BIT);
	//修改视角
	glMatrixMode(GL_MODELVIEW);
	glLoadIdentity();
	gluLookAt(0, 0, 6, 0, 0, 0.0, 0.0, 1.0, 0.0);
	glTranslatef(-1.1,-1.1,0.0);
	glRotatef(angle_x, 0, 1, 0);
	glTranslatef(1.1, 1.1, 0.0);
	for (auto &tmp_face : Cube1)
	{

		drawFace(tmp_face);
	}
	//修改视角
	glMatrixMode(GL_MODELVIEW);
	glLoadIdentity();
	gluLookAt(0, 0, 6, 0, 0, 0.0, 0.0, 1.0, 0.0);
	glTranslatef(1.1, 1.1, 0.0);
	glRotatef(angle_x, 0, -1, 0);
	glTranslatef(-1.1, -1.1, 0.0);
	for (auto& tmp_face : Cube2)
	{

		drawFace(tmp_face);
	}
	//使用DOUBLE_BUFFER后,使用以下代码来交换前后台内存
	glutSwapBuffers();
}


//初始化函数,一般包括视角等
void init()
{

	//全屏颜色变成黑色
	glClearColor(0.0, 0.0, 0.0, 1.0);
	//开启深度,阻挡后面的元素
	glEnable(GL_DEPTH_TEST);
	//改变投影视图,
	glMatrixMode(GL_PROJECTION);
	//opengl是一个状态机,要先清空之前的变换矩阵数据,所以每次视角操作时都要先变为单位矩阵
	glLoadIdentity();
	//使用透视变换,也可以使用gluPerspective函数,参数有所不同
	glFrustum(-2.0, 2.0, -2.0, 2.0, 2.0, 20.0);
}

//初始化六个面数组
void initVertexes()
{

	for (int i = 0; i < 6; i++)
	{

		face tmp_face1;
		face tmp_face2;
		for (int j = 0; j < 4; j++)
		{

			Point pt;
			pt.x = vertexes[facesId[i][j]][0]-1.1;
			pt.y = vertexes[facesId[i][j]][1]-1.1;
			pt.z = vertexes[facesId[i][j]][2];
			pt.r = facesColor[i][0];
			pt.g = facesColor[i][1];
			pt.b = facesColor[i][2];
			tmp_face1.emplace_back(pt);
			pt.x = vertexes[facesId[i][j]][0]+1.1;
			pt.y = vertexes[facesId[i][j]][1]+1.1;
			pt.r = facesColor[i][0];
			pt.g = facesColor[i][1];
			pt.b = facesColor[i][2];
			tmp_face2.emplace_back(pt);
		}
		Cube1.push_back(tmp_face1);
		Cube2.push_back(tmp_face2);
	}
}

//旋转函数
void rotate(int x)
{

	angle_x += 1;
	if (angle_x >= 360)angle_x = 0;
	//立刻绘制
	glutPostRedisplay();
	//设置新定时器
	glutTimerFunc(10, rotate, 0);
}


int main(int argc, char** argv)
{

	glutInit(&argc, argv);
	//displayMode,增加GLUT_DEPTH使得深度
	glutInitDisplayMode( GLUT_DOUBLE|GLUT_RGB|GLUT_DEPTH);
	//设置窗口名
	glutCreateWindow("Cubic");

	//初始化六个面
	initVertexes();

	//设置定时函数
	glutTimerFunc(10, rotate, 0);
	//绑定display函数
	glutDisplayFunc(mydisplay);
	//设定opengl初始状态
	init();

	//开启窗口循环
	glutMainLoop();
	return 0;
}

边栏推荐
- MySQL optimization series (2) -- InnoDB important parameter optimization
- leetcode-记忆化深搜/动态规划v2
- The assignment and answer of the "Cyberspace Security" competition of the 2020 secondary vocational group in Zhejiang Province (flag)
- CF. Bits And Pieces(子集状压dp + 剪枝)
- 卷积神经网络感受野计算指南
- 字符串的遍历及拼接
- Thread lifecycle and basic methods
- [Tkinter] layout management and event system
- Four ways of simple interest mode
- The difference between KIB and MIB and KB and MB
猜你喜欢

轻松学Pytorch-迁移学习实现表面缺陷检查

Ionic4 Learning Notes 6 -- using native ionic4 components in custom components
理解动态计算图,requires_grad、zero_grad

为什么梯度是函数变化最快的方向

深度学习中Dropout原理解析

微信小程序逆向

Get familiar with pytoch and pytoch environment configuration

Create parent-child projects in clion (cmake tool) and introduce the method of third-party libraries

Web
![[wechat applet development] custom tabbar case (custom message 99 + little hearts)](/img/49/354ecb448e91d9e15aaec4922a62e1.png)
[wechat applet development] custom tabbar case (custom message 99 + little hearts)
随机推荐
Four ways of simple interest mode
暑期牛客多校1: I Chiitoitsu(期望dp,求逆元)
Ionic4 learning notes 10 rotation map of an East Project
2022杭电多校第二场1009 ShuanQ(数学)
CF. Bits And Pieces(子集状压dp + 剪枝)
[Tkinter] common components (II)
Typora is still the most beautiful and beautiful document editing artifact of yyds in my heart. I believe you will never abandon it
Add column by column selection for JTable
EasyUI framework dialog repeated loading problem
Ionic4 learning notes 9 -- an east project 01
初识Pytorch和Pytorch环境配置
ETL开发工具Kettle下载安装环境搭建及使用教程
Ionic4 Learning Notes 6 -- using native ionic4 components in custom components
树链剖分板子
Tree chain partition board
Namespace:集群环境共享与隔离
Date function format conversion
13. What is the difference between onkeydown, up and onkeypress?
使用 tftp 无法向服务器上传文件问题解决
C Programming classic tutorial