当前位置:网站首页>kubernetes日志监控系统架构详解
kubernetes日志监控系统架构详解
2022-06-23 12:56:00 【51CTO】
1 背景
随着客户的不断增多,客户业务复杂程度不断加大,传统的服务器级别监控由于监控粒度过大,且当告警时需要进一步排查原因,已无法满足需求,为了深入客户业务,保证业务健康运行,我们需要收集服务器系统的日志、客户业务日志,并进行分析处理,做到故障发生时可以第一时间定位故障原因,通知相应的人员处理,那么怎么将日志文件归集,怎么将日志文件呈现,以及故障发生时第一时间通知给相应业务负责的人员,成了很多公司需要面对的问题,因此日志监控系统应运而生。
2 日志监控系统架构设计
2.1 架构组成

2.2 架构策略
在数据源端配置日志采集客户端,负责采集原始日志并汇总到MQ,MQ选择Kafka进行日志消息缓存与分发,后端部署LogStash,订阅Kafka topic内日志消息,并写入ES文件存储。
ElastAlert判断日志消息是否包含错误或异常等信息,通过邮件、短信等方式发送给相关联系人,ES提供数据给Grafana/Kibana进行数据展示,用户可通过web界面查询实时日志
3 日志监控系统介绍
3.1 数据采集
数据采集层位于业务服务器集群上,在每个业务服务器上面安装了数据采集工具,做日志采集,包括应用日志、系统日志、访问日志等,然后把采集到的原始日志通过发送至消息队列集群。
数据采集工具(Agent)的选型需考虑:
- 部署方式
- 部署难易度
- 业务入侵程度
- 资源消耗
目前主流的开源日志采集工具有:Logstash,Filebeat,Fluentd等
Logstash
Logstash 是一个开源数据收集引擎,具有实时管道功能。Logstash 可以动态地将来自不同数据源的数据统一起来,并将数据标准化到你所选择的目的地
- 优点就是它的灵活性,它提供很多插件,详细的文档以及直白的配置格式让它可以在多种场景下应用。而且现在
ELK整个技术栈在很多公司应用的比较多,所以基本上可以在往上找到很多相关的学习资源 - 缺点是它的性能以及资源消耗。尽管它的性能在近几年已经有很大提升,与它的替代者们相比还是要慢很多的,它在大数据量的情况下会是个问题。另一个问题是它目前不支持缓存。
Filebeat
Filebeat是一个轻量级的日志传输工具,它的存在正弥补了Logstash的缺点,Filebeat作为一个轻量级的日志传输工具可以将日志推送到 Kafka、Logstash、ElasticSearch、Redis
- 优点是只是一个二进制文件没有任何依赖。它占用资源极少,尽管它还十分年轻,正式因为它简单,所以几乎没有什么可以出错的地方,所以它的可靠性还是很高的。
- 缺点是
Filebeat的应用范围十分有限,所以在某些场景下我们会碰到问题。例如,如果使用Logstash作为下游管道,我们同样会遇到性能问题。正因为如此Filebeat的范围在扩大。开始时,它只能将日志发送到Logstash和Elasticsearch,而现在它可以将日志发送给Kafka和Redis。
Fluentd
Fluentd创建的初衷主要是尽可能的使用JSON作为日志输出,所以传输工具及其下游的传输线不需要猜测子字符串里面各个字段的类型。这样它为几乎所有的语言都提供库,这也意味着可以将它插入到自定义的程序中。
- 优点是
Fluentd插件是用Ruby语言开发的非常易于编写维护。所以它数量很多,几乎所有的源和目标存储都有插件。这也意味这可以用Fluentd来串联所有的东西。 - 缺点是
Fluentd的灵活性并不好。但是仍然可以通过正则表达式来解析非结构化的数据。尽管性能在大多数场景下都很好,但它并不是最好的,它的缓冲只存在与输出端,单线程核心以及Ruby GIL实现的插件意味着它大的节点下性能是受限的。
综上所述,Filebeat凭借占用资源极少、轻量化、可靠性高、部署简单,故数据采集层工具采用Filebeat
3.2 消息队列
随着业务规模扩增,日质量不断增长,接入到日志服务的产品线不断增多,遇到流量高峰,写入到ES的性能就会降低,cpu打满,随时都有集群宕机的风险。因此,需要引入消息队列进行削峰填谷。原始日志发送到Kafka+Zookeeper集群上后,会进行集中存储,此时,filebeat是消息的生产者,存储的消息可以随时被消费。
3.3 数据分析
LogStash作为消费者,会去Kafka+zookeeper集群节点实时拉取原始日志,然后将获取到的原始日志根据规则进行分析、清洗、过滤,最后将清洗好的日志转发至Elasticsearch集群。
3.4 数据持久化存储
Elasticsearch集群在接收到Logstash发送过来的数据后,执行写磁盘,建索引库等操作,最后将结构化的数据存储到Elasticsearch集群上
3.5 数据查询展示
Kibana/Grafana是一个可视化的数据展示平台,当有数据检索请求时,它从Elasticsearch集群上读取数据,然后进行可视化出图和多维度分析
4 安装部署
4.1 环境准备
服务器 | 运行软件 | 部署方式 |
10.1.1.11 | Nginx + Filebeat | 二进制 |
10.1.1.12 | Kafka + Zookeeper | docker-compose |
10.1.1.13 | ES + Logstash | docker-compose + 二进制 |
10.1.1.14 | Kibana + Grafana | 二进制 |
4.2 docker环境部署
在10.1.1.12和10.1.1.13上部署
4.2.1 安装docker
       [[email protected]_zoo ~]

       # yum install -y yum-utils device-mapper-persistent-data lvm2


[[email protected]_zoo ~]

       # yum-config-manager --add-repo http://mirrors.aliyun.com/docker-ce/linux/centos/docker-ce.repo


[[email protected]_zoo ~]

       # yum -y install docker-ce


docker

       -v


[[email protected]_zoo ~]

       # docker -v


Docker version

       20.10.6, build 370c289
- 1.
- 2.
- 3.
- 4.
- 5.
- 6.
4.2.2 配置加速器
       [[email protected]_zoo ~]

       # sudo mkdir -p /etc/docker


[[email protected]_zoo ~]

       # sudo tee /etc/docker/daemon.json <<-'EOF'


{


       "registry-mirrors": [

       "https://su9ppkb0.mirror.aliyuncs.com"]


}


EOF


[[email protected]_zoo ~]

       # systemctl daemon-reload


[[email protected]_zoo ~]

       # systemctl start docker


[[email protected]_zoo ~]

       # systemctl enable docker
- 1.
- 2.
- 3.
- 4.
- 5.
- 6.
- 7.
- 8.
- 9.
4.2.3 安装docker-compose
       [[email protected]_zoo ~]

       # yum install docker-compose -y


[[email protected]_zoo ~]

       # docker-compose -v


docker-compose version

       1.18.0, build 8dd22a9
- 1.
- 2.
- 3.
4.3 部署ES集群
4.3.1 环境配置
       # 优化内核,对es支持


[[email protected]_logst es]

       # echo 'vm.max_map_count=262144' >> /etc/sysctl.conf


[[email protected]_logst es]

       # sysctl -p


       # 配置变量


[[email protected]_logst es]

       # echo 'ELK_VERSION=7.5.1' > .env


       # 开启IPv4转发


[[email protected]_logst es]

       # echo "net.ipv4.ip_forward = 1" /usr/lib/sysctl.d/00-system.conf


[[email protected]_logst es]

       # systemctl restart network


[[email protected]_logst es]

       # systemctl restart docker
- 1.
- 2.
- 3.
- 4.
- 5.
- 6.
- 7.
- 8.
- 9.
- 10.
- 11.
4.3.2 准备目录
4.3.3 准备配置文件
cat /data/es/docker-compose.yml
version
'3.3'
services
es01
build
context
elasticsearch/
args
ELK_VERSION
$ELK_VERSION
container_name
es01
volumes
type
bind
source
/data/es/config/elasticsearch.yml
target
/usr/share/elasticsearch/config/elasticsearch.yml
read_only
true
type
volume
source
data-es1
target
/usr/share/elasticsearch/data
ports
9200:9200
9300:9300
environment
node.name=es01
cluster.name=es-docker-cluster
discovery.seed_hosts=es02,es03
cluster.initial_master_nodes=es01,es02,es03
"ES_JAVA_OPTS=-Xms512m -Xmx512m"
ulimits
memlock
soft
-1
hard
-1
networks
elastic
es02
build
context
elasticsearch/
args
ELK_VERSION
$ELK_VERSION
container_name
es02
volumes
type
bind
source
/data/es/config/elasticsearch.yml
target
/usr/share/elasticsearch/config/elasticsearch.yml
read_only
true
type
volume
source
data-es2
target
/usr/share/elasticsearch/data
environment
node.name=es02
cluster.name=es-docker-cluster
discovery.seed_hosts=es01,es03
cluster.initial_master_nodes=es01,es02,es03
bootstrap.memory_lock=true
"ES_JAVA_OPTS=-Xms512m -Xmx512m"
ulimits
memlock
soft
-1
hard
-1
networks
elastic
es03
build
context
elasticsearch/
args
ELK_VERSION
$ELK_VERSION
container_name
es03
volumes
type
bind
source
/data/es/config/elasticsearch.yml
target
/usr/share/elasticsearch/config/elasticsearch.yml
read_only
true
type
volume
source
data-es3
target
/usr/share/elasticsearch/data
environment
node.name=es03
cluster.name=es-docker-cluster
discovery.seed_hosts=es01,es02
cluster.initial_master_nodes=es01,es02,es03
bootstrap.memory_lock=true
"ES_JAVA_OPTS=-Xms512m -Xmx512m"
ulimits
memlock
soft
-1
hard
-1
networks
elastic
volumes
data-es1
driver
local
driver_opts
type
none
o
bind
device
/data/es/data-es1
data-es2
driver
local
driver_opts
type
none
o
bind
device
/data/es/data-es2
data-es3
driver
local
driver_opts
type
none
o
bind
device
/data/es/data-es3
networks
elastic
driver
bridge
- 1.
- 2.
- 3.
- 4.
- 5.
- 6.
- 7.
- 8.
- 9.
- 10.
- 11.
- 12.
- 13.
- 14.
- 15.
- 16.
- 17.
- 18.
- 19.
- 20.
- 21.
- 22.
- 23.
- 24.
- 25.
- 26.
- 27.
- 28.
- 29.
- 30.
- 31.
- 32.
- 33.
- 34.
- 35.
- 36.
- 37.
- 38.
- 39.
- 40.
- 41.
- 42.
- 43.
- 44.
- 45.
- 46.
- 47.
- 48.
- 49.
- 50.
- 51.
- 52.
- 53.
- 54.
- 55.
- 56.
- 57.
- 58.
- 59.
- 60.
- 61.
- 62.
- 63.
- 64.
- 65.
- 66.
- 67.
- 68.
- 69.
- 70.
- 71.
- 72.
- 73.
- 74.
- 75.
- 76.
- 77.
- 78.
- 79.
- 80.
- 81.
- 82.
- 83.
- 84.
- 85.
- 86.
- 87.
- 88.
- 89.
- 90.
- 91.
- 92.
- 93.
- 94.
- 95.
- 96.
- 97.
- 98.
- 99.
- 100.
- 101.
- 102.
- 103.
- 104.
- 105.
- 106.
- 107.
- 108.
- 109.
- 110.
- 111.
/data/es/elasticsearch/Dockerfile
/data/es/config/elasticsearch.yml
目录总览
       [[email protected]_logst data]

       # pwd


/data


[[email protected]_logst data]

       # tree


.


       `-- es


        |-- config


        | `

       -- elasticsearch.yml


    |-- data-es1


    |-- data-es2


    |-- data-es3


    |-- docker-compose.yml


       `-- elasticsearch


        `

       -- Dockerfile


       6 directories,

       3 files
- 1.
- 2.
- 3.
- 4.
- 5.
- 6.
- 7.
- 8.
- 9.
- 10.
- 11.
- 12.
- 13.
- 14.
- 15.
4.3.4 启动ES集群
       [[email protected]_logst es]

       # docker-compose up -d


Starting es02 ...


Starting es03 ...


Starting es01 ...

       done


[[email protected]_logst es]

       # docker-compose ps


Name              Command               State                         Ports


       --

       --

       --

       --

       --

       --

       --

       --

       --

       --

       --

       --

       --

       --

       --

       --

       --

       --

       --

       --

       --

       --

       --

       --

       --

       --

       --

       --

       --

       --

       --

       --

       --

       --

       --

       --

       --

       --

       --

       --

       --

       --

       --

       --

       --

       --

       --

       --

       --


es01   /usr/local/bin/docker-entr ...   Up

       0.0.0.0:9200->9200/tcp,:::9200->9200/tcp,

       9300/tcp


es02   /usr/local/bin/docker-entr ...   Up

       9200/tcp,

       9300/tcp


es03   /usr/local/bin/docker-entr ...   Up

       9200/tcp,

       9300/tcp
- 1.
- 2.
- 3.
- 4.
- 5.
- 6.
- 7.
- 8.
- 9.
- 10.
- 11.
       [[email protected]_logst es]

       # curl 10.1.1.13:9200


{


       "name" :

       "es01",


       "cluster_name" :

       "es-docker-cluster",


       "cluster_uuid" :

       "P5FnRclnSBCkO_wPAMJPow",


       "version" : {


       "number" :

       "7.5.1",


       "build_flavor" :

       "default",


       "build_type" :

       "docker",


       "build_hash" :

       "3ae9ac9a93c95bd0cdc054951cf95d88e1e18d96",


       "build_date" :

       "2019-12-16T22:57:37.835892Z",


       "build_snapshot" :

       false,


       "lucene_version" :

       "8.3.0",


       "minimum_wire_compatibility_version" :

       "6.8.0",


       "minimum_index_compatibility_version" :

       "6.0.0-beta1"


  },


       "tagline" :

       "You Know, for Search"


}
- 1.
- 2.
- 3.
- 4.
- 5.
- 6.
- 7.
- 8.
- 9.
- 10.
- 11.
- 12.
- 13.
- 14.
- 15.
- 16.
- 17.
- 18.
至此,ES集群部署完毕。
4.4 部署Kibana
4.4.1 安装Kibana
       [[email protected]_gra ~]

       # mkdir /data/kibana && cd /data/kibana


[[email protected]_gra kibana]

       # wget https://artifacts.elastic.co/downloads/kibana/kibana-7.5.1-x86_64.rpm
- 1.
- 2.
       # 安装


[[email protected]_gra kibana]

       # yum install -y kibana-7.5.1-x86_64.rpm


[[email protected]_gra kibana]

       # systemctl enable kibana.service


[[email protected]_gra kibana]

       # systemctl start kibana.service


       # 修改配置文件


[[email protected]_gra kibana]

       # grep -Ev "^#|^$" /etc/kibana/kibana.yml


server.port:

       5601


server.host:

       "localhost"


elasticsearch.hosts: [

       "http://10.1.1.13:9200"]


i18n.locale:

       "zh-CN"


       # 配置hosts


       10.1.1.13 es01 es02 es03
- 1.
- 2.
- 3.
- 4.
- 5.
- 6.
- 7.
- 8.
- 9.
- 10.
- 11.
- 12.
- 13.
- 14.
4.4.2 安装Nginx
       #由于kibana从5.5版本开始,就不提供认证功能,使用官方的X-Pack方式收费,这里采用nginx的代理做认证.


       #yum安装nginx


[[email protected]_gra ~]

       # yum install -y nginx


       #配置kiban用户名密码认证登录


[[email protected]_gra ~]

       # yum install -y httpd-tools


[[email protected]_gra ~]

       # mkdir -p /etc/nginx/passwd


[[email protected]_gra ~]

       # htpasswd -c -b /etc/nginx/passwd/kibana.passwd kibana [email protected]


       #进入到nginx的conf.d目录下,配置kibana.conf文件


[[email protected]_gra ~]

       # vim /etc/nginx/conf.d/kibana.conf


server {


    listen

       10.58.96.183:5601;


    auth_basic

       "Kibana Auth";


    auth_basic_user_file /etc/nginx/passwd/kibana.passwd;


    location / {


        proxy_pass http://127.0.0.1:5601;


        proxy_redirect off;


    }


}


[[email protected]_gra conf.d]

       # systemctl start nginx


[[email protected]_gra conf.d]

       # systemctl enable nginx
- 1.
- 2.
- 3.
- 4.
- 5.
- 6.
- 7.
- 8.
- 9.
- 10.
- 11.
- 12.
- 13.
- 14.
- 15.
- 16.
- 17.
- 18.
- 19.
- 20.
- 21.
- 22.
4.4.2 访问Kibana


4.5 部署Kafka集群
4.5.1 准备配置文件
version
'2'
services
zoo1
image
wurstmeister/zookeeper
restart
always
hostname
zoo1
container_name
zoo1
ports
2184:2181
volumes
"/data/kafka/volume/zoo1/data:/data"
"/data/kafka/volume/zoo1/datalog:/datalog"
environment
ZOO_MY_ID
1
ZOO_SERVERS
server.1=0.0.0.0
2888
3888 server.2=zoo2
2888
3888 server.3=zoo3
2888
3888
networks
kafka
ipv4_address
172.19.0.11
zoo2
image
wurstmeister/zookeeper
restart
always
hostname
zoo2
container_name
zoo2
ports
2185:2181
volumes
"/data/kafka/volume/zoo2/data:/data"
"/data/kafka/volume/zoo2/datalog:/datalog"
environment
ZOO_MY_ID
2
ZOO_SERVERS
server.1=zoo1
2888
3888 server.2=0.0.0.0
2888
3888 server.3=zoo3
2888
3888
networks
kafka
ipv4_address
172.19.0.12
zoo3
image
wurstmeister/zookeeper
restart
always
hostname
zoo3
container_name
zoo3
ports
2186:2181
volumes
"/data/kafka/volume/zoo3/data:/data"
"/data/kafka/volume/zoo3/datalog:/datalog"
environment
ZOO_MY_ID
3
ZOO_SERVERS
server.1=zoo1
2888
3888 server.2=zoo2
2888
3888 server.3=0.0.0.0
2888
3888
networks
kafka
ipv4_address
172.19.0.13
kafka1
image
wurstmeister/kafka
restart
always
hostname
kafka1
container_name
kafka1
ports
9092:9092
environment
KAFKA_ADVERTISED_HOST_NAME
kafka1
KAFKA_ADVERTISED_PORT
9092
KAFKA_ZOOKEEPER_CONNECT
zoo1
2181,zoo2
2181,zoo3
2181
KAFKA_ADVERTISED_LISTENERS
PLAINTEXT
//kafka1
9092
KAFKA_LISTENERS
PLAINTEXT
//kafka1
9092
volumes
/data/kafka/logs/kafka1/logs:/kafka
external_links
zoo1
zoo2
zoo3
networks
kafka
ipv4_address
172.19.0.14
kafka2
image
wurstmeister/kafka
restart
always
hostname
kafka2
container_name
kafka2
ports
9093:9093
environment
KAFKA_ADVERTISED_HOST_NAME
kafka2
KAFKA_ADVERTISED_PORT
9093
KAFKA_ZOOKEEPER_CONNECT
zoo1
2181,zoo2
2181,zoo3
2181
KAFKA_ADVERTISED_LISTENERS
PLAINTEXT
//kafka2
9093
KAFKA_LISTENERS
PLAINTEXT
//kafka2
9093
volumes
/data/kafka/logs/kafka2/logs:/kafka
external_links
zoo1
zoo2
zoo3
networks
kafka
ipv4_address
172.19.0.15
kafka3
image
wurstmeister/kafka
restart
always
hostname
kafka3
container_name
kafka3
ports
9094:9094
environment
KAFKA_ADVERTISED_HOST_NAME
kafka3
KAFKA_ADVERTISED_PORT
9094
KAFKA_ZOOKEEPER_CONNECT
zoo1
2181,zoo2
2181,zoo3
2181
KAFKA_ADVERTISED_LISTENERS
PLAINTEXT
//kafka3
9094
KAFKA_LISTENERS
PLAINTEXT
//kafka3
9094
volumes
/data/kafka/logs/kafka3/logs:/kafka
external_links
zoo1
zoo2
zoo3
networks
kafka
ipv4_address
172.19.0.16
networks
kafka
external
name
kafka
- 1.
- 2.
- 3.
- 4.
- 5.
- 6.
- 7.
- 8.
- 9.
- 10.
- 11.
- 12.
- 13.
- 14.
- 15.
- 16.
- 17.
- 18.
- 19.
- 20.
- 21.
- 22.
- 23.
- 24.
- 25.
- 26.
- 27.
- 28.
- 29.
- 30.
- 31.
- 32.
- 33.
- 34.
- 35.
- 36.
- 37.
- 38.
- 39.
- 40.
- 41.
- 42.
- 43.
- 44.
- 45.
- 46.
- 47.
- 48.
- 49.
- 50.
- 51.
- 52.
- 53.
- 54.
- 55.
- 56.
- 57.
- 58.
- 59.
- 60.
- 61.
- 62.
- 63.
- 64.
- 65.
- 66.
- 67.
- 68.
- 69.
- 70.
- 71.
- 72.
- 73.
- 74.
- 75.
- 76.
- 77.
- 78.
- 79.
- 80.
- 81.
- 82.
- 83.
- 84.
- 85.
- 86.
- 87.
- 88.
- 89.
- 90.
- 91.
- 92.
- 93.
- 94.
- 95.
- 96.
- 97.
- 98.
- 99.
- 100.
- 101.
- 102.
- 103.
- 104.
- 105.
- 106.
- 107.
- 108.
- 109.
- 110.
- 111.
- 112.
- 113.
- 114.
- 115.
- 116.
- 117.
- 118.
- 119.
- 120.
- 121.
- 122.
- 123.
- 124.
- 125.
- 126.
- 127.
4.5.2 启动Kafka集群
       # 创建网络


[[email protected]_zoo kafka]

       # docker network create --subnet=172.19.0.0/24 kafka


       # 启动集群


[[email protected]_zoo kafka]

       # docker-compose up -d


Creating zoo2 ...

       done


Creating zoo3 ...


Creating kafka1 ...


Creating zoo1 ...


Creating kafka2 ...


Creating zoo2 ...


       # 查看集群状态


[[email protected]_zoo kafka]

       # docker-compose ps


 Name               Command               State                                  Ports


       --

       --

       --

       --

       --

       --

       --

       --

       --

       --

       --

       --

       --

       --

       --

       --

       --

       --

       --

       --

       --

       --

       --

       --

       --

       --

       --

       --

       --

       --

       --

       --

       --

       --

       --

       --

       --

       --

       --

       --

       --

       --

       --

       --

       --

       --

       --

       --

       --

       --

       --

       --

       --

       --

       --

       --

       --

       --

       --


kafka1   start-kafka.sh                   Up

       0.0.0.0:9092->9092/tcp,:::9092->9092/tcp


kafka2   start-kafka.sh                   Up

       0.0.0.0:9093->9093/tcp,:::9093->9093/tcp


kafka3   start-kafka.sh                   Up

       0.0.0.0:9094->9094/tcp,:::9094->9094/tcp


zoo1     /bin/sh

       -c /usr/sbin/sshd  ...   Up

       0.0.0.0:2184->2181/tcp,:::2184->2181/tcp,

       22/tcp,

       2888/tcp,

       3888/tcp


zoo2     /bin/sh

       -c /usr/sbin/sshd  ...   Up

       0.0.0.0:2185->2181/tcp,:::2185->2181/tcp,

       22/tcp,

       2888/tcp,

       3888/tcp


zoo3     /bin/sh

       -c /usr/sbin/sshd  ...   Up

       0.0.0.0:2186->2181/tcp,:::2186->2181/tcp,

       22/tcp,

       2888/tcp,

       3888/tcp
- 1.
- 2.
- 3.
- 4.
- 5.
- 6.
- 7.
- 8.
- 9.
- 10.
- 11.
- 12.
- 13.
- 14.
- 15.
- 16.
- 17.
- 18.
- 19.
- 20.
- 21.
- 22.
4.6 部署Filebeat
4.6.1 安装Filebeat
       [[email protected]_ng filebeat]

       # mkdir /data/filebeat && cd /data/filebeat


[[email protected]_ng filebeat]

       # wget https://artifacts.elastic.co/downloads/beats/filebeat/filebeat-6.8.5-linux-x86_64.tar.gz


[[email protected]_ng filebeat]

       # mv filebeat-6.8.5-linux-x86_64 /usr/local/filebeat
- 1.
- 2.
- 3.
4.6.2 配置Filebeat
备份默认配置文件
新增配置文件,读取nginx日志
filebeat.inputs
type
log
access
enabled
true
json.keys_under_root
true
json.overwrite_keys
true
json.add_error_key
true
paths
/var/log/nginx/access.log
fields
source
nginx-access
setup.ilm.enabled
false
output.kafka
enabled
true
hosts
"10.1.1.12:9092"
"10.1.1.12:9093"
"10.1.1.12:9094"
topic
"elk-%{[fields.source]}"
partition.hash
reachable_only
true
compression
gzip
max_message_bytes
1000000
bulk_max_size
2048
- 1.
- 2.
- 3.
- 4.
- 5.
- 6.
- 7.
- 8.
- 9.
- 10.
- 11.
- 12.
- 13.
- 14.
- 15.
- 16.
- 17.
- 18.
- 19.
- 20.
- 21.
- 22.
- 23.
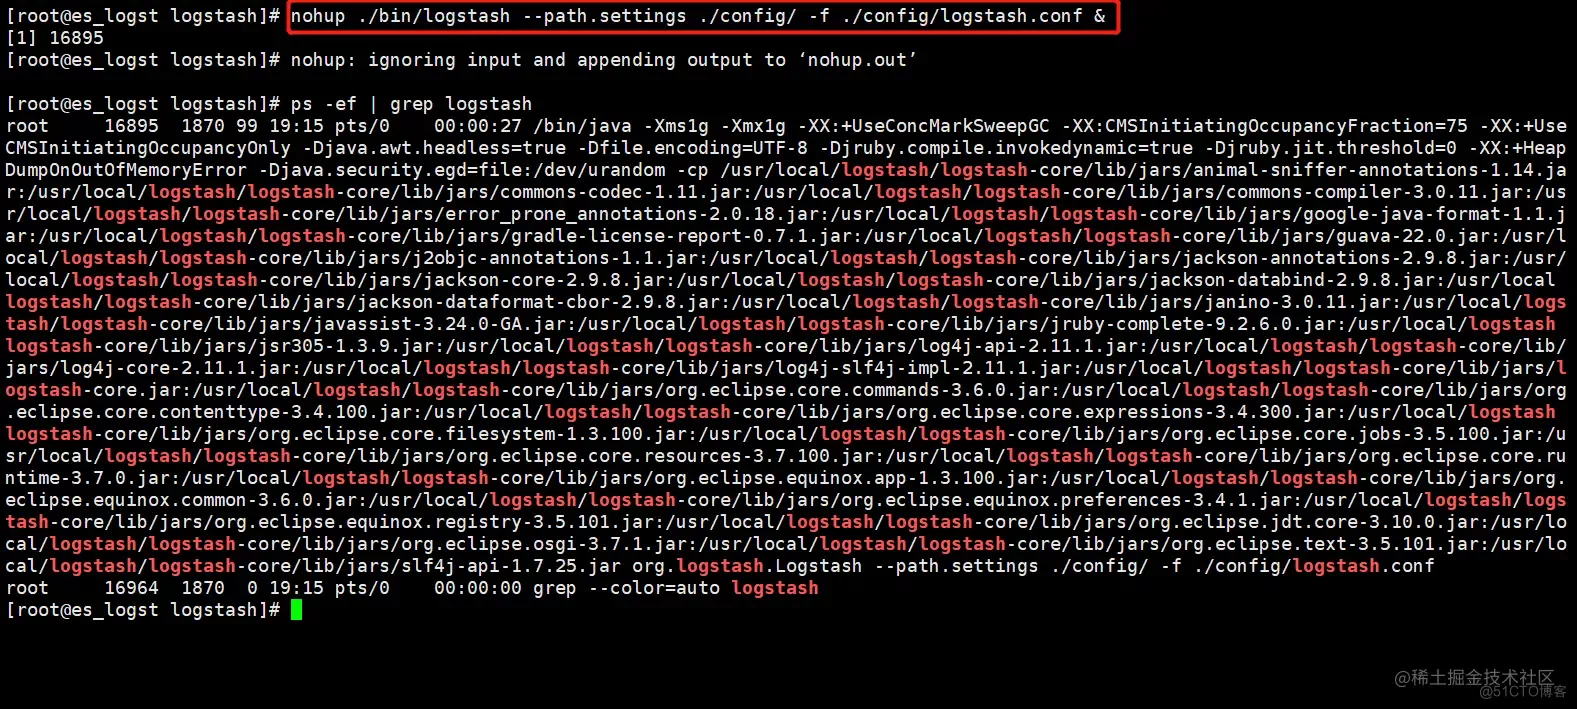
4.6.3启动Filebeat
       [[email protected]_ng filebeat]

       # nohup ./filebeat -e -c filebeat.yml &


[1]

       6624


[[email protected]_ng filebeat]

       # nohup: ignoring input and appending output to ‘nohup.out’
- 1.
- 2.
- 3.
之后运行正常,可以准确输出到kafka
4.7 部署LogStash
4.7.1 安装LogStash
       [[email protected]_logst ~]

       # yum install java -y


[[email protected]_logst ~]

       # mkdir /data/logstash && cd /data/logstash


[[email protected]_logst ~]

       # wget https://artifacts.elastic.co/downloads/logstash/logstash-7.0.0.tar.gz


[[email protected]_logst logstash]

       # tar zxf logstash-7.0.0.tar.gz


[[email protected]_logst logstash]

       # mv logstash-7.0.0 /usr/local/logstash
- 1.
- 2.
- 3.
- 4.
- 5.
4.7.2 配置LogStash
       [[email protected]_logst logstash]

       # cd /usr/local/logstash/config/


[[email protected]_logst config]

       # mv logstash-sample.conf logstash-sample.conf.bak
- 1.
- 2.
新建配置文件logstash-sample.conf
input
kafka
bootstrap_servers =>
"10.1.1.12:9092,10.1.1.12:9093,10.1.1.12:9094"
auto_offset_reset =>
"latest"
topics_pattern =>
"elk-.*"
codec =>
"json"
consumer_threads => 5
decorate_events =>
"true"
filter
geoip
target =>
"geoip"
source =>
"client_ip"
add_field =>
"[geoip][coordinates]"
"%{[geoip][longitude]}"
add_field =>
"[geoip][coordinates]"
"%{[geoip][latitude]}"
remove_field =>
"[geoip][latitude]"
"[geoip][longitude]"
"[geoip][country_code]"
"[geoip][country_code2]"
"[geoip][country_code3]"
"[geoip][timezone]"
"[geoip][continent_code]"
"[geoip][region_code]"
mutate
convert =>
"size"
"integer"
convert =>
"status"
"integer"
convert =>
"responsetime"
"float"
convert =>
"upstreamtime"
"float"
convert =>
"[geoip][coordinates]"
"float"
remove_field =>
"ecs"
"agent"
"host"
"cloud"
"@version"
"input"
"logs_type"
useragent
source =>
"http_user_agent"
target =>
"ua"
remove_field =>
"[ua][minor]"
"[ua][major]"
"[ua][build]"
"[ua][patch]"
"[ua][os_minor]"
"[ua][os_major]"
output
elasticsearch
# Logstash输出到ES
hosts =>
"10.1.1.13:9200"
index =>
"%{[fields][source]}-%{+YYYY-MM-dd}"
stdout
codec => rubydebug
- 1.
- 2.
- 3.
- 4.
- 5.
- 6.
- 7.
- 8.
- 9.
- 10.
- 11.
- 12.
- 13.
- 14.
- 15.
- 16.
- 17.
- 18.
- 19.
- 20.
- 21.
- 22.
- 23.
- 24.
- 25.
- 26.
- 27.
- 28.
- 29.
- 30.
- 31.
- 32.
- 33.
- 34.
- 35.
- 36.
- 37.
- 38.
- 39.
- 40.
- 41.
- 42.
- 43.
- 44.
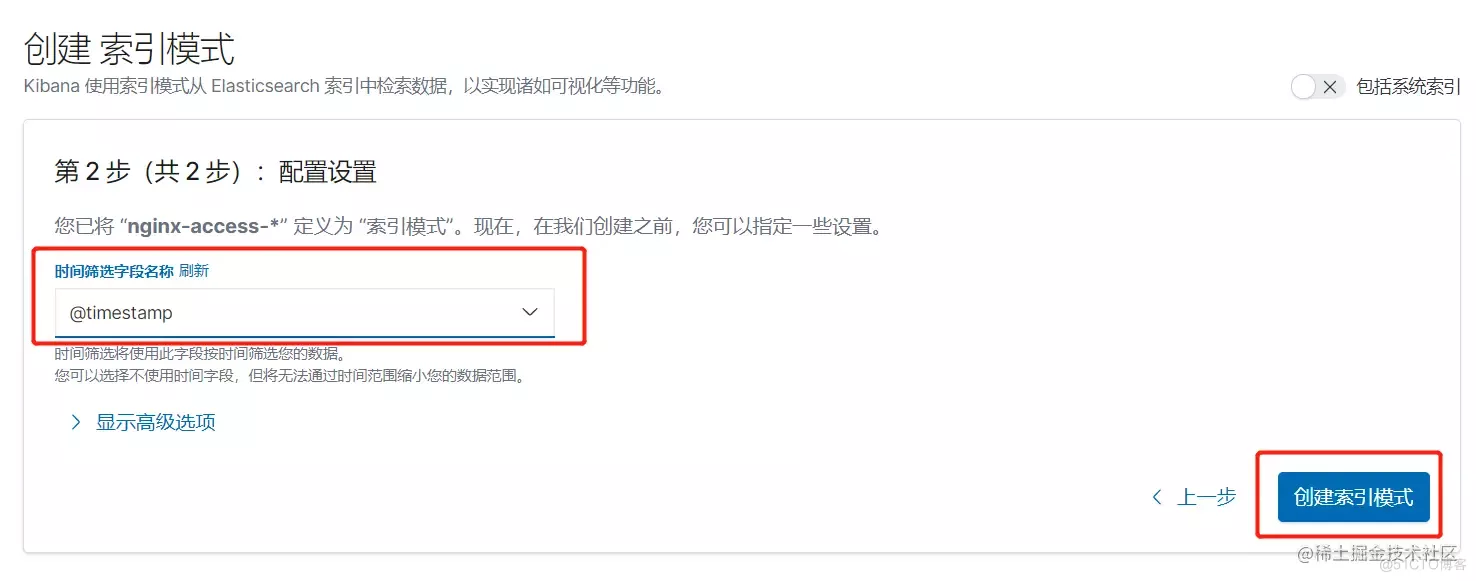
4.8 配置Kibana


4.9 模拟故障
模拟LogStash故障

等待一段时间后,查看Kibana日志,发现Filebeat收集的日志并没有存储到ES中,被Kibana展示

再次启动LogStash
可以看到,LogStash故障这段时间,未上报的日志是否已经补全上去,LogStash正常工作后,从Kafka消费未消费的信息,写入ES中,Kibana可正常展示所有日志信息,避免了某些组件故障导致的日志丢失问题

5 故障记录
5.1 Kibana启动失败
5.1.1 故障现象
5.1.2 错误日志
       [[email protected]_gra log]# journalctl -u kibana


Apr 27 14:58:24 kibana_gra kibana[12671]: {"type":"log","@timestamp":"2021-04-27T06:58:24Z","tags":["warning","migrations"],"pid":12671,"message":"Another Kibana instance appears to be migrating the index. Waiting for that migration to complete. If no other Kibana instance is attempting migrations, you can get past this message by deleting index .kibana_2 and restarting Kibana."}
- 1.
- 2.
5.1.3 解决方案
       [[email protected]_logst logstash]# curl -XDELETE http://localhost:9200/.kibana_2


{"acknowledged":true}
- 1.
- 2.
边栏推荐
- HomeKit支持matter协议,这背后将寓意着什么?
- 【网站架构】10年数据库设计浓缩的绝技,实打实的设计步骤与规范
- Homekit supports the matter protocol. What does this imply?
- R language uses the multinom function of NNET package to build a disordered multi classification logistic regression model, uses regression coefficients and their standard errors to calculate the valu
- After the uncommitted transactions in the redo log buffer of MySQL InnoDB are persisted to the redo log, what happens if the transaction rollback occurs?
- Capacity limited facility location problem
- Wallys/DR6018-S/ 802.11AX MU-MIMO OFDMA / 2* GE PORTS/WIFI 6e / BAND DUAL CONCURRENT
- 64 channel telephone +2-channel Gigabit Ethernet 64 channel PCM telephone optical transceiver voice telephone to optical fiber
- Can cold plate, submerged and spray liquid cooling lead the development of high-performance computing?
- Cloud native essay deep understanding of ingress
猜你喜欢

The two 985 universities share the same president! School: true

Unity learning day14 -- collaboration and WWW
Gradle Build Cache引发的Task缓存编译问题怎么解决

Germancreditdata of dataset: a detailed introduction to the introduction, download and use of germancreditdata dataset

Windows install MySQL

Homekit and NFC support: smart Ting smart door lock SL1 only costs 149 yuan

Ablebits Ultimate Suite for Excel

MySQL使用ReplicationConnection导致的连接失效分析与解决
MySQL使用ReplicationConnection導致的連接失效分析與解决

Go写文件的权限 WriteFile(filename, data, 0644)?
随机推荐
How to test the third-party payment interface?
4k-hdmi optical transceiver 1 channel [email protected] Hdmi2.0 optical transceiver HDMI HD video optical transceiver
交换两个数的三种方法原理解析
Meta said that the UK security law will "scan all private information", which risks infringing on users' privacy
AssetBundle resource management
Unity learning day14 -- collaboration and WWW
Hanyuan hi tech 1-way uncompressed 4k-dvi optical transceiver 4K HD uncompressed DVI to optical fiber 4k-dvi HD video optical transceiver
Quarkus+saas multi tenant dynamic data source switching is simple and perfect
Homekit supports the matter protocol. What does this imply?
华三交换机配置SSH远程登录
Hanyuan high tech new generation green energy-saving Ethernet access industrial switch high efficiency energy-saving Gigabit Industrial Ethernet switch
Principle analysis of three methods for exchanging two numbers
Overview of national parks in the United States
首次曝光!唯一全域最高等级背后的阿里云云原生安全全景图
R language dplyr package arrange function sorts dataframe data and sorts dataframe data through multiple data columns (ascending sort by default)
【深入理解TcaplusDB技术】单据受理之事务执行
R language uses the multinom function of NNET package to build a disordered multi classification logistic regression model, uses regression coefficients and their standard errors to calculate the valu
Is it safe for flush to open an account online? What should we pay attention to
火绒安全与英特尔vPro平台合作 共筑软硬件协同安全新格局
The R language inputs the distance matrix to the hclust function for hierarchical clustering analysis, uses the cutree function to divide the hierarchical clustering clusters, specifies the number of