当前位置:网站首页>Elasticsearch数据库 | Elasticsearch-7.5.0应用搭建实战
Elasticsearch数据库 | Elasticsearch-7.5.0应用搭建实战
2020-11-06 20:58:00 【mazhilin】
Elasticsearch 是一个可用于分布式以及符合RESTful 风格的搜索和数据分析引擎。—— Elastic Stack 官网

搭建Elasticsearch的“那些事儿"

有一天,在黄金梅丽号的甲板上,韦柏告诉萨博,需要在接下来的项目开发过程中,运用到Elasticsearch数据库,主要用于黄金梅丽号上的各种设备采集数据实时查询,或许后期还会运用于分布式日志系统的搭建运用等,让萨博先做一次技术预研。于是,在萨博查询大量的资料发现,关于Elasticsearch数据库的搭建,网上的资料几乎是千篇一律,或者多数都是没有一个完整的流程。甚至,还发现,对于Elasticsearch数据库实际应用方面,大多数海贼只局限于ELK等这样的情况,就像是大多数海贼提到Redis,就只觉得这个玩意儿,只能用于缓存层面,但是实际上人家的功能强大到超出了海贼的想象空间。甚至于,萨博在一个阿里巴巴的地方,找到了关于Elasticsearch数据库免费试用的资源,但是对于免费的午餐,也许那一天收费之后,那就只能用一首“浪浪”来祭奠这万恶的黄金之恶。于是在萨博精心研究和分析发现,除了传统部署Elasticsearch数据库之外,有个叫Docker 的东西,除了能够稳定运行Elasticsearch数据库之外,还能节省不少的服务器内存。于是呀,萨博就开始了探索在Docker上搭建Elasticsearch之之路......
Docker部署Elasticsearch的“那些事儿"
1.基础先决条件
阿里云或者虚拟机VM主机一个,并且自行装有Docker容器: 
ps[️注意事项]: 对于Docker安装请参考:Linux环境基于CentOS7 搭建部署Docker容器
2.最大文件打开数
[2.1]参数优化:ulimit -a |grep open
[root@centos-meteor ~]# ulimit -a |grep open
open files   (-n) 65535
[root@centos-meteor ~]#
[2.2] 修改配置文件: /etc/security/limits.conf
#在最下边添加如下两行
* soft nofile 65536
* hard nofile 65536
* soft nproc 2048
* hard nproc 4096
[2.3] 确认是否修改: ulimit -a |grep open
[root@centos-meteor ~]# ulimit -a |grep open
open files   (-n) 65535
[root@centos-meteor ~]#
3.调整系统进程数
修改方法:vim /etc/security/limits.d/20-nproc.conf
#调整成以下配置
*          soft    nproc     4096
root       soft    nproc     unlimited
4.调整虚拟内存和最大并发连接数
虚拟内存(Virtual memory)->vm.max_map_count Elasticsearch默认使用 hybrid mmapfs / niofs 目录来存储索引。默认操作系统对mmap计数的限制太低,可能引发内存不足的异常
[1]临时解决方法:
sysctl –w vm.max_map_count=262144
sysctl –w vm.max_map_count=262144
如果不优化会出现启动Elasticsearch的时候会出现如下提示:
max virtual memory areas vm.max_map_count [65535] is too low, increase to at least [262144]
[2]永久生效方案:更新系统文件/etc/sysctl.conf的vm.max_map_count字段 执行命令:vim /etc/sysctl.conf
[root@turbo-master ~]# vim /etc/sysctl.conf
[root@turbo-master ~]#
#Settings Elasticsearch Virtual Memory—>655360
vm.max_map_count=655360
fs.file-max=655360
vm.overcommit_memory=1
加载到系统:sysctl -p --load /etc/sysctl.conf
[root@centos-meteor elasticsearch]# sysctl -p --load /etc/sysctl.conf
vm.swappiness = 0
net.ipv4.neigh.default.gc_stale_time = 120
net.ipv4.conf.all.rp_filter = 0
net.ipv4.conf.default.rp_filter = 0
net.ipv4.conf.default.arp_announce = 2
net.ipv4.conf.lo.arp_announce = 2
net.ipv4.conf.all.arp_announce = 2
net.ipv4.tcp_max_tw_buckets = 5000
net.ipv4.tcp_syncookies = 1
net.ipv4.tcp_max_syn_backlog = 1024
net.ipv4.tcp_synack_retries = 2
net.ipv6.conf.all.disable_ipv6 = 1
net.ipv6.conf.default.disable_ipv6 = 1
net.ipv6.conf.lo.disable_ipv6 = 1
kernel.sysrq = 1
vm.max_map_count = 655360
fs.file-max = 655360
vm.overcommit_memory = 1
[root@centos-meteor elasticsearch]#
5.关闭elasticsearch自检测
在elasticsearch.yml中添加配置项:
bootstrap.memory_lock: false
bootstrap.system_call_filter: false
ps[️注意事项]: 主要是避免以下问题: [1]最大文件打开数: max file descriptors [1024] for elasticsearch process is too low, increase to at least [65536] [2]调整虚拟内存和最大并发连接数: max virtual memory areas vm.max_map_count [65530] is too low, increase to at least [262144] [3]关闭elasticsearch自检测: system call filters failed to install; check the logs and fix your configuration or disable system call filters at your own risk [4]调整系统进程数: max number of threads [1024] for user [lish] likely too low, increase to at least [2048]
实战部署ElasticSearch服务
Docker 部署应用服务的基本步骤:Search[查询镜像]->Pull[拉取镜像]->Run[部署镜像]
1.查询Elasticsearch 镜像:
docker search elasticsearch
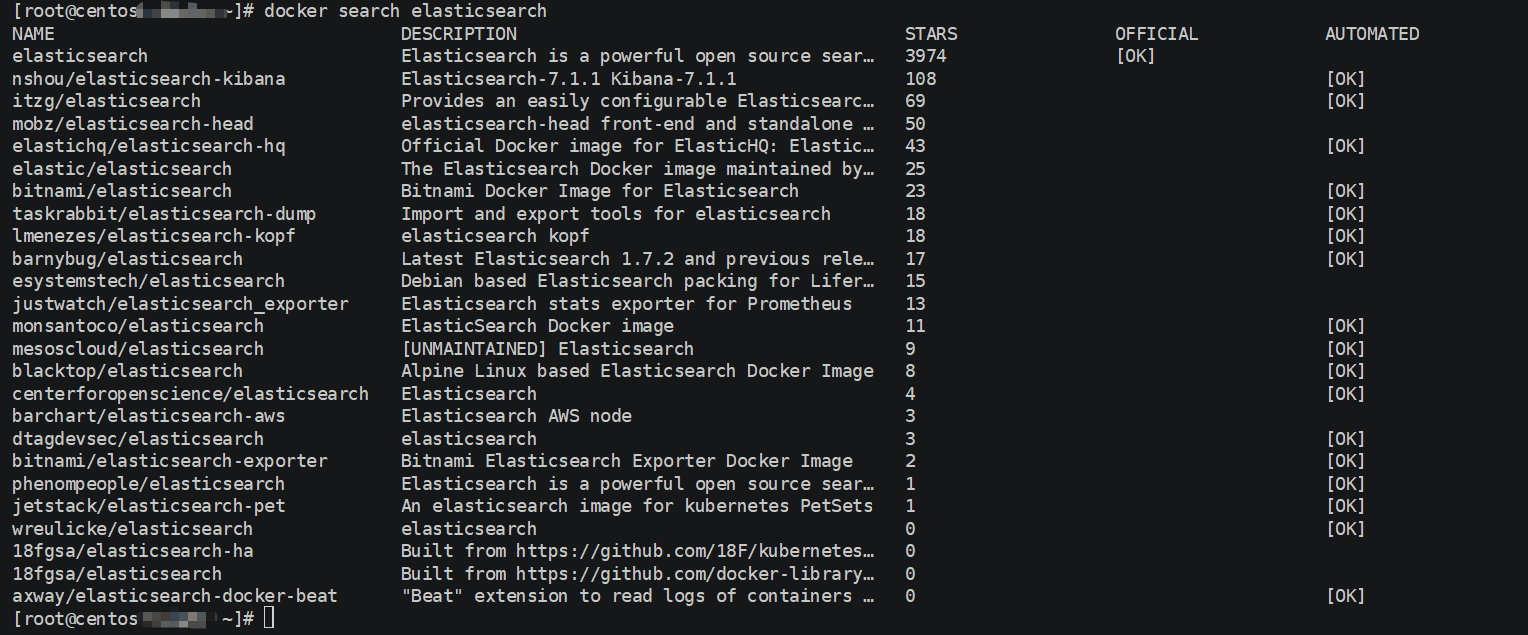
ps[注意事项]:
- 一般拉取镜像资源都是从Docker官方仓库[docker-hub]拉取,或者自己构建的Docker云仓库aliyun-docker 等
- 本教程选取的ELK镜像均是基于ELK官方Docker仓库elastic-io
2.拉取Elasticsearch 镜像:
docker pull docker.elastic.co/elasticsearch/elasticsearch:7.3.1

ps[注意事项]: 1.本教程采用7.3.x版本,目前最新版本7.4.x[主要用7.3.x版本在阿里云搭建过,避免入坑问题] 2.拉取的过程中可能会出现[net/http: TLS handshake timeout]问题,多尝试几次,主要是网络带宽限制问题
3.修改镜像名称:
docker tag docker.elastic.co/elasticsearch/elasticsearch:7.3.1 elasticsearch:latest

ps[注意事项]: 1.名称过长导致查看些许不便,通过docker tag source-image[来源镜像] target-image[目标镜像],推荐统一采用[target-image:target-version]格式定义,且不占用空间,相当于重命名镜像 2.对于拉取kibana[docker.elastic.co/kibana/kibana:7.3.1]和logstash[docker.elastic.co/logstash/logstash:7.3.1] 都建议修改。
4.部署镜像服务: 部署命令:
docker run -itd -p 9200:9200 -p 9300:9300 --restart=always --privileged=true --name elasticsearch-server -e "discovery.type=single-node" -e ES_JAVA_OPTS="-Xms=512m -Xms=512m" elasticsearch:latest
默认配置目录:
/usr/share/elasticsearch/config
/usr/share/elasticsearch/logs
查看容器列表:
docker ps --format "table {{.ID}}\t{{.Names}}\t{{.Ports}}"
![docker ps]
(https://ftp.bmp.ovh/imgs/2019/11/d7e09058af3fadbd.png) ps[注意事项]:
1.需要开放端口[9200和9300]->9200作为Http协议,主要用于外部通讯,9300作为Tcp协议,jar之间就是通过tcp协议通讯,通常部署集群就是通过9300通信。推荐[宿主机自定义端口:9200] 2.--restart=always :配置容器重启策略,当宿主机重启由于配置了开机自启动,不用手动启动 3.--privileged:配置容器操作权限[true-root操作权限,false-当前容器用户操作权限] 4.对于部署网络模式推荐默认桥接模式,也自定义可以host模式等
5.修改配置: 进入容器:docker exec -it container-id[容器id] or container-name[容器名称] /bin/bash 例如:docker exec -it f2d2e97da375 /bin/bash #f2d2e97da375-> container-id 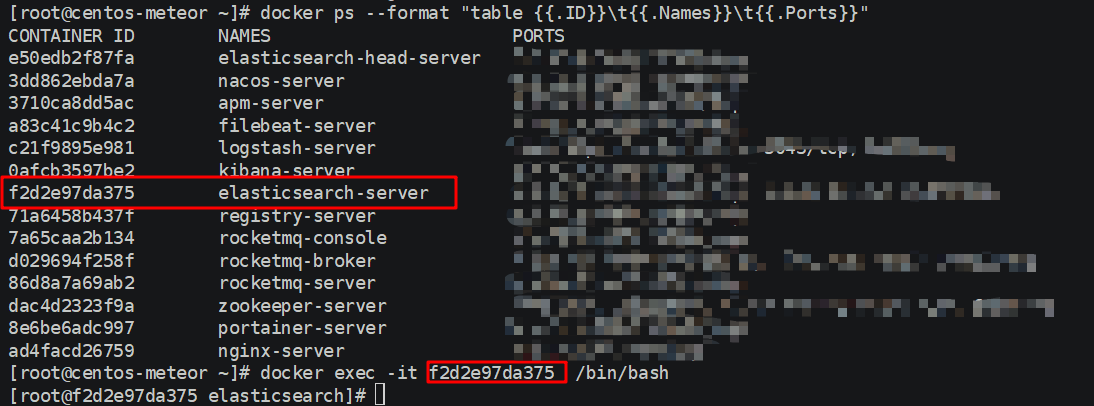
修改配置文件:
[root@f2d2e97da375 elasticsearch]# ls
LICENSE.txt  NOTICE.txt  README.textile  bin  config  data  jdk  lib  logs  modules  plugins
[root@f2d2e97da375 elasticsearch]#
[root@f2d2e97da375 elasticsearch]# cd config
[root@f2d2e97da375 config]# ls
elasticsearch.keystore  elasticsearch.yml  jvm.options  log4j2.properties  role_mapping.yml  roles.yml  users  users_roles
[root@f2d2e97da375 config]# vi elasticsearch.yml
添加跨域配置:http.cors.enabled: true && http.cors.allow-origin: "*"
cluster.name: "docker-cluster"
network.host: 0.0.0.0
http.cors.enabled: true
http.cors.allow-origin: "*"
然后退出exit容器,在宿主机重启容器:docker restart container-id[容器id] or container-name[容器名称] docker restart f2d2e97da375
[root@f2d2e97da375 config]# exit
exit
[root@centos-meteor ~]# docker restart f2d2e97da375
f2d2e97da375
[root@centos-meteor ~]#
ps[注意事项]: 1.进入容器方式:包括使用 docker attach 命令或 docker exec 命令, 推荐使用 docker exec 命令。原因:
- docker attach: 使用exit退出容器,会导致容器的停止
- docker exec:使用exit退出容器,不会导致容器的停止
- 参考docker进入容器的几种方法博客-docker进入容器的几种方法 2.如果Docker安装了可视化界面 Portainer,推荐采用这种方式进入容器:
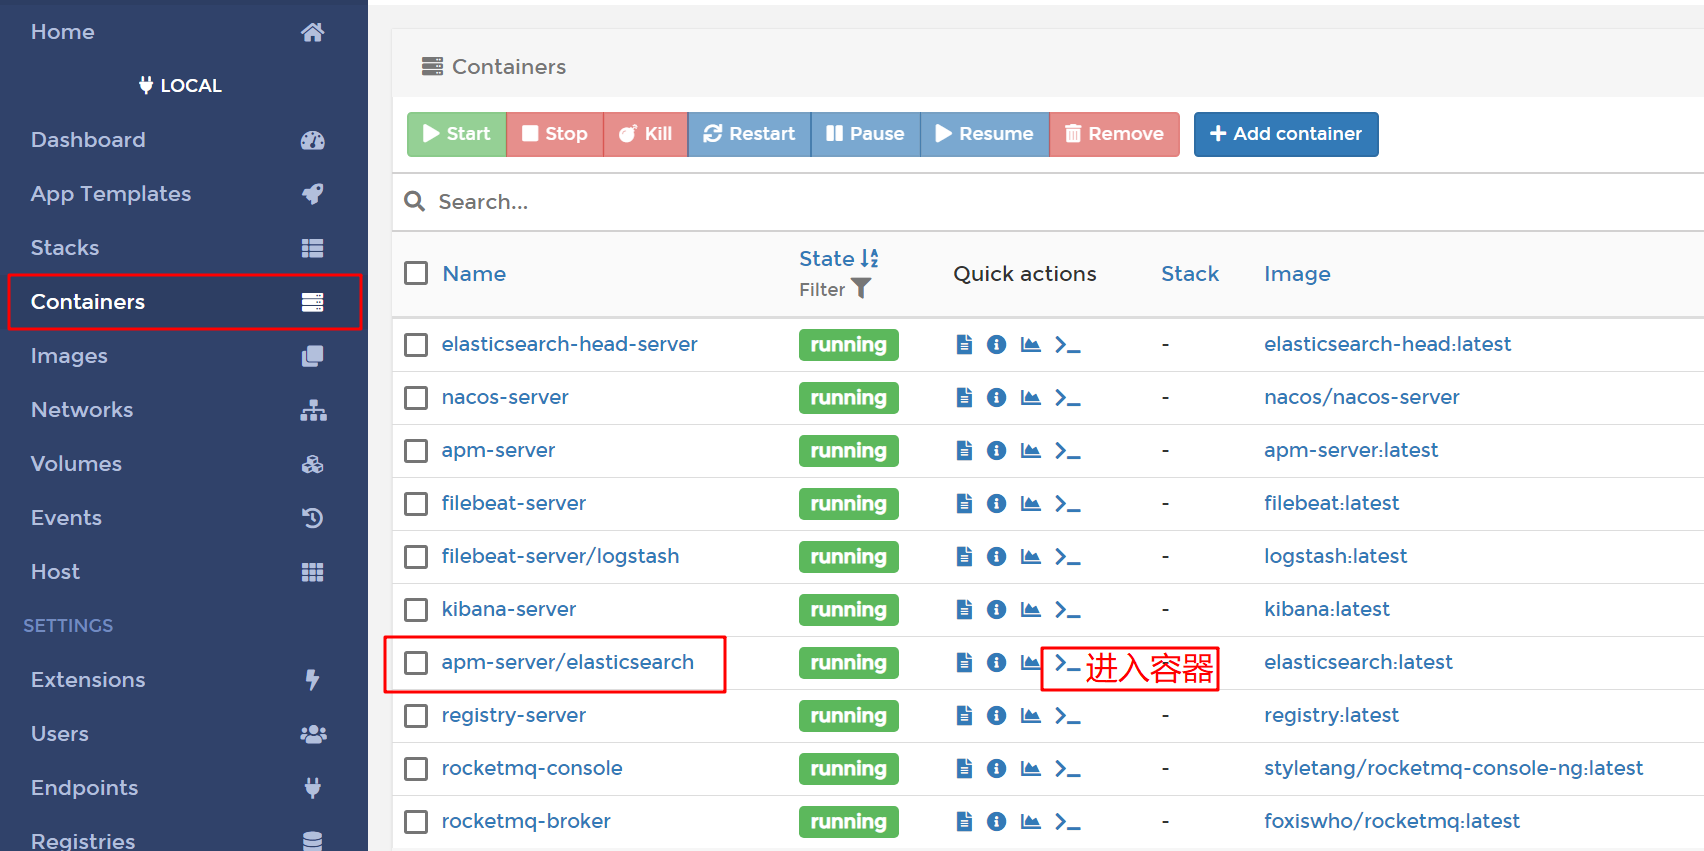
搭建部署ElasticSearch-Head服务
ElasticSearch-Head:弹性搜索集群的Web前端界面,是使用Nodjs构建的,主要用于查看ElasticSearch相关信息
1.拉取Elasticsearch-Head 镜像:docker pull mobz/elasticsearch-head:5
[root@centos-amber ~]# docker pull mobz/elasticsearch-head:5
5: Pulling from mobz/elasticsearch-head
75a822cd7888: Pull complete
57de64c72267: Pull complete
4306be1e8943: Pull complete
871436ab7225: Pull complete
0110c26a367a: Pull complete
1f04fe713f1b: Pull complete
723bac39028e: Pull complete
7d8cb47f1c60: Pull complete
7328dcf65c42: Pull complete
b451f2ccfb9a: Pull complete
304d5c28a4cf: Pull complete
4cf804850db1: Pull complete
Digest: sha256:55a3c82dd4ba776e304b09308411edd85de0dc9719f9d97a2f33baa320223f34
Status: Downloaded newer image for mobz/elasticsearch-head:5
docker.io/mobz/elasticsearch-head:5
[root@centos-amber ~]#
2.修改Elasticsearch-Head 镜像名称:docker tag mobz/elasticsearch-head:5 elasticsearch-head:latest
[root@centos-amber ~]# docker tag  mobz/elasticsearch-head:5        elasticsearch-head:latest
[root@centos-amber ~]# docker images
REPOSITORY                                      TAG                 IMAGE ID            CREATED             SIZE
grafana/grafana                                 latest              05d1bcf30d16        7 days ago          207MB
nginx                                           latest              540a289bab6c        3 weeks ago         126MB
prom/prometheus                                 latest              2c8e464e47f4        3 weeks ago         129MB
moxm/sentinel-dashboard                         latest              0ccaac81584e        4 weeks ago         167MB
portainer                                       latest              4cda95efb0e4        4 weeks ago         80.6MB
portainer/portainer                             latest              4cda95efb0e4        4 weeks ago         80.6MB
apache/skywalking-ui                            latest              fa66ca9c9862        2 months ago        123MB
apache/skywalking-oap-server                    latest              376a37cdf65c        2 months ago        190MB
docker.elastic.co/kibana/kibana                 7.3.1               b54865ba6b0b        2 months ago        1.01GB
docker.elastic.co/elasticsearch/elasticsearch   7.3.1               3d3aa92f641f        2 months ago        807MB
elasticsearch                                   latest              3d3aa92f641f        2 months ago        807MB
prom/node-exporter                              latest              e5a616e4b9cf        5 months ago        22.9MB
google/cadvisor                                 latest              eb1210707573        12 months ago       69.6MB
elasticsearch-head                              latest              b19a5c98e43b        2 years ago         824MB
mobz/elasticsearch-head                         5                   b19a5c98e43b        2 years ago         824MB
tutum/influxdb                                  latest              c061e5808198        3 years ago         290MB
[root@centos-amber ~]#
3.部署Elasticsearch-Head 容器:
docker run -itd --restart=always --privileged=true -p 9100:9100 --name elasticsearch-head-server elasticsearch-head:latest
查看容器服务:
docker ps --format "table {{.ID}}\t{{.Names}}\t{{.Ports}}"

4.浏览器访问:http://remote-ip:9100/ 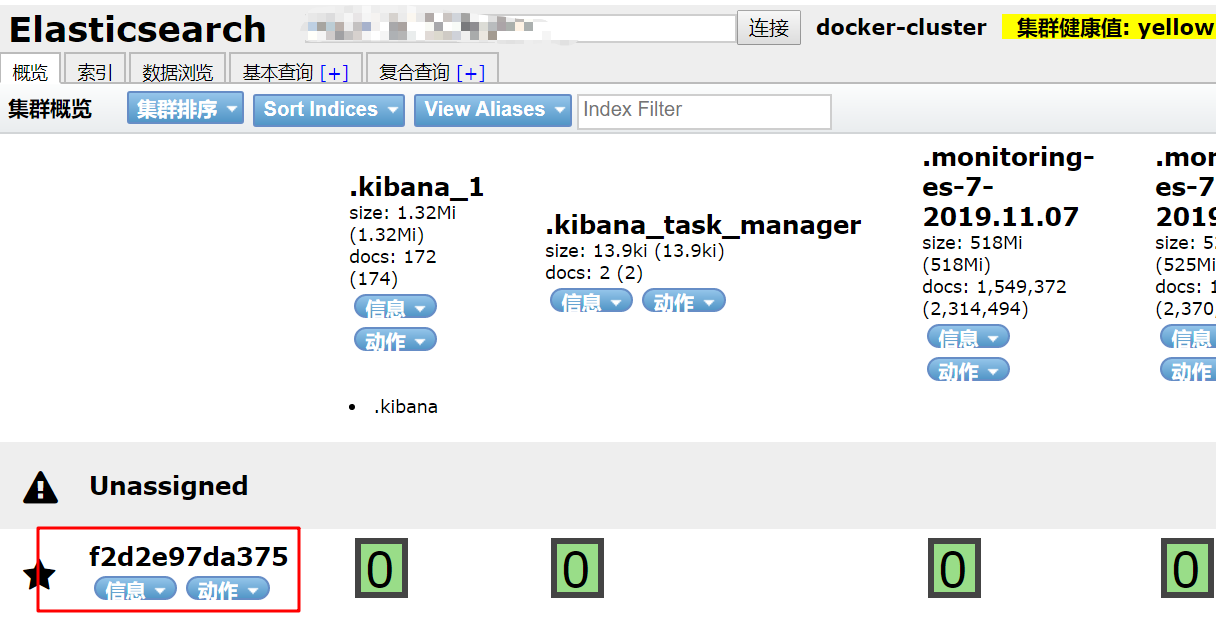
实战测试ElasticSearch-Head服务
1.准备数据: 
{
    "companyId": "ebcb4f99e0cb4ad781278ae636c1031f",
    "classifyName": "激素检测",
    "deviceType": "激素检测",
    "data": {
    	"deviceId": "20000060100000002",
        "deviceNo": "QC00020000060100000002",
        "appid": "00000000",
        "sim": "89860404191792655118",
        "csq": "30",
        "electric": "98",
        "voltage": "13279",
        "softVer": "5143000500010601-01020006|5143000500010601-01010003",
        "hardVer": "5143000500010601-00000002|5143000500010601-00000002",
        "status": "0",
        "date": "2020-09-13 11:23:52",
        "elements": [
        	{
                "key": "20",
                "value": "10",
                "time": "2020-09-13 11:23:52"
            },
            {
                "key": "21",
                "value": "11",
                "time": "2020-09-13 11:23:52"
            },
            {
                "key": "22",
                "value": "12",
                "time": "2020-09-13 11:23:52"
            },
            {
                "key": "23",
                "value": "13",
                "time": "2020-09-13 11:23:52"
            }
        ]
    }
}
2.设置请求头:application/json;charset=UTF-8 
3.发送PUT请求:http://remote-ip/device/deviceData/QC00020000060100000001 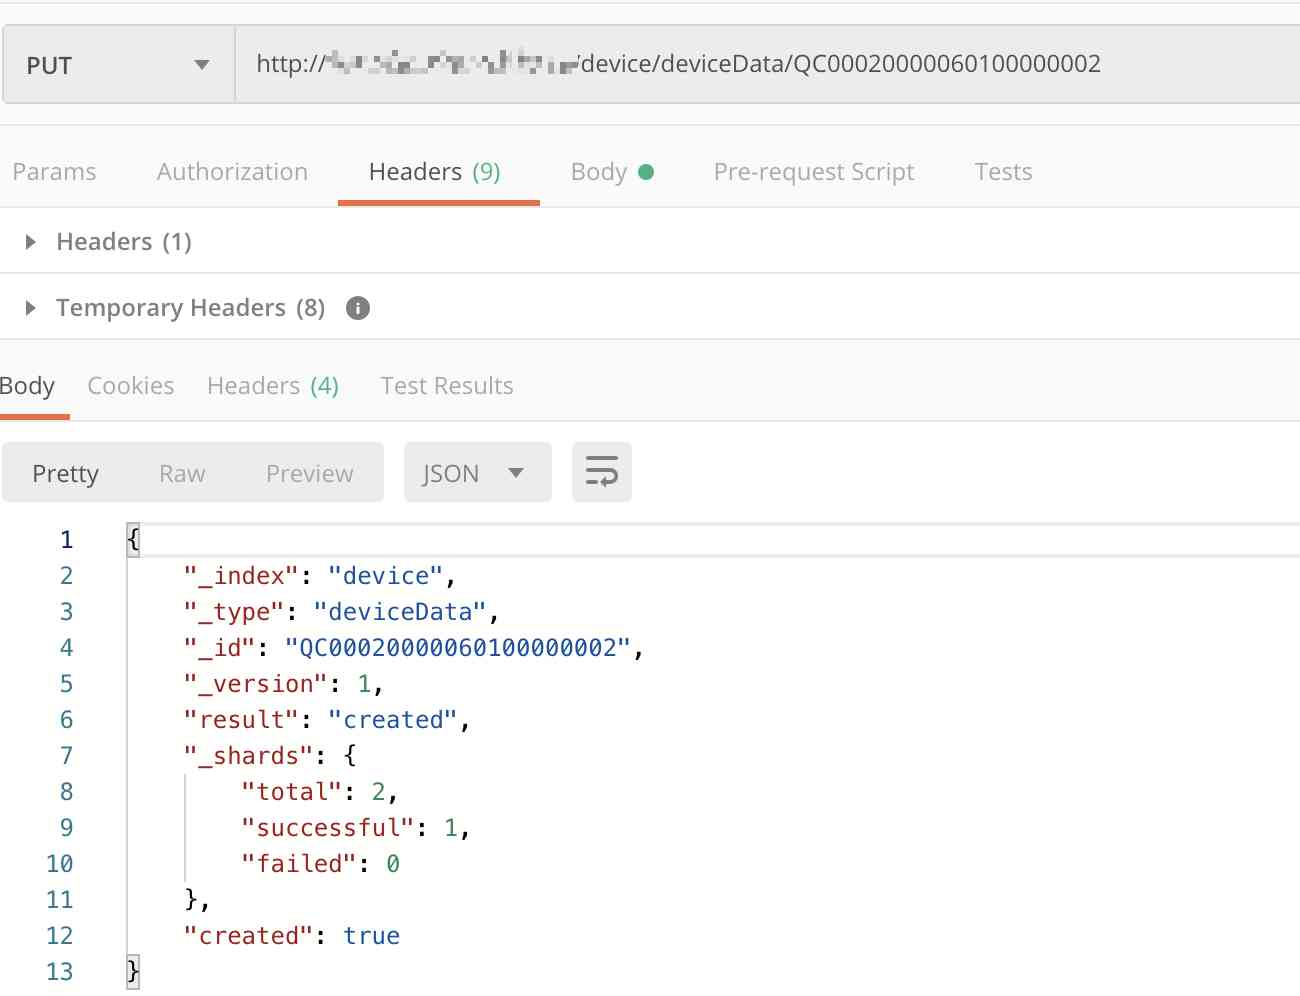
{
    "_index": "device",
    "_type": "deviceData",
    "_id": "QC00020000060100000002",
    "_version": 1,
    "result": "created",
    "_shards": {
        "total": 2,
        "successful": 1,
        "failed": 0
    },
    "created": true
}
4.打开浏览器查看结果: 
实战搭建ElasticSearch总结
1.部署基本命令:
docker run -itd -p 9200:9200 -p 9300:9300 --restart=always --privileged=true --name elasticsearch-server --network-alias elasticsearch-server --hostname elasticsearch-server -v /docker/elasticsearch/config/elasticsearch.yml:/usr/share/elasticsearch/config/elasticsearch.yml -v /docker/elasticsearch/data:/usr/share/elasticsearch/data -v /docker/elasticsearch/logs:/usr/share/elasticsearch/logs -e "discovery.type=single-node" -e ES_JAVA_OPTS="-server -Xms512m -Xmx512m -Xmn256m -XX:MetaspaceSize=128m -XX:MaxMetaspaceSize=320m -XX:+AlwaysPreTouch -XX:-UseBiasedLocking " -e TZ="Asia/Shanghai" elasticsearch:latest
2.配置文件[elasticsearch.yml ]:
cluster.name: elasticsearch-cluster
node.name: elasticsearch-server
network.host: 0.0.0.0
network.bind_host: 0.0.0.0
network.publish_host: 0.0.0.0
http.cors.enabled: true
http.cors.allow-origin: "*"
bootstrap.memory_lock: false
bootstrap.system_call_filter: false
transport.tcp.port: 9300
transport.tcp.compress: true
http.max_content_length: 128mb
3.分词插件安装:
./bin/elasticsearch-plugin install https://github.com/medcl/elasticsearch-analysis-ik/releases/download/v7.5.0/elasticsearch-analysis-ik-7.5.0.zip
4.Docker 部署 ElasticSearch-Head:
docker run -itd --restart=always --privileged=true -p 9100:9100 --network-alias elasticsearch-head-server --name elasticsearch-head-server --hostname elasticsearch-head-server -v /docker/elasticsearch-head/app:/usr/src/app elasticsearch-head:latest
5.ElasticSearch-Head 使用406错误:  ajaxSettings部分json配置:
    ajaxSettings: {
      url: ajaxLocation,
      isLocal: rlocalProtocol.test(ajaxLocParts[1]),
      global: true,
      type: "GET",
      //contentType: "application/x-www-form-urlencoded",
      contentType: "application/json;charset=UTF-8",
      processData: true,
      async: true,
      /*
		timeout: 0,
		data: null,
		dataType: null,
		username: null,
		password: null,
		cache: null,
		traditional: false,
		headers: {},
		*/

      accepts: {
        xml: "application/xml, text/xml",
        html: "text/html",
        text: "text/plain",
        json: "application/json, text/javascript",
        "*": "*/*",
      },
inspectData 部分json配置:
  // Detect, normalize options and install callbacks for jsonp requests
  jQuery.ajaxPrefilter("json jsonp", function (s, originalSettings, jqXHR) {
    //var inspectData = s.contentType === "application/x-www-form-urlencoded" &&
    var inspectData =
      (s.contentType === "application/x-www-form-urlencoded" &&
        typeof s.data === "string") ||
      (s.contentType === "application/json;charset=UTF-8" &&
        typeof s.data === "string");
版权声明:本文为博主原创文章,遵循相关版权协议,如若转载或者分享请附上原文出处链接和链接来源。
版权声明
本文为[mazhilin]所创,转载请带上原文链接,感谢
https://my.oschina.net/2273990296/blog/4705237
边栏推荐
- Existence judgment in structured data
- Skywalking series blog 2-skywalking using
- Skywalking series blog 1 - install stand-alone skywalking
- axios学习笔记(二):轻松弄懂XHR的使用及如何封装简易axios
- Common algorithm interview has been out! Machine learning algorithm interview - KDnuggets
- 6.5 request to view name translator (in-depth analysis of SSM and project practice)
- Synchronous configuration from git to consult with git 2consul
- How to use Python 2.7 after installing anaconda3?
- Relationship between business policies, business rules, business processes and business master data - modern analysis
- Arrangement of basic knowledge points
猜你喜欢

Interface pressure test: installation, use and instruction of siege pressure test

速看!互联网、电商离线大数据分析最佳实践!(附网盘链接)
如何玩转sortablejs-vuedraggable实现表单嵌套拖拽功能

How to use Python 2.7 after installing anaconda3?
Filecoin的经济模型与未来价值是如何支撑FIL币价格破千的

What to do if you are squeezed by old programmers? I don't want to quit
From zero learning artificial intelligence, open the road of career planning!

Vue 3 responsive Foundation

With the advent of tensorflow 2.0, can pytoch still shake the status of big brother?

Working principle of gradient descent algorithm in machine learning
随机推荐
React design pattern: in depth understanding of react & Redux principle
It's so embarrassing, fans broke ten thousand, used for a year!
华为云“四个可靠”的方法论
5.5 controlleradvice notes - SSM in depth analysis and project practice
The choice of enterprise database is usually decided by the system architect - the newstack
git rebase的時候捅婁子了,怎麼辦?線上等……
How to select the evaluation index of classification model
Subordination judgment in structured data
How to become a data scientist? - kdnuggets
PHPSHE 短信插件说明
Don't go! Here is a note: picture and text to explain AQS, let's have a look at the source code of AQS (long text)
多机器人行情共享解决方案
如何玩转sortablejs-vuedraggable实现表单嵌套拖拽功能
Mac installation hanlp, and win installation and use
Vuejs development specification
Process analysis of Python authentication mechanism based on JWT
Common algorithm interview has been out! Machine learning algorithm interview - KDnuggets
ES6学习笔记(二):教你玩转类的继承和类的对象
Python基础数据类型——tuple浅析
从海外进军中国,Rancher要执容器云市场牛耳 | 爱分析调研