One 、 Quickly create and initialize applications through the cloud development platform
1. To create relevant application templates, please refer to the link : Try a few high-performance code Svelte frame
2. After the creation is completed, you can go to github View the new Vite Warehouse

Two 、 Written locally Svelte3 The chat room
1. Clone the application template to local
- First, suppose you have installed Git、node, Not installed, please move node Install on the official website . Cloning project :
git clone + Project address
- Enter the project file
cd Svelte
- Switch to feature/1.0.0 On the branch
git checkout feature/1.0.0
- Install dependency packages
npm install
- Start the service
npm run dev
Open the browser here 8080 port , And the default page appears .
2. Project structure catalog

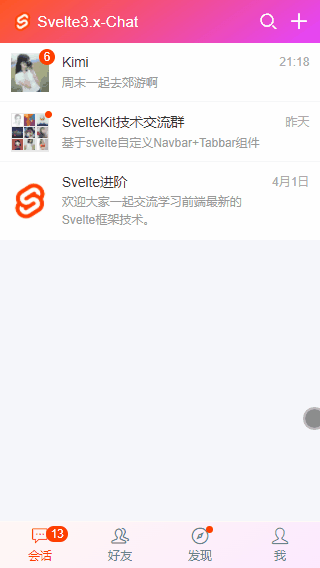
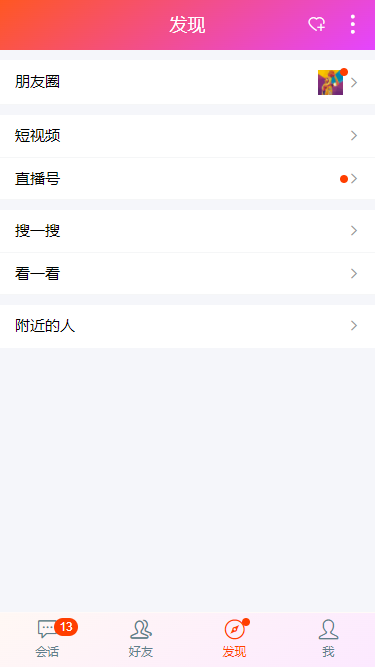
3. Custom navigation bar Navbar+ menu bar Tabbar
The top navigation bar and the bottom menu bar in the project are based on svelte Custom developed custom components .


4. Customize the pop-up window component of mobile phone
svelte-popup Based on a Svelte3.x Develop custom multifunction svPopup Pop up components , Support over 20+ Parameters can be configured freely 、 Modular + Functional mixed call mode .
5.config.js The configuration file
How to be in svelte.js Project use sass/less Writing styles ? Can install sass And svelte-preprocess rely on .

/**
 * svelte.config.js Basic profile
 */

import adapter from '@sveltejs/adapter-auto'
import path from 'path'
import SvelteProcess from 'svelte-preprocess'

/** @type {import('@sveltejs/kit').Config} */
const config = {
    kit: {
        adapter: adapter(),
        vite: {
            resolve: {
                alias: {
                    '@': path.resolve('./src'),
                    '@assets': path.resolve('./src/assets'),
                    '@utils': path.resolve('./src/utils')
                }
            }
        }
    },
    // allow you to use Svelte with tools like TypeScript, PostCSS, SCSS, and Less.
    preprocess: SvelteProcess()
};

export default config6.SvelteKit Public template and error page
Use svelteKit Projects built , Public templates __layout.svelte And error page __error.svelte The configuration is as follows .
<script>
    import { onMount } from 'svelte'
    import { page } from '$app/stores'
    import { goto } from '$app/navigation'
    import { userinfo } from '@/store/index.js'

    let whiteRoute = ['/auth/login', '/auth/register']

    onMount(() => {
        if(!$userinfo) {
            goto('/auth/login')
        }else {
            if(whiteRoute.includes($page.url.pathname)) {
                goto('/')
            }else {
                goto($page.url.pathname)
            }
        }
    })
</script>

<div class="sv__container flexbox flex-col">
    <slot />
</div>

<style>
    @import '@/app.scss';
    @import '@assets/css/reset.scss';
    @import '@assets/css/layout.scss';
    @import '@assets/fonts/iconfont.css';
</style>
<!-- //Svelte Error page  -->
<script context="module">
    export function load({ error, status }) {
        return {
            props: { error, status }
        }
    }
</script>

<script>
    import Navbar from '$lib/Navbar'

    export let status
    export let error

    function goBack() {
        history.go(-1)
    }
</script>

<svelte:head>
    <title>404 error </title>
</svelte:head>

<Navbar title="Page Error!!!" />

<div class="sv__scrollview flex1">
    <div class="sv__page-error flexbox flex-col flex-alignc flex-justifyc">
        <div class="sv__page-error-img">
            <img src="404.png" alt="" />
        </div>
        <div class="sv__page-error-content">
            <div class="c-red fs-36">┗| {status} |┛  Ow ~~</div>
            <div class="c-999 mt-10">{error.message}</div>
            <div class="mt-20 sv__btn sv__btn-default" on:click={goBack}><i class="iconfont icon-arrL"></i>  Back to the home page </div>
        </div>
    </div>
</div>
7. State management + The local store
svelte The framework also provides creation state management svelte/store, To configure localStorage Localized storage services .
/**
 * Svelte State management
*/

import { writable } from 'svelte/store'

const createStore = (value, key) => {
    const { subscribe, set, update } = writable(value)
    return {
        //  Persistent storage
        useStorage: () => {
            const data = localStorage.getItem(key)
            if(data) {
                set(JSON.parse(data))
            }
            //  subscribe
            subscribe(val => {
                [null, undefined].includes(val) ? localStorage.removeItem(key) : localStorage.setItem(key, JSON.stringify(val))
            })
        },
        subscribe,
        set,
        update,
    }
}

export const userinfo = createStore(localStorage.getItem('userinfo')||null, 'userinfo')
8. Realize the pull-down refresh of imitation circle of friends
Use svelte.js+mescroll Realize the pull-down rotation function of imitation circle of friends .
...
9. Realize chat function
Chat page text box supports text +emoj Mixed platoon , Insert an expression at the cursor 、 website / picture / Video preview 、 Red packets and other functions . And the bottom text box is separated from a editor.svelte Components .

The above is based on svelte.js+svelteKit Develop imitation wechat app Some sharing of interface chat examples , I hope that's helpful !
3、 ... and 、 One click deployment of online applications in the cloud
1. Upload code
git add .
git commit -m ' Add your comments '
git push
2. Deploy in a daily environment
One click application deployment . On the application details page, click... Of daily environment 「 Deploy 」 Button for one click deployment , The deployment status turns green. After deployment, you can click to visit the deployment website to see the effect .

3. Configure custom domain name online environment
- Configure online environment custom domain name . After the functional development verification is completed, it shall be deployed in the online environment , Online environment 「 Deployment configuration 」-「 Custom domain name 」 Fill in your own domain name . For example, we add a secondary domain name company.workbench.fun To bind the front-end applications we deploy . Then copy the... Under the custom domain name API The gateway address controls the added secondary domain name CNAME To configure .

- To configure CNAME Address . Good copy API After the gateway domain name address , Come to your own domain name management platform ( The domain name management in this example is Alibaba cloud's domain name management console , Please go to your own domain name console to operate ). Add a record of 「 Record type 」 choice 「CNAME」, stay 「 Host record 」 Enter the secondary domain name you want to create , Here we put in 「company」, stay 「 Record value 」 Paste what we copied before API Gateway domain name address ,「TTL」 Just keep the default value or set a value you think is appropriate .

- Online environment deployment . Go back to the application details page of the cloud development platform , Follow the deployment , Click... In the online environment 「 Deploy button 」, After the deployment is completed, the domain name you defined will be launched .CNAME After entry into force , We type in company.workbench.fun( Sample web address ) You can open the deployment page . thus , How to deploy an application to an online environment , How to bind your domain name to access an online application is completed , Quickly deploy your application to the online environment , Play with your own domain name ;)

4. Project preview effect


A key to create svelte Apply template link :https://workbench.aliyun.com/application/front/create?fromConfig=25&fromRepo=sol_github_25
reference :https://www.cnblogs.com/xiaoyan2017/p/16110203.html


![[shell] collection of common instructions](/img/27/cba1d42cf8d69a712e2440a82a9ff9.png)