当前位置:网站首页>Web development framework - Express (installation and use, static hosting, routing processing, use of Middleware)
Web development framework - Express (installation and use, static hosting, routing processing, use of Middleware)
2022-06-27 02:28:00 【Front end pony】
Express - be based on Node.js Platform web Application development framework - Express Chinese document | Express Chinese net  https://www.expressjs.com.cn/ Express yes be based on Node.js Developed web Development framework , It's a Node.js modular ; Since it's based on Node.js, So use Express The premise is that the computer must have been installed Node Environmental Science ,Node It's easy to install , No more details here .
Catalog
3、 ... and 、 adopt Express Hosting static files
5、 ... and 、Express middleware
1. Application level middleware
4. Third-party middleware —— body-parser
One 、Express install
First, create a folder study_Express As a project file , Create an entry file in the file app.js;

Use commands in the integrated terminal npm init -y Initialize a package.json file ;
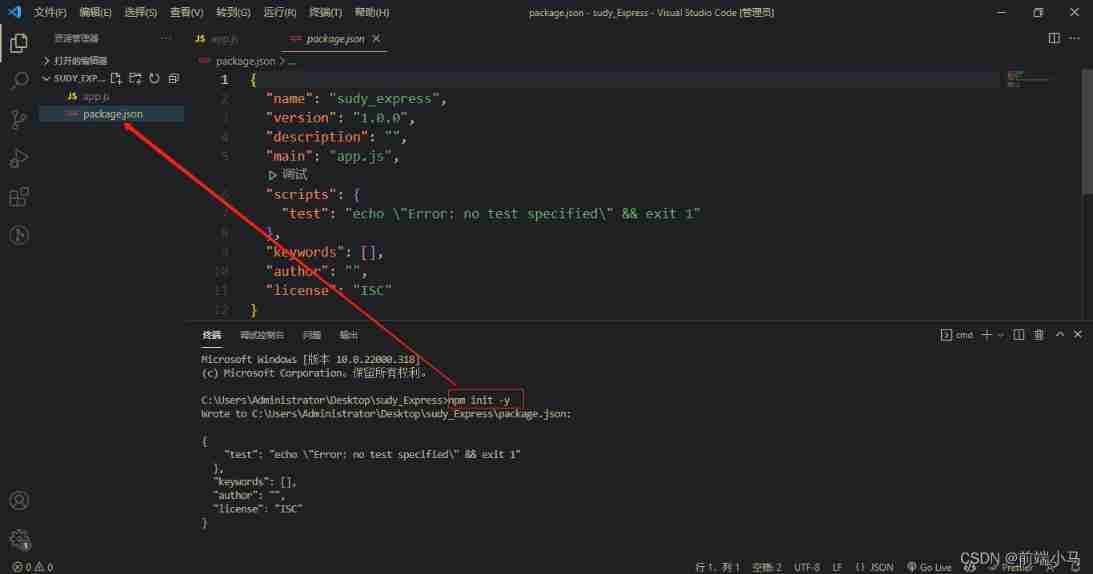
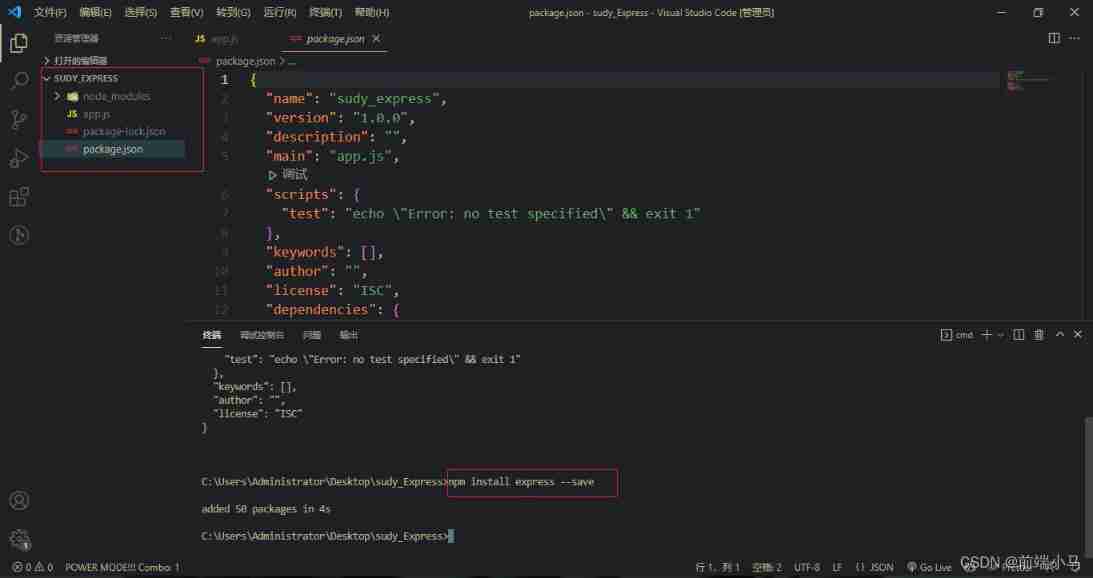
Use command npm install express -- save download Express; After successful installation, the following is true :
Two 、Express Use
download Express after , It can be used normally , stay app.js Create an application server example in ;
// study_Express/app.js

const express = require('express') //require Function introduced express package
const app = express() // Call function
const port = 3000 // Set port 3000

app.get('/', (req, res) => {
  res.send('Hello World!') //app Object call get API, Listen to the root path  /, Return when there is a root path request “Hello World!”
})

app.listen(port, () => {
  console.log(`Example app listening on port ${port}`) // monitor 3000 port , Trigger the callback function after starting the service
})
Start the service after creation ;

At this point, let's look at the local address 3000 port , I can go back “Hello World!”;

The above is the simplest application server .
3、 ... and 、 adopt Express Hosting static files
The so-called managed static file is to make the image 、 file 、js/css/html Files, etc. can be accessed through url Address to access ; Let's create a new file static.js To demonstrate the hosting of static files ;
// study_Express/static.js

const express = require('express') //require Function introduced express package
const app = express() // Call function

// Implement static resource services
let server = app.use(express.static('public')) //public Is the root directory of static resources , Static resources are placed in this folder

server.listen(3000, () => { // Create a listener
  console.log(' Server started successfully ...')
})
Tips :app.use Statement can write multiple entries to set the root directory of multiple static resources , Access does not affect each other .
In the above code, we set the root directory to public, So create this directory and add the sample files 1.html and 1.jpg For static hosting ;

Next , Start the service ;

At this point, you can use... In the browser url To access the static resources we just added .


besides , We can also set a virtual directory for the access path , The specific way is to app.use Add a new parameter after ; as follows , Set up virtual directory /express;
let server = app.use('/express',express.static('public')) //use The first parameter of specifies the virtual directory ( route )Tips : No matter what changes are made to the application server file, the service needs to be restarted .
Next, we will access the static resources url You also need to add this virtual directory in ;


Four 、 Routing processing
Routing is the process of path distribution according to the request path and request mode ;
http The common request methods of are post( add to )、get( Inquire about )、put( to update )、delete( Delete ), That is, add, delete, modify, and query ; Let's create a new file router.js To demonstrate routing processing :
// study_express/router.js
const express = require('express') //require Function introduced express package
const app = express() // Call function
// Four basic routing processes ( Handle specific requests )
app.get('/', (req, res) => {
res.send('get data !')
})
app.post('/', (req, res) => {
res.send('post data !')
})
app.put('/', (req, res) => {
res.send('put data !')
})
app.delete('/', (req, res) => {
res.send('delete data !')
})
// Use it directly use Distribution can handle all routing requests ( Handle all requests )
// app.use((req,res) => {
// res.send('ok!')
// })
app.listen(3000, () => { // Create a listener
console.log('router Server started successfully ...')
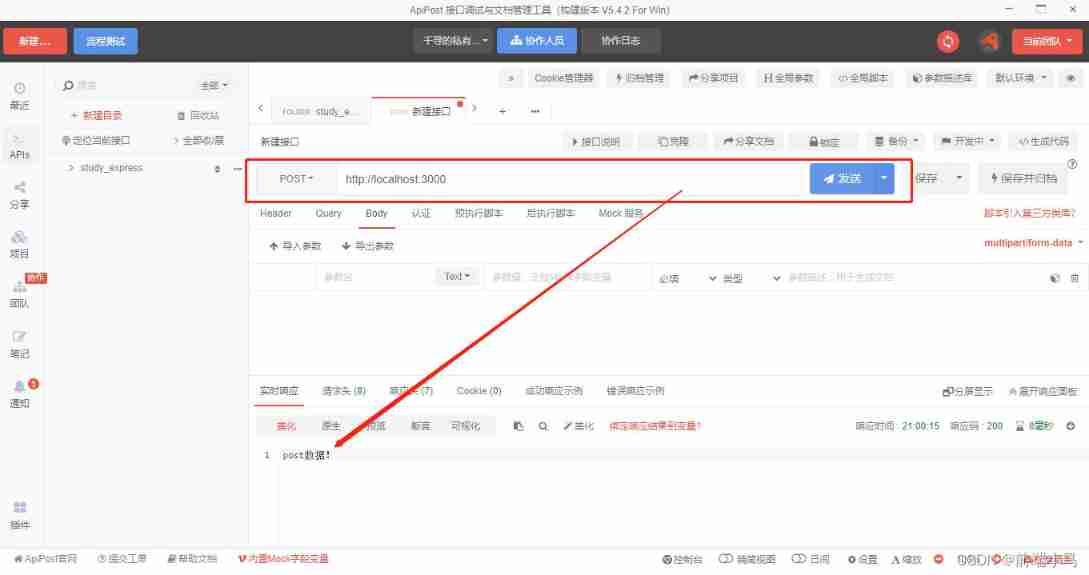
})Next, perform interface test , Because the browser is not very convenient , What I'm using here is ApiPost;
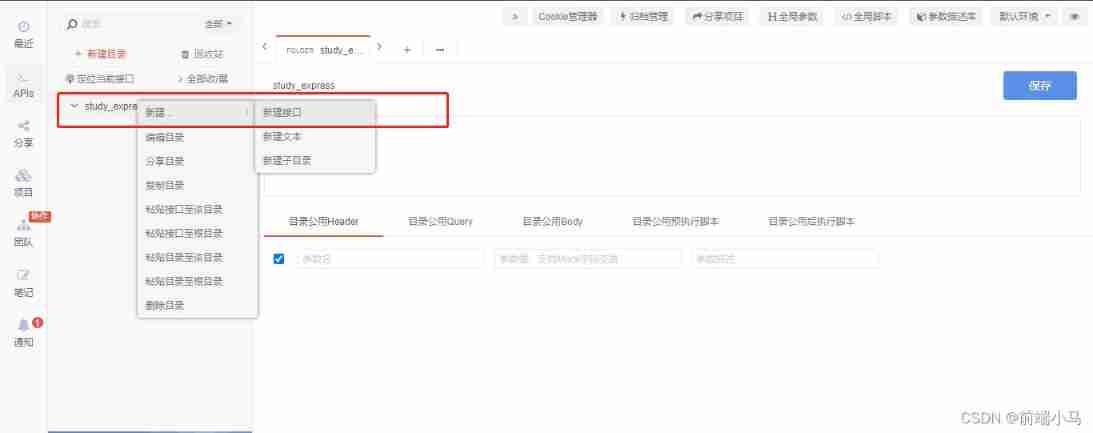
Add : ApiPost Test interface method
First, in the ApiPost Normal login ;
Then create a new directory --> Right mouse button --> newly build --> New interface ;
Enter the interface address , We use a local address 、3000 port ;
After entering the address , Start the server ;
Next, select the sending method to test :


The test results are as follows :

5、 ... and 、Express middleware
middleware It's a function , It can access the request object (request objeck(req))、 The response object (response object(res)) , and Web Application in request · Middleware in the response loop process ;
The middleware also has a third parameter next, Used to pass this request to the next step ; essentially , One Express Applications are just calling various middleware . Middleware is divided into the following categories :
- Application level middleware (app.use)
- Routing level middleware (app.get/post...)
- Error handling middleware
- Built in middleware ( Such as the static resource hosting we used before static Built in middleware )
- Third-party middleware
1. Application level middleware
Application level middleware is bound to app object Use app.use() and app.METHOD();
newly build 1.js File for demonstration , Access is realized through three middleware /user route , Record the visit time 、 Access log and access times .
// study_Express/1.js

const express = require('express') //require Function introduced express package
const app = express() // Call function

let total = 0; // Traffic volume

// Application level middleware
app.use('/user', (req, res, next) => { // The first middleware
  console.log(' Access time :' + Date.now()) // Record the visit time
  next() // Go to the next middleware , Don't use next The following middleware will not be executed
})

app.use('/user', (req, res, next) => { // The second middleware
  console.log(' journal :××× Visited /user') // Log access logs
  next()
})

app.use('/user', (req, res) => { // The third middleware
  total++; // More visits
  console.log(' Current traffic :' + total)
  res.send(' Return results ')
})

app.listen(3000, () => { // Create a listener
  console.log(' Middleware server started successfully ...')
})
Access after starting the service /user route ;

Relevant information will be printed in the background , Every time I refresh , Times plus one ;

2. Routing level middleware
New file 2.js demonstrate , Print out... Using two middleware 1、2.
// study_Express/2.js

const express = require('express') //require Function introduced express package
const app = express() // Call function

// Routing level middleware
app.get('/luyou', (req, res, next) => {
  console.log(1)
  next()
})

app.get('/luyou', (req, res) => {
  console.log(2)
})

app.listen(3000, () => { // Create a listener
  console.log(' The routing level middleware server was started successfully ...')
})
Access after starting the service /luyou route ;

Print the results in the background ;

Besides , Call in the routing level middleware next when , You can add one route Parameters next('route'), Jump to the next route ;
Pay attention to distinguish between :
next(); Jump to the next middleware .
next('route'); Jump to next route , The next route is through get、post Or the route bound by other methods .
As the following way of writing :
const express = require('express') //require Function introduced express package
const app = express() // Call function

// Routing level middleware
app.get('/luyou', (req, res, next) => { // The first middleware   The first route
  console.log(1)
  next('route') // Jump to next route
}, (req, res) => { // The second middleware
  console.log(2)
})

app.get('/luyou', (req, res) => { // The third middleware   The second route
  console.log(3);
  res.send(' The routing level middleware returns the result ')
})

app.listen(3000, () => { // Create a listener
  console.log(' The routing level middleware server was started successfully ...')
})
The first middleware and the second middleware are nested , Only one route is used , In the first middleware next('route'); Directly jump to the next route , So the result of the second middleware 2 It won't print , as follows :


3. Error handling middleware
Error handling middleware requires 4 Parameters , Four parameters must be provided to identify it as an error handling middleware function . Even if you don't need to use next object , It must also be specified . otherwise , The next Objects will be interpreted as regular middleware and cannot handle errors . The format is as follows :
app.use(function (err, req, res, next) {
  console.error(err.stack)
  res.status(500).send('Something broke!')
})
4. Third-party middleware —— body-parser
There are many third-party middleware , Here we focus on Parameter passing body-parser, The usage of other third-party middleware is the same ;

First npm install body-parser, Commands used in the terminal npm install body-parser --save;
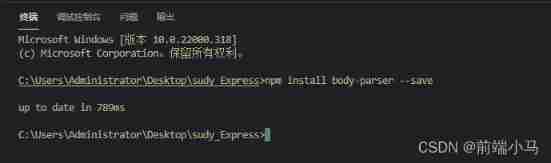
After the installation is successful, it will be in package.json The file shows ;

New file 3.js demonstrate , Realize simple login form verification function ;
// study_Express/3.js
const express = require('express') //require Function introduced express package
const app = express() // Call function
const bodyParser = require('body-parser') // introduce body-parser
// mount ( Enable ) Built in middleware static, Hosting static resources
app.use(express.static('public'))
// Mount parameter processing middleware ( Here we analyze post Data submitted by form )
app.use(bodyParser.urlencoded({
extended: false
}))
// Handle get Data submitted
// app.get('/login', (req, res) => {
// let data = req.query;
// console.log(data);
// res.send('get Data at the time of submission ')
// })
// Handle post Data submitted
app.post('/login', (req, res) => {
let data = req.body;
if (data.username == ' Front end pony ' && data.password == '123456') {
res.send(' Login successful !')
} else {
res.send(' Wrong user name or password !')
}
})
app.listen(3000, () => {
console.log(' The third-party middleware service is started ...')
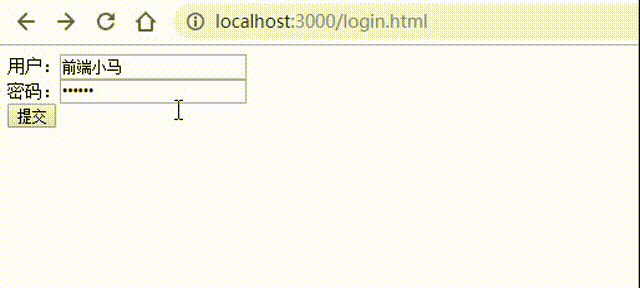
})To show the effect , We're in the catalog public So let's make a new one html File to make forms , And host it ;
<!DOCTYPE html>
<html>

<head>
  <meta charset="UTF-8">
  <title> Forms </title>
  <style></style>
</head>

<body>
  <form action="http://localhost:3000/login" method="post">
     user :<input type="text" name="username"><br>
     password :<input type="password" name="password"><br>
    <input type="submit" value=" Submit ">
  </form>
</body>

</html>
Access after starting the service /login.html, It can be verified normally :
边栏推荐
- Hot discussion: what are you doing for a meaningless job with a monthly salary of 18000?
- 学习太极创客 — MQTT(八)ESP8266订阅MQTT主题
- D's appendto packaging
- Oracle/PLSQL: Trim Function
- Oracle/PLSQL: CharToRowid Function
- 企业数字化转型:信息化与数字化
- Installing the Damon database using the command line
- Detailed explanation of ThreadLocal
- Oracle/PLSQL: Lower Function
- three.js多米诺骨牌js特效
猜你喜欢

Learn Tai Chi Maker - mqtt Chapter 2 (3) reserved messages

1. Project preparation and creation

Flink learning 3: data processing mode (stream batch)

docker部署redis集群

Learn Tai Chi maker mqtt (IX) esp8266 subscribe to and publish mqtt messages at the same time

Flink学习1:简介

Learning Tai Chi Maker - mqtt Chapter 2 (II) esp8266 QoS application
学习太极创客 — MQTT(九)ESP8266 同时订阅和发布 MQTT 消息

Google began to roll itself, AI architecture pathways was blessed, and 20billion generation models were launched

"All majors are persuading them to quit." is it actually the most friendly to college students?
随机推荐
使用命令行安装达梦数据库
Memcached Foundation 12
执念斩长河暑期规划
mmdetection 用yolox训练自己的coco数据集
Flink learning 3: data processing mode (stream batch)
TechSmith Camtasia latest 2022 detailed function explanation Download
three.js多米诺骨牌js特效
C# Tcp服务器如何限制同一个IP的连接数量?
Oracle/PLSQL: From_ Tz function
Installing the Damon database using the command line
Getting started with Scala_ Immutable list and variable list
Learn Tai Chi Maker - mqtt (VI) esp8266 releases mqtt message
Memcached basics 15
平均风向风速计算(单位矢量法)
Oracle/PLSQL: Lower Function
消费者追捧iPhone,在于它的性价比超越国产手机
How does the C # TCP server limit the number of connections to the same IP?
Why pass SPIF_ Sendchange flag systemparametersinfo will hang?
学习太极创客 — MQTT(七)MQTT 主题进阶
docker部署redis集群