当前位置:网站首页>YUV444、YUV422、YUV420、YUV420P、YUV420SP、YV12、YU12、NV12、NV21
YUV444、YUV422、YUV420、YUV420P、YUV420SP、YV12、YU12、NV12、NV21
2022-06-25 23:38:00 【android_ cai_ niao】
Preface
Various YUV There are so many formats , It's really hard to learn at first , The article about online search is not very clear .
All kinds of different YUV The format is just different from the sampling method and storage method , Just these two points , Different sampling methods are used to save memory , I don't know the usefulness of different storage methods .
RGB turn YUV444
Let's assume that there is a sheet with a width of 4 Pixels , High for 2 Pixel image , Then this picture has 8 Pixel , I use a grid to represent a pixel ,8 One pixel is 8 Lattice , Here's the picture :
Pictured above , share 8 A grid represents 8 Pixel ,0 ~ 7 Represents the position of the pixel . In fact, a pixel is very small , A pixel on a computer is almost invisible to the naked eye , So I use a large grid to represent a pixel , Easy to understand . The pixels in the computer are made of RGB Composed of three primary colors , Here I put RGB Label in pixels , as follows :
Every R use 1 Bytes to store ,G use 1 Byte store ,B Also used 1 Byte store , therefore 1 Of pixels RGB need 3 Bytes to store , And in the above figure 8 Pixel , There is a 8 Yes RGB value , need 24 Bytes to store .
RGB It can be converted into by mathematical formula YUV, As for the principle of transformation, we don't need to understand , As long as you know that you can convert each other through formulas , Put up the picture above. RGB Convert to YUV Format , as follows :
Y need 1 Bytes to store ,U need 1 Bytes to store ,V Also needed 1 Bytes to store , therefore 8 A pixel YUV Pictures are also needed 24 Bytes to store , and RGB equally . It feels like YUV No advantage , Don't worry. , Then you will know the benefits .
YV12 Collection method of (YUV444 * YV12)
front RGB Converted YUV The data is called YUV444, In this format YUV The sampling is complete , No loss of precision . And what we got from the camera YUV Image data can never be YUV444 Format , But something else YUV Format , Are those formats that have lost precision , such as YV12, stay Android In the system , You can set the data collected by the camera to come out YV12 Format ( perhaps NV21 Format ),YV12 Is a loss of precision YUV Format , When it is sampling ,Y There will be no loss , While collecting U when , Pick one every other , And pick one line after another , collection V It's also a matter of picking one at a time , Pick one line after another , Suppose a picture is... High 6 Pixels (6 That's ok ), be YV12 The format collection method is :
first line :Y All collect , collection U, Collect one every other , Don't collect V
The second line :Y All collect , collection V, Collect one every other , Don't collect U
The third line :Y All collect , collection U, Collect one every other , Don't collect V
In the fourth row :Y All collect , collection V, Collect one every other , Don't collect U
The fifth row :Y All collect , collection U, Collect one every other , Don't collect V
Sixth elements :Y All collect , collection V, Collect one every other , Don't collect U
It should be easy to understand ,U and V Lost , Therefore, the storage space required will be reduced ,YV12 comparison YUV444 Save half the storage space , That's why the data from the camera is YUV Format not RGB Format reason , Because the storage space required is small , And although some are missing U and V, But the quality of the image is almost no decline with the naked eye .
according to YV12 Format sampling method , We put the previous YUV444 The image sample of is YV12 Format , as follows :
first line :Y All collect , collection U, Collect one every other , Don't collect V, as follows :
The second line :Y All collect , collection V, Collect one every other , Don't collect U, as follows :
The two lines come together , as follows :
As can be seen from the figure above ,YUV444 Every line of the has 12 individual YUV related data , need 12 Bytes to store , Acquisition component YV12 after , Each line is just 6 individual YUV The relevant data , It only needs 6 Bytes can be stored , It saves half of the storage space , This is why the data collected by the camera is generally YUV Format reasons .
YV12 Storage mode
YV12 The storage mode of is : hold Y、U、V Keep separately , Pre deposit Y, Save again V, Save again U, as follows :
YV12 In this way Y、U、V Are stored separately , The technical term is divided into 3 Planes , It seems that you need to use 3 An array to store , In fact, the pictures collected by the camera are transmitted to us YUV Data is a one-dimensional array , It's not two-dimensional , as follows :
therefore , Let's not think YV12 The three planes are divided into 3 An array to store , The camera came out YV12 It's a one-dimensional array , When saving the file, you can directly save the one-dimensional array . Yes, of course , In the code , To facilitate the operation of this YV12 data , You can convert a one-dimensional array to save it separately Y、U、V Three arrays of .
Here we are. , Let's take a look at another YUV Format :YU12( Also called I420), It and YV12 It's like , Just when it's stored YU12 First deposit U Save again V, as follows :
YV12 Reduction (YV12 * YUV444)
adopt YV12 Some of the sampled data is missing U and V Of , How to restore it ? as follows :
As can be seen above ,YV12 The restore method of is : In every two lines , Every time 4 Next to each other Y Share a set UV( That is... In the red box 4 individual Y Share a set UV, In the blue box 4 individual Y Share a set UV), When again YUV Convert back to RGB when , And the original RGB It must be different , But in practical effect , We can hardly see the difference with our naked eyes ( Only one color can tell the difference , But if you look at a whole picture, you can't see the difference ).
According to this YV12 Restore back YUV444 Principle , You can know , The width and height of the image should be even , So when we do the exercises , When setting the width and height of the image, do not make a singular width and height , So as to avoid any abnormality ! We are seeing that the resolution settings of some mobile phones or cameras are even , There is no singular .
Through code simulation YUV444 * YV12 * YUV444
1、 The illustration

As shown in the figure above , Next, we will simulate through code YUV444 To YV12 Data collection and storage process , Then restore back YUV444. For the convenience of later operation YUV Convenience of data ,YV12 We use three arrays to store the data of , Instead of using an array to hold .
2、 Analog out YUV444 data

Simulate the above figure through code YUV444 data , as follows :
fun main() {

    val yuv444Bytes = arrayOf(
        arrayOf("Y0", "U0", "V0", "Y1", "U1", "V1", "Y2", "U2", "V2", "Y3", "U3", "V3"),
        arrayOf("Y4", "U4", "V4", "Y5", "U5", "V5", "Y6", "U6", "V6", "Y7", "U7", "V7")
    )
    printYUV444(yuv444Bytes)
}

fun printYUV444(yuv444Bytes: Array<Array<String>>) {

    println(" Next output YUV444 data ")
    for (oneLine in yuv444Bytes) {

        for (columnIndex in oneLine.indices step 3) {

            val y = oneLine[columnIndex + 0]
            val u = oneLine[columnIndex + 1]
            val v = oneLine[columnIndex + 2]
            print("$y $u $v | ")
        }
        println()
    }
}
The operation results are as follows :
 Next output YUV444 data
Y0 U0 V0 | Y1 U1 V1 | Y2 U2 V2 | Y3 U3 V3 |
Y4 U4 V4 | Y5 U5 V5 | Y6 U6 V6 | Y7 U7 V7 |
Here we use a two-dimensional string array to represent a sheet with a width of 4, High for 2 The picture of YUV444 data , Use strings to simulate YUV The data is for the convenience of viewing the results . The next step is to implement the from YUV444 Collected from YV12 data .
3、 from YUV444 Collected from YV12 data

Pictured above , We need to YUV444 From the data collected YV12 The data of , The code is as follows :
fun main() {

    val yuv444Bytes = arrayOf(
        arrayOf("Y0", "U0", "V0", "Y1", "U1", "V1", "Y2", "U2", "V2", "Y3", "U3", "V3"),
        arrayOf("Y4", "U4", "V4", "Y5", "U5", "V5", "Y6", "U6", "V6", "Y7", "U7", "V7")
    )
    printYUV444(yuv444Bytes)

    val (yBytes, uBytes, vBytes) = yuv444ToYv12(yuv444Bytes)
    printYV12(yBytes, uBytes, vBytes)
}

fun printYUV444(yuv444Bytes: Array<Array<String>>) {

    println(" Next output YUV444 data ")
    for (oneLine in yuv444Bytes) {

        for (columnIndex in oneLine.indices step 3) {

            val y = oneLine[columnIndex + 0]
            val u = oneLine[columnIndex + 1]
            val v = oneLine[columnIndex + 2]
            print("$y $u $v | ")
        }
        println()
    }
}

fun printYV12(yBytes: Array<String>, uBytes: Array<String>, vBytes: Array<String>) {

    println(" Next output YV12 data ")
    yBytes.forEach {
     print("$it ") }
    println()
    vBytes.forEach {
     print("$it ") }
    println()
    uBytes.forEach {
     print("$it ") }
    println()
}

private fun yuv444ToYv12(yuv444Bytes: Array<Array<String>>): Triple<Array<String>, Array<String>, Array<String>> {

    val width = yuv444Bytes[0].size / 3 //  notes : because yuv444 One pixel of the format is 3 Bytes , So divide by 3
    val height = yuv444Bytes.size
    val ySize = width * height
    val vSize = ySize / 4
    val yBytes = Array(ySize) {
     "" }
    val uBytes = Array(vSize) {
     "" }
    val vBytes = Array(vSize) {
     "" }
    var yIndex = 0
    var uIndex = 0
    var vIndex = 0
    var saveU = true
    var saveV = true
    for (rowIndex in 0 until height) {

        val oneLine = yuv444Bytes[rowIndex]
        for (columnIndex in oneLine.indices step 3) {

            val y = oneLine[columnIndex + 0]
            val u = oneLine[columnIndex + 1]
            val v = oneLine[columnIndex + 2]
            yBytes[yIndex++] = y
            if (rowIndex % 2 == 0) {

                //  Even lines take U, Take one from another
                if (saveU) {

                    uBytes[uIndex++] = u
                }
                saveU = !saveU
            } else {

                //  The singular row is taken as V, Take one from another
                if (saveV) {

                    vBytes[vIndex++] = v
                }
                saveV = !saveV
            }
        }
    }
    return Triple(yBytes, uBytes, vBytes)
}
The operation effect is as follows :
 Next output YUV444 data
Y0 U0 V0 | Y1 U1 V1 | Y2 U2 V2 | Y3 U3 V3 |
Y4 U4 V4 | Y5 U5 V5 | Y6 U6 V6 | Y7 U7 V7 |
 Next output YV12 data
Y0 Y1 Y2 Y3 Y4 Y5 Y6 Y7
V4 V6
U0 U2
4、 hold YV12 Revert to YUV444

The implementation code is as follows :
fun main() {

    val yuv444Bytes = arrayOf(
        arrayOf("Y0", "U0", "V0", "Y1", "U1", "V1", "Y2", "U2", "V2", "Y3", "U3", "V3"),
        arrayOf("Y4", "U4", "V4", "Y5", "U5", "V5", "Y6", "U6", "V6", "Y7", "U7", "V7")
    )
    printYUV444(yuv444Bytes)

    val (yBytes, uBytes, vBytes) = yuv444ToYv12(yuv444Bytes)
    printYV12(yBytes, uBytes, vBytes)

    val width = yuv444Bytes[0].size
    val height = yuv444Bytes.size
    val yuv444 = yv12ToYuv444(width, height, yBytes, uBytes, vBytes)
    printYUV444(yuv444)
}

fun yv12ToYuv444(width: Int, height: Int, yBytes: Array<String>, uBytes: Array<String>, vBytes: Array<String>): Array<Array<String>> {

    var yIndex = 0
    val yuv444Bytes = Array(height) {
     Array(width) {
     " " } }
    val oneLineUvSize = width / 2 //  stay YV12 in , In a row U or V The number of
    var twoLineIndex = -1  //  Count every two lines
    for (rowIndex in 0 until height) {

        val oneLineBytes = yuv444Bytes[rowIndex]
        var u = ""
        var v = ""

        //  Because it reads every two lines UV The starting position is the same , So we'll just put twoLineIndex Just add
        if (rowIndex % 2 == 0) {

            twoLineIndex++
        }

        //  Calculate each row in the fetch UV when uvIndex Starting position
        var uvIndex = twoLineIndex * oneLineUvSize

        for (columnIndex in oneLineBytes.indices step 3) {

            if (yIndex % 2 == 0) {

                //  In a row , Every two Y Just once UV
                u = uBytes[uvIndex]
                v = vBytes[uvIndex]
                uvIndex++
            }

            val y = yBytes[yIndex++]
            oneLineBytes[columnIndex + 0] = y
            oneLineBytes[columnIndex + 1] = u
            oneLineBytes[columnIndex + 2] = v
        }
    }

    return yuv444Bytes
}
The operation results are as follows :
 Next output YUV444 data
Y0 U0 V0 | Y1 U1 V1 | Y2 U2 V2 | Y3 U3 V3 |
Y4 U4 V4 | Y5 U5 V5 | Y6 U6 V6 | Y7 U7 V7 |
 Next output YV12 data
Y0 Y1 Y2 Y3 Y4 Y5 Y6 Y7
V4 V6
U0 U2
 Next output YUV444 data
Y0 U0 V4 | Y1 U0 V4 | Y2 U2 V6 | Y3 U2 V6 |
Y4 U0 V4 | Y5 U0 V4 | Y6 U2 V6 | Y7 U2 V6 |
You can compare the results with the previous screenshot :
You can see ,4 individual Y Share a set UV, In this case , Per pixel YUV The value is not original YUV The value of , So the color effect must be biased , But looking at the whole picture , The naked eye can hardly see the difference , As mentioned earlier , We need to be clear about this .
YUV444 To YV12 It's relatively simple , But put YV12 Restore back YUV444 The logic of is quite complicated , So here are some details :
As shown in the figure above , In a row , Every two Y Share a set UV, therefore , Every two Y Read only once UV that will do , Let's look at preservation Y The index of each element of the array , as follows :
That is, every two Y Read it once UV, Find out from the above picture , Actually in y When the index of is an even number , That is to say 0、2、4、6 Read when , So the implementation code is as follows :
if (yIndex % 2 == 0) {

    u = uBytes[uvIndex]
    v = vBytes[uvIndex]
    uvIndex++
}
Every two Y Read once UV It is also relatively easy to implement , The harder part is the second line 、 The third line 、 On the fourth line UV How to get it ? This is really difficult , It is a logical problem , To find its regularity :
- The first line takes UV And the second line UV It's exactly the same , from 0 Start reading , So just let their uvIndex Just keep reading the first and second lines the same .
- The third line takes UV And the fourth line UV It's the same thing , And first 、 The difference between the two lines is ,uvIndex The starting position of is not from 0 Here we go .
therefore , The difficulty is how to find uvIndex The starting position of , To find out the rules , We need more data , Suppose the width is 8 Pixels , High for 6 Pixels , It has a total of 6 x 8 = 48 Pixels , There will be 48 individual Y, We know that every 4 individual Y Corresponding to one U and V, be 48 / 4 = 12, There will be 12 individual U and 12 individual V, The drawing analysis is as follows :
Pictured above , It analyzes and calculates each row read UV The formula of the starting position of time , The corresponding implementation code is as follows :
...
fun yv12ToYuv444(...): Array<Array<String>> {

    ...
    val oneLineUvSize = width / 2 //  stay YV12 in , In a row U or V The number of
    var twoLineIndex = -1  //  Count every two lines
    for (rowIndex in 0 until height) {

        ...
        //  Because it reads every two lines UV The starting position is the same , So we'll just put twoLineIndex Just add
        if (rowIndex % 2 == 0) {

            twoLineIndex++
        }

        //  Calculate each row before reading UV when uvIndex Starting position
        var uvIndex = twoLineIndex * oneLineUvSize
        ...
    }

    return yuv444Bytes
}
5、 Complete code
fun main() {

    val yuv444Bytes = arrayOf(
        arrayOf("Y0", "U0", "V0", "Y1", "U1", "V1", "Y2", "U2", "V2", "Y3", "U3", "V3"),
        arrayOf("Y4", "U4", "V4", "Y5", "U5", "V5", "Y6", "U6", "V6", "Y7", "U7", "V7")
    )
    printYUV444(yuv444Bytes)

    val (yBytes, uBytes, vBytes) = yuv444ToYv12(yuv444Bytes)
    printYV12(yBytes, uBytes, vBytes)

    val width = yuv444Bytes[0].size
    val height = yuv444Bytes.size
    val yuv444 = yv12ToYuv444(width, height, yBytes, uBytes, vBytes)
    printYUV444(yuv444)
}

fun yv12ToYuv444(width: Int, height: Int, yBytes: Array<String>, uBytes: Array<String>, vBytes: Array<String>): Array<Array<String>> {

    var yIndex = 0
    val yuv444Bytes = Array(height) {
     Array(width) {
     " " } }
    val oneLineUvSize = width / 2 //  stay YV12 in , In a row U or V The number of
    var twoLineIndex = -1  //  Count every two lines
    for (rowIndex in 0 until height) {

        val oneLineBytes = yuv444Bytes[rowIndex]
        var u = ""
        var v = ""

        //  Because it reads every two lines UV The starting position is the same , So we'll just put twoLineIndex Just add
        if (rowIndex % 2 == 0) {

            twoLineIndex++
        }

        //  Calculate each row in the fetch UV when uvIndex Starting position
        var uvIndex = twoLineIndex * oneLineUvSize

        for (columnIndex in oneLineBytes.indices step 3) {

            if (yIndex % 2 == 0) {

                //  In a row , Every two Y Just once UV
                u = uBytes[uvIndex]
                v = vBytes[uvIndex]
                uvIndex++
            }

            val y = yBytes[yIndex++]
            oneLineBytes[columnIndex + 0] = y
            oneLineBytes[columnIndex + 1] = u
            oneLineBytes[columnIndex + 2] = v
        }
    }

    return yuv444Bytes
}

fun printYUV444(yuv444Bytes: Array<Array<String>>) {

    println(" Next output YUV444 data ")
    for (oneLine in yuv444Bytes) {

        for (columnIndex in oneLine.indices step 3) {

            val y = oneLine[columnIndex + 0]
            val u = oneLine[columnIndex + 1]
            val v = oneLine[columnIndex + 2]
            print("$y $u $v | ")
        }
        println()
    }
}

fun printYV12(yBytes: Array<String>, uBytes: Array<String>, vBytes: Array<String>) {

    println(" Next output YV12 data ")
    yBytes.forEach {
     print("$it ") }
    println()
    vBytes.forEach {
     print("$it ") }
    println()
    uBytes.forEach {
     print("$it ") }
    println()
}

fun yuv444ToYv12(yuv444Bytes: Array<Array<String>>): Triple<Array<String>, Array<String>, Array<String>> {

    val width = yuv444Bytes[0].size / 3
    val height = yuv444Bytes.size
    val ySize = width * height
    val vSize = ySize / 4
    val yBytes = Array(ySize) {
     "" }
    val uBytes = Array(vSize) {
     "" }
    val vBytes = Array(vSize) {
     "" }
    var yIndex = 0
    var uIndex = 0
    var vIndex = 0
    var saveU = true
    var saveV = true
    for (rowIndex in 0 until height) {

        val oneLine = yuv444Bytes[rowIndex]
        for (columnIndex in oneLine.indices step 3) {

            val y = oneLine[columnIndex + 0]
            val u = oneLine[columnIndex + 1]
            val v = oneLine[columnIndex + 2]
            yBytes[yIndex++] = y
            if (rowIndex % 2 == 0) {

                //  Even lines take U, Take one from another
                if (saveU) {

                    uBytes[uIndex++] = u
                }
                saveU = !saveU
            } else {

                //  The singular row is taken as V, Take one from another
                if (saveV) {

                    vBytes[vIndex++] = v
                }
                saveV = !saveV
            }
        }
    }
    return Triple(yBytes, uBytes, vBytes)
}
6、 Complete code ( hold String Replace with byte)
below , We put yuv444 turn YV12 and YV12 turn YUV444 The code of is modified to use byte, And wrapped in YuvUtil in , To facilitate reuse , Here's the thing to watch out for , Here is a row of data byte The array size is multiplied by the width 3 Of , because 1 Pixels need to be 3 Bytes to store , In turn, , When we pass a line byte When the array calculates the width , You need to divide the size of the array by 3.
object YuvUtil {


    fun yv12ToYuv444(width: Int, height: Int, yBytes: Array<Byte>, uBytes: Array<Byte>, vBytes: Array<Byte>): Array<ByteArray> {

        var yIndex = 0
        val yuv444Bytes = Array(height) {
     ByteArray(width * 3) } //  Because each pixel needs 3 Bytes , So this is multiplied by 3
        val oneLineUvSize = width / 2 //  stay YV12 in , In a row U or V The number of
        var twoLineIndex = -1  //  Count every two lines
        for (rowIndex in 0 until height) {

            val oneLineBytes = yuv444Bytes[rowIndex]
            var u: Byte = 0
            var v: Byte = 0

            //  Because it reads every two lines UV The starting position is the same , So we'll just put twoLineIndex Just add
            if (rowIndex % 2 == 0) {

                twoLineIndex++
            }

            //  Calculate each row in the fetch UV when uvIndex Starting position
            var uvIndex = twoLineIndex * oneLineUvSize

            for (columnIndex in oneLineBytes.indices step 3) {

                if (yIndex % 2 == 0) {

                    //  In a row , Every two Y Just once UV
                    u = uBytes[uvIndex]
                    v = vBytes[uvIndex]
                    uvIndex++
                }

                val y = yBytes[yIndex++]
                oneLineBytes[columnIndex + 0] = y
                oneLineBytes[columnIndex + 1] = u
                oneLineBytes[columnIndex + 2] = v
            }
        }

        return yuv444Bytes
    }

    private fun yuv444ToYv12(yuv444Bytes: Array<ByteArray>): Triple<ByteArray, ByteArray, ByteArray> {

        val width = yuv444Bytes[0].size / 3 //  Because each pixel accounts for 3 Bytes , So divide by 3
        val height = yuv444Bytes.size
        val ySize = width * height
        val vSize = ySize / 4
        val yBytes = ByteArray(ySize)
        val uBytes = ByteArray(vSize)
        val vBytes = ByteArray(vSize)
        var yIndex = 0
        var uIndex = 0
        var vIndex = 0
        var saveU = true
        var saveV = true
        for (rowIndex in 0 until height) {

            val oneLine = yuv444Bytes[rowIndex]
            for (columnIndex in oneLine.indices step 3) {

                val y = oneLine[columnIndex + 0]
                val u = oneLine[columnIndex + 1]
                val v = oneLine[columnIndex + 2]
                yBytes[yIndex++] = y
                if (rowIndex % 2 == 0) {

                    //  Even lines take U, Take one from another
                    if (saveU) {

                        uBytes[uIndex++] = u
                    }
                    saveU = !saveU
                } else {

                    //  The singular row is taken as V, Take one from another
                    if (saveV) {

                        vBytes[vIndex++] = v
                    }
                    saveV = !saveV
                }
            }
        }
        return Triple(yBytes, uBytes, vBytes)
    }

    fun printYUV444(yuv444Bytes: Array<ByteArray>) {

        println(" Next output YUV444 data ")
        for (oneLine in yuv444Bytes) {

            for (columnIndex in oneLine.indices step 3) {

                val y = oneLine[columnIndex + 0]
                val u = oneLine[columnIndex + 1]
                val v = oneLine[columnIndex + 2]
                print("$y $u $v | ")
            }
            println()
        }
    }

    fun printYV12(yBytes: ByteArray, uBytes: ByteArray, vBytes: ByteArray) {

        //  With 16 Print in hexadecimal
        println(" Next output YV12 data ")
        println(" Next output Y data ")
        yBytes.forEach {
     print("${
      toHexString(byteToInt(it))} ") }
        println("\n Next output V data ")
        vBytes.forEach {
     print("${
      toHexString(byteToInt(it))} ") }
        println("\n Next output U data ")
        uBytes.forEach {
     print("${
      toHexString(byteToInt(it))} ") }
        println()
    }

    fun byteToInt(byte: Byte): Int = byte.toInt() shl 24 ushr 24
    fun toHexString(int: Int): String = Integer.toHexString(int)

}
YV12 Picture vs bmp Pictures interact with each other
bmp Refer to this document for relevant knowledge of pictures :https://blog.csdn.net/android_cai_niao/article/details/120528734
YV12 And bmp Transformation , To put it bluntly yuv and rgb Transformation , Find the conversion formula . There are many conversion formulas on the Internet , Which of these conversion formulas is reliable , I'm not sure , Because there are too many knowledge points in it , Different color spaces have different conversion formulas , I took a picture from my mobile camera YUV Convert the picture to bmp View pictures under the computer , The color is almost the same, so I think it is the correct formula , I'm too lazy to think about what color space it is .
RGB turn YUV The formula
- Y = 0.299 * R + 0.587 * G + 0.114 * B
- U = -0.169 * R - 0.331 * G + 0.499 * B + 128
- V = 0.499 * R - 0.418 * G - 0.0813 * B + 128
It should be noted that ,R、G、B The range is 0 ~ 255, Just one byte Can be said , We read from memory RGB when , It's also byte Data of type , However, you should pay attention to when participating in the conversion formula ,java Medium byte It's symbolic , One byte Yes 8 A bit , If it's all 1, stay byte The middle is -1, If in int The middle is 255, So we need to take byte Converted to a positive number int value , Otherwise, the calculation formula will not work . Also note that :byte.toInt() This function , One -1 Of byte Convert to int After all -1, So we need to pay attention , We're going to take int The lowest 8 position , Then turn the high positions into 0, Then it becomes a positive number . There is also the conversion formula Y、U、V The range of values is also 0 ~ 255 Of , It needs to be handled beyond the scope .
Corresponding Kotlin The implementation code is as follows :
object YuvUtil {


    fun byteToInt(byte: Byte): Int = byte.toInt() shl 24 ushr 24
    fun verify(int: Int) = if (int < 0) 0 else if (int > 255) 255 else int
    fun toHexString(int: Int): String = Integer.toHexString(int)

    fun rgbToYuv(R: Byte, G: Byte, B: Byte): Triple<Byte, Byte, Byte> {

        //  notes :R、G、B The range of values is 0 ~ 255, There is no negative number , That needs to be converted to a positive number int.
        //  A negative number is used byte.toInt() After conversion, it is still a negative number , So we use bitwise operators to convert ,Byte Of -1 Convert to Int The value should be 255
        return rgbToYuv(byteToInt(R), byteToInt(G), byteToInt(B))
    }

    fun rgbToYuv(R: Int, G: Int, B: Int): Triple<Byte, Byte, Byte> {

        var Y = (0.299 * R + 0.587 * G + 0.114 * B).toInt()
        var U = (-0.169 * R - 0.331 * G + 0.499 * B + 128).toInt()
        var V = (0.499 * R - 0.418 * G - 0.0813 * B + 128).toInt()
        Y = verify(Y)
        U = verify(U)
        V = verify(V)
        println("rgb: ${
      toHexString(R)} ${
      toHexString(G)} ${
      toHexString(B)} -> yuv: ${
      toHexString(Y)} ${
      toHexString(U)} ${
      toHexString(V)}")
        return Triple(Y.toByte(), U.toByte(), V.toByte())
    }
}
YUV turn RGB The formula
- R = Y + 1.4075 * (V - 128)
- G = Y - 0.3455 * (U - 128) - 0.7169 * (V - 128)
- B = Y + 1.7790 * (U - 128)
Here also need to pay attention to byte Data processing before participating in formula calculation , There is also out of range processing of calculation results .
Corresponding Kotlin The implementation code is as follows :
object YuvUtil {


    fun byteToInt(byte: Byte): Int = byte.toInt() shl 24 ushr 24
    fun verify(int: Int) = if (int < 0) 0 else if (int > 255) 255 else int
    fun toHexString(int: Int): String = Integer.toHexString(int)

    fun yuvToRgb(Y: Byte, U: Byte, V: Byte): Triple<Byte, Byte, Byte> {

        //  notes :Y、U、V The range of values is 0 ~ 255, There is no negative number , That needs to be converted to a positive number int.
        //  A negative number is used byte.toInt() After conversion, it is still a negative number , So we use bitwise operators to convert ,Byte Of -1 Convert to Int The value should be 255
        return yuvToRgb(byteToInt(Y), byteToInt(U), byteToInt(V))
    }

    fun yuvToRgb(Y: Int, U: Int, V: Int): Triple<Byte, Byte, Byte> {

        var R = (Y + 1.4075 * (V - 128)).toInt()
        var G = (Y - 0.3455 * (U - 128) - 0.7169 * (V - 128)).toInt()
        var B = (Y + 1.779 * (U - 128)).toInt()
        R = verify(R)
        G = verify(G)
        B = verify(B)
        println("yuv: ${
      toHexString(Y)} ${
      toHexString(U)} ${
      toHexString(V)} -> rgb: ${
      toHexString(R)} ${
      toHexString(G)} ${
      toHexString(B)}")
        return Triple(R.toByte(), G.toByte(), B.toByte())
    }

}
RGB and YUV Rotation deviation
RGB and YUV It's impossible to perfect each other , in other words RGB Convert to YUV after , Then switch back to GRB Time is the same as the original RGB There may be deviations , Examples are as follows :
fun main() {

    val (Y, U, V) = YuvUtil.rgbToYuv(0xff, 0, 0)
    val (R, G, B) = YuvUtil.yuvToRgb(Y, U, V)
}
The operation results are as follows :
rgb: ff 0 0 -> yuv: 4c 54 ff
yuv: 4c 54 ff -> rgb: fe 0 0
As you can see from the results , The original RGB by :0xff0000, Convert to YUV by :0x4c54ff, Then switch back to RGB by :0xfe0000, And the original RGB The values are different , But it's close to , That is to say, they are all red , There is almost no difference between the original red and the converted red with the naked eye .
bmp Picture turn YUV picture
import java.io.*

object YuvUtil {


    fun bmpFileToYV12FileDemo() {

        val grbBytes = BmpUtil.createRgbBytes(4, 2)
        println(" Next output RGB pixel data :")
        BmpUtil.printColorBytes(grbBytes)
        val yuv444Bytes = rgbBytesToYuv444Bytes(grbBytes)
        println(" Next output YUV pixel data :")
        BmpUtil.printColorBytes(yuv444Bytes)
        val (yBytes, uBytes, vBytes) = yuv444BytesToYv12Bytes(yuv444Bytes)
        printYV12(yBytes, uBytes, vBytes)
        val yv12File = File("C:\\Users\\Even\\Pictures\\demo.yuv")
        writeYv12BytesToFile(yv12File, yBytes, vBytes, uBytes)
    }

    fun bmpFileToYV12FileDemo2() {

        val bmpFile = File("C:\\Users\\Even\\Pictures\\ Haiqin smoke .bmp")
        val yv12File = File("C:\\Users\\Even\\Pictures\\ Haiqin smoke .yuv")
        val rgbBytes = BmpUtil.readBmpFilePixelBytes(bmpFile)
        val yuv444Bytes = rgbBytesToYuv444Bytes(rgbBytes)
        val (yBytes, uBytes, vBytes) = yuv444BytesToYv12Bytes(yuv444Bytes)
        writeYv12BytesToFile(yv12File, yBytes, vBytes, uBytes)
    }

    private fun writeYv12BytesToFile(yv12File: File, yBytes: ByteArray, vBytes: ByteArray, uBytes: ByteArray) {

        FileOutputStream(yv12File).use {
     fos ->
            BufferedOutputStream(fos).use {
     bos ->
                bos.write(yBytes)
                bos.write(vBytes)
                bos.write(uBytes)
            }
        }
    }

    fun rgbBytesToYuv444Bytes(rgbBytes: Array<ByteArray>): Array<ByteArray> {

        val yuv444Bytes = Array(rgbBytes.size) {
     ByteArray(rgbBytes[0].size) }
        for (rowIndex in rgbBytes.indices) {

            val oneLineBytes = rgbBytes[rowIndex]
            val oneLineYuv444Bytes = yuv444Bytes[rowIndex]
            for (columnIndex in oneLineBytes.indices step 3) {

                val red   = oneLineBytes[columnIndex + 0]
                val green = oneLineBytes[columnIndex + 1]
                val blue  = oneLineBytes[columnIndex + 2]
                val (Y, U, V) = rgbToYuv(red, green, blue)
                oneLineYuv444Bytes[columnIndex + 0] = Y
                oneLineYuv444Bytes[columnIndex + 1] = U
                oneLineYuv444Bytes[columnIndex + 2] = V
            }
        }
        return yuv444Bytes
    }

    fun byteToInt(byte: Byte): Int = byte.toInt() shl 24 ushr 24
    fun verify(int: Int) = if (int < 0) 0 else if (int > 255) 255 else int
    fun toHexString(int: Int): String = Integer.toHexString(int)

    fun rgbToYuv(R: Byte, G: Byte, B: Byte): Triple<Byte, Byte, Byte> {

        //  notes :R、G、B The range of values is 0 ~ 255, There is no negative number , That needs to be converted to a positive number int.
        //  A negative number is used byte.toInt() After conversion, it is still a negative number , So we use bitwise operators to convert ,Byte Of -1 Convert to Int The value should be 255
        return rgbToYuv(byteToInt(R), byteToInt(G), byteToInt(B))
    }

    fun rgbToYuv(R: Int, G: Int, B: Int): Triple<Byte, Byte, Byte> {

        var Y = (0.299 * R + 0.587 * G + 0.114 * B).toInt()
        var U = (-0.169 * R - 0.331 * G + 0.499 * B + 128).toInt()
        var V = (0.499 * R - 0.418 * G - 0.0813 * B + 128).toInt()
        Y = verify(Y)
        U = verify(U)
        V = verify(V)
        //println("rgb: ${toHexString(R)} ${toHexString(G)} ${toHexString(B)} -> yuv: ${toHexString(Y)} ${toHexString(U)} ${toHexString(V)}")
        return Triple(Y.toByte(), U.toByte(), V.toByte())
    }

    fun yuvToRgb(Y: Byte, U: Byte, V: Byte): Triple<Byte, Byte, Byte> {

        //  notes :Y、U、V The range of values is 0 ~ 255, There is no negative number , That needs to be converted to a positive number int.
        //  A negative number is used byte.toInt() After conversion, it is still a negative number , So we use bitwise operators to convert ,Byte Of -1 Convert to Int The value should be 255
        return yuvToRgb(byteToInt(Y), byteToInt(U), byteToInt(V))
    }

    fun yuvToRgb(Y: Int, U: Int, V: Int): Triple<Byte, Byte, Byte> {

        var R = (Y + 1.4075 * (V - 128)).toInt()
        var G = (Y - 0.3455 * (U - 128) - 0.7169 * (V - 128)).toInt()
        var B = (Y + 1.779 * (U - 128)).toInt()
        R = verify(R)
        G = verify(G)
        B = verify(B)
        //println("yuv: ${toHexString(Y)} ${toHexString(U)} ${toHexString(V)} -> rgb: ${toHexString(R)} ${toHexString(G)} ${toHexString(B)}")
        return Triple(R.toByte(), G.toByte(), B.toByte())
    }


    fun yv12BytesToYuv444Bytes(width: Int, height: Int, yBytes: ByteArray, uBytes: ByteArray, vBytes: ByteArray): Array<ByteArray> {

        var yIndex = 0
        val yuv444Bytes = Array(height) {
     ByteArray(width * 3) }
        val oneLineUvSize = width / 2 //  stay YV12 in , In a row U or V The number of
        var twoLineIndex = -1  //  Count every two lines
        for (rowIndex in 0 until height) {

            val oneLineBytes = yuv444Bytes[rowIndex]
            var u: Byte = 0
            var v: Byte = 0

            //  Because it reads every two lines UV The starting position is the same , So we'll just put twoLineIndex Just add
            if (rowIndex % 2 == 0) {

                twoLineIndex++
            }

            //  Calculate each row in the fetch UV when uvIndex Starting position
            var uvIndex = twoLineIndex * oneLineUvSize

            for (columnIndex in oneLineBytes.indices step 3) {

                if (yIndex % 2 == 0) {

                    //  In a row , Every two Y Just once UV
                    u = uBytes[uvIndex]
                    v = vBytes[uvIndex]
                    uvIndex++
                }

                val y = yBytes[yIndex++]
                oneLineBytes[columnIndex + 0] = y
                oneLineBytes[columnIndex + 1] = u
                oneLineBytes[columnIndex + 2] = v
            }
        }

        return yuv444Bytes
    }

    private fun yuv444BytesToYv12Bytes(yuv444Bytes: Array<ByteArray>): Triple<ByteArray, ByteArray, ByteArray> {

        val width = yuv444Bytes[0].size / 3  //  Each pixel accounts for 3 Bytes , So divide by 3
        val height = yuv444Bytes.size
        val ySize = width * height
        val vSize = ySize / 4
        val yBytes = ByteArray(ySize)
        val uBytes = ByteArray(vSize)
        val vBytes = ByteArray(vSize)
        var yIndex = 0
        var uIndex = 0
        var vIndex = 0
        var saveU = true
        var saveV = true
        for (rowIndex in 0 until height) {

            val oneLine = yuv444Bytes[rowIndex]
            for (columnIndex in oneLine.indices step 3) {

                val y = oneLine[columnIndex + 0]
                val u = oneLine[columnIndex + 1]
                val v = oneLine[columnIndex + 2]
                yBytes[yIndex++] = y
                if (rowIndex % 2 == 0) {

                    //  Even lines take U, Take one from another
                    if (saveU) {

                        uBytes[uIndex++] = u
                    }
                    saveU = !saveU
                } else {

                    //  The singular row is taken as V, Take one from another
                    if (saveV) {

                        vBytes[vIndex++] = v
                    }
                    saveV = !saveV
                }
            }
        }
        return Triple(yBytes, uBytes, vBytes)
    }

    fun printYUV444(yuv444Bytes: Array<ByteArray>) {

        println(" Next output YUV444 data ")
        for (oneLine in yuv444Bytes) {

            for (columnIndex in oneLine.indices step 3) {

                val y = oneLine[columnIndex + 0]
                val u = oneLine[columnIndex + 1]
                val v = oneLine[columnIndex + 2]
                print("$y $u $v | ")
            }
            println()
        }
    }

    fun printYV12(yBytes: ByteArray, uBytes: ByteArray, vBytes: ByteArray) {

        //  With 16 Print in hexadecimal
        println(" Next output YV12 data ")
        println(" Next output Y data ")
        yBytes.forEach {
     print("${
      toHexString(byteToInt(it))} ") }
        println("\n Next output V data ")
        vBytes.forEach {
     print("${
      toHexString(byteToInt(it))} ") }
        println("\n Next output U data ")
        uBytes.forEach {
     print("${
      toHexString(byteToInt(it))} ") }
        println()
    }

}
import java.io.*

object BmpUtil {


    /**  establish Bitmap An example of : By reading a bmp Pixels of the file , Then write these pixels into a new bmp file  */
    fun createBitmapDemo2() {

        val bmpFilePixelBytes = readBmpFilePixelBytes(File("C:\\Users\\Even\\Pictures\\ Haiqin smoke .bmp"))
        //printPixelBytes(bmpFilePixelBytes)
        createBmpFile(bmpFilePixelBytes, File("C:\\Users\\Even\\Pictures\\demo.bmp"))
    }

    /**  establish Bitmap An example of : Create one with the top half red , The lower half is green bmp file  */
    fun createBitmapDemo() {

        val width = 300 //  Be careful : The width and height should be set to 4 Multiple , So as to avoid the operation of filling positions
        val height = 200
        val pixelBytes = createRgbBytes(width, height)
        //printPixelBytes(pixelBytes)
        val bmpFile = File("C:\\Users\\Even\\Pictures\\demo.bmp")
        createBmpFile(pixelBytes, bmpFile)
    }

    fun readBmpFilePixelBytes(bmpFile: File): Array<ByteArray> {

        //  obtain bmp All bytes of the file
        val bmpFileBytes = bmpFile.readBytes()

        //  from bmp Get the byte array of the width and height of the image in the file
        val widthLittleEndianBytes = ByteArray(4)
        val heightLittleEndianBytes = ByteArray(4)
        System.arraycopy(bmpFileBytes, 0x12, widthLittleEndianBytes, 0, 4)
        System.arraycopy(bmpFileBytes, 0x16, heightLittleEndianBytes, 0, 4)

        //  Convert the byte array at the small end to Int
        val width = littleEndianBytesToInt(widthLittleEndianBytes)
        val height = littleEndianBytesToInt(heightLittleEndianBytes)
        println(" Read bmp Images width = $width, height = $height")
        val pixelBytes = Array(height) {
     ByteArray(width * 3) }
        var rowIndex = height - 1 //  because bmp The picture is saved from the last line , When we read it, we put it in the correct position
        var columnIndex = 0
        var oneLineBytes = pixelBytes[rowIndex]
        val oneLineBytesSize = oneLineBytes.size
        //  Pixel values are all from 0x36 Start saving at , And every pixel 3 Bytes
        for (i in 0x36 until bmpFileBytes.size step 3) {

            if (columnIndex == oneLineBytesSize) {

                //  There is a full line , Need to wrap to save . here --rowIndex Because the original image is saved from the last line to the front line
                oneLineBytes = pixelBytes[--rowIndex]
                columnIndex = 0
            }

            //  Be careful :bmp The color of the file is blue 、 green 、 Saved in red order
            val blue  = bmpFileBytes[i + 0]
            val green = bmpFileBytes[i + 1]
            val red   = bmpFileBytes[i + 2]

            oneLineBytes[columnIndex++] = red
            oneLineBytes[columnIndex++] = green
            oneLineBytes[columnIndex++] = blue
        }

        return pixelBytes
    }

    /**  Convert the byte array at the small end to int */
    private fun littleEndianBytesToInt(littleEndianBytes: ByteArray): Int {

        val bigEndianBytes = littleEndianBytes.reversedArray()
        val bais = ByteArrayInputStream(bigEndianBytes)
        val dis = DataInputStream(bais)
        return dis.readInt()
    }

    /**  Create a pixel matrix , Be careful : The width should be set to 4 Multiple  */
    fun createRgbBytes(width: Int, height: Int) : Array<ByteArray> {

        val redColor   = 0xFF0000
        val greenColor = 0x00FF00
        val redBytes   = getColorBytes(redColor)
        val greenBytes = getColorBytes(greenColor)
        val rgbBytes = Array(height) {
     ByteArray(width * 3) }
        for (rowIndex in 0 until height) {

            val colorBytes = if (rowIndex < height / 2) redBytes else greenBytes
            val oneLineBytes = rgbBytes[rowIndex]
            for (columnIndex in oneLineBytes.indices step 3) {

                val red   = colorBytes[0x00]
                val green = colorBytes[0x01]
                val blue  = colorBytes[0x02]
                oneLineBytes[columnIndex + 0] = red
                oneLineBytes[columnIndex + 1] = green
                oneLineBytes[columnIndex + 2] = blue
            }
        }
        return rgbBytes
    }

    fun getColorBytes(color: Int): ByteArray {

        val red   = (color and 0xFF0000 ushr 16).toByte()
        val green = (color and 0x00FF00 ushr 8).toByte()
        val blue  = (color and 0x0000FF).toByte()
        val colorBytes = byteArrayOf(red, green, blue)
        return colorBytes
    }

    /**  Print color values , Printable rgb Color value , You can also print yuv444 Color value  */
    fun printColorBytes(pixelBytes: Array<ByteArray>) {

        for (rowIndex in pixelBytes.indices) {

            val oneLine = pixelBytes[rowIndex]
            for (columnIndex in oneLine.indices step 3) {

                //  obtain 1 A pixel 3 A color channel :R、G、B  or  Y、U、V
                val colorChannel1 =   oneLine[columnIndex + 0]
                val colorChannel2 =  oneLine[columnIndex + 1]
                val colorChannel3 = oneLine[columnIndex + 2]

                //  hold byte To int, And then to 16 Binary output
                val colorChannelInt1 = toHexString(byteToInt(colorChannel1))
                val colorChannelInt2 = toHexString(byteToInt(colorChannel2))
                val colorChannelInt3 = toHexString(byteToInt(colorChannel3))

                //  With 16 Print in hexadecimal
                print("$colorChannelInt1 $colorChannelInt2 $colorChannelInt3| ")
            }
            println()
        }
    }

    fun byteToInt(byte: Byte): Int = byte.toInt() shl 24 ushr 24
    fun toHexString(int: Int): String = Integer.toHexString(int)

    /**  According to the given pixel two-dimensional data , according to bmp The file specification is saved to the specified bmp In file  */
    fun createBmpFile(pixelBytes: Array<ByteArray>, saveFile: File) {

        //  Because each pixel in a row occupies 3 Bytes of , Divide 3 You get the width of the image
        val pixelWidth = pixelBytes[0].size / 3
        val pixelHeight = pixelBytes.size
        //  Each pixel accounts for 3 individual byte, So multiply by 3
        val pixelBytesCount = pixelWidth * pixelHeight * 3
        //  The total size of the file is : Pixel data size  +  Header file size
        val fileBytesCount = pixelBytesCount + 54
        //  Create a byte Array , Used to hold bmp All of the documents byte data
        val bmpFileBytes = ByteArray(fileBytesCount)
        //  Go to bmpFileBytes Add bmp The file header
        addBmpFileHeader(pixelWidth, pixelHeight, bmpFileBytes)
        //  Go to bmpFileBytes Add pixel data to
        addPixelBytes(pixelBytes, bmpFileBytes)
        //  Write all the bytes to the file
        saveFile.writeBytes(bmpFileBytes)
    }

    fun addBmpFileHeader(width: Int, height: Int, bmpFileBytes: ByteArray) {

        val pixelBytesCount = width * height * 3
        val fileBytesCount = pixelBytesCount + 54

        // 424d
        bmpFileBytes[0x00] = 0x42
        bmpFileBytes[0x01] = 0x4d

        //  file size
        var bytes = getLittleEndianBytes(fileBytesCount)
        bmpFileBytes[0x02] = bytes[0]
        bmpFileBytes[0x03] = bytes[1]
        bmpFileBytes[0x04] = bytes[2]
        bmpFileBytes[0x05] = bytes[3]

        //  Keep the data
        bmpFileBytes[0x06] = 0x00
        bmpFileBytes[0x07] = 0x00
        bmpFileBytes[0x08] = 0x00
        bmpFileBytes[0x09] = 0x00

        //  Pixel storage location
        bmpFileBytes[0x0a] = 0x36
        bmpFileBytes[0x0b] = 0x00
        bmpFileBytes[0x0c] = 0x00
        bmpFileBytes[0x0d] = 0x00

        // bmp Header file size
        bmpFileBytes[0x0e] = 0x28
        bmpFileBytes[0x0f] = 0x00
        bmpFileBytes[0x10] = 0x00
        bmpFileBytes[0x11] = 0x00

        //  The width of the image
        bytes = getLittleEndianBytes(width)
        bmpFileBytes[0x12] = bytes[0]
        bmpFileBytes[0x13] = bytes[1]
        bmpFileBytes[0x14] = bytes[2]
        bmpFileBytes[0x15] = bytes[3]

        //  Height of the image
        bytes = getLittleEndianBytes(height)
        bmpFileBytes[0x16] = bytes[0]
        bmpFileBytes[0x17] = bytes[1]
        bmpFileBytes[0x18] = bytes[2]
        bmpFileBytes[0x19] = bytes[3]

        //  Number of color planes
        bmpFileBytes[0x1a] = 0x01
        bmpFileBytes[0x1b] = 0x00

        //  Pixel digits
        bmpFileBytes[0x1c] = 0x18
        bmpFileBytes[0x1d] = 0x00

        //  Compression way
        bmpFileBytes[0x1e] = 0x00
        bmpFileBytes[0x1f] = 0x00
        bmpFileBytes[0x20] = 0x00
        bmpFileBytes[0x21] = 0x00

        //  Pixel data size
        bytes = getLittleEndianBytes(pixelBytesCount)
        bmpFileBytes[0x22] = bytes[0]
        bmpFileBytes[0x23] = bytes[1]
        bmpFileBytes[0x24] = bytes[2]
        bmpFileBytes[0x25] = bytes[3]

        //  Lateral resolution
        bmpFileBytes[0x26] = 0x00
        bmpFileBytes[0x27] = 0x00
        bmpFileBytes[0x28] = 0x00
        bmpFileBytes[0x29] = 0x00

        //  Vertical resolution
        bmpFileBytes[0x2a] = 0x00
        bmpFileBytes[0x2b] = 0x00
        bmpFileBytes[0x2c] = 0x00
        bmpFileBytes[0x2d] = 0x00

        //  Number of palette colors
        bmpFileBytes[0x2e] = 0x00
        bmpFileBytes[0x2f] = 0x00
        bmpFileBytes[0x30] = 0x00
        bmpFileBytes[0x31] = 0x00

        //  Number of important colors
        bmpFileBytes[0x32] = 0x00
        bmpFileBytes[0x33] = 0x00
        bmpFileBytes[0x34] = 0x00
        bmpFileBytes[0x35] = 0x00
    }

    /**  Add the specified pixel data to bmp File array  */
    fun addPixelBytes(pixelBytes: Array<ByteArray>, bmpFileBytes: ByteArray) {

        val height = pixelBytes.size
        var index = 0x36

        //  Set pixel data , Be careful : To store from the last row of pixels
        for (rowIndex in height - 1 downTo 0) {

            val oneLineBytes = pixelBytes[rowIndex]
            for (columnIndex in oneLineBytes.indices step 3) {

                val red   = oneLineBytes[columnIndex + 0]
                val green = oneLineBytes[columnIndex + 1]
                val blue  = oneLineBytes[columnIndex + 2]

                //  The three primary colors of each pixel are stored in reverse order
                bmpFileBytes[index++] = blue
                bmpFileBytes[index++] = green
                bmpFileBytes[index++] = red
            }
        }
    }

    /**  hold int Convert to byte Array , The default is the array of big end mode , Returns an array converted to the small end method  */
    fun getLittleEndianBytes(number: Int): ByteArray {

        val baos = ByteArrayOutputStream()
        val dos = DataOutputStream(baos)
        dos.writeInt(number)
        val bigEndianBytes = baos.toByteArray()
        val littleEndianBytes = bigEndianBytes.reversedArray()
        return littleEndianBytes
    }

}
fun main() {

    YuvUtil.bmpFileToYV12FileDemo()
    //YuvUtil.bmpFileToYV12FileDemo2()
}
Here we write two Demo:bmpFileToYV12FileDemo()、bmpFileToYV12FileDemo2(), first Demo It is created by code rgbBytes data , Only red and green , And it's 4 x 2 Size , This makes it easy for us to check whether the data is correct , It will be very convenient to troubleshoot problems if you can't get the correct results , The operation results are as follows :
 Next output RGB pixel data :
ff 0 0| ff 0 0| ff 0 0| ff 0 0|
0 ff 0| 0 ff 0| 0 ff 0| 0 ff 0|
 Next output YUV pixel data :
4c 54 ff| 4c 54 ff| 4c 54 ff| 4c 54 ff|
95 2b 15| 95 2b 15| 95 2b 15| 95 2b 15|
 Next output YV12 data
 Next output Y data
4c 4c 4c 4c 95 95 95 95
 Next output V data
15 15
 Next output U data
54 54
Because of the small amount of data , You can see that the data is correct , It can even be used 16 Open the generated demo.yuv View the data , as follows :
Because of the small amount of data , So it's easy to check whether the data is wrong . Now our data is correct , And then we can run bmpFileToYV12FileDemo2() This function , I read this one bmp picture , Width height is 640 x 480, Here is bmp picture , And generated yuv Picture effect comparison :
On the left is Windows 11 The self-contained drawing viewing software opens bmp picture , On the right is to use YUV Player The open yuv picture , You can see bmp Convert to yuv The back color is biased , And it can be seen , I don't know if it's the wrong formula I chose that caused the problem .
YUV Player Download address :https://github.com/latelee/YUVPlayer/tree/master/bin, This has not been updated for a long time , But it's easy to use . For more updates, there is another , But this setting feels complicated , I don't know how to adjust parameters :https://github.com/IENT/YUView, Download address :https://github.com/IENT/YUView/releases
YUV Picture turn bmp picture
import java.io.BufferedOutputStream
import java.io.File
import java.io.FileOutputStream

object YuvUtil {


    fun yv12FileToBmpFile() {

        val yv12File = File("C:\\Users\\Even\\Pictures\\ Haiqin smoke .yuv")
        val bmpFile = File("C:\\Users\\Even\\Pictures\\ Haiqin smoke (yuv turn bmp).bmp")
        val (yBytes, uBytes, vBytes) = readYuvFilePlanarBytes(yv12File, 640, 480)
        val yuv444Bytes = yv12BytesToYuv444Bytes(640, 480, yBytes, uBytes, vBytes)
        val rgbBytes = yuv444BytesToRgbBytes(yuv444Bytes)
        BmpUtil.createBmpFile(rgbBytes, bmpFile)
    }

    fun bmpFileToYV12FileDemo() {

        val grbBytes = BmpUtil.createRgbBytes(4, 2)
        println(" Next output RGB pixel data :")
        BmpUtil.printColorBytes(grbBytes)
        val yuv444Bytes = rgbBytesToYuv444Bytes(grbBytes)
        println(" Next output YUV pixel data :")
        BmpUtil.printColorBytes(yuv444Bytes)
        val (yBytes, uBytes, vBytes) = yuv444BytesToYv12Bytes(yuv444Bytes)
        printYV12(yBytes, uBytes, vBytes)
        val yv12File = File("C:\\Users\\Even\\Pictures\\demo.yuv")
        writeYv12BytesToFile(yv12File, yBytes, vBytes, uBytes)
    }

    fun bmpFileToYV12FileDemo2() {

        val bmpFile = File("C:\\Users\\Even\\Pictures\\ Haiqin smoke .bmp")
        val yv12File = File("C:\\Users\\Even\\Pictures\\ Haiqin smoke .yuv")
        val rgbBytes = BmpUtil.readBmpFilePixelBytes(bmpFile)
        val yuv444Bytes = rgbBytesToYuv444Bytes(rgbBytes)
        val (yBytes, uBytes, vBytes) = yuv444BytesToYv12Bytes(yuv444Bytes)
        writeYv12BytesToFile(yv12File, yBytes, vBytes, uBytes)
    }

    /**  Read YUV The three planes of the file are saved in three arrays , Keep separately Y、U、V Three planes  */
    fun readYuvFilePlanarBytes(yuvFile: File, width: Int, height: Int): Triple<ByteArray, ByteArray, ByteArray> {

        return readYuvFilePlanarBytes(yuvFile.readBytes(), width, height)
    }

    fun readYuvFilePlanarBytes(yuvBytes: ByteArray, width: Int, height: Int): Triple<ByteArray, ByteArray, ByteArray> {

        val ySize = width * height
        val vSize = ySize / 4
        val yBytes = ByteArray(ySize)
        val uBytes = ByteArray(vSize)
        val vBytes = ByteArray(vSize)
        var i = 0
        yuvBytes.forEachIndexed {
     index, byte ->
            val bytes = when {

                index < ySize -> yBytes
                index < ySize + vSize -> vBytes
                else -> uBytes
            }
            if (index == ySize || index == ySize + vSize) {

                i = 0
            }
            bytes[i++] = byte
        }
        return Triple(yBytes, uBytes, vBytes)
    }

    private fun writeYv12BytesToFile(yv12File: File, yBytes: ByteArray, vBytes: ByteArray, uBytes: ByteArray) {

        FileOutputStream(yv12File).use {
     fos ->
            BufferedOutputStream(fos).use {
     bos ->
                bos.write(yBytes)
                bos.write(vBytes)
                bos.write(uBytes)
            }
        }
    }

    fun rgbBytesToYuv444Bytes(rgbBytes: Array<ByteArray>): Array<ByteArray> {

        val yuv444Bytes = Array(rgbBytes.size) {
     ByteArray(rgbBytes[0].size) }
        for (rowIndex in rgbBytes.indices) {

            val oneLineBytes = rgbBytes[rowIndex]
            val oneLineYuv444Bytes = yuv444Bytes[rowIndex]
            for (columnIndex in oneLineBytes.indices step 3) {

                val red   = oneLineBytes[columnIndex + 0]
                val green = oneLineBytes[columnIndex + 1]
                val blue  = oneLineBytes[columnIndex + 2]
                val (Y, U, V) = rgbToYuv(red, green, blue)
                oneLineYuv444Bytes[columnIndex + 0] = Y
                oneLineYuv444Bytes[columnIndex + 1] = U
                oneLineYuv444Bytes[columnIndex + 2] = V
            }
        }
        return yuv444Bytes
    }

    fun byteToInt(byte: Byte): Int = byte.toInt() shl 24 ushr 24
    fun verify(int: Int) = if (int < 0) 0 else if (int > 255) 255 else int
    fun toHexString(int: Int): String = Integer.toHexString(int)

    fun rgbToYuv(R: Byte, G: Byte, B: Byte): Triple<Byte, Byte, Byte> {

        //  notes :R、G、B The range of values is 0 ~ 255, There is no negative number , That needs to be converted to a positive number int.
        //  A negative number is used byte.toInt() After conversion, it is still a negative number , So we use bitwise operators to convert ,Byte Of -1 Convert to Int The value should be 255
        return rgbToYuv(byteToInt(R), byteToInt(G), byteToInt(B))
    }

    fun rgbToYuv(R: Int, G: Int, B: Int): Triple<Byte, Byte, Byte> {

        var Y = (0.299 * R + 0.587 * G + 0.114 * B).toInt()
        var U = (-0.169 * R - 0.331 * G + 0.499 * B + 128).toInt()
        var V = (0.499 * R - 0.418 * G - 0.0813 * B + 128).toInt()
        Y = verify(Y)
        U = verify(U)
        V = verify(V)
        //println("rgb: ${toHexString(R)} ${toHexString(G)} ${toHexString(B)} -> yuv: ${toHexString(Y)} ${toHexString(U)} ${toHexString(V)}")
        return Triple(Y.toByte(), U.toByte(), V.toByte())
    }

    fun yuvToRgb(Y: Byte, U: Byte, V: Byte): Triple<Byte, Byte, Byte> {

        //  notes :Y、U、V The range of values is 0 ~ 255, There is no negative number , That needs to be converted to a positive number int.
        //  A negative number is used byte.toInt() After conversion, it is still a negative number , So we use bitwise operators to convert ,Byte Of -1 Convert to Int The value should be 255
        return yuvToRgb(byteToInt(Y), byteToInt(U), byteToInt(V))
    }

    fun yuvToRgb(Y: Int, U: Int, V: Int): Triple<Byte, Byte, Byte> {

        var R = (Y + 1.4075 * (V - 128)).toInt()
        var G = (Y - 0.3455 * (U - 128) - 0.7169 * (V - 128)).toInt()
        var B = (Y + 1.779 * (U - 128)).toInt()
        R = verify(R)
        G = verify(G)
        B = verify(B)
        //println("yuv: ${toHexString(Y)} ${toHexString(U)} ${toHexString(V)} -> rgb: ${toHexString(R)} ${toHexString(G)} ${toHexString(B)}")
        return Triple(R.toByte(), G.toByte(), B.toByte())
    }


    fun yv12BytesToYuv444Bytes(width: Int, height: Int, yBytes: ByteArray, uBytes: ByteArray, vBytes: ByteArray): Array<ByteArray> {

        var yIndex = 0
        val yuv444Bytes = Array(height) {
     ByteArray(width * 3) }
        val oneLineUvSize = width / 2 //  stay YV12 in , In a row U or V The number of
        var twoLineIndex = -1  //  Count every two lines
        for (rowIndex in 0 until height) {

            val oneLineBytes = yuv444Bytes[rowIndex]
            var u: Byte = 0
            var v: Byte = 0

            //  Because it reads every two lines UV The starting position is the same , So we'll just put twoLineIndex Just add
            if (rowIndex % 2 == 0) {

                twoLineIndex++
            }

            //  Calculate each row in the fetch UV when uvIndex Starting position
            var uvIndex = twoLineIndex * oneLineUvSize

            for (columnIndex in oneLineBytes.indices step 3) {

                if (yIndex % 2 == 0) {

                    //  In a row , Every two Y Just once UV
                    u = uBytes[uvIndex]
                    v = vBytes[uvIndex]
                    uvIndex++
                }

                val y = yBytes[yIndex++]
                oneLineBytes[columnIndex + 0] = y
                oneLineBytes[columnIndex + 1] = u
                oneLineBytes[columnIndex + 2] = v
            }
        }

        return yuv444Bytes
    }

    private fun yuv444BytesToYv12Bytes(yuv444Bytes: Array<ByteArray>): Triple<ByteArray, ByteArray, ByteArray> {

        val width = yuv444Bytes[0].size / 3  //  Each pixel accounts for 3 Bytes , So divide by 3
        val height = yuv444Bytes.size
        val ySize = width * height
        val vSize = ySize / 4
        val yBytes = ByteArray(ySize)
        val uBytes = ByteArray(vSize)
        val vBytes = ByteArray(vSize)
        var yIndex = 0
        var uIndex = 0
        var vIndex = 0
        var saveU = true
        var saveV = true
        for (rowIndex in 0 until height) {

            val oneLine = yuv444Bytes[rowIndex]
            for (columnIndex in oneLine.indices step 3) {

                val y = oneLine[columnIndex + 0]
                val u = oneLine[columnIndex + 1]
                val v = oneLine[columnIndex + 2]
                yBytes[yIndex++] = y
                if (rowIndex % 2 == 0) {

                    //  Even lines take U, Take one from another
                    if (saveU) {

                        uBytes[uIndex++] = u
                    }
                    saveU = !saveU
                } else {

                    //  The singular row is taken as V, Take one from another
                    if (saveV) {

                        vBytes[vIndex++] = v
                    }
                    saveV = !saveV
                }
            }
        }
        return Triple(yBytes, uBytes, vBytes)
    }

    fun yuv444BytesToRgbBytes(yuv444Bytes: Array<ByteArray>): Array<ByteArray> {

        val rgbBytes = Array(yuv444Bytes.size) {
     ByteArray(yuv444Bytes[0].size) }
        for (rowIndex in yuv444Bytes.indices) {

            val oneLineYuv444Bytes = yuv444Bytes[rowIndex]
            val oneLineRgbBytes = rgbBytes[rowIndex]
            for (columnIndex in oneLineYuv444Bytes.indices step 3) {

                val Y   = oneLineYuv444Bytes[columnIndex + 0]
                val U = oneLineYuv444Bytes[columnIndex + 1]
                val V  = oneLineYuv444Bytes[columnIndex + 2]
                val (R, G, B) = yuvToRgb(Y, U, V)
                oneLineRgbBytes[columnIndex + 0] = R
                oneLineRgbBytes[columnIndex + 1] = G
                oneLineRgbBytes[columnIndex + 2] = B
            }
        }
        return rgbBytes
    }

    fun printYUV444(yuv444Bytes: Array<ByteArray>) {

        println(" Next output YUV444 data ")
        for (oneLine in yuv444Bytes) {

            for (columnIndex in oneLine.indices step 3) {

                val y = oneLine[columnIndex + 0]
                val u = oneLine[columnIndex + 1]
                val v = oneLine[columnIndex + 2]
                print("$y $u $v | ")
            }
            println()
        }
    }

    fun printYV12(yBytes: ByteArray, uBytes: ByteArray, vBytes: ByteArray) {

        //  With 16 Print in hexadecimal
        println(" Next output YV12 data ")
        println(" Next output Y data ")
        yBytes.forEach {
     print("${
      toHexString(byteToInt(it))} ") }
        println("\n Next output V data ")
        vBytes.forEach {
     print("${
      toHexString(byteToInt(it))} ") }
        println("\n Next output U data ")
        uBytes.forEach {
     print("${
      toHexString(byteToInt(it))} ") }
        println()
    }

}
import java.io.*

object BmpUtil {


    /**  establish Bitmap An example of : By reading a bmp Pixels of the file , Then write these pixels into a new bmp file  */
    fun createBitmapDemo2() {

        val bmpFilePixelBytes = readBmpFilePixelBytes(File("C:\\Users\\Even\\Pictures\\ Haiqin smoke .bmp"))
        //printPixelBytes(bmpFilePixelBytes)
        createBmpFile(bmpFilePixelBytes, File("C:\\Users\\Even\\Pictures\\demo.bmp"))
    }

    /**  establish Bitmap An example of : Create one with the top half red , The lower half is green bmp file  */
    fun createBitmapDemo() {

        val width = 300 //  Be careful : The width and height should be set to 4 Multiple , So as to avoid the operation of filling positions
        val height = 200
        val pixelBytes = createRgbBytes(width, height)
        //printPixelBytes(pixelBytes)
        val bmpFile = File("C:\\Users\\Even\\Pictures\\demo.bmp")
        createBmpFile(pixelBytes, bmpFile)
    }

    fun readBmpFilePixelBytes(bmpFile: File): Array<ByteArray> {

        //  obtain bmp All bytes of the file
        val bmpFileBytes = bmpFile.readBytes()

        //  from bmp Get the byte array of the width and height of the image in the file
        val widthLittleEndianBytes = ByteArray(4)
        val heightLittleEndianBytes = ByteArray(4)
        System.arraycopy(bmpFileBytes, 0x12, widthLittleEndianBytes, 0, 4)
        System.arraycopy(bmpFileBytes, 0x16, heightLittleEndianBytes, 0, 4)

        //  Convert the large byte array to Int
        val width = littleEndianBytesToInt(widthLittleEndianBytes)
        val height = littleEndianBytesToInt(heightLittleEndianBytes)
        println(" Read bmp Images width = $width, height = $height")
        val pixelBytes = Array(height) {
     ByteArray(width * 3) }
        var rowIndex = height - 1 //  because bmp The picture is saved from the last line , When we read it, we put it in the correct position
        var columnIndex = 0
        var oneLineBytes = pixelBytes[rowIndex]
        val oneLineBytesSize = oneLineBytes.size
        //  Pixel values are all from 0x36 Start saving at , And every pixel 3 Bytes
        for (i in 0x36 until bmpFileBytes.size step 3) {

            if (columnIndex == oneLineBytesSize) {

                //  There is a full line , Need to wrap to save . here --rowIndex Because the original image is saved from the last line to the front line
                oneLineBytes = pixelBytes[--rowIndex]
                columnIndex = 0
            }

            //  Be careful :bmp The color of the file is blue 、 green 、 Saved in red order
            val blue  = bmpFileBytes[i + 0]
            val green = bmpFileBytes[i + 1]
            val red   = bmpFileBytes[i + 2]

            oneLineBytes[columnIndex++] = red
            oneLineBytes[columnIndex++] = green
            oneLineBytes[columnIndex++] = blue
        }

        return pixelBytes
    }

    /**  Convert the byte array at the small end to int */
    private fun littleEndianBytesToInt(littleEndianBytes: ByteArray): Int {

        val bigEndianBytes = littleEndianBytes.reversedArray()
        val bais = ByteArrayInputStream(bigEndianBytes)
        val dis = DataInputStream(bais)
        return dis.readInt()
    }

    /**  Create a pixel matrix , Be careful : The width should be set to 4 Multiple  */
    fun createRgbBytes(width: Int, height: Int) : Array<ByteArray> {

        val redColor   = 0xFF0000
        val greenColor = 0x00FF00
        val redBytes   = getColorBytes(redColor)
        val greenBytes = getColorBytes(greenColor)
        val rgbBytes = Array(height) {
     ByteArray(width * 3) }
        for (rowIndex in 0 until height) {

            val colorBytes = if (rowIndex < height / 2) redBytes else greenBytes
            val oneLineBytes = rgbBytes[rowIndex]
            for (columnIndex in oneLineBytes.indices step 3) {

                val red   = colorBytes[0x00]
                val green = colorBytes[0x01]
                val blue  = colorBytes[0x02]
                oneLineBytes[columnIndex + 0] = red
                oneLineBytes[columnIndex + 1] = green
                oneLineBytes[columnIndex + 2] = blue
            }
        }
        return rgbBytes
    }

    fun getColorBytes(color: Int): ByteArray {

        val red   = (color and 0xFF0000 ushr 16).toByte()
        val green = (color and 0x00FF00 ushr 8).toByte()
        val blue  = (color and 0x0000FF).toByte()
        val colorBytes = byteArrayOf(red, green, blue)
        return colorBytes
    }

    /**  Print color values , Printable rgb Color value , You can also print yuv444 Color value  */
    fun printColorBytes(pixelBytes: Array<ByteArray>) {

        for (rowIndex in pixelBytes.indices) {

            val oneLine = pixelBytes[rowIndex]
            for (columnIndex in oneLine.indices step 3) {

                //  obtain 1 A pixel 3 A color channel :R、G、B  or  Y、U、V
                val colorChannel1 =   oneLine[columnIndex + 0]
                val colorChannel2 =  oneLine[columnIndex + 1]
                val colorChannel3 = oneLine[columnIndex + 2]

                //  hold byte To int, And then to 16 Binary output
                val colorChannelInt1 = toHexString(byteToInt(colorChannel1))
                val colorChannelInt2 = toHexString(byteToInt(colorChannel2))
                val colorChannelInt3 = toHexString(byteToInt(colorChannel3))

                //  With 16 Print in hexadecimal
                print("$colorChannelInt1 $colorChannelInt2 $colorChannelInt3| ")
            }
            println()
        }
    }

    fun byteToInt(byte: Byte): Int = byte.toInt() shl 24 ushr 24
    fun toHexString(int: Int): String = Integer.toHexString(int)

    /**  According to the given pixel two-dimensional data , according to bmp The file specification is saved to the specified bmp In file  */
    fun createBmpFile(rgbBytes: Array<ByteArray>, saveFile: File) {

        //  Because each pixel in a row occupies 3 Bytes of , Divide 3 You get the width of the image
        val pixelWidth = rgbBytes[0].size / 3
        val pixelHeight = rgbBytes.size
        //  Each pixel accounts for 3 individual byte, So multiply by 3
        val pixelBytesCount = pixelWidth * pixelHeight * 3
        //  The total size of the file is : Pixel data size  +  Header file size
        val fileBytesCount = pixelBytesCount + 54
        //  Create a byte Array , Used to hold bmp All of the documents byte data
        val bmpFileBytes = ByteArray(fileBytesCount)
        //  Go to bmpFileBytes Add bmp The file header
        addBmpFileHeader(pixelWidth, pixelHeight, bmpFileBytes)
        //  Go to bmpFileBytes Add pixel data to
        addPixelBytes(rgbBytes, bmpFileBytes)
        //  Write all the bytes to the file
        saveFile.writeBytes(bmpFileBytes)
    }

    fun addBmpFileHeader(width: Int, height: Int, bmpFileBytes: ByteArray) {

        val pixelBytesCount = width * height * 3
        val fileBytesCount = pixelBytesCount + 54

        // 424d
        bmpFileBytes[0x00] = 0x42
        bmpFileBytes[0x01] = 0x4d

        //  file size
        var bytes = getLittleEndianBytes(fileBytesCount)
        bmpFileBytes[0x02] = bytes[0]
        bmpFileBytes[0x03] = bytes[1]
        bmpFileBytes[0x04] = bytes[2]
        bmpFileBytes[0x05] = bytes[3]

        //  Keep the data
        bmpFileBytes[0x06] = 0x00
        bmpFileBytes[0x07] = 0x00
        bmpFileBytes[0x08] = 0x00
        bmpFileBytes[0x09] = 0x00

        //  Pixel storage location
        bmpFileBytes[0x0a] = 0x36
        bmpFileBytes[0x0b] = 0x00
        bmpFileBytes[0x0c] = 0x00
        bmpFileBytes[0x0d] = 0x00

        // bmp Header file size
        bmpFileBytes[0x0e] = 0x28
        bmpFileBytes[0x0f] = 0x00
        bmpFileBytes[0x10] = 0x00
        bmpFileBytes[0x11] = 0x00

        //  The width of the image
        bytes = getLittleEndianBytes(width)
        bmpFileBytes[0x12] = bytes[0]
        bmpFileBytes[0x13] = bytes[1]
        bmpFileBytes[0x14] = bytes[2]
        bmpFileBytes[0x15] = bytes[3]

        //  Height of the image
        bytes = getLittleEndianBytes(height)
        bmpFileBytes[0x16] = bytes[0]
        bmpFileBytes[0x17] = bytes[1]
        bmpFileBytes[0x18] = bytes[2]
        bmpFileBytes[0x19] = bytes[3]

        //  Number of color planes
        bmpFileBytes[0x1a] = 0x01
        bmpFileBytes[0x1b] = 0x00

        //  Pixel digits
        bmpFileBytes[0x1c] = 0x18
        bmpFileBytes[0x1d] = 0x00

        //  Compression way
        bmpFileBytes[0x1e] = 0x00
        bmpFileBytes[0x1f] = 0x00
        bmpFileBytes[0x20] = 0x00
        bmpFileBytes[0x21] = 0x00

        //  Pixel data size
        bytes = getLittleEndianBytes(pixelBytesCount)
        bmpFileBytes[0x22] = bytes[0]
        bmpFileBytes[0x23] = bytes[1]
        bmpFileBytes[0x24] = bytes[2]
        bmpFileBytes[0x25] = bytes[3]

        //  Lateral resolution
        bmpFileBytes[0x26] = 0x00
        bmpFileBytes[0x27] = 0x00
        bmpFileBytes[0x28] = 0x00
        bmpFileBytes[0x29] = 0x00

        //  Vertical resolution
        bmpFileBytes[0x2a] = 0x00
        bmpFileBytes[0x2b] = 0x00
        bmpFileBytes[0x2c] = 0x00
        bmpFileBytes[0x2d] = 0x00

        //  Number of palette colors
        bmpFileBytes[0x2e] = 0x00
        bmpFileBytes[0x2f] = 0x00
        bmpFileBytes[0x30] = 0x00
        bmpFileBytes[0x31] = 0x00

        //  Number of important colors
        bmpFileBytes[0x32] = 0x00
        bmpFileBytes[0x33] = 0x00
        bmpFileBytes[0x34] = 0x00
        bmpFileBytes[0x35] = 0x00
    }

    /**  Add the specified pixel data to bmp File array  */
    fun addPixelBytes(pixelBytes: Array<ByteArray>, bmpFileBytes: ByteArray) {

        val height = pixelBytes.size
        var index = 0x36

        //  Set pixel data , Be careful : To store from the last row of pixels
        for (rowIndex in height - 1 downTo 0) {

            val oneLineBytes = pixelBytes[rowIndex]
            for (columnIndex in oneLineBytes.indices step 3) {

                val red   = oneLineBytes[columnIndex + 0]
                val green = oneLineBytes[columnIndex + 1]
                val blue  = oneLineBytes[columnIndex + 2]

                //  The three primary colors of each pixel are stored in reverse order
                bmpFileBytes[index++] = blue
                bmpFileBytes[index++] = green
                bmpFileBytes[index++] = red
            }
        }
    }

    /**  hold int Convert to byte Array , The default is the array of small end mode , Returns an array converted to the big end method  */
    fun getLittleEndianBytes(number: Int): ByteArray {

        val baos = ByteArrayOutputStream()
        val dos = DataOutputStream(baos)
        dos.writeInt(number)
        val bigEndianBytes = baos.toByteArray()
        val littleEndianBytes = bigEndianBytes.reversedArray()
        return littleEndianBytes
    }

}
fun main() {

// YuvUtil.bmpFileToYV12FileDemo()
// YuvUtil.bmpFileToYV12FileDemo2()
    YuvUtil.yv12FileToBmpFile()
}
The operation effect is as follows :
The leftmost part is the screenshot saved after the screenshot of the software bmp The original document , In the middle bmp The conversion yuv picture , On the right is yuv Converted back bmp picture , I don't know the difference , The difference is small , If there is no comparison with the original picture, there is generally no difference !
YUV444、YUV422、YUV420、YUV420P、YUV420SP、YV12、YU12、NV12、NV21
As the title ,YUV There are so many formats , It is really difficult to understand , in front , We mainly explained YV12 Format , Whatever you want to know YUV Format , After understanding the most complicated YV12 After the format , It's easy to understand other formats , That's why I put these differences between multiple formats to the end .
Why use YUV without RGB
R(red)、G(green)、B(blue) It is called three primary colors , The three primary colors can be combined into any color , We modify RGB Value , The color will change , And the brightness of the color will also change , so to speak RGB The brightness information and color information are mixed together .
Y、U、V Simple understanding ,Y Indicates brightness ,U and V Color . And RGB comparison ,YUV Separate brightness and color information , This coding method is very suitable for human eyes , According to the research , The human eye is more sensitive to brightness information than to color information , for instance , You make a red color less red , It may seem that you can't find that the red color has been reduced , And you darken the red , It is easier to find , According to this feature , When we collect image information , You can collect all the brightness , But you can throw away some when you collect color information , Because after losing some, people's eyes can't find , such , We go through YUV Get a good quality image , And the required storage space is larger than RGB The way should be small .
YUV Separate brightness and color information , It is also more convenient for us to deal with brightness and color respectively , For example, make the image brighter , hold Y You can increase the value of , And for RGB, To brighten a color, you need to change it 3 It's worth , For example, you put 3 Both values are increased , Maybe the color has also changed , It's not just a change in brightness , It is difficult to adjust .
Another advantage is that it can be compatible with black-and-white TV sets and color TV sets , For black and white TV sets , Just parse Y Information is enough , For color TV set, I will explain YUV Information .
YUV Classify according to the sampling method
YUV There are three main sampling methods :
- YUV444, Every time 4 individual Y, There are corresponding 4 individual U and 4 individual V, So called YUV444
- YUV422, Every time 4 individual Y, There are corresponding 2 individual U and 2 individual V, So called YUV422
- YUV420, Every time 4 individual Y, There are corresponding 2 individual U and 0 individual V, Or every time 4 individual Y There are corresponding 2 individual V and 0 individual U, So called YUV420
1、YUV444 Sampling method of

Pictured above , For each pixel , It collects Y、U、V value , So every 4 Every pixel will have 4 individual Y、4 individual U、4 individual V, This is a YUV444 The origin of the name .
2、YUV422 Sampling method of

Pictured above , For each pixel ,Y It's all collected , and U or V Collect only one of them , As shown in the above figure, the rule is , First pixel acquisition U, Second pixel acquisition V, Third pixel acquisition U, The fourth pixel acquisition V... So repeat the cycle , Then every 4 Pixels must have 4 individual Y、2 individual U、2 individual V, This is it. YUV422 The origin of the name .
When restoring , Every two Y Share a pair UV, After the restoration, it must not be the same as before , But as we said before , The perception of color information by human eyes is relatively low , As long as the brightness doesn't change , We changed it U or Y Value , Generally, I can't feel any change , And most of the two adjacent pixels have the same color , That is, most of the two adjacent pixels U and V Not much difference in value , That's why the number one 1 Pixels are represented by the 2 A pixel V, The first 2 Pixels are represented by the 1 A pixel U, And we can't feel the reason why the image color is wrong !
3、YUV420 Sampling method of

Pictured above , For each pixel ,Y It's all collected . about U and V They are all taken from one line to another , as follows :
The first 1 That's ok : collection 1 individual U, Collect another one every other U... By analogy
The first 2 That's ok : collection 1 individual V, Collect another one every other V... By analogy
If there are more lines , This is also the law collection , as follows :
The first 3 That's ok : collection 1 individual U, Collect another one every other U... By analogy
The first 4 That's ok : collection 1 individual V, Collect another one every other V... By analogy
first line , Every time 4 individual Y There will be 2 individual U and 0 individual V.
The second line , Every time 4 individual Y There will be 2 individual V and 0 individual U.
This may be YUV420 The origin of , I can't find the official website description , Anyway, this is a reasonable explanation !
When restoring , The two lines come together , Two of the first line Y And the two in the second line Y share 1 individual U and 1 individual V, in other words 4 individual Y Corresponding 1 individual U and 1 individual V, comparison YUV422 The accuracy of the restore is even lower , But people still can't see the difference , This is it. YUV The power of this place , So it can be seen that ,YUV420 Should be the most commonly used , Because it saves the most space , And the image quality is also very good !
YUV Classify according to storage mode
YUV The format is first classified according to the collection method , Then it can be classified for the second time according to the storage mode , such as YUV420 Format , This is classified by acquisition format ,YUV420 Storage can be divided into multiple formats in different ways , such as :YV12、YU12、NV21、NV12, this 4 Both formats are based on YUV420 The method of sampling , It's just that the storage order is a little different when storing .
YV12、YU12

Pictured above , hold Y、U、V They are stored separately Planar( Plane ) Format , combination YUV420 Call YUV420P. Save before storing V Save again U Call YV12, Pre deposit U Save again V Call YU12( Also called I420).YV12 Format and YU12 The format belongs to YUV420P Sub format under format .
NV21、NV12

Pictured above ,Y and UV Are stored separately , Belong to Planar( Plane ) Format , however U and V It's every two packs (Packed) Together , So called Semi-Planar( Half plane ) Format , and YUV420 Put it all together YUV420SP. stay U and V In the order of , Pre deposit V Post storage U Yes. NV21 Format , Pre deposit U Post storage V Yes. NV12 Format ,NV21 and NV12 All are YUV420SP The subformat of .
about Planar、Semi-Planar The format of , There's another one called Packed( pack ) Format , For example YUV444 In the format , Store each pixel's Y、U、V All packaged together for storage , This is called Packed Format , Examples are as follows :
because YUV420 Is the most commonly used , So I put YUV420 The three formats are classified and counted :
Conversion between formats
After understanding the principles of various formats , In fact, there is no need to search the conversion formula on the Internet , Write your own code , Of course , If you want to pursue efficiency , Looking for open source libraries , such as libyuv library .
Here is a brief introduction to the conversion of common formats , as follows :
YU12 turn YV12:
YU12 turn NV12:
NV21 turn NV12:
边栏推荐
- cookie、session、token
- 【opencv450 samples】创建图像列表yaml
- jdbc常见异常及错误解决办法汇总
- Use of xinchida ble 5.0 Low Power Bluetooth module (at command serial port transparent transmission) rsbrs02abr
- My vscode
- Share a downloaded osgeo4w64 Library Based on qgis3.10
- 我的vscode
- OpenJudge NOI 2.1 15:Counterfeit Dollar
- Idea common plug-ins
- C1. k-LCM (easy version)-Codeforces Round #708 (Div. 2)
猜你喜欢

Style setting when there is a separator in the qcombobox drop-down menu
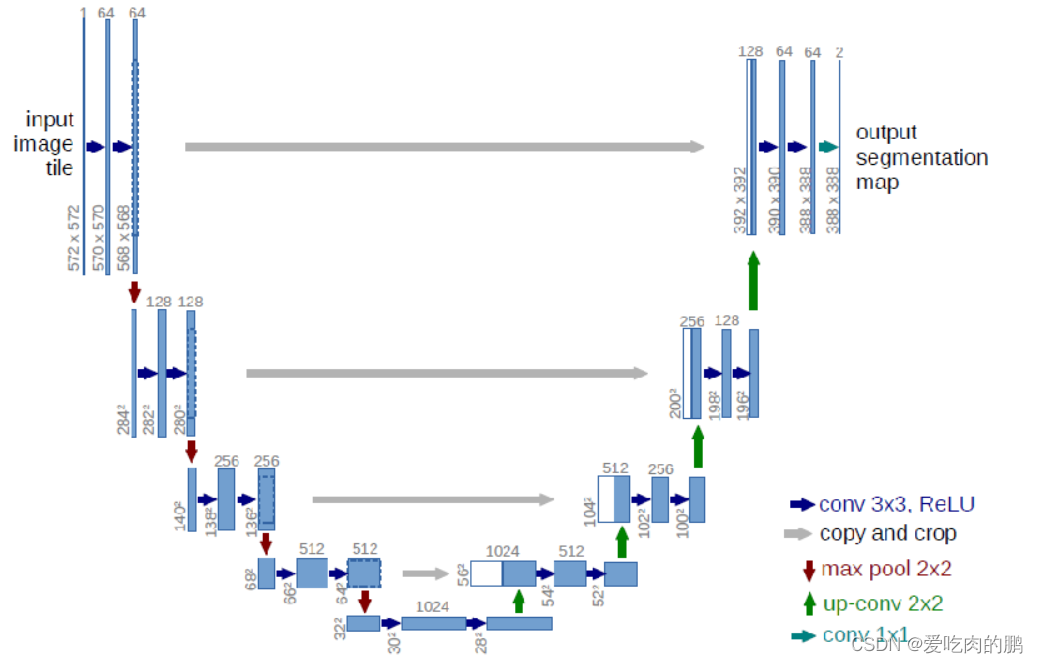
经典图像分割网络:Unet 支持libtorch部署推理【附代码】

提取系统apk

Use of xinchida ble 5.0 Low Power Bluetooth module (at command serial port transparent transmission) rsbrs02abr

Kotlin空指针Bug

hiberate架构介绍及环境搭建(非常详细)

我的vscode

The first public available pytorch version alphafold2 is reproduced, and Columbia University is open source openfold, with more than 1000 stars

qtcreator 格式化代码

BI-SQL丨存储过程(一)
随机推荐
QT custom implemented calendar control
How to download the software package of CDH version
hiberate架构介绍及环境搭建(非常详细)
BI-SQL丨存储过程(一)
Go语言逃逸分析全纪录
Ad20 learning notes I
解决TypeError: Unicode-objects must be encoded before hashing
Analysis on the control condition and mode of go cooperation overtime exit
[opencv450 samples] read the image path list and maintain the proportional display
A. Balance the Bits--Codeforces Round #712 (Div. 1)
[opencv450 samples] create image list yaml
[Axi] interpretation of Axi protocol disorder mechanism
18亿像素火星全景超高清NASA放出,非常震撼
hiberate核心API/配置文件/一级缓存详解
What is Unified Extensible Firmware Interface (UEFI)?
【AXI】解读AXI协议乱序机制
Mutual conversion between QT utf8 and Unicode encoding, and the Unicode encoding output format is &xxxxx
Idea shortcut
Solve 'tuple' object has no attribute 'lower‘
23class introduction