当前位置:网站首页>Section 9: dual core startup of zynq
Section 9: dual core startup of zynq
2022-06-28 07:36:00 【youbin2013】
ZYNQ Dual core boot
1 Principle of dual core operation
ZYNQ It is a kind of master-slave relationship AMP framework , Share resources through loose coupling , Allow two processors to run their own operating systems or bare metal applications at the same time , When they run their own programs or systems , The interaction between dual cores can be realized through shared memory . Dual core boot in progress ,cpu0 Complete system initialization , control cpu1 Start of , And cpu1 signal communication , Read write shared memory ; And cpu1 communicate , Read write shared memory .
Share resources to prevent conflicts :
1,DDR Memory usage ,CPU0 The memory address used is 0x00100000-0x001fffff,CPU1 You should avoid this address , Use address set to 0x00200000-0x003fffff;
2,CPU1 Don't use L2 Memory , only CPU0 Use ;
3,CPU1 From the core at PL Interrupts of are routed to PPI controller , By using PPI Route interrupts to the core , and CPU0 adopt ICD Route to the core ;
4, When CPU0 When accessing shared memory ,CPU1 Do not visit , Empathy ,CPU1 When accessing shared memory ,CPU0 Do not visit ;
The process of dual core operation :
ZYNQ Is an extensible platform , There is FPGA As a peripheral A9 Dual core processor , Its startup process is similar to FPGA Completely different , And with the traditional ARM The processor is similar to ,ZYNQ The startup configuration of requires multiple processing steps , General situation , It needs to include the following 3 Stages :
- Stage 0: After the chip is powered on , The processor starts automatically stage0-boot, It's in the film BOORROM The code in , After power on reset or hot reset , The processor executes immutable code ;
- Stage 1:BOORROM initialization CPU And some peripherals , Read the program code required for the next stage FSBL(first stage boot loader), It is the code that can be modified and controlled by the user ;
- Stage 2: This is based on BSP( Board level support package ), It can also be the boot loader of the operating system , This phase is completely under the control of the user ;
After the system is powered on and started , The first 0 The phase startup code determines the startup mode , The first stage will start the code FSBL Download to DDR And execute .FSBL Will configure the hardware bitstream file , load CPU0 Executables and CPU1 Executable to DDR Corresponding link address , At this stage , All code in CPU0 In the implementation of , In execution CPU0 When it comes to programming , hold CPU1 Write the execution address of the application to be executed to OCM Of 0xFFFFFFF0 Address , And then execute SEV Assembly instruction , Activate CPU1,CPU1 After activation , It will come to OCM Of 0xFFFFFFF0 Address reads its value , Its value is CPU1 The address where the executable program is executed ,CPU1 Will execute... From this address .
2 Configuration of dual core operation
2.1 Establish the difference between Engineering :
nucleus 0 The build project is the same as before , But nuclear 1 The building project is different from before , A board level support package needs to be created separately bsp. establish CPU1 Board level support package steps for :
- stay SDK Under the main menu of the main interface , choice File->New->Board Support Package;
- appear “New Board Support Package Project” Dialog box , Pictured 1 Shown ;
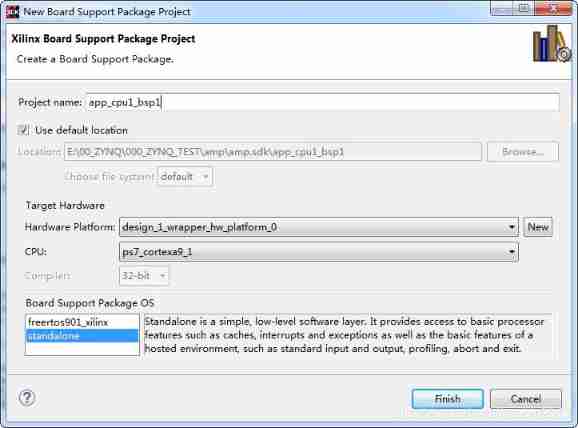
chart 1 newly build cpu1 Board level support package
- Click on finish After setting up the support package , appear “Board Support Package Settings” Dialog box , In the window on the left of the interface , an Overview, In the expanded item , Find and expand drivers, find ps_cortexa9_1, And choose it ;
- On the right side of the Configuration for OS In the interface , Found the name extra_compiler_flags a line , Match it with Value Change the value of a column to -g –DUSE_AMP_ = 1, Pictured 2 Shown ;

chart 2 Board level development kit attribute settings
After the board level development package is established , establish cpu1 Of sdk engineering , Configuration of the project and 0 There are different , The parameter configuration in the New Project dialog box should be consistent with the core 0 Different , The core choice is the core 1, Select the newly created board level support package cpu1 Board level support package for (proccessor:ps7_cortexa9_1;Borad Support Package:app_cpu1_bsp), After establishing the dual core application engineering and board level development kit , Design the software .
2.2 software design :
1,cpu0 Software for , stay fsbl start-up cpu0 After procedure , Its program needs to add startup cpu1 Process code of ;
2,cpu0 and cpu1 Your software needs a piece of shared memory , This memory cannot be cache turn ;
3, Time sharing access through shared memory , Design two cpu The flow of the program ;
Add startup cpu1 The code for is as follows :
#define sev() __asm__("sev")
#define CPU1STARTADDR 0xFFFFFFF0
#define CPU1STARTMEM 0x10000000
voidStartCpu1(void)
{
Xil_Out32(CPU1STARTADDR,CPU1STARTMEM);
dmb();
sev();
}
Code to disable shared memory :
#define COMM_VAL (*(volatileunsignedlong *)(0xffff0000))
Xil_SetTlbAttributes(0xffff0000,0x14de2);
3 Dual core source code and testing
3.1 An example of using shared memory for communication :
Cpu0 Code :
#include"stdio.h"
#include"xil_io.h"
#include"xil_mmu.h"
#include"xil_exception.h"
#include"xpseudo_asm.h"
#include"sleep.h"
#define COMM_VAL (*(volatileunsignedlong *)(0xffff0000))
#define sev() __asm__("sev")
#define CPU1STARTADDR 0xFFFFFFF0
#define CPU1STARTMEM 0x10000000
voidStartCpu1(void)
{
Xil_Out32(CPU1STARTADDR,CPU1STARTMEM);
dmb();
sev();
}
intmain(void)
{
Xil_SetTlbAttributes(0xffff0000,0x14de2);
StartCpu1();
COMM_VAL = 0;
while(1)
{
print("CPU0:hello world CPU0\r\n");
sleep(2);
COMM_VAL = 1;
while(COMM_VAL == 1);
}
return 0;
}
Cpu1 Code :
#include"stdio.h"
#include"xil_io.h"
#include"xil_mmu.h"
#include"xil_exception.h"
#include"xpseudo_asm.h"
#include"xparameters.h"
#include"sleep.h"
#define COMM_VAL (*(volatileunsignedlong *)(0xffff0000))
intmain(void)
{
Xil_SetTlbAttributes(0xffff0000,0x14de2);
while(1)
{
while(COMM_VAL == 0);
print("CPU1:hello world CPU1\r\n");
sleep(2);
COMM_VAL = 0;
}
return 0;
}
test result :
Generate the above program boot.bin file , And then download it to flash, After startup, you can receive... Through the serial port assistant cpu0 And cpu1 Print information for , Print every two seconds , Pictured 3 Shown .

chart 3 Program testing
3.2 Examples of using software interrupts for communication :
In this example ,cpu0 and cpu1 Both software interrupts are registered , take 1 No. software interrupt is registered to cpu1, Express cpu0 Send interrupt to cpu1, take 2 No. software interrupt is registered to cpu0, Express cpu1 Send interrupt to cpu0; Then when the program is running ,cpu0 Trigger 1 Software interrupt No , here cpu1 The running main program was interrupted by this interrupt , Enter the interrupt service function , It triggers after processing the interrupt 2 Software interrupt No , At this point, the interrupt will interrupt cpu0, Enter the interrupt service function ,cpu0 After processing the interrupt, return to the main function , Trigger again 1 Software interrupt No , shuttle run .
Cpu0 Code :
/*
* app_cpu0.c
*
* Created on: 2019 year 3 month 27 Japan
* Author: dz
*/
#include"xil_cache.h"
#include"xparameters.h"
#include"xil_mmu.h"
#include"xil_misc_psreset_api.h"
#include"xil_exception.h"
#include"xscugic.h"
#include"xuartps.h"
#include"stdio.h"
#include"sleep.h"
volatileu8 software_intr_received = 0;
#define CORE0_TO_CORE1_INTR_ID 0x01
#define CORE1_TO_CORE0_INTR_ID 0x02
voidsys_intr_init(void);
voidSetup_Intr_Exception(XScuGic * IntcInstancePtr);
voidScu_Intr_Init(XScuGic* IntancePtr,int Scu_Int_ID);
voidInit_Software_Intr(XScuGic *GicInstancePtr, Xil_InterruptHandler IntrHanedler, u16 SoftwareIntrId, u8 CpuId);
voidGen_Software_Intr(XScuGic *GicInstancePtr, u16 SoftwareIntrId, u32 CpuId);
voidCpu0_Intr_Hanedler(void *Callback);
voidCpu1_Intr_Hanedler(void *Callback);
XScuGic ScuGic;
voiddelay(unsignedint count)
{
int i = 0;
for(i = 0;i < count;i++)
;
}
intmain(void)
{
sys_intr_init();
xil_printf("cpu0 start!\r\n");
while(1)
{
if(XPAR_CPU_ID == 0)
Gen_Software_Intr(&ScuGic, CORE0_TO_CORE1_INTR_ID, XSCUGIC_SPI_CPU1_MASK);
// Gen_Software_Intr(&ScuGic, CORE0_TO_CORE1_INTR_ID, XSCUGIC_SPI_CPU0_MASK);
else
Gen_Software_Intr(&ScuGic, CORE1_TO_CORE0_INTR_ID, XSCUGIC_SPI_CPU0_MASK);
delay(200000000);
if(1 == software_intr_received)
{
xil_printf("cpu0_main\r\n");
software_intr_received = 0;
}
}
return 0;
}
voidsys_intr_init(void)
{
Scu_Intr_Init(&ScuGic,XPAR_SCUGIC_SINGLE_DEVICE_ID);
// if(XPAR_CPU_ID == 0)
Init_Software_Intr(&ScuGic, Cpu0_Intr_Hanedler, CORE0_TO_CORE1_INTR_ID, 0);
// else
Init_Software_Intr(&ScuGic, Cpu1_Intr_Hanedler, CORE1_TO_CORE0_INTR_ID, 1);
Setup_Intr_Exception(&ScuGic);
}
voidSetup_Intr_Exception(XScuGic * IntcInstancePtr)
{
//connect hardware interrupt
Xil_ExceptionInit();
Xil_ExceptionRegisterHandler(XIL_EXCEPTION_ID_INT,(Xil_ExceptionHandler)XScuGic_InterruptHandler,(void *)IntcInstancePtr);
//enable hardware interrupt
Xil_ExceptionEnable();
}
voidScu_Intr_Init(XScuGic* IntancePtr,int Scu_Int_ID)
{
XScuGic_Config *ScuConfigPtr;
//find device
ScuConfigPtr = XScuGic_LookupConfig(Scu_Int_ID);
//configscuint
XScuGic_CfgInitialize(IntancePtr, ScuConfigPtr,ScuConfigPtr->CpuBaseAddress);
}
voidCpu0_Intr_Hanedler(void *Callback)
{
xil_printf("receive interrupt from core1!\r\n");
software_intr_received = 1;
}
voidCpu1_Intr_Hanedler(void *Callback)
{
xil_printf("receive interrupt from core0!\r\n");
software_intr_received = 1;
}
voidInit_Software_Intr(XScuGic *GicInstancePtr, Xil_InterruptHandler IntrHanedler, u16 SoftwareIntrId, u8 CpuId)
{
int Status;
// XScuGic_SetPriorityTriggerType(GicInstancePtr, SoftwareIntrId, 0xB0, 0x2);
XScuGic_SetPriorityTriggerType(GicInstancePtr, SoftwareIntrId, 0xd0, 0x3);
Status = XScuGic_Connect(GicInstancePtr, SoftwareIntrId,
(Xil_InterruptHandler)IntrHanedler, NULL);
if (Status != XST_SUCCESS) {
xil_printf("core%d: interrupt %d set fail!\r\n", XPAR_CPU_ID, SoftwareIntrId);
return;
}
XScuGic_InterruptMaptoCpu(GicInstancePtr, CpuId, SoftwareIntrId); //map the the Software interrupt to target CPU
XScuGic_Enable(GicInstancePtr, SoftwareIntrId);//enable the interrupt for the Software interrupt at GIC
}
voidGen_Software_Intr(XScuGic *GicInstancePtr, u16 SoftwareIntrId, u32 CpuId)
{
int Status;
Status = XScuGic_SoftwareIntr(GicInstancePtr, SoftwareIntrId, CpuId);
if (Status != XST_SUCCESS) {
xil_printf("core%d: interrupt %d gen fail!\r\n", XPAR_CPU_ID, SoftwareIntrId);
return;
}
}
Cpu1 Code :
/*
* app_cpu0.c
*
* Created on: 2019 year 3 month 27 Japan
* Author: dz
*/
#include"xil_cache.h"
#include"xparameters.h"
#include"xil_mmu.h"
#include"xil_misc_psreset_api.h"
#include"xil_exception.h"
#include"xscugic.h"
#include"xuartps.h"
#include"stdio.h"
#include"sleep.h"
volatileu8 software_intr_received = 0;
#define CORE0_TO_CORE1_INTR_ID 0x01
#define CORE1_TO_CORE0_INTR_ID 0x02
voidsys_intr_init(void);
voidSetup_Intr_Exception(XScuGic * IntcInstancePtr);
voidScu_Intr_Init(XScuGic* IntancePtr,int Scu_Int_ID);
voidInit_Software_Intr(XScuGic *GicInstancePtr, Xil_InterruptHandler IntrHanedler, u16 SoftwareIntrId, u8 CpuId);
voidGen_Software_Intr(XScuGic *GicInstancePtr, u16 SoftwareIntrId, u32 CpuId);
voidCpu0_Intr_Hanedler(void *Callback);
voidCpu1_Intr_Hanedler(void *Callback);
XScuGic ScuGic;
voiddelay(unsignedint count)
{
int i = 0;
for(i = 0;i < count;i++)
;
}
intmain(void)
{
sys_intr_init();
// Gen_Software_Intr(&ScuGic, CORE1_TO_CORE0_INTR_ID, XSCUGIC_SPI_CPU1_MASK);
xil_printf("cpu1 start!\r\n");
while(1)
{
if(1 == software_intr_received)
{
software_intr_received = 0;
if(XPAR_CPU_ID == 0)
Gen_Software_Intr(&ScuGic, CORE0_TO_CORE1_INTR_ID, XSCUGIC_SPI_CPU1_MASK);
// Gen_Software_Intr(&ScuGic, CORE0_TO_CORE1_INTR_ID, XSCUGIC_SPI_CPU0_MASK);
else
Gen_Software_Intr(&ScuGic, CORE1_TO_CORE0_INTR_ID, XSCUGIC_SPI_CPU0_MASK);
delay(200000000);
xil_printf("cpu1_main\r\n");
}
}
return 0;
}
voidsys_intr_init(void)
{
Scu_Intr_Init(&ScuGic,XPAR_SCUGIC_SINGLE_DEVICE_ID);
// if(XPAR_CPU_ID == 0)
Init_Software_Intr(&ScuGic, Cpu0_Intr_Hanedler, CORE0_TO_CORE1_INTR_ID, 0);
// else
Init_Software_Intr(&ScuGic, Cpu1_Intr_Hanedler, CORE1_TO_CORE0_INTR_ID, 1);
Setup_Intr_Exception(&ScuGic);
}
voidSetup_Intr_Exception(XScuGic * IntcInstancePtr)
{
//connect hardware interrupt
Xil_ExceptionInit();
Xil_ExceptionRegisterHandler(XIL_EXCEPTION_ID_INT,(Xil_ExceptionHandler)XScuGic_InterruptHandler,(void *)IntcInstancePtr);
//enable hardware interrupt
Xil_ExceptionEnable();
}
voidScu_Intr_Init(XScuGic* IntancePtr,int Scu_Int_ID)
{
XScuGic_Config *ScuConfigPtr;
//find device
ScuConfigPtr = XScuGic_LookupConfig(Scu_Int_ID);
//configscuint
XScuGic_CfgInitialize(IntancePtr, ScuConfigPtr,ScuConfigPtr->CpuBaseAddress);
}
voidCpu0_Intr_Hanedler(void *Callback)
{
xil_printf("receive interrupt from core1!\r\n");
software_intr_received = 1;
}
voidCpu1_Intr_Hanedler(void *Callback)
{
xil_printf("receive interrupt from core0!\r\n");
software_intr_received = 1;
}
voidInit_Software_Intr(XScuGic *GicInstancePtr, Xil_InterruptHandler IntrHanedler, u16 SoftwareIntrId, u8 CpuId)
{
int Status;
XScuGic_SetPriorityTriggerType(GicInstancePtr, SoftwareIntrId, 0xB0, 0x2);
// XScuGic_SetPriorityTriggerType(GicInstancePtr, SoftwareIntrId, 0xd0, 0x3);
Status = XScuGic_Connect(GicInstancePtr, SoftwareIntrId,
(Xil_InterruptHandler)IntrHanedler, NULL);
if (Status != XST_SUCCESS) {
xil_printf("core%d: interrupt %d set fail!\r\n", XPAR_CPU_ID, SoftwareIntrId);
return;
}
XScuGic_InterruptMaptoCpu(GicInstancePtr, CpuId, SoftwareIntrId); //map the the Software interrupt to target CPU
XScuGic_Enable(GicInstancePtr, SoftwareIntrId);//enable the interrupt for the Software interrupt at GIC
}
voidGen_Software_Intr(XScuGic *GicInstancePtr, u16 SoftwareIntrId, u32 CpuId)
{
int Status;
Status = XScuGic_SoftwareIntr(GicInstancePtr, SoftwareIntrId, CpuId);
if (Status != XST_SUCCESS) {
xil_printf("core%d: interrupt %d gen fail!\r\n", XPAR_CPU_ID, SoftwareIntrId);
return;
}
}
Generate the above program boot.bin file , And then download it to flash, After startup, you can receive... Through the serial port assistant cpu0 And cpu1 Print information for , Print every two seconds , Pictured 4 Shown .

chart 4 test result
边栏推荐
- flutter 实现摇一摇功能
- Force buckle 515 Find the maximum value in each tree row
- Optimization steps of SQL statements (II) -- MySQL statement optimization
- HTTP Caching Protocol practice
- PLC -- Notes
- vite2.9 中指定路径别名
- Alibaba cloud server creates snapshots and rolls back disks
- 8 figures | analyze Eureka's first synchronization registry
- Dbeaver 22.1.1 release, visual database management platform
- 2021 programming language ranking summary
猜你喜欢

In idea, the get and set methods may be popular because the Lombok plug-in is not installed

网传互联网公司加班表,排名第一的没悬念

Design and practice of vivo sensitive word matching system

Yesterday, I went to a large factory for an interview and asked me to do four arithmetic operations. Fortunately, I am smart enough

什么是EC鼓风机(ec blower fan)?

以动态规划的方式求解最长回文子串

Tencent continued to lay off staff in the second half of the year, and all business groups reduced by at least 10%. What do you think of this? Followers

open62541直接导入NodeSet文件

PLC -- Notes
Solving the longest palindrome substring by dynamic programming
随机推荐
QT -- communication protocol
Sword finger offer|: linked list (simple)
R language Kolmogorov Smirnov tests whether the two samples follow the same distribution.
Uninstall and reinstall the latest version of MySQL database. The test is valid
Is it safe for flush to open an account online
自动化测试的生命周期是什么?
MySQL installation steps - how to create a virtual machine under Linux (1)
linux下修改mysql端口号
ABAP skill tree
R language drawing ggplot2 seasonal graph
Makefile
flutter 实现摇一摇功能
代码提交规范
Reading notes - MySQL technology l act: InnoDB storage engine (version 2)
kubernetes部署thanos ruler的发送重复告警的一个隐秘的坑
ACM笔记
Optimization steps of SQL statements (II) -- MySQL statement optimization
MMR重排(相似度通过编辑距离和重复度计算)
Kubelet garbage collection (exiting containers and unused images) source code analysis
Leetcode+ 66 - 70 high precision, two sub topics