当前位置:网站首页>Ardiuno smart mosquito racket
Ardiuno smart mosquito racket
2022-06-26 02:12:00 【strongerHuang】
Focus on + Star sign public Number , Don't miss the highlights

author | lmu34
translate | DF Maker community
Summer is coming , It's mosquito buzzing season again , At this point , There is no difference between domestic and overseas .
The project we introduced today , Is to upgrade our weapons —— Electric mosquito swatter , Let's make the fight against mosquitoes more interesting !
The upgraded electric mosquito racket features include :
Add electronics to detect lethality
Add one more 4 A counter of digits , Statistics “ Number of kills ”
Support USB Charge
increase “ Killing sound ” For a better experience
▼ Click to see the effect
Creative ideas
The author's idea is , When the mosquito strikes the metal net of the electric mosquito swatter and generates an electric arc , There must be some current change in the circuit of the electric mosquito racket . If you can find one in the circuit that can be Arduino or ATtiny Where to read ( namely 0 To 5 In between ), Then you can easily count and display scores , And play the sound .
The sound function can be used DFPlayer Modules can easily be found in ATtiny Add .
The score will be given in a 4 position 7 Segment display , Its onboard TM1637 Just two wires (ATtiny Of the two IO Pin ) Can drive this display .
Because these electronic modules are in 5V Running down , The electric mosquito swatter usually uses 2 section 1.5V Of battery , So by the way USB Recharge the battery and upgrade the power supply of the electric mosquito swatter .
let me put it another way , This time “ Weapon upgrade ” Are relatively easy to find ready-made electronic modules to transform , Unique The more complicated part is in signal calculation , This is made by ATtiny Programmed .
In the following tutorial sharing , Suppose everyone is right Ardiuno And how to program , without , You can learn it first Arduino Basic course .
There is also a security issue to be addressed before we begin :
The electric mosquito swatter uses high voltage ( There are hundreds of volts on the mesh when the button is pressed ), Even if the current is very low , When connecting the battery, be careful not to touch it or its internal circuit .
Be careful not to let children play with this .
material
For this “ ultimate ” Electric mosquito swatter , We need to :
An electric mosquito swatter
Digispark pro ( with ATtiny, It is easy to find on the Internet )
DFPlayer (DFRobot Buy )
resistor :1Ω、1kΩ
8Ω The speaker
SD card ( A small capacity card is enough , Used to store some sound files )
Lithium ion rechargeable battery : Used batteries
Battery charger
Potentiometer ( I use it 1MΩ Of , It's not very important , However, a high value will limit the current consumption through the potentiometer )
with TM1637 Four digits of LED display ( Make sure it is 4 Digit display +TM1637, Not just 4 Digit display )
capacitance :470μF
open / Turn off the toggle switch
Button
wire ( Reuse old telephone or Internet cables )
Tool part , We need an electric soldering iron 、 A hot glue gun and a 3D The printer ( Some ideas to modify the handle of the racket ......)
The first 1 Step : How to upgrade our electric mosquito rackets ?
If you don't care how it works , Just want to do “ ultimate ” Electric mosquito swatter , Then you can skip this step .
Resources explaining how the electric mosquito swatter works can be found on the Internet .https://www.homemade-circuits.com/mosquito-swatter-bat-circuit/

It is an oscillation circuit and a circuit that raises the voltage to hundreds of volts , Plus the metal mesh connected to the beat .
The first problem is , I can't find anything to hang here ATtiny( because ATtiny Of 5 Volt limit , High voltage side cannot be used directly ).
To solve this problem , The second idea is to measure the current consumption .
When an electric arc occurs on the metal mesh , When mosquitoes are killed by electricity , There must be some energy consumption , It should be possible to go through ATtiny Read .
The best way to measure this consumption is to measure the current consumption , The simplest way to measure current is to measure the voltage across the resistor , This point ATtiny It can be done .
therefore , The way to count mosquitoes is to insert a small resistance between the battery and the electric mosquito racket circuit , And monitor the voltage on this resistor .
besides , We use electronic modules that have been made ( Each function has a : voice 、 Show 、 Charger, etc ), So all in all , This is a relatively simple electronic project .
The first 2 Step : Prepare the circuit


The main components are :
ATtiny (Digispark pro)
DFPlayer
USB Charger and battery
Monitor
Reset button
open / Turn off the switch
Potentiometer for adjusting volume
Two resistors and one capacitor
We'd better put them away first , To make sure they fit into the handle ,Digispark and DFPlayer You can get closer , According to their position in the final module , Leave appropriate wire lengths for other components ( namely USB There is a... On the charger USB port , Need to be able to charge ).
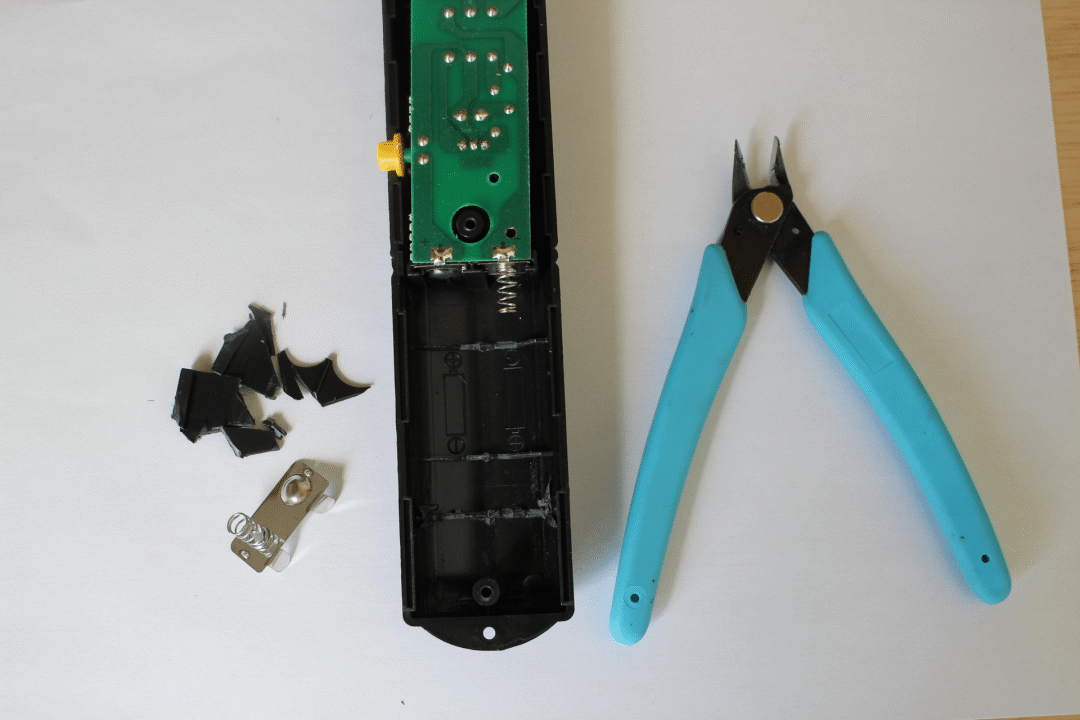
The first 3 Step : Open the electric mosquito racket


Remove the battery , Open the beat ( There should be only a few screws ).
Let's take a look at how much space there is for us to put additional components .
You can also check to see if your time is the same as that used in this tutorial .
The main difference that needs to be noticed is the push button of the beat " Location ". In the picture , It is located on the... Of the battery + Between the number and the beat circuit . If so , That's all right. ( See photo ).
On some beats , This button is located on the ground line - And the circuit . under these circumstances , The following modifications and code will not work . There will be some adjustments in hardware and software .
The first 4 Step : Magic changed electric mosquito swatter


In this step , We :
For two AAA The battery compartment is designed to make room for the battery ( And reuse the battery connector of the rechargeable battery ).
The first 5 Step : Build circuits and solder components


Pre layout according to the final position of all components , Estimate the length of various lines , Start welding .
In the last step , For the sake of clarity , The ground wire and... Are not drawn VCC(5V) Line , But all the ground wires need to be connected to each other , be-all VCC All need to be interconnected .
about VCC,Digispark Yes 3 Mark with 5V The pin of , They are connected , Can be used to reassign to other components . Do not use Digispark Of VIN(VIN Is a need higher than 6V Voltage input , We don't use it , But using a battery charger 5V Output ).
Recommend from Digispark Start :
take Digispark Weld to DFPlayer On
take Digispark Welded to the display 、 Buttons and potentiometers
Use heat shrinkable tubes to avoid contact and short circuit ( For example Digispark and DFPlayer The resistance between )
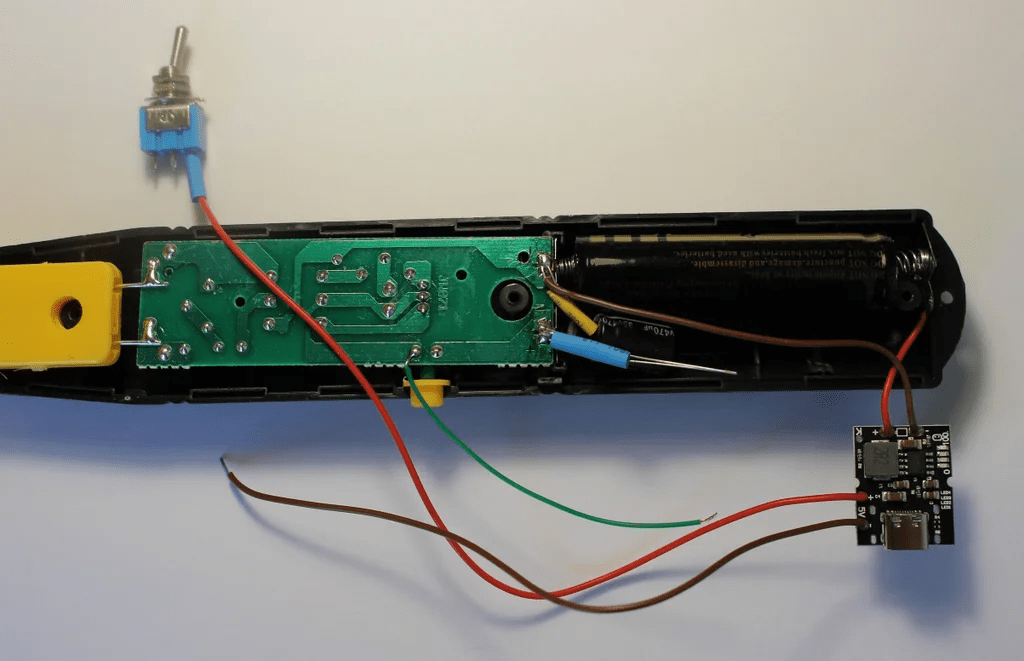
then , Continue with the electric mosquito racket circuit 、 Battery charger 、 Switch connection :
The battery
-To the charger The battery-InputThe battery
+To the charger The battery+InputOn the electric mosquito racket circuit 1 Ohmic resistance
+Electric mosquito racket circuit
+and-Capacitor on , Pay attention to the polarity of the capacitor !Digispark Of A12 The foot is connected to the button ( The button has two connectors , One with battery
+Connect ,A12 Connect to another )Use heat shrinkable tubes to avoid contact and short circuits ( In the capacitor / Resistance, etc ).
The first 6 Step : Isolate the display screen from the electric mosquito racket circuit

It is found that the display problem will be encountered during the test —— When the mosquito touches the mesh of the electric mosquito swatter , The display will turn off or error .
It is suspected that this is due to electronic interference caused by high voltage change, which affects the display circuit and connection .
The fix is simple , Put some tape on the circuit , aluminum foil ( Electromagnetic shielding ), Then stick the tape .
Of course , Do not put aluminum foil directly on the circuit ……
The first 7 Step : stay SD Load sound on card
DFPlayer The sound played is stored in SD On the card .
It's easy to do , Put the card in place , Then copy the selected sound :
The sound played when starting up (" Get ready for the next battle ")
One " The monster was killed " The sound of
One " Level up " The sound of
Some random sound files when a kill is detected
DFPlayer Based on the " Track number " The play .
According to observation , It is found that the files are not sorted by their names , But according to what they are on the card inode No ( stay Linux It can be used ls -id see )
ls -id * | more
647 1_Monster_kill.mp3
648 2_mixkit-final-level-bonus-2061.wav
649 3_get_ready_to_the_newt_fight.mp3
650 mixkit-arcade-retro-scoring-counter-273.wav
651 mixkit-arcade-video-game-bonus-2044.wav
652 mixkit-arcade-video-game-scoring-presentation-274.wav
653 mixkit-game-bonus-reached-2065.wav
654 mixkit-game-experience-level-increased-2062.wav
655 mixkit-winning-an-extra-bonus-2060.wav
If you start with a newly formed card , Track number /inode The order of will be the sound file copy order ( That is, the first file copied on the card is 1 Number ).
In the following code , file / The choice of sound track is through setTrack() Accomplished .
// 0 is random betwen tracks 4 to 9
 // 1 is monster kill = track 1 (listed by inode on card (ls -id))
 // 2 is level up
 // 3 is power on
 if (sound_type==0)  setTrack(int(random(4,9))); //SD card contains 9 files
 if (sound_type==1)  setTrack(1); // monster kill
 if (sound_type==2)  setTrack(2); //level up
 if (sound_type==3)  setTrack(3); //power on
You can modify this part by yourself , Let's move sound_type And the playing audio .
The audio can be packaged and downloaded at the end of the text .
The first 8 Step : Print a new grip

If the electric mosquito swatter is the same as the one above , You can print the handle design of this directly .
If it's not the same , You may need to design one yourself .
however , Some rackets have large handles , Then there was almost nothing in it , Additional circuits can also be installed directly . Remember that we still need to find a place for the display and speakers .
3D The printed files can be packaged and downloaded at the end of the document .
The first 9 Step : Assemble


Here, use the hot glue gun to fix the parts in their final position .
The loudspeaker is also directly attached to the racket .
The first 10 Step : Where are the mosquitoes ?
Reiterated , If you don't care how it works , Just want to get your “ ultimate ” The player of the electric mosquito racket , You can skip this step ...... Or come back later .
Once we weld all the components together , If in ATtiny Load a simple program on , Just do an analog read (A12), Then look at the raw data :
The raw data looks very noisy , We don't know where on the map / When are mosquitoes ( Or something , I didn't wait for the mosquitoes to hit my racket to debug the code :) It bumped into the mesh of the electric mosquito swatter ( See the picture 1).
Averaging is a good way to clean up some of the noise , My idea is to compare the final average with " long-term " Compare the average , But the result was a bit disappointing ( See the picture 2).

Then learn how others do it :https://www.iese.fraunhofer.de/blog/change-point-detection/
This seems to be what we are looking for , Calculating the standard deviation of the signal should enable us to detect that the mosquito has been killed ( See... In the link above "Animation of change point detection via sliding window" part ).
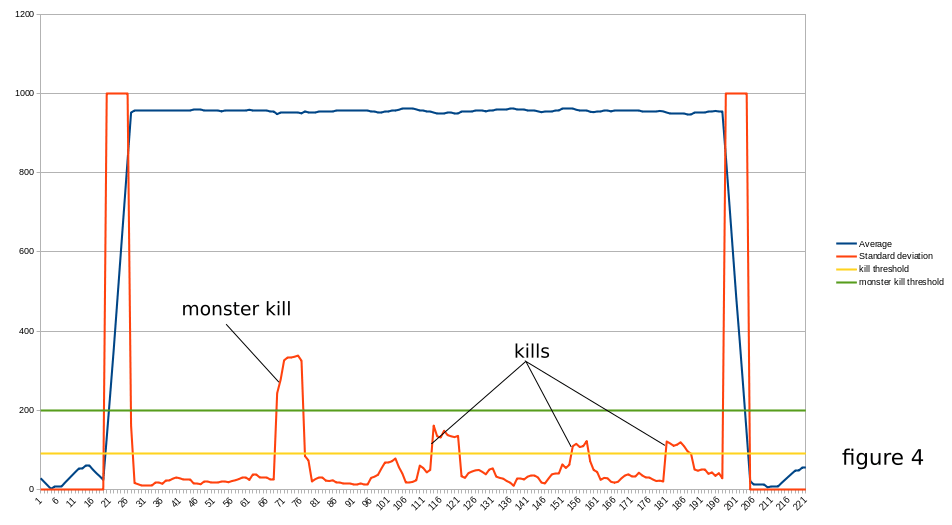
Apply to our settings , You will get the following results ( chart 3).

In the program , We calculated the square of the standard deviation , We can see , When the button is pressed or released , It reaches a very high value ( This is expected , The signal comes from 0V To approach 5V), But once these stages are eliminated , We can monitor the standard deviation , And suppose that if it reaches some high value , We have a disturbance in the circuit , This must be a mosquito quilt “ kill ” 了 ( chart 4)!

Now we know how to judge completion “ One shot ”, The rest is simple ( The play , Increase the score ).
In order to be more accurate , We have added some more things :
One 470uF The capacitor ( It itself provides some more noise filtering , And when large current is required, it can be used as “ Charging treasure ”)
We have a two-level averaging mechanism ( You can see that in the code , We measured in the original state 5 Time A12 The voltage at the foot , Take the average , The mean value is then stored in the sliding window of the standard deviation calculation ).
The first 11 Step : stay Digispark Pro Load program on
This is simpler , have access to Arduino IDE Yes ATtiny Programming .
Wiki:http://digistump.com/wiki/Digispark/tutorials/connectingpro
Explain the code :
stay setup() Function , We initialize DFPlayer Serial communication required , Read the potentiometer value to adjust the volume ( Read only once during setup , This means that the beat needs to be turned off / Turn on the power to allow for volume adjustment ).
For the reset of the counter , If you want to reset the score to zero , You need to press the reset button , Turn on the power of the racket , Wait for the display to show "0".
Then it will read the data stored in EEPROM The score in .
It sets the brightness of the display ( Otherwise it will remain closed ).
stay loop() Function , We basically deal with the average of the beat power process_average() And the square of the standard deviation , It tells us whether it is lethal process_std_dev()
Relevant codes can be downloaded at the end of the text .
The first 12 Step : to update Digispark micronucleus( Optional )
Digispark micronucleus Be responsible for " start-up "Digispark A piece of code .
It checks whether we have uploaded a new program , If not, start the loaded program .
The problem is that it needs to wait 6 Second , This time for us to start our weapons to shoot mosquitoes , It will look longer .
however ,micronucleus Some variants have different checking mechanisms . If you follow these instructions to update micronucleus( Use " recommend " To configure ), The time will be ready in oneortwo seconds .
Reference resources :https://github.com/ArminJo/micronucleus-firmware
Updating micronucleus After the firmware, reload your program .
The first 13 Step : Troubleshooting
I hope you don't need to read this ,
Some tips , In case of a one thousand ......
1、 Not much work ...... Check wires and solder ;
2、 If the electric mosquito swatter restarts itself ( You hear the sound of starting , But it didn't open / Turn off ), Please charge the battery ;
3、 about 30 Seconds later , The electric mosquito swatter will turn off automatically .
some USB The charger circuit has an automatic standby mode ( That's what happened to me , Using a chip IP5306), If the current consumed is less than a certain amount (IP5306 by 45mA), Will enter standby mode .
The first possible solution is to press the beat button regularly ...... Like every 20 second . Circuit board ( contain IP5306) There is one " The key " function , Power can be turned on or off , The circuit board is marked with "K". In the code suggested above
watchdog()The function will keep the power supply working properly .
4、 If the beat detection ability is really poor or often detects errors ... Then you may have to make some code adjustments .
If you want to use USB Port to display some variables , You have to change the code , For use DigiCDC Library and delete SoftSerial( be used for 4 Digit display ). But more importantly , When you do this , We will start from USB Port instead of battery charger port for power supply , There is a big difference ......VCC The quality of has a great influence on our calculated mean and standard deviation ......
let me put it another way , stay USB Any adjustments made when connecting to the , It may fail when running on battery .
The way to get some small information is to use the monitor itself ( That is, the last standard deviation is displayed when the reset button is pressed ).
I know that , You can try to adjust the following values in the code , These values have a great impact on our detection .
Number of samples read in a single time :
int samples=10;Average sliding window size :
int nbr_slot=15;
int value[16];  // array of (nbr_slot + 1)
Threshold of standard deviation :
int threshold=110;
int monster_threshold=250;
The first 14 Step : Continue to improve the electric mosquito racket , Share your improvements
If you find a simpler way to modify the electric mosquito racket or design , Welcome to share !
Link to the original text :https://www.instructables.com/Ultimate-Mosquito-Swatter-Mod-for-Gamer-Add-Kill-C/
------------ END ------------

● special column 《 Embedded tools 》
● special column 《 Embedded development 》
● special column 《Keil course 》
● Embedded column selection tutorial
Pay attention to the reply of the official account “ Add group ” Join the technical exchange group according to the rules , reply “1024” See more .


Click on “ Read the original ” See more sharing .
边栏推荐
猜你喜欢

Abnova CMV CISH probe solution

win32

General introduction to gun make (2)

CVPR2022 | 长期行动预期的Future Transformer

Abnova CSV monoclonal antibody solution

FPGA实现图像二值形态学滤波——腐蚀膨胀

cv==biaoding---open----cv001

Prompt to update to the latest debug version during vscode debugging

树莓派 + AWS IoT 入门实验
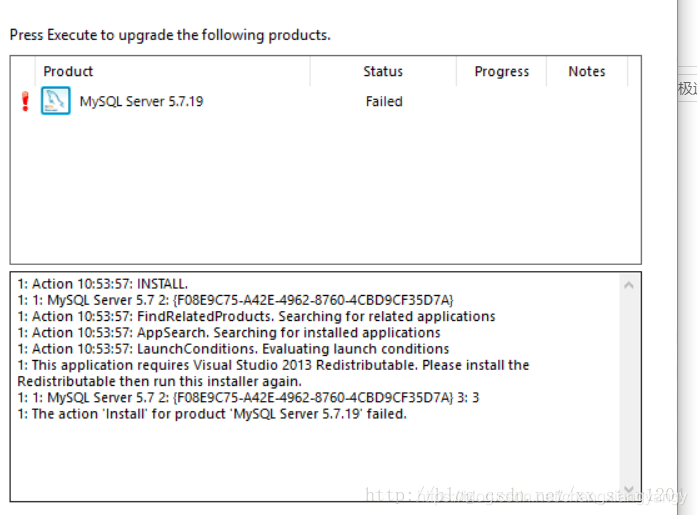
Visual studio 2013 redistributable is installed, but MySQL installation fails
随机推荐
螺旋矩阵
Gun make (7) execute make
缓存技术之第一次亲密接触
weishi相机显示
How to set achievable medium - and long-term goals?
Codecraft-17 and Codeforces Round #391 (Div. 1 + Div. 2, combined) D. Felicity‘s Big Secret Revealed
Timer case
微服务之consul
Unexpected output super efficiency SBM model matlab code
如何使用命令将文件夹中的文件名(包括路径)写入到txt文件中
Shell learning record (IV)
标定。。。
樹莓派 + AWS IoT Greengrass
Gun make (3) Rules for makefile
[untitled] vsbiji ESP thirty-two
启牛推荐的证券账户安全吗?
How to set an achievable annual goal?
Weishi camera display
連接投影儀
树莓派 + AWS IoT Greengrass